Thanksgiving cheese board: the ultimate appetizer that will have your guests grazing happily while you put the finishing touches on the turkey! Forget slaving away over complicated hors d’oeuvres; this elegant and effortless spread is the perfect way to kick off your Thanksgiving feast.
Cheese boards, in their essence, are a modern interpretation of the communal platters of food shared throughout history. From ancient Roman banquets to medieval feasts, sharing food has always been a way to connect and celebrate. While the specific cheeses and accompaniments may change with the times, the spirit of abundance and togetherness remains the same.
What makes a Thanksgiving cheese board so irresistible? It’s the symphony of flavors and textures! The creamy richness of brie, the sharp tang of cheddar, the salty bite of prosciutto, all perfectly complemented by the sweetness of cranberries, the crunch of nuts, and the subtle spice of a fig jam. It’s a customizable experience, allowing everyone to find something they love. Plus, let’s be honest, it looks absolutely stunning! A beautifully arranged cheese board is a feast for the eyes as well as the palate, setting the stage for a memorable Thanksgiving celebration. I find that it’s the perfect way to keep everyone happy and satisfied while they eagerly await the main course.

Ingredients:
- Cheeses:
- 8 oz Sharp Cheddar Cheese, aged
- 8 oz Brie Cheese, double cream
- 6 oz Goat Cheese, plain or flavored (cranberry cinnamon recommended)
- 6 oz Blue Cheese, Gorgonzola or Stilton
- 4 oz Smoked Gouda
- Cured Meats:
- 4 oz Prosciutto, thinly sliced
- 4 oz Salami, assorted varieties (e.g., Genoa, Calabrese)
- 2 oz Chorizo, sliced
- Crackers & Bread:
- Assorted Crackers (e.g., water crackers, whole wheat crackers, rosemary crackers)
- Baguette, sliced and toasted
- Breadsticks
- Fruits & Vegetables:
- 1 cup Red Grapes, stemmed
- 1 cup Green Grapes, stemmed
- 1 Apple, sliced (Honeycrisp or Gala recommended)
- 1 Pear, sliced (Bosc or Anjou recommended)
- 1/2 cup Dried Cranberries
- 1/2 cup Figs, fresh or dried
- 1/4 cup Pomegranate Seeds
- Celery sticks
- Baby carrots
- Nuts & Seeds:
- 1/2 cup Walnuts, toasted
- 1/2 cup Pecans, toasted
- 1/4 cup Almonds
- Pumpkin seeds
- Spreads & Dips:
- 1/4 cup Fig Jam
- 1/4 cup Honey
- 1/4 cup Dijon Mustard
- Olive tapenade
- Garnish:
- Fresh Rosemary sprigs
- Edible flowers (optional)
Preparing the Elements:
Before we even think about arranging our masterpiece, let’s get all our ingredients prepped and ready to go. This will make the assembly process much smoother and more enjoyable. Trust me, a little prep goes a long way!
- Cheese Preparation: Take your cheeses out of the refrigerator about 30-60 minutes before you plan to serve the cheese board. This allows them to come to room temperature, which enhances their flavor and texture. For the Brie, you can leave it whole or cut a wedge out to make it more inviting. The cheddar can be cut into cubes, triangles, or even crumbled. The goat cheese can be left as a log or crumbled as well. The blue cheese is best served crumbled or in small wedges. The smoked gouda can be cubed or sliced.
- Fruit & Vegetable Prep: Wash and thoroughly dry all your fruits and vegetables. Slice the apples and pears just before assembling the board to prevent browning. A little lemon juice can help prevent browning if you need to prep them further in advance. Stem the grapes and remove any damaged ones. If using fresh figs, wash them gently and slice them in half or quarters.
- Nut Toasting (Optional but Recommended): Toasting the nuts brings out their flavor and adds a delightful crunch. To toast walnuts and pecans, spread them in a single layer on a baking sheet and bake at 350°F (175°C) for 5-7 minutes, or until fragrant. Watch them carefully to prevent burning. Alternatively, you can toast them in a dry skillet over medium heat, stirring frequently, until fragrant and lightly browned. Let them cool completely before adding them to the board.
- Bread & Cracker Prep: Slice the baguette into thin rounds. You can toast these in the oven or in a toaster until golden brown and crispy. Arrange your crackers in small piles, ready to be placed on the board.
- Meat Prep: If your prosciutto slices are large, you can fold them into ribbons or roll them up for a more elegant presentation. Slice the salami and chorizo if they aren’t already pre-sliced.
Assembling the Thanksgiving Cheese Board:
Now for the fun part! This is where your creativity can shine. There’s no right or wrong way to arrange a cheese board, but here are some tips to help you create a visually appealing and delicious spread.
- Choose Your Board: Select a large wooden board, platter, or even a marble slab as your base. The size of the board will depend on the number of guests you’re serving. I like to use a large round wooden board for a rustic, Thanksgiving feel.
- Strategic Cheese Placement: Start by placing the cheeses on the board, spacing them out evenly. Think about varying the textures and colors of the cheeses to create visual interest. Place the Brie towards the center, as it’s often a focal point. The cheddar and gouda can be placed on opposite sides, and the goat cheese and blue cheese can fill in the gaps.
- Meat Arrangement: Arrange the cured meats around the cheeses. You can create small piles of prosciutto ribbons, salami slices, and chorizo rounds. Consider placing the meats near cheeses that they pair well with. For example, prosciutto and Brie are a classic combination.
- Cracker & Bread Placement: Place the crackers and toasted baguette slices in clusters around the cheeses and meats. Make sure there’s easy access to the crackers from all sides of the board. You can also use small bowls or ramekins to hold the crackers if you prefer.
- Adding Fruits & Vegetables: Now it’s time to add the fruits and vegetables. Arrange the grapes, apple slices, pear slices, dried cranberries, and figs around the cheeses and meats. Use the fruits and vegetables to fill in any empty spaces on the board. The pomegranate seeds can be sprinkled over the board for a pop of color and flavor. Celery and baby carrots can be placed in small bunches near the dips.
- Nuts & Seeds: Sprinkle the toasted walnuts, pecans, and almonds around the board. These add a delightful crunch and nutty flavor. The pumpkin seeds are a great addition for a Thanksgiving theme.
- Spreads & Dips: Place the fig jam, honey, Dijon mustard, and olive tapenade in small bowls or ramekins. Position these near the cheeses and meats that they complement. For example, fig jam pairs well with Brie and goat cheese, while Dijon mustard is a great accompaniment to cheddar and salami.
- Garnish & Final Touches: Garnish the board with fresh rosemary sprigs and edible flowers (if using). These add a touch of elegance and freshness. Take a step back and assess the overall appearance of the board. Make any necessary adjustments to ensure that it’s visually appealing and balanced.
Tips for Success:
Here are a few extra tips to help you create the perfect Thanksgiving cheese board:
- Variety is Key: Offer a variety of cheeses, meats, crackers, fruits, and nuts to cater to different tastes and preferences.
- Consider Dietary Restrictions: Be mindful of any dietary restrictions or allergies your guests may have. Offer gluten-free crackers or dairy-free cheese alternatives if needed.
- Presentation Matters: Pay attention to the presentation of your cheese board. A well-arranged board is not only visually appealing but also makes it easier for guests to sample the different items.
- Don’t Overcrowd: Avoid overcrowding the board. Leave some empty space to prevent it from looking cluttered.
- Refill as Needed: Keep an eye on the board and refill any items that are running low.
- Label Your Cheeses: If you’re serving a variety of cheeses, consider labeling them so your guests know what they’re trying. You can use small cheese markers or write the names on small pieces of paper.
- Pairing Suggestions: Offer pairing suggestions to help your guests create delicious combinations. For example, you could suggest pairing Brie with fig jam and prosciutto, or cheddar with apple slices and Dijon mustard.
- Serve with Wine: A cheese board is even better when paired with wine. Consider serving a variety of wines, such as a crisp white wine, a light-bodied red wine, and a sparkling wine.
- Make it Ahead: You can assemble the cheese board a few hours in advance and store it in the refrigerator. Just be sure to wrap it tightly in plastic wrap to prevent the cheeses from drying out. Add the crackers and nuts just before serving to prevent them from becoming soggy.
- Have Fun! Creating a cheese board should be a fun and enjoyable experience. Don’t be afraid to experiment with different ingredients and arrangements.
Cheese Selection Deep Dive:
Let’s talk a little more about why I chose these specific cheeses
Conclusion:
This isn’t just another cheese board; it’s a Thanksgiving cheese board experience! I truly believe this recipe is a must-try for anyone looking to elevate their holiday gathering. It’s more than just assembling cheese and crackers; it’s about crafting a beautiful, flavorful, and conversation-starting centerpiece that perfectly complements the warmth and abundance of Thanksgiving. The combination of sweet, savory, creamy, and crunchy elements creates a symphony of flavors that will tantalize your taste buds and impress your guests. From the tangy cranberry goat cheese to the sharp cheddar and the sweet fig jam, every component is carefully chosen to create a harmonious and unforgettable culinary experience.
Why is this Thanksgiving cheese board a must-try? Because it’s incredibly easy to assemble, requires minimal cooking, and can be customized to suit your preferences and dietary needs. It’s a fantastic way to offer a variety of flavors and textures, ensuring there’s something for everyone to enjoy. Plus, it’s visually stunning! The vibrant colors of the fruits, cheeses, and nuts create a beautiful presentation that will add a touch of elegance to your Thanksgiving table. Forget slaving away in the kitchen for hours; this cheese board allows you to spend more time with your loved ones while still offering a delicious and impressive appetizer.
Serving Suggestions and Variations:
Don’t be afraid to get creative! This recipe is just a starting point. Feel free to experiment with different cheeses, fruits, and nuts to create your own unique Thanksgiving cheese board masterpiece.
* Cheese Variations: Swap out the cheddar for a smoked gouda or a brie for a creamier option. Consider adding a blue cheese for a bolder flavor.
* Fruit Variations: In addition to cranberries and apples, try adding pears, grapes, or persimmons. Dried apricots and figs also make excellent additions.
* Nut Variations: Pecans, walnuts, and almonds are all great choices. Consider toasting the nuts for a richer flavor. Candied pecans add a touch of sweetness.
* Accompaniments: Offer a variety of crackers, baguette slices, and even some gluten-free options. Honey, mustard, and olive tapenade are also delicious additions.
* Meat Additions: For a heartier cheese board, consider adding some cured meats like prosciutto, salami, or chorizo.
For a festive touch, arrange the cheese board in the shape of a turkey or a cornucopia. You can also use fall-themed cookie cutters to create fun shapes with the cheese.
I’m so excited for you to try this recipe! I truly believe it will become a Thanksgiving tradition in your home. It’s a simple yet elegant way to elevate your holiday gathering and create lasting memories with your loved ones.
So, gather your ingredients, unleash your creativity, and prepare to impress your guests with this incredible Thanksgiving cheese board. I can’t wait to hear about your experience! Please share your photos and variations in the comments below. Let me know what cheeses and accompaniments you used and how your guests enjoyed it. Happy Thanksgiving, and happy cheese boarding! I am confident that this Thanksgiving cheese board will be a hit at your party.
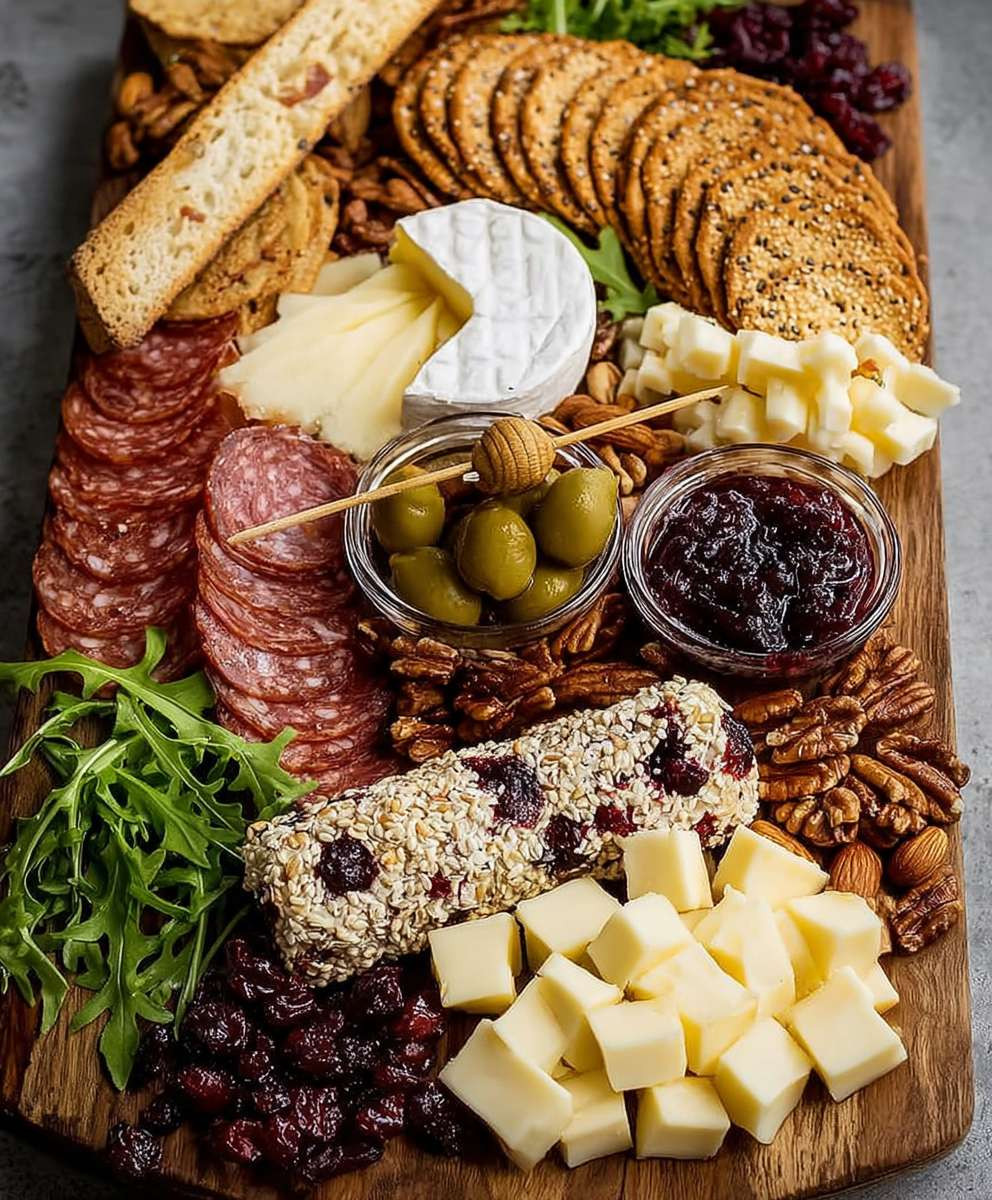
Thanksgiving Cheese Board: A Festive Guide to the Perfect Platter
A stunning Thanksgiving cheese board with cheeses, meats, fruits, nuts, and spreads. Perfect for entertaining!
Ingredients
- 8 oz Sharp Cheddar Cheese, aged
- 8 oz Brie Cheese, double cream
- 6 oz Goat Cheese, plain or flavored (cranberry cinnamon recommended)
- 6 oz Blue Cheese, Gorgonzola or Stilton
- 4 oz Smoked Gouda
- 4 oz Prosciutto, thinly sliced
- 4 oz Salami, assorted varieties (e.g., Genoa, Calabrese)
- 2 oz Chorizo, sliced
- Assorted Crackers (e.g., water crackers, whole wheat crackers, rosemary crackers)
- Baguette, sliced and toasted
- Breadsticks
- 1 cup Red Grapes, stemmed
- 1 cup Green Grapes, stemmed
- 1 Apple, sliced (Honeycrisp or Gala recommended)
- 1 Pear, sliced (Bosc or Anjou recommended)
- 1/2 cup Dried Cranberries
- 1/2 cup Figs, fresh or dried
- 1/4 cup Pomegranate Seeds
- Celery sticks
- Baby carrots
- 1/2 cup Walnuts, toasted
- 1/2 cup Pecans, toasted
- 1/4 cup Almonds
- Pumpkin seeds
- 1/4 cup Fig Jam
- 1/4 cup Honey
- 1/4 cup Dijon Mustard
- Olive tapenade
- Fresh Rosemary sprigs
- Edible flowers (optional)
Instructions
- Cheese Preparation: Take cheeses out of the refrigerator 30-60 minutes before serving to bring to room temperature. Cut cheeses into various shapes (cubes, wedges, crumbled).
- Fruit & Vegetable Prep: Wash and dry all produce. Slice apples and pears just before assembling (use lemon juice to prevent browning if needed). Stem grapes, slice figs.
- Nut Toasting (Optional): Toast walnuts and pecans at 350°F (175°C) for 5-7 minutes, or in a dry skillet until fragrant and lightly browned. Let cool.
- Bread & Cracker Prep: Slice baguette and toast until golden brown. Arrange crackers in small piles.
- Meat Prep: Fold or roll prosciutto slices. Slice salami and chorizo if not pre-sliced.
- Choose Your Board: Select a large wooden board, platter, or marble slab.
- Strategic Cheese Placement: Place cheeses on the board, spacing them evenly. Vary textures and colors. Place Brie towards the center.
- Meat Arrangement: Arrange cured meats around the cheeses in small piles. Pair meats with complementary cheeses.
- Cracker & Bread Placement: Place crackers and toasted baguette slices in clusters around the cheeses and meats.
- Adding Fruits & Vegetables: Arrange fruits and vegetables around the cheeses and meats, filling in empty spaces. Sprinkle pomegranate seeds. Place celery and baby carrots near dips.
- Nuts & Seeds: Sprinkle toasted nuts and seeds around the board.
- Spreads & Dips: Place spreads and dips in small bowls near complementary cheeses and meats.
- Garnish & Final Touches: Garnish with rosemary sprigs and edible flowers (if using). Assess the overall appearance and make adjustments.
Notes
- Variety is key. Offer a range of flavors and textures.
- Consider dietary restrictions (gluten-free crackers, dairy-free cheese).
- Presentation matters. Arrange the board attractively.
- Don’t overcrowd the board.
- Refill items as needed.
- Label cheeses for your guests.
- Offer pairing suggestions.
- Serve with wine.
- Assemble a few hours in advance and store in the refrigerator (add crackers and nuts just before serving).
- Have fun and experiment!