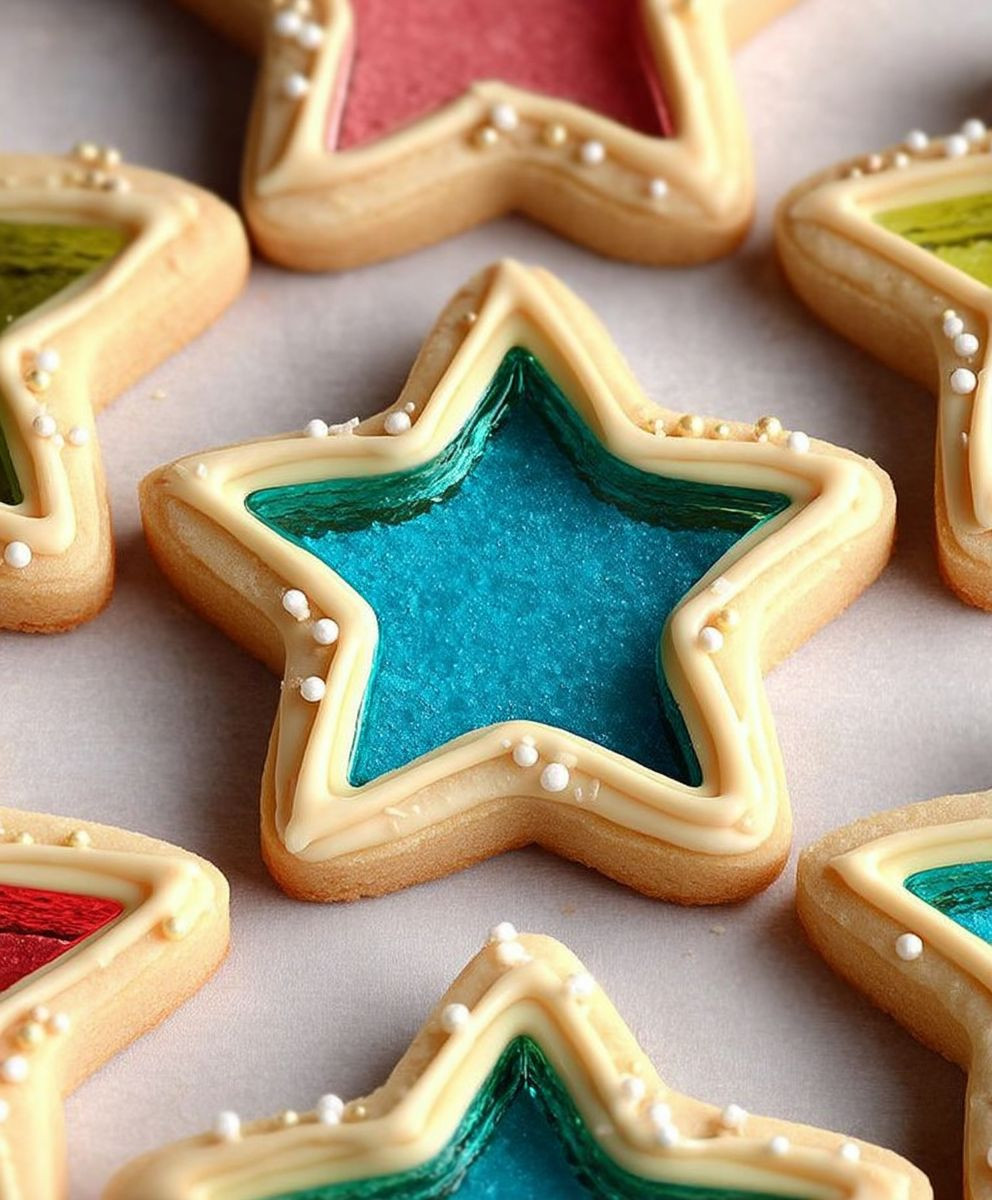
Stained Glass Cookies
Stained Glass Cookies: Just the name conjures up images of vibrant colors and delicate artistry, doesn’t it? And these aren’t just pretty; they’re incredibly delicious too! I’ve always been captivated by the beauty of stained glass windows, those breathtaking displays of color and light. That’s precisely the inspiration behind these stunning cookies, a delightful treat that perfectly captures that same magical quality.
While I can’t pinpoint the exact origin of this particular recipe, the concept of incorporating colorful candies into cookies to create a stained-glass effect is a relatively modern one, likely stemming from the popularity of holiday baking and the desire to create visually appealing desserts. It’s a testament to the enduring appeal of simple yet elegant treats. The beauty of Stained Glass Cookies lies in their versatility; you can adapt the colors to any occasion, from Christmas reds and greens to pastel shades for Easter or even vibrant hues for a summer celebration.
What makes these cookies so beloved? It’s the perfect combination of factors. The crisp, buttery cookie base provides a delightful contrast to the chewy, colorful candy centers. The vibrant colors are visually stunning, making them a showstopper at any gathering. Moreover, they’re surprisingly easy to make, even for novice bakers. The simple recipe allows for creative freedom, encouraging you to experiment with different candy colors and shapes to create your own unique masterpiece. So, gather your ingredients and let’s embark on this fun and rewarding baking adventure together, creating these unforgettable Stained Glass Cookies.

Ingredients:
- 2 ½ cups (300g) all-purpose flour
- 1 teaspoon baking powder
- ½ teaspoon salt
- 1 cup (2 sticks) unsalted butter, softened
- 1 ¾ cups (350g) granulated sugar
- 2 large eggs
- 1 teaspoon vanilla extract
- ½ cup (120ml) milk
- Food coloring gels in assorted bright colors (red, yellow, blue, green, etc.) – I recommend using gel food coloring for the most vibrant colors and to avoid altering the consistency of the dough.
- Clear candy melts or white chocolate, for assembling
- Sprinkles (optional, for extra decoration)
Preparing the Cookie Dough
- Preheat your oven to 375°F (190°C). Line several baking sheets with parchment paper. This is crucial for easy cleanup and to prevent the cookies from sticking.
- In a medium bowl, whisk together the flour, baking powder, and salt. This ensures even distribution of the leavening agents and salt throughout the dough.
- In a large bowl, cream together the softened butter and granulated sugar until the mixture is light and fluffy. I usually use an electric mixer for this step; it saves time and ensures a smooth, well-combined batter. If you’re doing this by hand, be prepared for a bit of a workout!
- Beat in the eggs one at a time, then stir in the vanilla extract. Make sure to scrape down the sides of the bowl to incorporate all the ingredients fully.
- Gradually add the dry ingredients to the wet ingredients, alternating with the milk, beginning and ending with the dry ingredients. Mix until just combined. Do not overmix; overmixing can lead to tough cookies.
Dividing and Coloring the Dough
- Divide the cookie dough into several smaller bowls – I usually use about 5 or 6, depending on the number of colors I’m using. The more colors, the more bowls you’ll need!
- Add a different color of food coloring gel to each bowl. Start with a small amount and add more gradually until you achieve your desired color intensity. Remember, it’s easier to add more color than to take it away!
- Mix each colored dough thoroughly until the color is evenly distributed. You might need to use your hands for this step to ensure there are no streaks of uncolored dough remaining.
Shaping and Baking the Cookies
- On a lightly floured surface, roll out each colored dough to about ¼ inch thickness. If the dough is too sticky, chill it in the refrigerator for about 30 minutes before rolling. This will make the rolling process much easier.
- Use cookie cutters to cut out various shapes from each colored dough. I like to use a variety of shapes and sizes to create a truly stained-glass effect. Circles, squares, and triangles work particularly well.
- Carefully transfer the cut-out cookies to the prepared baking sheets, leaving a little space between each cookie. This will prevent them from spreading too much during baking.
- Bake for 8-10 minutes, or until the edges are lightly golden brown. Keep a close eye on them, as oven temperatures can vary. Start checking for doneness around the 8-minute mark.
- Let the cookies cool on the baking sheets for a few minutes before transferring them to a wire rack to cool completely. This prevents them from breaking and ensures they cool evenly.
Assembling the Stained Glass Cookies
- Once the cookies are completely cool, melt the clear candy melts or white chocolate according to the package directions. I usually use a double boiler or a microwave-safe bowl set over a pan of simmering water for this.
- Carefully spread a thin layer of melted candy melts onto the back of one cookie. This will act as the “glue” to hold the cookies together.
- Top with another cookie of a different color, pressing gently to adhere. Repeat this process, layering cookies of different colors and shapes to create your stained-glass design. Get creative and have fun with it!
- Let the assembled cookies sit for at least 30 minutes, or until the candy melts have completely set. This ensures the cookies are securely bonded together.
- Once the candy melts have set, you can add sprinkles or other decorations, if desired. This adds a final touch of whimsy and personality to your stained-glass cookies.
Storage
- Store your finished stained-glass cookies in an airtight container at room temperature for up to a week. They’re best enjoyed fresh, but they’ll still be delicious for a few days after baking.
Conclusion:
So there you have it – my recipe for stunning Stained Glass Cookies! I truly believe this recipe is a must-try for several reasons. First, the visual impact is undeniable. These cookies are works of art, perfect for impressing guests at any gathering, from holiday parties to casual get-togethers. The vibrant, jewel-toned candies create a truly mesmerizing effect, making them a conversation starter guaranteed to delight everyone.
Beyond their beauty, these Stained Glass Cookies boast a delicious flavor profile. The buttery, melt-in-your-mouth cookie base provides the perfect canvas for the sweet, chewy candy filling. The combination of textures – the crisp cookie and the soft, almost gooey candy – is simply divine. It’s a delightful balance that keeps you coming back for more.
Furthermore, this recipe is surprisingly easy to execute. While the process might seem a little daunting at first glance, with a little patience and attention to detail, you’ll find yourself creating these beautiful cookies with ease. The detailed instructions and helpful tips included in the recipe ensure a successful outcome, even for beginner bakers. Don’t be intimidated by the intricate design; the result is well worth the effort!
And the best part? The possibilities for customization are endless! Experiment with different colored candies to create your own unique designs. Try using peppermint candies for a festive twist during the holidays, or incorporate fruity candies for a summery feel. You can even get creative with cookie cutters, using different shapes to add even more personality to your Stained Glass Cookies. Consider adding sprinkles or edible glitter for extra sparkle and shine.
I’ve personally enjoyed serving these cookies with a scoop of vanilla ice cream, the cold cream contrasting beautifully with the warm, chewy cookie and sweet candy. A cup of hot cocoa or a glass of cold milk also makes a wonderful accompaniment. For a more sophisticated presentation, arrange the cookies on a tiered cake stand or a beautiful serving platter. The possibilities are truly limitless!
Beyond the suggested pairings, I encourage you to get creative and explore different serving options. Perhaps you’ll discover a unique combination that becomes your new favorite! The beauty of this recipe lies in its adaptability; it’s a blank canvas for your culinary creativity.
Ready to give it a go?
I wholeheartedly encourage you to try this recipe and experience the magic of creating these breathtaking Stained Glass Cookies yourself. Once you’ve made them, I’d love to hear about your experience! Share your photos and feedback on social media using the hashtag #StainedGlassCookies – I can’t wait to see your stunning creations. Let’s spread the joy of baking and share the beauty of these delightful treats with the world. Happy baking!
Remember, baking is a journey of discovery and experimentation. Don’t be afraid to try new things and personalize the recipe to your liking. The most important ingredient is your passion and enthusiasm for creating something delicious and beautiful. So, gather your ingredients, put on your apron, and let’s bake some magic together!
Stained Glass Cookies: A Festive Holiday Baking Guide
Beautiful, colorful stained-glass cookies layered with different colored doughs and clear candy melts. Fun and perfect for any occasion!
Ingredients
- 2 ½ cups (300g) all-purpose flour
- 1 teaspoon baking powder
- ½ teaspoon salt
- 1 cup (2 sticks) unsalted butter, softened
- 1 ¾ cups (350g) granulated sugar
- 2 large eggs
- 1 teaspoon vanilla extract
- ½ cup (120ml) milk
- Assorted bright colors of gel food coloring (red, yellow, blue, green, etc.)
- Clear candy melts or white chocolate
- Sprinkles (optional)
Instructions
- Preheat oven to 375°F (190°C). Line baking sheets with parchment paper.
- Whisk together flour, baking powder, and salt in a medium bowl.
- Cream together butter and sugar in a large bowl until light and fluffy (use an electric mixer for best results).
- Beat in eggs one at a time, then stir in vanilla extract.
- Gradually add dry ingredients to wet ingredients, alternating with milk, beginning and ending with dry ingredients. Mix until just combined; do not overmix.
- Divide dough into several smaller bowls (5-6).
- Add a different color of gel food coloring to each bowl, mixing until evenly distributed.
- On a lightly floured surface, roll out each colored dough to ¼ inch thickness. Chill if sticky.
- Use cookie cutters to cut out shapes.
- Transfer cookies to prepared baking sheets, leaving space between.
- Bake for 8-10 minutes, or until edges are lightly golden.
- Cool on baking sheets for a few minutes before transferring to a wire rack to cool completely.
- Melt candy melts according to package directions.
- Spread a thin layer of melted candy melts onto the back of one cookie.
- Top with another cookie of a different color, pressing gently. Repeat layering.
- Let sit for at least 30 minutes, or until candy melts have set.
- Add sprinkles (optional).
Notes
- Gel food coloring is recommended for vibrant colors and to avoid altering dough consistency.
- Don’t overmix the dough, or the cookies will be tough.
- If the dough is too sticky to roll, chill it in the refrigerator for about 30 minutes before proceeding.
- Keep a close eye on the cookies while baking, as oven temperatures can vary. Start checking for doneness around the 8-minute mark.
- Get creative with your cookie shapes and color combinations! Circles, squares, and triangles work particularly well for the stained-glass effect.