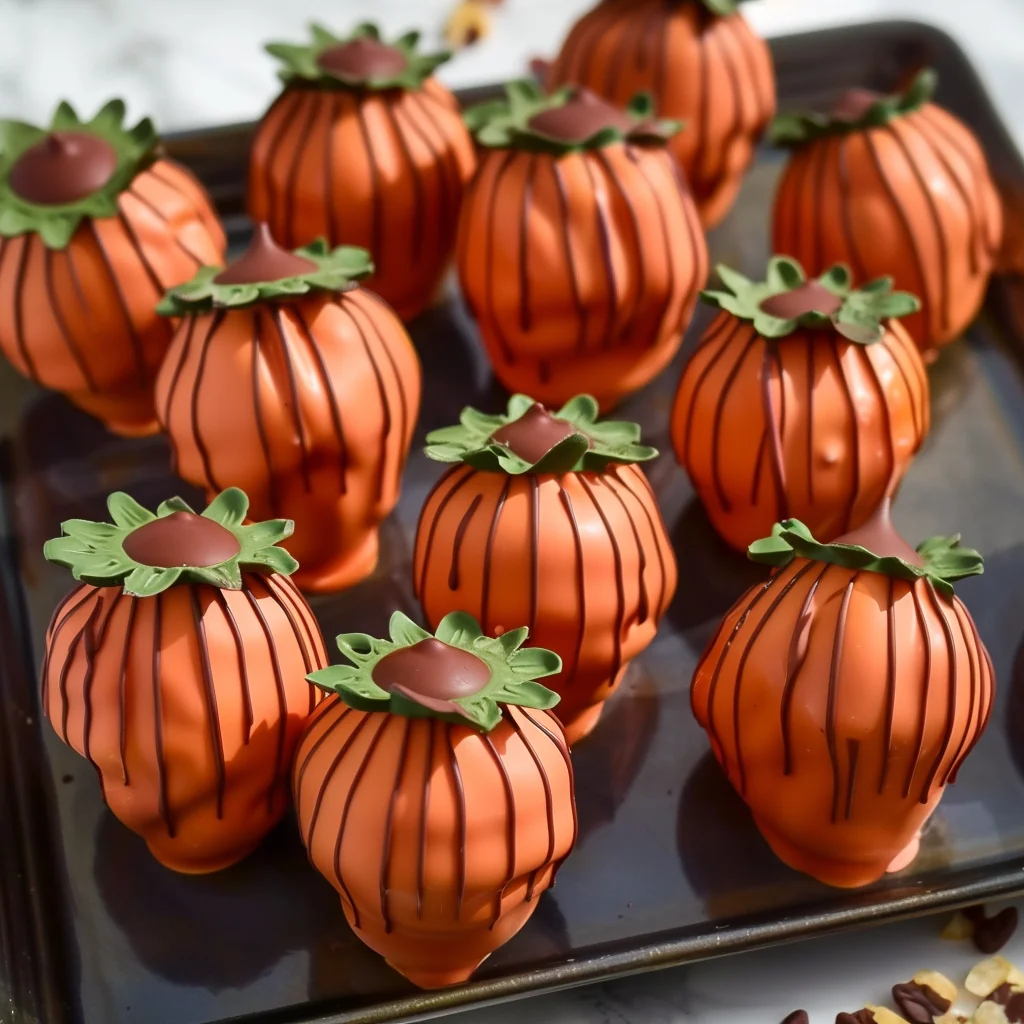
Pumpkin Patch Strawberries might sound like an unexpected pairing, but allow me to introduce you to a culinary delight that beautifully bridges the vibrant freshness of summer with the comforting warmth of autumn. I recently discovered this innovative concept, and I am absolutely thrilled to share how it has quickly become a new favorite in my kitchen. This unique recipe isn’t rooted in centuries of tradition, but it perfectly encapsulates the modern joy of seasonal eating, celebrating the transition from the golden days of late summer into the cozy embrace of fall festivities. Imagine serving something truly distinctive at your next gathering that sparks conversation and tantalizes taste buds.
Why This Dish Will Capture Your Heart and Palate
People are falling head over heels for this dish because it delivers an irresistible combination of textures and flavors. The juicy, sweet burst of fresh strawberries provides a delightful contrast to the subtle, warm undertones that evoke the spirit of a pumpkin patch – perhaps a hint of spice or a creamy, earthy element. It’s incredibly versatile, remarkably easy to prepare, and visually stunning, making it a showstopper for anything from a casual brunch to an elegant dessert spread. The “Pumpkin Patch Strawberries” concept offers a refreshing yet comforting experience, perfect for adding a touch of unexpected charm to your autumn menu. I truly believe you’ll adore this clever twist on seasonal ingredients!

Ingredients:
-
For the “Pumpkin” Coated Strawberries:
- 2 pounds (approximately 32-40 medium to large) fresh strawberries, preferably with stems intact for easy handling and a natural “pumpkin stem” look. Look for plump, firm berries.
- 18-20 ounces good quality white chocolate melting wafers or bars (not chips, as chips often contain stabilizers that prevent smooth melting). You’ll want a reliable brand for an even, glossy coat on your “Pumpkin Patch Strawberries.”
- Orange gel food coloring (gel is preferred over liquid for intense color without altering chocolate consistency too much).
- 1/4 teaspoon ground cinnamon (optional, for a subtle spiced aroma in the chocolate).
- 1/8 teaspoon ground nutmeg (optional, pairs wonderfully with the cinnamon).
- 1-2 tablespoons coconut oil or vegetable shortening (optional, to thin the chocolate slightly if needed for a smoother dip).
-
For the “Pumpkin Stems” and “Vines”:
- 1/2 cup mini pretzel sticks (for natural-looking stems if strawberry stems are removed or short).
- Small bag of green candy melts (for optional leafy details or additional vines).
- Green sprinkles (leaf or vine shapes are ideal, but any green will do for a touch of texture).
- Edible green glitter or luster dust (optional, for a magical shimmer on your “Pumpkin Patch Strawberries”).
-
For the Edible “Pumpkin Patch Dirt” Base:
- 1 package (14.4 ounces) chocolate sandwich cookies (like Oreos, filling removed or left in, depending on preference for “richness” in the dirt).
- 1/2 cup graham cracker crumbs (adds a slightly different texture and flavor profile to the “dirt”).
- 1/4 cup finely crushed chocolate wafer cookies (adds depth to the “soil”).
- 2-3 tablespoons unsalted butter, melted (helps bind the “dirt” slightly, creating a more stable base).
- 2-3 tablespoons granulated sugar (optional, if you want a sweeter “dirt”).
- 1/4 teaspoon ground cinnamon (optional, for a hint of warmth in the “dirt”).
-
Optional Decorative Elements:
- Small amount of black gel food coloring and a fine-tipped food-safe brush (for drawing tiny pumpkin faces, if desired).
- Edible googly eyes (for a whimsical touch on your “Pumpkin Patch Strawberries”).
- A few sprigs of fresh mint leaves (for realistic “vines” or garnishes on the final display).
Preparing Your “Pumpkin Patch Strawberries” Base
My culinary journey with “Pumpkin Patch Strawberries” begins, as with any good recipe, with meticulous preparation. This ensures that every element is ready for its moment, contributing to a seamless and enjoyable cooking experience. Trust me, a little planning goes a long way when crafting something as delightful as these.
- Wash and Dry the Strawberries: First things first, we need to make sure our star ingredient, the beautiful strawberries, are perfectly clean and dry. Gently rinse all 2 pounds of your fresh strawberries under cool running water. Be careful not to bruise them. Once rinsed, the most crucial step for successful chocolate dipping is thorough drying. Lay them out in a single layer on paper towels or a clean kitchen towel. You can also very gently pat each one dry. Any moisture on the strawberries will cause your melted white chocolate to seize and become clumpy, making it impossible to achieve that smooth, glossy finish we’re aiming for. I often let mine air dry for at least 30 minutes, or even longer if humidity is high, making sure they are bone dry. This is a non-negotiable step for truly stunning “Pumpkin Patch Strawberries.”
- Prepare for Dipping: While your strawberries are drying, get your dipping station ready. Line two baking sheets with parchment paper or wax paper. This provides a non-stick surface for your dipped strawberries to set without adhering, making for easy removal. You’ll want to have these sheets easily accessible once the chocolate is melted and colored.
- Ready Your “Pumpkin Stems”: If you plan to use mini pretzel sticks as additional “stems” for any strawberries that might have lost theirs, or if you simply want a uniform look, break them into smaller pieces, about 1/2 to 1 inch long. These little pieces will be inserted into the top of the strawberry after dipping, resembling a pumpkin stem. Have these nearby and ready for quick application.
Crafting the Pumpkin Coating
Now for the magical transformation! This is where our ordinary strawberries begin their journey to becoming vibrant “Pumpkin Patch Strawberries.” The key here is proper chocolate melting and careful coloring to achieve that perfect autumnal hue.
-
Melt the White Chocolate: Choose your preferred method for melting the white chocolate. I find the double boiler method to be the most forgiving and gives you the most control.
- Double Boiler Method: Place the white chocolate melting wafers or chopped bars in a heatproof bowl. Set this bowl over a saucepan containing about an inch or two of simmering water, ensuring the bottom of the bowl does not touch the water. Stir occasionally with a clean, dry spatula until the chocolate is completely smooth and melted. Be patient and keep the heat on low to medium-low; overheating white chocolate can cause it to seize or burn.
- Microwave Method (Use with Caution): If using the microwave, place the white chocolate in a microwave-safe bowl. Heat in 30-second intervals, stirring thoroughly after each interval. Continue until the chocolate is mostly melted, then stir vigorously to melt any remaining lumps using residual heat. It’s very easy to burn white chocolate in the microwave, so go slow!
Once melted, if using, stir in the optional coconut oil or vegetable shortening. This will slightly thin the chocolate, making it easier to dip and ensuring a smoother, thinner coat on your “Pumpkin Patch Strawberries.”
- Color the Chocolate: Now for the fun part – turning our white chocolate into a beautiful pumpkin orange! Add a very small amount of orange gel food coloring to the melted white chocolate. Start with just a tiny drop on the end of a toothpick. Stir thoroughly. Continue adding tiny amounts and stirring until you achieve your desired pumpkin shade. Remember, it’s easier to add more color than to take it away. Gel food coloring is crucial here; liquid food coloring can cause the chocolate to seize. The color should be vibrant and autumnal, setting the stage for perfectly themed “Pumpkin Patch Strawberries.”
- Infuse Optional Spices: If you’re adding cinnamon and nutmeg for that wonderful autumnal aroma and flavor, stir them into the orange-colored chocolate now. These subtle spices will enhance the overall experience of biting into your delightful “Pumpkin Patch Strawberries.” Ensure they are fully incorporated for even flavor distribution.
- Prepare Green Candy Melts (Optional): If you plan to add green vine details using candy melts, prepare them similarly. Melt a small amount of green candy melts in a separate, small microwave-safe bowl or using a mini double boiler. Once melted and smooth, transfer it to a piping bag with a very small round tip, or simply snip a tiny corner off a Ziploc bag. This will be used later for drawing details onto your finished “Pumpkin Patch Strawberries.”
Dipping and Decorating Your Strawberries
This is where the magic truly unfolds, as each strawberry is transformed into a miniature edible pumpkin. The precision and care you take in this stage will directly reflect in the beauty of your finished “Pumpkin Patch Strawberries.”
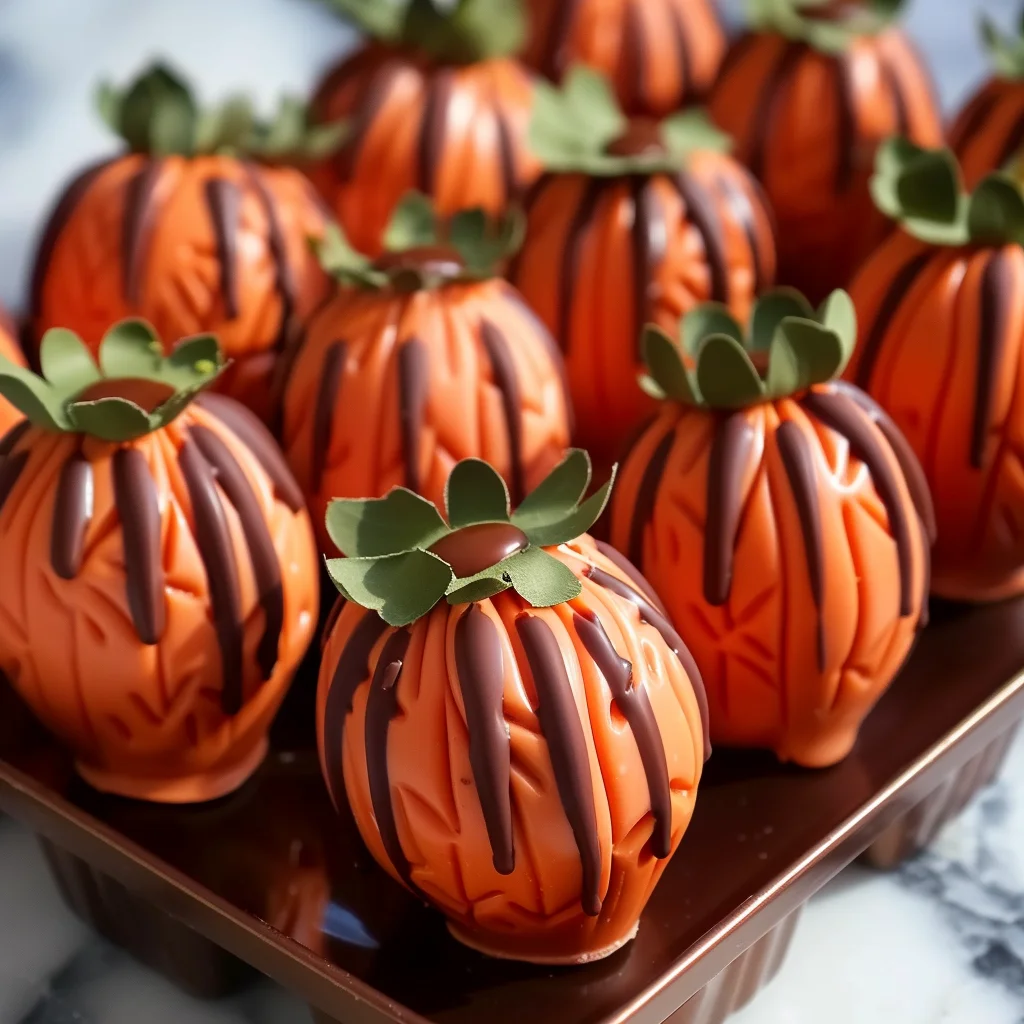
- Dip the Strawberries: Holding a strawberry by its stem (if present) or by gently pinching the top, dip it into the warm, orange-colored white chocolate. Submerge it almost completely, leaving a small sliver of red at the very top near the stem, or enough room to insert a pretzel “stem.” Gently lift the strawberry, allowing excess chocolate to drip back into the bowl. You can lightly tap the wrist holding the strawberry against the edge of the bowl to encourage dripping and ensure a thin, even coating. We want elegant “Pumpkin Patch Strawberries,” not gloppy ones!
- Place on Prepared Sheets: Carefully place each dipped strawberry onto one of your parchment-lined baking sheets. Leave a little space between each berry to prevent them from sticking together as they set.
- Add Stems and Details Immediately: While the chocolate is still wet, if using mini pretzel sticks for stems, gently insert one into the top center of each strawberry. If you’re using green sprinkles for leafy details, gently sprinkle them around the base of the “stem” or along the sides of the “pumpkin.” If you have any edible green glitter or luster dust, a light dusting now will give your “Pumpkin Patch Strawberries a lovely shimmer. Work quickly here, as the chocolate will begin to set relatively fast.
- Allow to Set: Once all strawberries are dipped and decorated with their initial details, place the baking sheets in the refrigerator for 15-20 minutes, or until the chocolate is completely set and firm to the touch. This chilling process ensures the chocolate hardens beautifully, giving your “Pumpkin Patch Strawberries” a professional finish.
- Add Vine Details (Optional): Once the orange chocolate is fully set, you can add more intricate vine details using your prepared green candy melts. Pipe small curls, squiggles, or tiny leaf shapes onto your “Pumpkin Patch Strawberries.” You can also use a fine-tipped food-safe brush and black gel food coloring to paint on small pumpkin faces if you’re feeling extra creative. Let these additional details set for a few minutes before handling.
Creating the Edible Pumpkin Patch Base
Every pumpkin needs a patch, and our “Pumpkin Patch Strawberries” deserve a delicious and visually appealing one! This edible “dirt” base provides the perfect backdrop, enhancing the overall theme and adding a lovely textural contrast.
- Process the Cookies: Take your chocolate sandwich cookies (with or without cream, depending on your preference for sweetness and texture in the “dirt”). Place them in a food processor and pulse until they form fine crumbs. If you don’t have a food processor, you can place them in a sturdy Ziploc bag and crush them with a rolling pin or the bottom of a heavy pan. You want a fine, uniform crumb to mimic rich soil.
- Combine with Other Crumbs: In a medium bowl, combine the chocolate sandwich cookie crumbs with the graham cracker crumbs and the finely crushed chocolate wafer cookies. This blend of different chocolatey elements creates a more complex “dirt” appearance and flavor.
- Add Wet Ingredients and Spices: Pour the melted unsalted butter over the cookie crumb mixture. If using, add the granulated sugar and the optional ground cinnamon. Stir everything together thoroughly until all the crumbs are moistened and resemble damp soil. The butter helps bind the crumbs slightly, making it easier to form your “patch” without it being overly crumbly, ensuring a stable foundation for your “Pumpkin Patch Strawberries.”
- Prepare Your Serving Platter: Choose a serving platter, tray, or shallow dish that will showcase your “Pumpkin Patch Strawberries” beautifully. Spread the prepared edible “dirt” mixture evenly across the bottom of your chosen platter. You can create gentle mounds and valleys to give it a more natural, organic “patch” look. This base will not only look great but also be a delightful addition to each bite of your “Pumpkin Patch Strawberries.”
Assembling Your “Pumpkin Patch Strawberries” Display
The grand finale! This is where all your hard work comes together, and your individual “Pumpkin Patch Strawberries” transform into a captivating edible centerpiece. Presentation is everything, especially when creating themed treats like these.
- Arrange the Strawberries: Carefully remove your chilled, chocolate-coated strawberries from the parchment paper. Arrange them artfully on top of your edible “dirt” base. You can place them close together to simulate a dense pumpkin patch, or space them out slightly for a more artistic display. Experiment with different orientations, showcasing their individual “pumpkin” characteristics.
- Add Fresh Mint (Optional Garnish): For an extra touch of realism and a burst of fresh aroma, tuck a few sprigs of fresh mint leaves around the base of the strawberries. These mimic little pumpkin leaves or vines growing in the patch and add a beautiful contrast of color. This thoughtful detail elevates the entire presentation of your “Pumpkin Patch Strawberries.”
- Final Touches: Step back and admire your creation! If there are any bare spots or if you feel a section needs a little something extra, you can add a few more green sprinkles or even a tiny amount of additional green candy melt “vines” piped directly onto the “dirt” around the base of your “Pumpkin Patch Strawberries.”
- Serve or Store: Your stunning “Pumpkin Patch Strawberries” are now ready to be served! They are best enjoyed fresh, but if you need to prepare them in advance, store them loosely covered in the refrigerator for up to 2-3 days. Bring them to room temperature for about 15-20 minutes before serving for the best flavor and texture experience.
Tips for Perfect “Pumpkin Patch Strawberries”
Creating these delightful “Pumpkin Patch Strawberries” is not just about following steps; it’s also about understanding the nuances that elevate a good treat to an extraordinary one. Here are some extra pointers I’ve picked up along the way:
- Quality of Chocolate Matters: For dipping, always opt for high-quality melting wafers or chocolate specifically designed for dipping. Brands like Ghirardelli, Guittard, or Callebaut callets are excellent choices. Regular chocolate chips often contain stabilizers that make them less fluid when melted, leading to a thicker, less desirable coating on your “Pumpkin Patch Strawberries.” A smooth, thin coating is key for an elegant finish.
- Temperature Control for Chocolate: Maintaining the correct temperature for your melted white chocolate is vital. If it gets too cool, it will become thick and difficult to work with. If it gets too hot, it can scorch, become grainy, or seize. If using a double boiler, keep the water simmering gently. If using a microwave, reheat in very short bursts (5-10 seconds) and stir well to maintain fluidity. A lukewarm temperature is ideal for dipping, ensuring it adheres well without dripping excessively.
- Gel Food Coloring is Your Friend: I cannot stress this enough – only use gel-based food coloring for chocolate. Liquid food coloring, even a small amount, introduces water into the chocolate, which will cause it to seize instantly, turning into a thick, unusable mess. Gel colors are concentrated and oil-based, making them perfect for coloring chocolate without compromise.
- Strawberry Size and Firmness: Choose strawberries that are firm and of a consistent, medium-to-large size. This makes them easier to handle and ensures a more uniform “pumpkin” appearance. Overripe or soft strawberries will not hold up well to dipping and chilling.
- Creative Stem Alternatives: While pretzel sticks offer a lovely rustic look, consider other edible options for your “Pumpkin Patch Strawberries” stems. Small pieces of green licorice, mini chocolate chips, or even tiny pieces of actual mint leaf can serve as charming and delicious alternatives, adding different textures and flavors.
- Enhancing the “Dirt” Base: For an even richer “dirt” flavor, you could toast the graham cracker crumbs lightly before mixing them in. You could also add a touch of instant espresso powder to the chocolate crumb mixture for a deeper, more sophisticated flavor profile.
- Personalizing Your Pumpkins: Don’t be afraid to get creative with your “Pumpkin Patch Strawberries”! Tiny edible pearls, gold luster dust, or even small edible sugar decorations can be added for extra sparkle and whimsy. For a truly unique touch, consider experimenting with different shades of orange by blending a tiny bit of red or yellow gel color into your orange chocolate.
- Storage Best Practices: While these are best enjoyed fresh, if you need to store them, place your “Pumpkin Patch Strawberries” in a single layer in an airtight container in the refrigerator. To prevent condensation from forming on the chocolate, which can cause sugar bloom (a white, powdery film), let them come to room temperature slowly before serving. This will preserve their beautiful appearance.
- Making Ahead for Parties: You can prepare the edible “dirt” base a day or two in advance and store it in an airtight container at room temperature. The strawberries themselves are best dipped and decorated on the day of serving for optimal freshness and appearance. However, they can be made a few hours ahead and kept chilled.
- Involve the Family: This is a fantastic recipe for getting kids involved in the kitchen! Younger children can help wash and dry strawberries (carefully!), crush cookies, or add sprinkles. Older children can assist with dipping and decorating, making it a fun and memorable activity to create these festive “Pumpkin Patch Strawberries” together.
Enjoy crafting and devouring your beautiful and delicious “Pumpkin Patch Strawberries”! They’re sure to be a hit at any autumnal gathering or simply a delightful treat for yourself.
Conclusion:
And there you have it, my friends! We’ve journeyed through the simple steps to create a truly remarkable treat, and I sincerely hope you’re feeling inspired to bring this delightful recipe to life in your own kitchen. I truly believe that what we’ve just discussed isn’t just another set of instructions; it’s an invitation to experience a burst of unexpected flavor and a whisper of joy with every bite. If you’ve been searching for something that feels both familiar and excitingly new, something that delights the senses and sparks conversation, then you’ve absolutely found it here. This recipe is more than just a dish; it’s a testament to how a few thoughtful ingredients, when combined with a little love and creativity, can transform into something truly extraordinary. It’s the kind of recipe that makes you feel like a culinary wizard, even with minimal effort. Trust me when I say, the incredibly unique and utterly irresistible taste profile of this creation is something you simply have to experience firsthand.
What truly sets this recipe apart and makes it a definitive must-try is the delightful, unexpected fusion that creates what I’ve affectionately named our Pumpkin Patch Strawberries. It’s not just a dish; it’s an experience, a little bite of autumnal magic infused into a summer staple, making it perfect for any time you crave something uniquely delicious. The way the vibrant sweetness of the strawberries marries with those warm, comforting undertones creates an unforgettable symphony on your palate. It’s sweet, it’s slightly spiced, and it’s surprisingly refreshing all at once. This isn’t just a snack; it’s a moment of culinary bliss, designed to surprise and satisfy. The ease of preparation belies the sophisticated flavor, making it a perfect candidate for impressing guests or simply treating yourself after a long day. You’ll find yourself reaching for these again and again, not just because they’re tasty, but because they evoke a feeling of cozy contentment.
Now, let’s talk about the endless possibilities for enjoying your incredible creation. While these are utterly divine straight out of the bowl, perfectly chilled and ready to be devoured, don’t limit your imagination! They are incredibly versatile. Imagine spooning a generous helping over a scoop of creamy vanilla bean ice cream or a velvety plain yogurt for a truly luxurious dessert. The contrast between the cool dessert and the flavorful strawberries is simply divine. For breakfast, they make an exceptional topping for your morning pancakes, waffles, or even a warm bowl of oatmeal, adding a burst of fresh flavor and a touch of elegance to start your day. Don’t overlook their potential as a beautiful garnish for cocktails or mocktails, adding both visual appeal and a delightful aromatic twist. For a creative brunch idea, try incorporating them into a light, fresh fruit salad for an unexpected pop of flavor that will surely intrigue your guests.
Serving Suggestions:
- Simple Snack: Enjoy them chilled, by the handful, for a quick and satisfying sweet treat.
- Dessert Topper: Spoon over ice cream, cheesecake, panna cotta, or a simple bowl of whipped cream.
- Breakfast Boost: Elevate your oatmeal, yogurt parfaits, pancakes, or waffles.
- Elegant Garnish: Adorn your favorite cocktails, sparkling water, or fruit tarts.
- Savory Contrast: Pair with a creamy goat cheese on crackers for an unexpected appetizer.
Feeling adventurous? You can easily vary this recipe to suit your mood or what you have on hand. For an extra layer of decadence, a light drizzle of melted white or dark chocolate just before serving can elevate them to a gourmet level. Consider experimenting with a tiny pinch of black pepper or a whisper of cayenne if you’re feeling bold, to add an unexpected zing that truly enhances the fruity sweetness. Or, for an even richer, deeper flavor profile, try gently roasting the prepared strawberries for a few minutes before chilling – this can bring out an intensified sweetness and a slightly jammy texture that is absolutely divine. You could even mix in a few other berries, like blueberries or raspberries, to create a colorful medley, but ensure the unique essence of the Pumpkin Patch Strawberries still shines through.
So, what are you waiting for? This is your sign to dive in and experience the magic for yourself. I genuinely can’t wait for you to try this recipe. It’s one of those special creations that brings a smile to my face every time I make it, and I know it will do the same for you. Please, don’t hesitate to give it a whirl this week. And when you do, I would absolutely love to hear all about your experience! Did you stick to the recipe, or did you put your own unique spin on it? What were your favorite serving suggestions? Share your thoughts, your successes, and even your creative variations in the comments below. Your feedback and personal touches are what truly bring a recipe to life and build a wonderful community of food lovers. Let’s inspire each other with our culinary adventures! Happy cooking, and even happier eating!
Pumpkin Patch Strawberries: Easy Fall Dessert Recipe
Discover Pumpkin Patch Strawberries, a delightful fall dessert that blends the freshness of summer strawberries with the comforting warmth of autumn. This easy-to-make dish features juicy strawberries coated in a vibrant pumpkin-spice-infused chocolate, arranged on an edible ‘dirt’ base. Perfect for adding unique charm to your autumn gatherings, it’s visually stunning and irresistibly delicious.
Ingredients
-
1 lb fresh strawberries
-
12 oz orange candy melts (or white chocolate + orange food coloring)
-
1 tsp coconut oil or shortening (optional)
-
12 chocolate sandwich cookies, crushed
-
6 chocolate peanut butter cups or chocolate disks (optional)
-
1/2 cup mini pretzel sticks (for stems)
-
Small bag green candy melts (optional, for vines)
-
Green sprinkles (optional)
-
Fresh mint sprigs (optional, for garnish)
Instructions
-
Step 1
Gently rinse and thoroughly dry strawberries. Line two baking sheets with parchment paper. If using, break mini pretzel sticks into 1/2 to 1-inch pieces for stems. -
Step 2
Melt orange candy melts (or white chocolate with orange gel food coloring) using a double boiler or microwave. Stir until smooth. If desired, stir in 1 tsp coconut oil/shortening for a thinner consistency. Set aside 2-3 tbsp of melted orange chocolate for later drizzling, if desired. -
Step 3
If adding vine details, melt a small amount of green candy melts and transfer to a piping bag with a tiny snipped corner. -
Step 4
Hold a strawberry by its stem (or top) and dip into the orange chocolate, leaving a small red sliver near the stem. Gently tap to remove excess chocolate. Place on prepared baking sheets. Immediately insert a pretzel stick into the top, and add green sprinkles if using. Repeat for all strawberries. -
Step 5
Refrigerate dipped strawberries for 15-20 minutes, or until the chocolate is completely set. -
Step 6
Once orange chocolate is set, use the melted green candy melts to pipe small vine designs onto the ‘pumpkins’. Let set. -
Step 7
Process chocolate sandwich cookies (and optional chocolate peanut butter cups/disks) in a food processor until fine crumbs form. Spread evenly on a serving platter to create the ‘pumpkin patch’ base. -
Step 8
Arrange the chilled, chocolate-coated strawberries artfully on the edible ‘dirt’ base. Add fresh mint sprigs for garnish, mimicking leaves and vines. Drizzle with reserved orange chocolate if desired. -
Step 9
Serve immediately. For storage, refrigerate in an airtight container for up to 2-3 days. Allow to come to room temperature for 15-20 minutes before serving for best flavor and texture.
Important Information
Nutrition Facts (Per Serving)
It is important to consider this information as approximate and not to use it as definitive health advice.
Allergy Information
Please check ingredients for potential allergens and consult a health professional if in doubt.