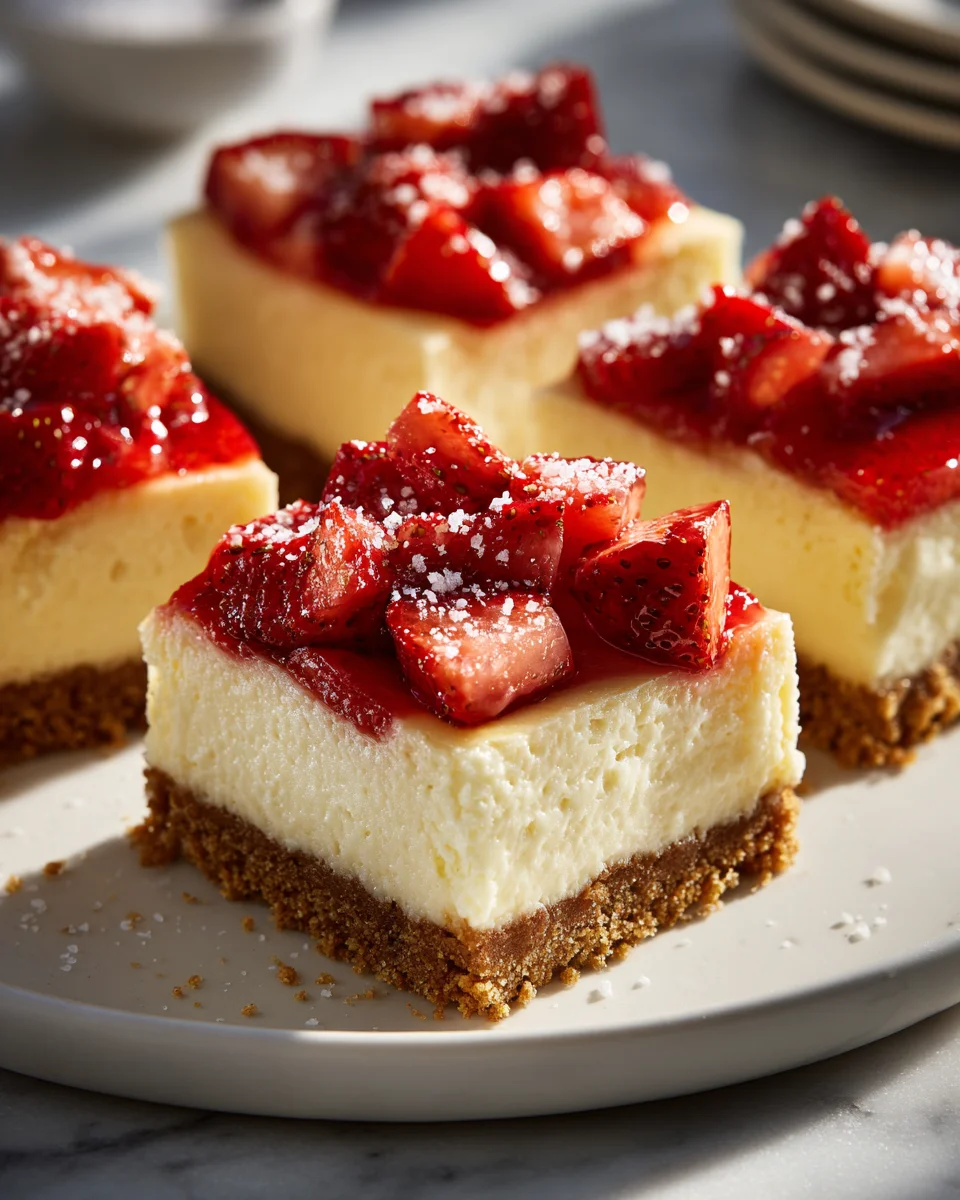
Philadelphia Cheesecake Bars
Oh boy, do I have a treat for you today! When it comes to classic desserts, few things hit the spot quite like a creamy, dreamy cheesecake. But let’s be honest, making a whole cheesecake can sometimes feel like a daunting task – the water baths, the potential for cracks… it can be a lot! That’s precisely why I’m so excited to share my recipe for Philadelphia Cheesecake Bars. This recipe takes everything you adore about that iconic, velvety smooth Philadelphia cream cheese flavor and transforms it into an incredibly convenient, absolutely irresistible bar format.
What makes these bars truly special is how they deliver all the lusciousness of a traditional cheesecake without any of the fuss. We’re talking about a perfectly buttery graham cracker crust, topped with a thick layer of that signature rich, tangy, and utterly smooth Philadelphia cream cheese filling. Baked to a beautiful golden perfection and then chilled until firm, these bars are a guaranteed crowd-pleaser. You’ll love them because they’re practically foolproof, easy to transport, and the individual portions are just perfect for sharing (or, let’s be real, for enjoying all by yourself!). Say goodbye to cracks and complicated baking steps, and say hello to your new favorite dessert that brings pure cheesecake joy in every bite. Get ready for a dessert that’s effortlessly elegant and unbelievably delicious!

Ingredient Notes
Crafting the perfect Philadelphia Cheesecake Bars starts with understanding your ingredients. While this recipe is incredibly straightforward, a few key components make all the difference, especially when you’re aiming for that signature creamy, tangy perfection.
The Star: Philadelphia Cream Cheese
- Full-Fat Philadelphia Cream Cheese: This is non-negotiable for achieving the rich, dense, yet silky-smooth texture that defines these bars. Lower-fat versions often have more water content, which can lead to a less stable and grainier filling. Always ensure your cream cheese is completely softened to room temperature. This is crucial for a lump-free batter; cold cream cheese will be difficult to beat smooth and can result in overmixing later, which we want to avoid.
The Foundation: The Crust
- Graham Cracker Crumbs: These provide that classic sweet, slightly sandy base. You can buy them pre-crushed or crush your own graham crackers using a food processor or by placing them in a Ziploc bag and crushing with a rolling pin.
- Substitution: If graham crackers aren’t available, digestive biscuits, vanilla wafers, shortbread cookies, or even gingersnaps (for a spicier twist) make excellent alternatives. Just ensure they are finely crushed.
- Melted Unsalted Butter: This binds the crumbs together, creating a sturdy and flavorful crust. I prefer unsalted butter so I can control the salt content in the entire recipe.
- Granulated Sugar: A touch of sugar sweetens the crust just enough to complement the creamy filling without being overly sweet.
The Velvety Filling
- Granulated Sugar: Sweetens the cream cheese filling. Don’t be tempted to drastically reduce it, as sugar also contributes to the cheesecake’s texture and structure.
- Large Eggs: Eggs are essential for structure and binding the filling. They help the cheesecake set and give it that characteristic custard-like texture. Like the cream cheese, ensure your eggs are at room temperature. This helps them incorporate more smoothly into the batter, preventing overmixing.
- Sour Cream (or Heavy Cream): A crucial ingredient for adding a delightful tanginess and extra creaminess to the filling. It also helps create a smoother, more tender texture and can help prevent cracking.
- Substitution: Full-fat plain Greek yogurt or heavy cream can be used in a pinch, but sour cream really does offer the best flavor profile for a classic cheesecake.
- Vanilla Extract: Pure vanilla extract is key to enhancing the overall flavor. Don’t skimp on good quality vanilla; it makes a difference!
- A Pinch of Salt: Just a tiny bit of salt in the filling helps to balance the sweetness and brightens all the other flavors.
Step-by-Step Instructions
Making Philadelphia Cheesecake Bars is a surprisingly simple and rewarding process. Just follow these steps carefully, and you’ll be enjoying a batch of creamy, delightful bars in no time!
Step 1: Prepare Your Pan and Preheat Oven
- First things first, preheat your oven to 325°F (160°C).
- Line a 9×13-inch baking pan with parchment paper, leaving an overhang on the longer sides. This overhang will act as “handles” later, making it incredibly easy to lift the entire cheesecake out of the pan for clean cutting. Lightly grease the exposed sides of the pan or spray with a non-stick baking spray.
Step 2: Make the Graham Cracker Crust
- In a medium bowl, combine the graham cracker crumbs, granulated sugar, and melted butter. Stir with a fork until the crumbs are evenly moistened and resemble wet sand.
- Press the mixture firmly and evenly into the bottom of the prepared pan. You can use the back of a spoon, the bottom of a measuring cup, or your fingers to get a compact and level crust.
- Bake the crust for 8-10 minutes, just until it’s lightly golden and fragrant. This step helps to set the crust and prevents it from becoming soggy.
- Remove the crust from the oven and set it aside to cool slightly while you prepare the filling. Keep the oven on.
Step 3: Prepare the Cheesecake Filling
- In a large mixing bowl, using an electric mixer on medium-low speed, beat the softened full-fat Philadelphia cream cheese until it’s completely smooth and creamy, with no lumps. This should take about 1-2 minutes.
- Gradually add the granulated sugar to the cream cheese, continuing to beat on medium-low speed until well combined and smooth, scraping down the sides of the bowl as needed.
- Add the sour cream (or your chosen alternative), vanilla extract, and pinch of salt. Mix on low speed until just combined. Be careful not to overmix at this stage.
- Add the eggs, one at a time, mixing on very low speed just until each egg is incorporated. Overmixing eggs can incorporate too much air, leading to cracks in your cheesecake. The batter should be smooth but not fluffy.
Step 4: Bake the Cheesecake Bars
- Pour the prepared cheesecake filling evenly over the slightly cooled graham cracker crust in the pan.
- Carefully place the pan in the preheated oven.
- Bake for 35-45 minutes, or until the edges are set and lightly golden, but the center still has a slight jiggle when you gently shake the pan. This indicates that it’s cooked through but not overbaked.
Step 5: Cool and Chill
- Once baked, turn off the oven and prop the oven door open slightly (with a wooden spoon, for example). Let the cheesecake bars cool in the oven for about 30-60 minutes. This gradual cooling helps prevent cracking.
- Remove the pan from the oven and transfer it to a wire rack to cool completely to room temperature. This will take at least 1-2 hours.
- Once at room temperature, cover the pan loosely with plastic wrap and refrigerate the cheesecake bars for at least 4 hours, or preferably overnight. Chilling is essential for the bars to fully set and for easy, clean cutting.
Step 6: Cut and Serve
- Once thoroughly chilled, use the parchment paper overhang to carefully lift the entire cheesecake out of the pan and onto a cutting board.
- Using a sharp knife, wipe the blade clean with a warm, damp cloth after each cut for the cleanest bars. Slice into squares or rectangles of your desired size.
- Serve chilled and enjoy!
Tips & Suggestions
To ensure your Philadelphia Cheesecake Bars turn out perfectly every time, here are some of my favorite tips and suggestions:
- Room Temperature Ingredients are Key: I cannot stress this enough! Make sure your cream cheese and eggs are at true room temperature. This is the secret to a smooth, lump-free filling and prevents overmixing, which can introduce too much air and cause cracks. Take them out of the fridge at least an hour, or even two, before you start baking.
- Don’t Overmix the Filling: Once you add the eggs, mix only until just combined on the lowest speed. Overmixing incorporates too much air, which expands during baking and then collapses during cooling, leading to unsightly cracks. A few tiny lumps from the cream cheese are far better than a cracked cheesecake!
- Prevent Cracks with Gradual Cooling: Cheesecake is sensitive to sudden temperature changes. Leaving it in the turned-off oven with the door ajar allows it to cool slowly and gently, significantly reducing the risk of cracking.
- The Jiggle Test: When checking for doneness, look for edges that are set and firm, but the very center (about a 2-inch circle) should still have a slight jiggle. It will continue to set as it cools. An overbaked cheesecake is often dry and crumbly.
- Chill Thoroughly: This is arguably the most important step for cheesecake bars. A well-chilled cheesecake is not only easier to cut into neat portions but also has the best texture and flavor. Rushing this step will result in a messy, soft bar.
- For Clean Cuts: After chilling, use a long, sharp knife. For super clean cuts, run your knife under hot water, wipe it dry, make a cut, and then repeat the process (warm water, wipe, cut) for each subsequent slice. This prevents the cheesecake from sticking to the knife.
- Flavor Variations: These bars are delicious as is, but feel free to get creative!
- Lemon Zest: Add a tablespoon of fresh lemon zest to the filling for a brighter, more citrusy flavor.
- Chocolate Swirl: Melt some semi-sweet chocolate, drizzle it over the filling before baking, and swirl gently with a knife.
- Fruit Topping: After the bars are fully chilled, top them with fresh berries, a fruit compote, or a cherry pie filling for an extra flourish.
- Caramel or Chocolate Drizzle: A simple drizzle of caramel sauce or chocolate ganache just before serving adds an elegant touch.
Storage
Proper storage is essential to keep your Philadelphia Cheesecake Bars fresh, delicious, and safe to eat. They are a perishable treat, so refrigeration is key!
- Refrigeration: Always store leftover Philadelphia Cheesecake Bars in an airtight container in the refrigerator. Cheesecake is a dairy-based dessert and needs to be kept cold. This will prevent them from drying out and absorbing odors from other foods in your fridge.
- Shelf Life in the Fridge: When stored correctly, your cheesecake bars will stay fresh and delicious for 4-5 days in the refrigerator. I find they often taste even better the day after baking once the flavors have had a chance to meld.
- Freezing: Yes, you can freeze Philadelphia Cheesecake Bars! This is a fantastic option if you’ve made a large batch or want to prepare them in advance.
- How to Freeze:
- Ensure the cheesecake bars are completely chilled and firm.
- Cut them into individual bar portions.
- Wrap each bar tightly in plastic wrap, ensuring no air is exposed to the cheesecake surface.
- For extra protection, you can then wrap the plastic-wrapped bars in aluminum foil or place them in an airtight freezer-safe container or bag.
- Freezer Shelf Life: Properly wrapped, the bars can be stored in the freezer for up to 1-2 months. Beyond this, the quality might start to decline.
- Thawing: To enjoy, simply transfer the desired number of frozen bars from the freezer to the refrigerator and let them thaw slowly overnight (or for at least 6-8 hours). Alternatively, you can thaw them at room temperature for about 1-2 hours for a quicker option, though refrigeration is generally preferred for food safety and texture.
- Serving After Freezing: Serve thawed bars chilled, just as you would fresh ones.
- How to Freeze:
Final Thoughts
After making and undoubtedly devouring these incredible Philadelphia Cheesecake Bars, I can confidently say this recipe is an absolute game-changer. There’s just something magical about the way the rich, creamy cheesecake layer, made with the iconic Philadelphia cream cheese, melts in your mouth, perfectly balanced by that delightful graham cracker crust. These aren’t just any cheesecake bars; they embody that classic, comforting cheesecake experience in an incredibly convenient and shareable format. I promise you, the ease of preparation combined with the show-stopping results makes these Philadelphia Cheesecake Bars a must-try for any occasion. They’re perfect for impressing guests, delighting your family, or simply treating yourself to a slice of pure dessert heaven. Go ahead, bake a batch – you won’t regret it!
Easy & Creamy Philadelphia Cheesecake Bars Recipe

Enjoy the rich, creamy flavor of classic cheesecake in a convenient bar format with these Philadelphia Cheesecake Bars. Perfectly buttery graham cracker crust topped with a smooth cream cheese filling makes for an irresistible treat!
- Prep Time: 20 mins
- Cook Time: 45 mins
- Total Time: 1 hour 5 minutes
- Yield: 16 servings 1x
- Category: Dessert
- Method: Baking
- Cuisine: American
Ingredients
- 2 cups Graham Cracker Crumbs
- 1/4 cup Granulated Sugar (for crust)
- 1/2 cup Melted Unsalted Butter
- 1 cup Granulated Sugar (for filling)
- 4 Large Eggs
- 1 cup Sour Cream (or Heavy Cream)
- 1 teaspoon Vanilla Extract
- A Pinch of Salt
- Full-Fat Philadelphia Cream Cheese (softened to room temperature)
Instructions
- Preheat your oven to 325°F (160°C).
- Line a 9×13-inch baking pan with parchment paper, leaving an overhang on the longer sides. Lightly grease the exposed sides of the pan or spray with a non-stick baking spray.
- In a medium bowl, combine the graham cracker crumbs, granulated sugar, and melted butter. Stir with a fork until the crumbs are evenly moistened and resemble wet sand.
- Press the mixture firmly and evenly into the bottom of the prepared pan. Bake the crust for 8-10 minutes until lightly golden and fragrant. Remove from the oven and set aside to cool slightly while you prepare the filling.
- In a large mixing bowl, beat the softened Philadelphia cream cheese until completely smooth and creamy, about 1-2 minutes.
- Gradually add the granulated sugar to the cream cheese, continuing to beat until well combined and smooth.
- Add the sour cream (or your chosen alternative), vanilla extract, and pinch of salt. Mix on low speed until just combined.
- Add the eggs, one at a time, mixing on very low speed just until each egg is incorporated.
- Pour the prepared cheesecake filling evenly over the slightly cooled graham cracker crust in the pan.
- Bake for 35-45 minutes, or until the edges are set and lightly golden, but the center still has a slight jiggle.
- Once baked, turn off the oven and prop the oven door open slightly. Let the cheesecake bars cool in the oven for about 30-60 minutes.
- Remove the pan from the oven and transfer it to a wire rack to cool completely to room temperature, at least 1-2 hours.
- Once at room temperature, cover the pan loosely with plastic wrap and refrigerate the cheesecake bars for at least 4 hours, or preferably overnight.
- Once thoroughly chilled, use the parchment paper overhang to carefully lift the entire cheesecake out of the pan and onto a cutting board.
- Using a sharp knife, wipe the blade clean with a warm, damp cloth after each cut for the cleanest bars. Slice into squares or rectangles of your desired size.
- Serve chilled and enjoy!
Nutrition
- Serving Size: 1 bar
- Calories: 250
- Sugar: 15 g
- Sodium: 200 mg
- Fat: 15 g
- Saturated Fat: 9 g
- Unsaturated Fat: 4 g
- Trans Fat: 0 g
- Carbohydrates: 25 g
- Fiber: 1 g
- Protein: 4 g
- Cholesterol: 80 mg
Keywords: Ensure your cream cheese and eggs are at room temperature for a smooth filling. Avoid overmixing the filling to prevent cracks, and allow the cheesecake to cool gradually to reduce the risk of cracking.