No Bake Christmas Oreo Lasagna Recipe
Get ready to discover your new favorite holiday dessert: the No Bake Christmas Oreo Lasagna Recipe! I honestly don’t think there’s a more perfect treat for the festive season that combines pure joy with absolute ease. What makes this recipe so incredibly special, you ask? Well, for starters, it’s ‘no bake’! That means no oven time, no stress, and more free moments for you to enjoy the magic of Christmas. It’s a total lifesaver when your oven is already crammed with savory dishes, or when you just want a spectacular dessert without all the fuss.
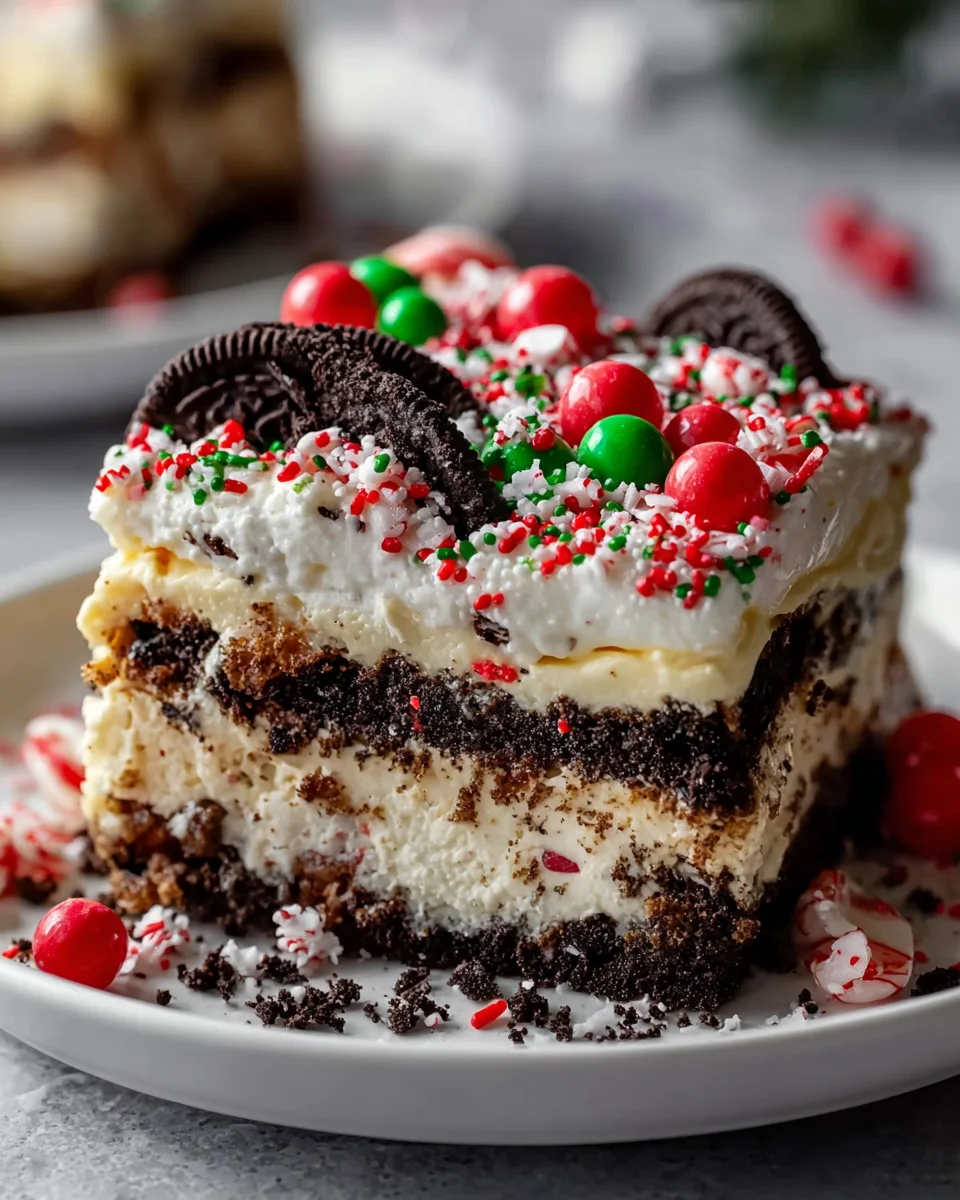
You are going to absolutely adore this No Bake Christmas Oreo Lasagna. It’s not just easy; it’s a guaranteed showstopper that tastes as amazing as it looks. Imagine layers of rich, chocolatey Oreo crust, a creamy, luscious cheesecake-style filling, perhaps some festive sprinkles for that extra holiday sparkle, and a dreamy whipped topping, all coming together in a symphony of flavors and textures. It’s the ultimate crowd-pleaser, perfect for holiday parties, family gatherings, or just a cozy night in. Trust me, every bite is pure Christmas cheer, and it’s so simple that even the kids can help assemble it. Get ready to impress everyone with this delightfully simple, incredibly delicious, and beautifully festive layered dessert!

Ingredient Notes
Creating this festive No Bake Christmas Oreo Lasagna is so much fun, and the ingredients are pretty straightforward! Here’s a rundown of what we’ll need and some helpful notes on substitutions to ensure your holiday dessert is a huge success.
- Oreo Cookies: The star of our show! I absolutely love using the special Christmas edition Oreos with their red or green creme filling for that extra festive touch. If you can’t find them, regular Oreos work perfectly fine; you can always add some red and green sprinkles to your crust mixture or as a topping later. We’ll need a good amount for both the crust and for decorating the top layer.
- Unsalted Butter: This is essential for binding our delicious Oreo crust together. I recommend unsalted so you can control the saltiness in your dessert. If you only have salted butter, that’s perfectly fine, just be mindful of any other salty additions. Margarine can be used as a substitute if needed.
- Cream Cheese: Full-fat cream cheese, softened to room temperature, is crucial for that rich, tangy, and smooth second layer. Make sure it’s fully softened to avoid lumps in your mixture. For a slightly lighter texture, you could experiment with mascarpone cheese, though the flavor profile will be a bit different.
- Powdered Sugar (Confectioners’ Sugar): This sweetens our cream cheese layer beautifully and dissolves easily, ensuring a smooth texture. Don’t substitute with granulated sugar, as it won’t give you the same silky finish.
- Milk: We’ll use this in both our cream cheese layer and to prepare the instant pudding. Any type of milk works here – whole milk will give you a richer result, but 2% or even dairy-free alternatives like almond or oat milk are great if you have dietary preferences.
- Whipped Topping (like Cool Whip): This is the secret to the lasagna’s light and airy texture. It’s folded into the cream cheese layer and also forms our beautiful top layer. I highly recommend using a store-bought whipped topping that’s thawed in the refrigerator, as homemade whipped cream tends to be less stable for no-bake desserts that need to hold their shape for several days.
- Instant Pudding Mix: For this recipe, I usually go for instant white chocolate pudding mix or vanilla pudding mix because they provide a lovely neutral or complementary flavor that doesn’t overpower the Oreos and allows for color customization. Chocolate pudding is also a fantastic option for a richer flavor profile. Ensure it’s instant pudding, not cook-and-serve.
- Christmas Sprinkles/Decorations: This is where you can truly make it your own! Red and green sprinkles, mini chocolate chips, crushed mini candy canes, or even some festive M&M’s really elevate the holiday cheer.
- Food Coloring (Optional): If you want to make your pudding layer or even a portion of your whipped topping vibrantly red or green, a few drops of gel food coloring will do the trick and make your lasagna even more Christmasy!
Step-by-Step Instructions
Alright, let’s get into the fun part – assembling our delightful No Bake Christmas Oreo Lasagna! This recipe is all about layering, and it’s surprisingly simple to put together.
- Prepare the Oreo Crust:
- First things first, let’s make that irresistible crust! Take about 36 (a standard package) of your Christmas Oreo cookies. Place them in a food processor and pulse until they form fine crumbs. If you don’t have a food processor, you can put them in a large zip-top bag and crush them with a rolling pin – it’s a great stress reliever!
- Melt 6 tablespoons of unsalted butter in a microwave-safe bowl. Pour the melted butter over your Oreo crumbs and mix well until everything is moistened and resembles wet sand.
- Press this mixture firmly and evenly into the bottom of a 9×13 inch baking dish. Use the back of a spoon or the bottom of a flat glass to get it nice and compact. Pop the dish into the refrigerator to chill for at least 15-20 minutes while you prepare the next layer. This helps the crust set up beautifully.
- Create the Cream Cheese Layer:
- In a large mixing bowl, beat 8 ounces of softened cream cheese with 1 cup of powdered sugar and 2 tablespoons of milk until the mixture is completely smooth and creamy, with no lumps. An electric mixer works wonders here.
- Gently fold in 1 container (8 oz.) of thawed whipped topping. Be careful not to overmix; you want to keep that light, airy texture.
- Carefully spread this fluffy cream cheese mixture over your chilled Oreo crust in an even layer. Return the dish to the refrigerator to chill while you prepare the pudding layer.
- Whisk Up the Pudding Layer:
- In another mixing bowl, combine 2 packages (3.4 oz each) of instant white chocolate or vanilla pudding mix with 3 cups of cold milk. Whisk vigorously for about 2-3 minutes, until the pudding starts to thicken considerably.
- If you’re adding food coloring for a festive touch, stir in a few drops of red or green gel food coloring until you reach your desired shade.
- Carefully spread the thickened pudding mixture over the cream cheese layer. Try to be gentle so you don’t disturb the layers underneath.
- Add the Final Whipped Topping & Decorate:
- Spread the remaining 1 container (8 oz.) of thawed whipped topping evenly over the pudding layer. This forms our beautiful, snowy top layer.
- Now for the fun part – decoration! Crush a few more Christmas Oreos (about 4-6 cookies) and sprinkle them generously over the top. Add your favorite Christmas sprinkles, mini chocolate chips, or even some crushed mini candy canes for that extra holiday sparkle.
- Chill Time is Critical:
- Cover the baking dish tightly with plastic wrap and return it to the refrigerator. This is the most important step! Your No Bake Christmas Oreo Lasagna needs to chill for a minimum of 4 hours to allow all the layers to set properly and meld their flavors. For the best results and easiest slicing, I highly recommend chilling it overnight.
- Serve and Enjoy:
- Once thoroughly chilled, remove from the fridge, slice into generous squares, and serve! Get ready for some happy faces.
Tips & Suggestions
Making this No Bake Christmas Oreo Lasagna is already a breeze, but a few extra tips can make it even more spectacular and ensure your success:
- Crushing Those Oreos: For a super fine crust, a food processor is your best friend. If you prefer a bit more texture, or don’t have a food processor, placing them in a sturdy zip-top bag and crushing them with a rolling pin works perfectly. Just make sure to get them consistently crushed for an even crust.
- Softened Cream Cheese is Key: I can’t stress this enough – ensure your cream cheese is at true room temperature and very soft. This will prevent any stubborn lumps in your cream cheese layer, guaranteeing a smooth, creamy texture that everyone will love. Plan ahead and take it out of the fridge at least an hour before you start.
- Don’t Rush the Pudding: When whisking the instant pudding, give it the full 2-3 minutes. It might seem thin at first, but it truly thickens up. Under-mixing can lead to a runny pudding layer, and we want nice, distinct layers for our lasagna!
- Even Layers Make a Difference: Use an offset spatula or the back of a spoon to gently and evenly spread each layer. Taking a moment to smooth them out makes for a beautiful presentation when you slice into it.
- Chilling is Non-Negotiable: Seriously, this is the most critical step for any no-bake dessert. The minimum 4 hours chilling time allows everything to set firmly, making for clean slices and stable layers. Overnight chilling is truly ideal, especially if you’re making it for a holiday gathering.
- Get Festive with Color: Don’t shy away from using red and green food coloring! You can split your pudding mixture into two, coloring one red and one green for a super vibrant middle layer. Or, just color one layer for a pop of holiday cheer. Gel food coloring provides the best, most concentrated color without adding extra liquid.
- Pan Size Matters: This recipe is designed for a standard 9×13 inch baking dish. Using a smaller pan will result in much thicker layers, which might be harder to serve, and a larger pan could make the layers too thin.
- Toppings Galore: Beyond crushed Oreos and sprinkles, consider adding mini chocolate chips, M&M’s (the red and green holiday ones!), mini candy canes (crushed for a minty kick!), or even some festive edible glitter to your top layer for extra sparkle.
- Perfect for Make-Ahead: This No Bake Christmas Oreo Lasagna is an absolute dream for holiday entertaining because it needs to be made ahead! Prepare it the day before your event, chill it overnight, and it’s ready to go when you are.
Storage
Proper storage is essential to keep your No Bake Christmas Oreo Lasagna fresh, delicious, and looking its best for as long as possible!
- Refrigeration is Key: This dessert must be stored in the refrigerator at all times due to the fresh dairy ingredients like cream cheese and whipped topping. Do not leave it out at room temperature for extended periods.
- Cover It Tightly: After serving or when storing any leftovers, make sure to cover the baking dish tightly with plastic wrap or aluminum foil. An airtight container is even better if you have one large enough. This prevents the lasagna from drying out, absorbing any odors from other foods in your fridge, and keeps the whipped topping fresh and fluffy.
- Shelf Life: When stored correctly in the refrigerator, your No Bake Christmas Oreo Lasagna will remain fresh and delicious for up to 3-4 days. The crust might soften slightly over time, but the flavors will still be fantastic.
- Not Freezer Friendly: I generally do not recommend freezing this dessert. The texture of the whipped topping and cream cheese can change significantly upon thawing, becoming watery or grainy, which would compromise the delightful consistency of the lasagna. It’s best enjoyed fresh from the fridge within its recommended shelf life.
Final Thoughts
I truly believe that the No Bake Christmas Oreo Lasagna Recipe is an absolute game-changer for your holiday dessert table. What I love most about it is how it combines the irresistible crunch of an Oreo crust with those dreamy, creamy layers, all without ever needing to turn on the oven! It’s the perfect solution for busy festive days, freeing you up to enjoy more time with loved ones and less time worrying about baking.
This dish isn’t just easy; it’s a showstopper that captures the spirit of Christmas in every delicious bite. From its festive colors to its delightful texture, the No Bake Christmas Oreo Lasagna Recipe promises to be a memorable treat that everyone, from the youngest elf to Santa himself, will adore. I’m confident that once you try it, this simple yet spectacular dessert will become a cherished part of your holiday traditions for years to come!
Easy No Bake Christmas Oreo Lasagna Recipe – Festive Treat

Discover your new favorite holiday dessert with this No Bake Christmas Oreo Lasagna! It’s a guaranteed showstopper that combines rich flavors and festive cheer without any oven time.
- Prep Time: 30 mins
- Cook Time: 0 mins
- Total Time: 30 minutes
- Yield: 12 servings 1x
- Category: Dessert
- Method: No Bake
- Cuisine: American
Ingredients
- 36 Christmas Oreo cookies
- 6 tablespoons unsalted butter
- 8 ounces cream cheese, softened
- 1 cup powdered sugar (confectioners' sugar)
- 2 tablespoons milk
- 1 container (8 oz.) whipped topping (like Cool Whip), thawed
- 2 packages (3.4 oz each) instant white chocolate or vanilla pudding mix
- 3 cups cold milk
- 1 container (8 oz.) whipped topping (like Cool Whip), thawed (for topping)
- Christmas sprinkles/decorations (red and green sprinkles, mini chocolate chips, crushed mini candy canes, or festive M&M's)
- Food coloring (optional)
Instructions
- Prepare the Oreo Crust: Take about 36 Christmas Oreo cookies and pulse them in a food processor until they form fine crumbs. Melt 6 tablespoons of unsalted butter in a microwave-safe bowl and pour it over the Oreo crumbs, mixing well until moistened. Press this mixture firmly into the bottom of a 9×13 inch baking dish and chill in the refrigerator for at least 15-20 minutes.
- Create the Cream Cheese Layer: In a large mixing bowl, beat 8 ounces of softened cream cheese with 1 cup of powdered sugar and 2 tablespoons of milk until smooth. Gently fold in 1 container (8 oz.) of thawed whipped topping and spread this mixture over the chilled Oreo crust. Return to the refrigerator to chill.
- Whisk Up the Pudding Layer: In another mixing bowl, combine 2 packages (3.4 oz each) of instant pudding mix with 3 cups of cold milk and whisk for 2-3 minutes until thickened. If desired, stir in a few drops of food coloring. Carefully spread the pudding mixture over the cream cheese layer.
- Add the Final Whipped Topping & Decorate: Spread the remaining 1 container (8 oz.) of thawed whipped topping over the pudding layer. Crush a few more Christmas Oreos (about 4-6 cookies) and sprinkle them over the top along with your favorite Christmas decorations.
- Chill Time is Critical: Cover the baking dish tightly with plastic wrap and chill for a minimum of 4 hours, preferably overnight.
- Serve and Enjoy: Once chilled, slice into squares and serve.
Nutrition
- Serving Size: 1 square
- Calories: 300
- Sugar: 25 g
- Sodium: 200 mg
- Fat: 18 g
- Saturated Fat: 10 g
- Unsaturated Fat: 5 g
- Trans Fat: 0 g
- Carbohydrates: 30 g
- Fiber: 1 g
- Protein: 3 g
- Cholesterol: 30 mg
Keywords: Ensure cream cheese is at room temperature for a smooth texture. Chill the lasagna overnight for the best results and clean slices. Use gel food coloring for vibrant layers.