Pumpkin Spice Rice Krispie Treat – prepare to redefine your autumn dessert experience! Imagine the comforting crunch of a timeless childhood classic, now magnificently infused with the quintessential, aromatic flavors of fall. This isn’t just any treat; it’s a delightful culinary fusion that perfectly encapsulates the spirit of the season in every single bite.
The original Rice Krispie Treat, a beloved no-bake staple, has charmed generations since its inception by the Kellogg Company in the late 1930s, celebrated for its simple yet satisfying appeal. Fast forward to our modern era, and pumpkin spice has firmly established itself as the comforting, aromatic signature of autumn. By thoughtfully marrying these two iconic concepts, we’ve crafted a dessert that feels both profoundly nostalgic and wonderfully contemporary. I find this dish utterly irresistible because it brilliantly combines that satisfyingly gooey, chewy texture with an irresistible crisp, all beautifully uplifted by the warm, inviting notes of cinnamon, nutmeg, and clove. It’s a sensory experience that instantly evokes cozy autumn evenings and vibrant fall foliage.
Moreover, its no-bake simplicity makes the Pumpkin Spice Rice Krispie Treat an incredibly convenient indulgence for even the busiest of schedules. Whether you’re hosting a seasonal gathering or simply craving a moment of sweet, spiced comfort, these treats deliver joy with remarkable ease and speed. Get ready to fall in love with your new favorite autumn confection!

Ingredients:
To embark on our delightful journey of creating the ultimate Pumpkin Spice Rice Krispie Treat, you’ll need to gather a few essential items. The beauty of this recipe lies in its simplicity, yet the quality of each ingredient plays a crucial role in achieving that perfect balance of chewy, crispy, and warm spice flavors that truly sing of autumn. Let’s make sure we have everything ready for a seamless and enjoyable baking experience.
- 6 tablespoons (85g) unsalted butter: I always opt for unsalted butter when baking, as it gives me complete control over the salt content in my treats. This amount ensures a rich, buttery base that helps bind everything together and provides that irresistible depth of flavor.
- 1 (10-ounce/283g) bag mini marshmallows: While large marshmallows can work, mini marshmallows melt down much more quickly and evenly, creating a smoother, more consistent marshmallow base for our Pumpkin Spice Rice Krispie Treat. You’ll want a fresh bag for optimal stickiness and chewiness.
- 1/2 cup (120g) pumpkin puree (not pumpkin pie filling): This is the heart of our pumpkin flavor! It’s absolutely crucial to use plain pumpkin puree, which is simply cooked and pureed pumpkin, without any added sugars or spices. Pumpkin pie filling, on the other hand, already contains spices and sweeteners, which would throw off our carefully balanced flavor profile.
- 2 teaspoons pumpkin pie spice: This pre-blended spice mix typically includes cinnamon, nutmeg, ginger, and cloves – the quintessential flavors of autumn. If you don’t have a pre-made mix, you can easily create your own with 1 teaspoon ground cinnamon, 1/2 teaspoon ground ginger, 1/4 teaspoon ground nutmeg, and 1/4 teaspoon ground cloves.
- 1/2 teaspoon ground cinnamon (additional): I love adding a little extra cinnamon because it really enhances the warmth and aroma without overpowering the other spices. It provides that classic, comforting note that everyone expects in a truly exceptional pumpkin treat.
- 1/4 teaspoon salt: A small amount of salt is a non-negotiable for me in sweet recipes. It doesn’t make the treats salty, but rather acts as a flavor enhancer, balancing the sweetness and making all the other flavors, especially the pumpkin and spices, truly pop.
- 6 cups (about 150g) crispy rice cereal (like Rice Krispies): The iconic foundation of any Rice Krispie Treat! Make sure your cereal is fresh and crispy. Stale cereal will result in a less satisfying texture, and we’re aiming for that delightful crunch in every bite of our Pumpkin Spice Rice Krispie Treat.
- For the optional white chocolate drizzle:
- 1/2 cup (85g) white chocolate chips or chopped white chocolate: A high-quality white chocolate will give you a smoother melt and better flavor for the drizzle.
- 1 teaspoon coconut oil or vegetable shortening (optional): This helps to thin out the melted white chocolate, making it easier to drizzle smoothly and achieve that beautiful, glossy finish without it becoming too brittle.
Pre-Preparation & Gathering Your Tools
Before we even think about melting butter, it’s essential to set ourselves up for success. Making Pumpkin Spice Rice Krispie Treats is a quick process once you start cooking, so having everything ready beforehand ensures a smooth and stress-free experience. There’s nothing worse than scrambling for an ingredient or a piece of equipment in the middle of a delicate step!
- Prepare your baking pan: Lightly grease a 9×13-inch baking pan with butter, cooking spray, or line it with parchment paper, leaving an overhang on the sides. The parchment paper method is my absolute favorite, as it makes lifting the entire slab of treats out incredibly easy, allowing for cleaner cuts and less mess. If you’re using butter or spray, make sure every corner and side is covered to prevent sticking. This step is crucial because these treats are notoriously sticky, and we want them to release cleanly.
- Measure out your ingredients: In separate bowls, measure out your crispy rice cereal, mini marshmallows, pumpkin puree, and spices. Having these ready to go in their respective amounts will allow you to add them into the mix seamlessly when the time comes, preventing any delays that could lead to an overcooked marshmallow base. I usually combine the pumpkin pie spice, extra cinnamon, and salt in a small bowl so they can be added all at once.
- Gather your tools: You will need a large, heavy-bottomed pot or Dutch oven for melting the butter and marshmallows. A large rubber spatula or wooden spoon will be essential for stirring. You might also want a second piece of parchment paper or a piece of waxed paper, lightly greased, to help press the mixture into the pan without it sticking to your hands. Having all these items within arm’s reach will make the entire process much more enjoyable.
Crafting the Pumpkin Spice Marshmallow Base
This is where the magic truly begins! The creation of the marshmallow base is the foundational step for our extraordinary Pumpkin Spice Rice Krispie Treat. Achieving the right consistency and incorporating the flavors correctly here will define the ultimate texture and taste of your finished product. Pay close attention to the heat and stirring to prevent burning and ensure a beautifully smooth, cohesive base.
- Melt the butter: Place your large, heavy-bottomed pot over medium-low heat. Add the 6 tablespoons of unsalted butter to the pot. Allow the butter to melt slowly and completely. Keep a watchful eye on it; you want it to melt without browning excessively, though a slight nutty aroma is perfectly fine and even desirable for a richer flavor profile. Swirl the pot occasionally to ensure even melting. This low-and-slow approach prevents scorching and provides a consistent base for our marshmallows.
- Add the marshmallows: Once the butter is fully melted and slightly shimmering, add the entire bag of mini marshmallows to the pot. Continue stirring constantly with your rubber spatula or wooden spoon. The key here is patience and consistent stirring. The marshmallows will slowly start to soften and melt down. It’s important to keep the heat at medium-low to prevent the marshmallows from burning or becoming too tough. If the heat is too high, the sugar in the marshmallows can caramelize too quickly, leading to a hard treat. Continue stirring until the marshmallows are about 90-95% melted. You might see a few small lumps remaining, and that’s perfectly okay; they will typically dissolve as you continue to stir in the next steps.
- Incorporate the pumpkin puree and spices: As soon as the marshmallows are mostly melted and form a thick, gooey liquid, it’s time to infuse them with our signature autumnal flavors. Remove the pot from the heat immediately. Stir in the 1/2 cup of pumpkin puree, 2 teaspoons of pumpkin pie spice, 1/2 teaspoon of extra ground cinnamon, and the 1/4 teaspoon of salt. Stir vigorously and continuously until all these ingredients are thoroughly combined and no streaks of pumpkin puree are visible. The mixture will take on a lovely pale orange hue, and the aroma of pumpkin and spices will begin to fill your kitchen – this is the hallmark of a true Pumpkin Spice Rice Krispie Treat! Make sure everything is homogenous, which means the color and texture are consistent throughout. This quick mixing off the heat prevents the pumpkin from cooking further and ensures the spices are evenly distributed.
Combining and Pressing Your Treats
Now comes the exciting part – bringing all the components together! This stage requires quick action and gentle handling to ensure your Pumpkin Spice Rice Krispie Treats have that perfect balance of crunchiness and chewiness, without becoming too dense or hard. The sticky marshmallow mixture will quickly cool and become more difficult to work with, so speed is of the essence here.
- Add the crispy rice cereal: Once your pumpkin spice marshmallow base is perfectly smooth and fragrant, immediately add the 6 cups of crispy rice cereal to the pot. Using your large rubber spatula, begin to fold the cereal into the marshmallow mixture. The goal is to coat every single piece of cereal evenly. Work quickly but gently. I find that a folding motion, bringing the marshmallow from the bottom of the pot over the cereal, works best. Continue folding until all the cereal is thoroughly coated in the sticky, pumpkin-spiced marshmallow mixture. It’s important not to overmix here; you want to maintain the integrity of the crispy cereal. Overmixing can crush the cereal, leading to a denser, less appealing texture.
- Transfer to the prepared pan: As soon as the cereal is fully coated, immediately transfer the entire mixture into your prepared 9×13-inch baking pan. The mixture will be very sticky and warm, so be careful. Use your greased spatula or, even better, a piece of greased parchment paper or waxed paper, to help you spread the mixture evenly into the pan.
- Press gently into the pan: This is a crucial step for achieving the perfect texture. Using your greased spatula or the piece of greased paper, gently but firmly press the mixture into the pan. The key word here is “gently.” You want to press it enough so that it forms a cohesive, even layer that reaches all corners of the pan, but avoid pressing down too hard. Over-compacting the mixture will result in a hard, dense Pumpkin Spice Rice Krispie Treat, losing that signature light and airy chewiness that makes them so delightful. Aim for a nice, even thickness across the entire pan. The less you compact them, the chewier and lighter your treats will be. If using your hands, make sure they are lightly greased with butter or cooking spray to prevent sticking.
The Optional Decadent Topping
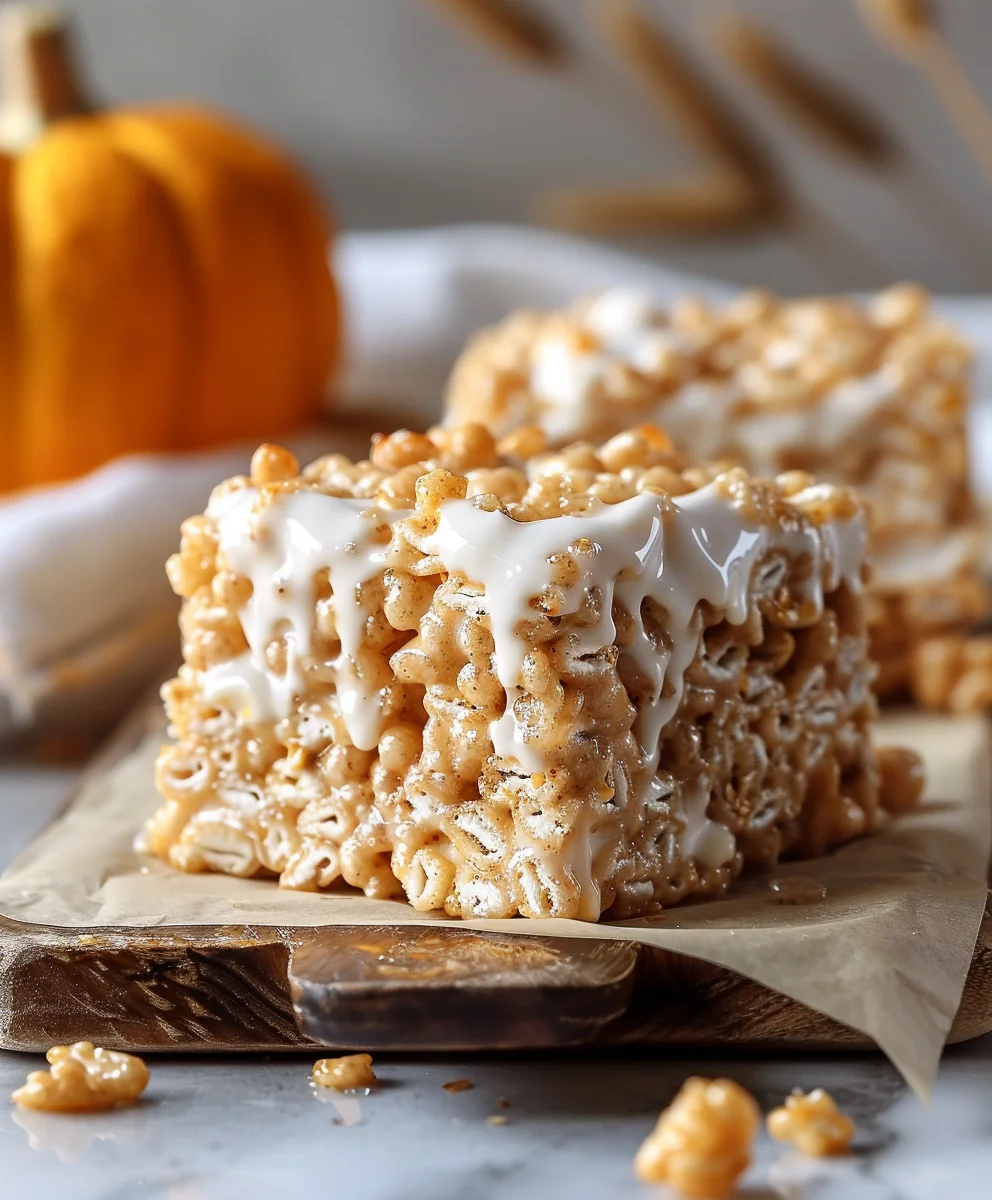
While our Pumpkin Spice Rice Krispie Treats are absolutely phenomenal on their own, a simple white chocolate drizzle can elevate them to an even more impressive and indulgent level. It adds an extra layer of sweetness, a beautiful visual contrast, and a touch of elegance that makes them perfect for gifting or a special occasion. This step is entirely optional, but I highly recommend it for that extra flair!
- Prepare the white chocolate drizzle: If you’ve decided to add this delightful topping, it’s time to melt your white chocolate. Place the 1/2 cup of white chocolate chips or chopped white chocolate into a microwave-safe bowl. If using, add the 1 teaspoon of coconut oil or vegetable shortening; this helps create a smoother, more fluid consistency for drizzling.
- Melt the white chocolate: Microwave the white chocolate in 30-second intervals, stirring thoroughly after each interval. White chocolate can seize or burn easily, so it’s important to go slowly and stir frequently. Continue microwaving and stirring until the white chocolate is completely melted and smooth. The mixture should be fluid enough to drizzle. If it feels too thick, you can add another 1/2 teaspoon of coconut oil or shortening and stir until fully incorporated. Alternatively, you can melt the white chocolate using a double boiler method for a more controlled melt.
- Drizzle over the treats: Once your white chocolate is perfectly melted and smooth, use a spoon or a piping bag with a very small snip in the corner to drizzle it artistically over the pressed Pumpkin Spice Rice Krispie Treats. You can create a classic zigzag pattern, or just random swirls – let your creativity guide you! The contrast of the white chocolate against the warm orange of the treats is simply stunning and adds an undeniable touch of sophistication.
- Allow the drizzle to set: If you’ve added the white chocolate drizzle, let the treats sit for an additional 10-15 minutes, or until the white chocolate has fully set. This will prevent smudging when you cut and serve them, ensuring a beautiful presentation for your finished Pumpkin Spice Rice Krispie Treat.
Setting, Slicing, and Serving
The final steps are all about patience and precision to ensure your Pumpkin Spice Rice Krispie Treats are perfectly set, beautifully cut, and ready to be enjoyed. While it’s tempting to dive right in, allowing them to cool completely will result in cleaner cuts and a more satisfying, well-structured treat. This also helps the flavors meld and the texture firm up just right.
- Allow the treats to cool and set: This is perhaps the hardest part of the entire process – waiting! Allow the Pumpkin Spice Rice Krispie Treats to cool at room temperature for at least 1 to 2 hours, or until completely set. If you’re in a hurry, you can place them in the refrigerator for about 30-45 minutes to speed up the setting process, but be aware that chilling them too long can sometimes make them a little harder. Room temperature cooling generally yields the best, chewiest results. You’ll know they’re ready when they feel firm to the touch and are no longer warm.
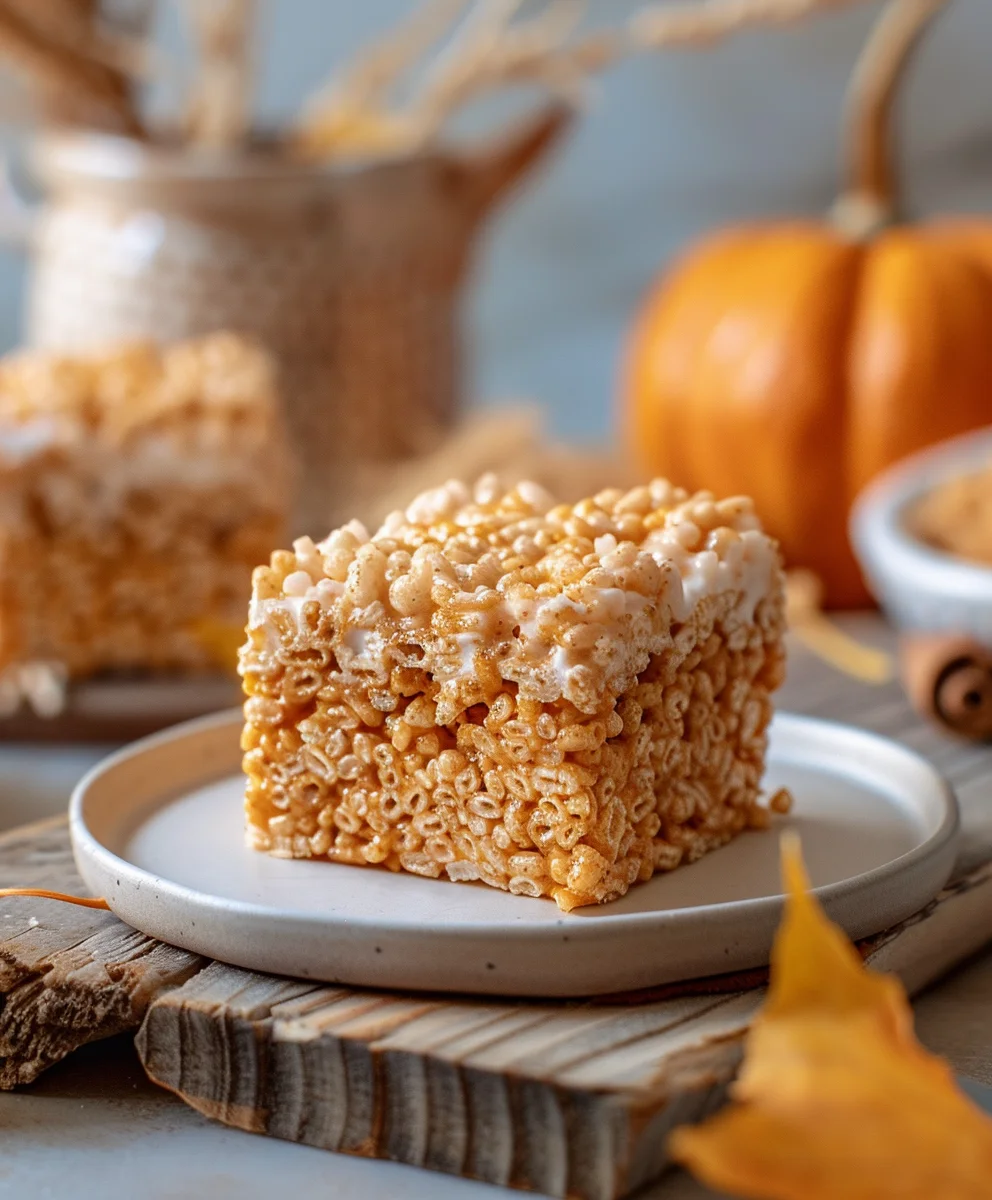
- Cut into squares: Once fully set, use the parchment paper overhang (if you used it) to lift the entire slab of treats out of the pan and onto a cutting board. If you didn’t use parchment, you might need to run a knife around the edges of the pan to help loosen them before inverting. Using a sharp, lightly greased knife, cut the treats into squares or rectangles of your desired size. I typically go for 12 or 16 squares from a 9×13-inch pan, but feel free to make them as big or as small as you like. For cleaner cuts, you can lightly grease your knife with cooking spray or butter between each cut, or run it under hot water and wipe dry.
- Serve and enjoy: Arrange your beautiful Pumpkin Spice Rice Krispie Treats on a platter and serve immediately. They are at their absolute best when freshly made and still wonderfully chewy. The combination of the classic crispy texture with the comforting notes of pumpkin and warm spices is truly irresistible.
- Storage recommendations: If you happen to have any leftovers (a rare occurrence in my house!), store them in an airtight container at room temperature for up to 2-3 days. To maintain their freshness and chewiness, I recommend placing a piece of waxed paper or parchment paper between layers if stacking. Avoid refrigerating them for extended periods, as this can make them hard and diminish their delightful texture. These treats also make wonderful gifts, so consider wrapping individual squares in festive cellophane bags for friends and family!
Conclusion:
And there you have it, my friends! We’ve reached the sweet finale of our culinary journey, and I genuinely hope you’re as excited as I am about this particular confection. If you’ve been searching for that perfect blend of autumnal warmth, effortless preparation, and undeniable deliciousness, then allow me to say that this recipe is truly a non-negotiable must-try for your kitchen. What makes this treat so special, you ask? Well, it’s not just another sweet snack; it’s an experience. Imagine the comforting embrace of a crisp autumn day, the scent of cinnamon and nutmeg lingering in the air, all encapsulated within a perfectly chewy, delightfully crunchy square. This recipe, with its seasonal spices and delightful texture, transforms a classic into something truly extraordinary. It’s a testament to the fact that sometimes, the simplest ingredients can create the most memorable flavors. I’ve poured my heart into perfecting this balance, ensuring that every bite delivers a harmonious symphony of spice and sweetness.
The beauty of this particular creation lies not only in its fantastic flavor but also in its incredible versatility and ease. Forget complicated baking projects that require hours of intricate steps and a long list of exotic ingredients. This is about pure, unadulterated joy in the kitchen, accessible to everyone, regardless of their baking prowess. You’ll be amazed at how quickly these come together, making them an ideal last-minute treat for unexpected guests or a spontaneous craving. Whether you’re a seasoned baker or just dipping your toes into the world of homemade goodies, this recipe is designed for success. It’s robust, forgiving, and yields consistently delightful results, ensuring that your efforts are always rewarded with a batch of truly irresistible treats. The way the rice cereal binds with the marshmallow and pumpkin spice mixture creates a textural masterpiece – a delightful give and crunch that keeps you coming back for more. It’s truly a sensory delight.
Serving Suggestions & Creative Variations: Elevate Your Treat!
Now, let’s talk about how to truly make these your own, or how to present them to maximize their impact. While a freshly cut square of this delightful confection is perfect on its own, there are so many ways to enjoy and customize them. For a cozy evening, serve them alongside a steaming mug of hot cocoa, a spiced chai latte, or even a robust cup of coffee; the contrast between the warm beverage and the sweet treat is simply divine. They also make an incredible addition to any fall-themed dessert platter, adding a pop of color and a unique flavor profile that will stand out amongst the usual suspects. Think about packing them in school lunchboxes for a delightful surprise, or bringing them to your next potluck where they are guaranteed to disappear quickly!
But why stop there? Let’s get creative! Here are some of my favorite ways to switch things up:
- Drizzle Delights: A simple drizzle of melted white chocolate, dark chocolate, or even a salted caramel sauce can add an extra layer of decadence and visual appeal. Just melt, drizzle, and let set!
- Nutty Nibblers: Fold in a handful of finely chopped pecans, walnuts, or even candied almonds during the mixing process for an added crunch and nutty depth.
- Cream Cheese Frosting: For a truly indulgent experience, whip up a quick batch of cream cheese frosting (think thin enough to spread easily) and spread it over the cooled treats. This adds a delightful tang and creamy texture.
- Mini Marshmallow Magic: Stir in an extra cup of mini marshmallows right at the end, just before pressing into the pan. Some will melt, creating extra gooeyness, while others will remain whole, adding soft pockets of sweetness.
- Festive Shapes: Once slightly cooled but still pliable, use cookie cutters to create fun, seasonal shapes like leaves, pumpkins, or even ghosts for Halloween. This is especially fun if you’re making them with kids!
- Spiced Up: Want to lean even more into the spice? Add a pinch of ginger or a touch of black pepper for a more complex and warming spice profile. A dash of maple extract can also deepen the autumn flavor.
- Layered Luxe: For a truly show-stopping dessert, consider creating two layers. You could make one layer of our amazing
Pumpkin Spice Rice Krispie Treat
and then top it with a layer of traditional treats, or even a layer made with cocoa powder for a chocolatey contrast.
The possibilities are truly endless, limited only by your imagination!
Your Turn: Taste the Magic, Share the Joy!
So, my culinary comrades, now it’s your turn. Don’t just read about this incredible treat; experience it for yourself! I wholeheartedly encourage you to roll up your sleeves, gather your ingredients, and whip up a batch of these truly amazing treats. Trust me, your taste buds will thank you, and so will anyone lucky enough to share them with you. There’s a special kind of magic that happens when you create something delicious from scratch, and I want you to feel that joy. It’s more than just a recipe; it’s an invitation to create memories, to fill your home with wonderful aromas, and to share a little bit of happiness.
Once you’ve made them, I would absolutely love to hear about your experience! Did you stick to the recipe, or did you try one of the variations? What were your favorite parts? Did you share them with family and friends, and what was their reaction? Your feedback and shared experiences are what make this community so vibrant and exciting. Please feel free to share your thoughts, your successes, and even your creative tweaks in the comments section below. Even better, snap a photo of your magnificent creations and share them with us!
Thank you for joining me on this delicious adventure. I’m confident that this delightful treat will quickly become a cherished part of your seasonal baking repertoire. Happy baking!
Pumpkin Spice Rice Krispie Treat
Redefine your autumn dessert with these Pumpkin Spice Rice Krispie Treats. This delightful fusion combines the comforting crunch of a classic no-bake treat with the aromatic flavors of fall, creating a profoundly nostalgic yet wonderfully contemporary confection. With a gooey, chewy texture, crisp rice cereal, and warm notes of cinnamon, nutmeg, and clove, these easy-to-make treats are perfect for any seasonal gathering or a moment of sweet, spiced comfort.
Ingredients
-
6 tbsp (85g) unsalted butter
-
1 (10-oz/283g) bag mini marshmallows
-
1/2 cup (120g) pumpkin puree (not pumpkin pie filling)
-
2 tsp pumpkin pie spice
-
1/2 tsp ground cinnamon
-
1/4 tsp salt
-
6 cups (150g) crispy rice cereal
-
1 cup mini marshmallows (for folding in)
-
Optional Drizzle:
-
1/2 cup (85g) white chocolate chips or chopped white chocolate
-
1 tsp coconut oil or vegetable shortening (optional)
-
Mini candy pumpkins (optional)
Instructions
-
Step 1
Line a 9×13-inch baking pan with parchment paper or grease it. Measure all ingredients and have tools ready for quick assembly. -
Step 2
In a large, heavy-bottomed pot over medium-low heat, melt the unsalted butter. Add the 10-oz bag of mini marshmallows and stir constantly until about 90-95% melted. Remove the pot from heat immediately. -
Step 3
Stir in the pumpkin puree, pumpkin pie spice, additional ground cinnamon, and salt. Stir vigorously until all ingredients are thoroughly combined and the mixture is smooth and takes on a pale orange hue. -
Step 4
Immediately add the crispy rice cereal and the extra 1 cup mini marshmallows to the pot. Fold quickly and gently until the cereal is evenly coated in the sticky pumpkin-spiced marshmallow mixture. Do not overmix. -
Step 5
Transfer the mixture to the prepared pan. Using a greased spatula or piece of greased parchment paper, gently but firmly press the mixture evenly into the pan. Avoid over-compacting to keep treats light and chewy. -
Step 6
(Optional) For the white chocolate drizzle: Melt white chocolate chips with coconut oil/shortening in 30-second intervals in a microwave-safe bowl, stirring after each, until smooth. Drizzle artistically over the treats and scatter mini candy pumpkins if desired. Let the drizzle set for 10-15 minutes. -
Step 7
Allow the treats to cool at room temperature for at least 1 to 2 hours, or until completely set. For quicker setting, refrigerate for 30-45 minutes. -
Step 8
Lift the entire slab out of the pan using the parchment overhang onto a cutting board. Cut into 12-16 squares. Serve immediately. Store any leftovers in an airtight container at room temperature for up to 4 days, placing wax paper between layers.
Important Information
Nutrition Facts (Per Serving)
It is important to consider this information as approximate and not to use it as definitive health advice.
Allergy Information
Please check ingredients for potential allergens and consult a health professional if in doubt.