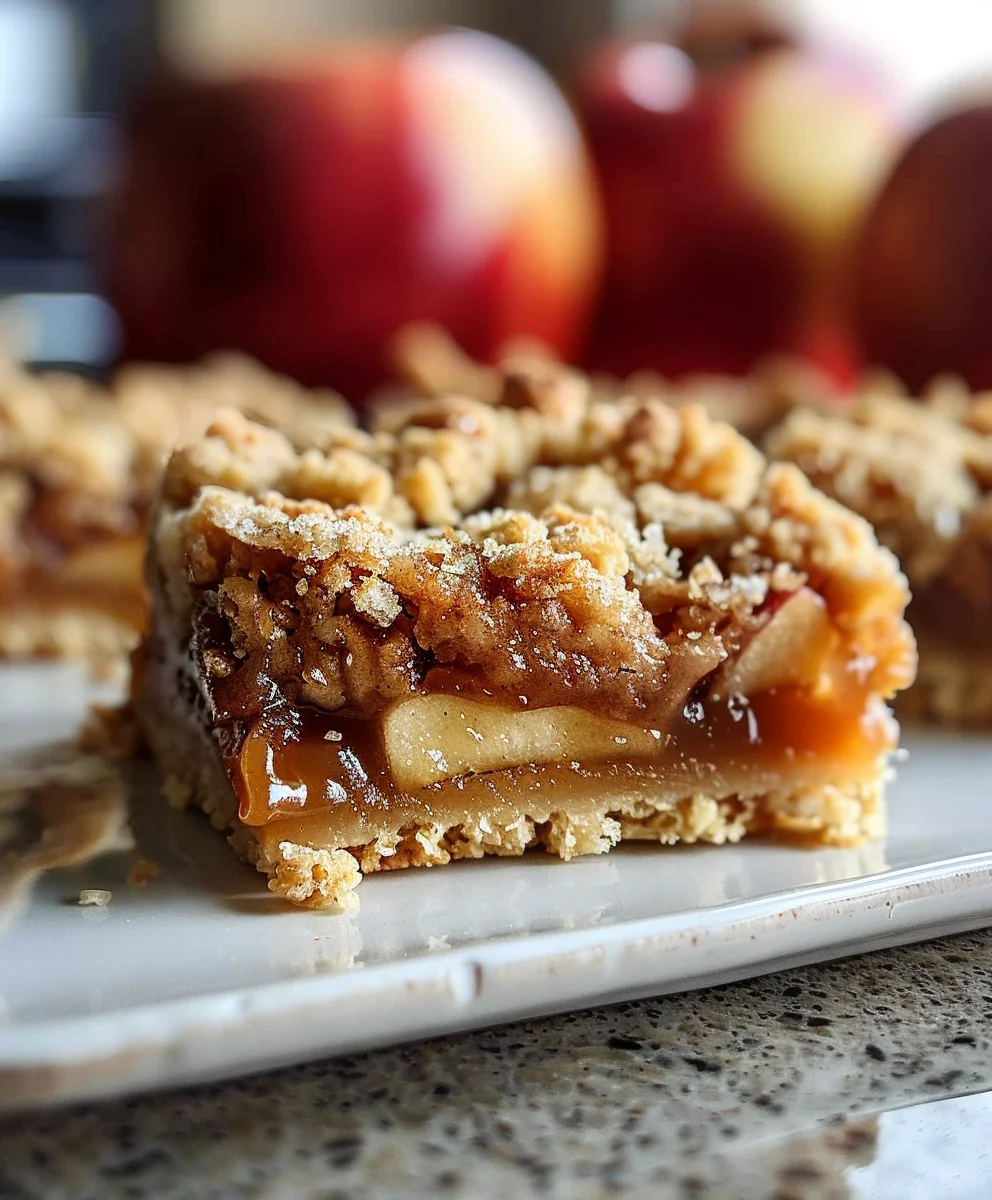
Salted Caramel Apple Crumble Bars Fall Treat – the very name instantly conjures images of crisp autumn air, cozy sweaters, and the undeniable magic of baking. Have you ever dreamt of a dessert that perfectly marries classic comfort with a touch of modern indulgence? I know I have, and this recipe delivers on that dream spectacularly.
While traditional apple crumble has been a beloved staple in homes for generations, particularly through British culinary traditions celebrating harvest season, these bars take that nostalgic charm and elevate it to new heights. We’re talking about the comforting warmth of spiced apples, transformed by a generous swirl of luscious salted caramel, all nestled beneath a buttery, crumbly oat topping. The addition of rich, savory caramel provides a delightful counterpoint to the sweet fruit, creating a flavor profile that is both familiar and exciting.
People adore this dish not just for its incredible symphony of flavors—the delightful balance of sweet, tart, and salty notes—but also for its irresistible textures. Imagine the tender, yielding apple filling contrasting with the chewy caramel and the crisp, golden crumble in every bite. Furthermore, the convenience of serving these as bars makes them an ideal candidate for potlucks, fall festivities, or simply a delightful treat at home. Get ready to experience the ultimate autumn delight with these magnificent Salted Caramel Apple Crumble Bars Fall Treat.

Ingredients:
- For the Shortbread Crust & Crumble Topping:
- 2 ½ cups (300g) all-purpose flour: I always use unbleached, all-purpose flour for a tender crumb and substantial structure.
- ¾ cup (150g) granulated sugar: This provides the perfect sweetness to balance the richness of the butter.
- 1 teaspoon ground cinnamon: For a touch of warmth that beautifully complements the apples.
- ½ teaspoon ground nutmeg: Just a hint to deepen the fall flavors.
- ¼ teaspoon salt: A crucial addition to enhance all the other flavors and provide a subtle contrast.
- 1 cup (226g) unsalted butter, very cold and cut into ½-inch cubes: This is key! Cold butter is essential for creating that wonderfully flaky, tender shortbread texture that melts in your mouth.
- For the Salted Caramel Sauce:
- 1 cup (200g) granulated sugar: The base for our luscious caramel.
- ¼ cup (60ml) water: Helps to dissolve the sugar evenly, preventing crystallization.
- ½ cup (120ml) heavy cream, warmed: Warming the cream prevents it from seizing when added to the hot sugar.
- 4 tablespoons (56g) unsalted butter, cut into 1-tablespoon pieces: Adds richness and a beautiful gloss to the caramel.
- 1 teaspoon pure vanilla extract: Elevates the flavor profile with its aromatic sweetness.
- ½ teaspoon flaky sea salt, or to taste: My favorite part! This provides that delightful salty contrast to the sweet caramel, making these Salted Caramel Apple Crumble Bars truly irresistible.
- For the Apple Filling:
- 6 medium-sized apples (about 2-2.5 lbs), such as Granny Smith, Honeycrisp, or Fuji, peeled, cored, and sliced ¼-inch thick: I love a mix of tart (Granny Smith) and sweet (Honeycrisp) for a balanced flavor and texture.
- ½ cup (100g) granulated sugar: To sweeten the apples and help create a syrupy filling.
- 2 tablespoons all-purpose flour or cornstarch: This acts as a thickener, ensuring our filling isn’t too watery.
- 1 teaspoon ground cinnamon: Classic apple pie spice, warming and aromatic.
- ½ teaspoon ground ginger: Adds a subtle, zesty warmth.
- ¼ teaspoon ground cloves: A small amount goes a long way to add depth to the apple flavor.
- 2 tablespoons fresh lemon juice: Prevents apples from browning and brightens their flavor.
Preparing the Shortbread Crust & Crumble Topping:
- Preheat and Prepare: First things first, let’s get our oven ready. Preheat your oven to 375°F (190°C). Then, line a 9×13-inch baking pan with parchment paper, leaving an overhang on the longer sides. This parchment sling is my secret to easily lifting the bars out of the pan once they’re cooled and ready to cut. A little spray of non-stick cooking spray under the parchment can help keep it in place, too!
- Combine Dry Ingredients: In a large mixing bowl, I like to whisk together the all-purpose flour, granulated sugar, ground cinnamon, ground nutmeg, and salt. Make sure these dry ingredients are thoroughly combined so that the flavors are evenly distributed throughout our crust and crumble. A large balloon whisk works wonderfully here to aerate everything a bit.
- Incorporate the Butter: Now for the fun part – adding the cold butter! Scatter the ½-inch cold butter cubes over the dry ingredients. Using a pastry blender, two knives, or even your fingertips (just be quick so the butter doesn’t get too warm), cut the butter into the flour mixture until it resembles coarse crumbs with some pea-sized pieces remaining. It’s important not to overwork the dough at this stage; we want those little pockets of butter to create steam during baking, which gives us that lovely tender, flaky texture. If the mixture seems too dry, resist the urge to add any liquid; it will come together.
- Divide and Press the Crust: Take about two-thirds of this crumb mixture and press it firmly and evenly into the bottom of your prepared 9×13-inch baking pan. I like to use the bottom of a measuring cup or a flat-bottomed glass to really pack it down for a sturdy base for our Salted Caramel Apple Crumble Bars. Set the remaining one-third of the crumb mixture aside; this will be our glorious crumble topping!
- Pre-bake the Crust: Place the pan with the pressed crust into the preheated oven and bake for 15-18 minutes, or until the edges are lightly golden. This pre-baking step ensures that our shortbread crust is perfectly cooked through and holds up well under the apple filling and caramel. While it’s baking, we’ll move on to our next delicious component!
Making the Salted Caramel Sauce:
- Prepare for Caramel: Before you even think about putting sugar on the stove, make sure your heavy cream is gently warmed. I usually pop it in the microwave for 30-45 seconds or warm it in a small saucepan over low heat until just steaming. Having it warm helps prevent the caramel from seizing when added. Have your butter, vanilla, and flaky sea salt measured out and ready to go by the stove as well, because once the caramel starts, it moves quickly!
- Start the Sugar: In a medium-sized, heavy-bottomed saucepan (important for even heating!), combine the granulated sugar and water. Stir gently just to moisten all the sugar. Avoid splashing sugar up the sides of the pan, as this can cause crystallization.
- Cook the Sugar: Place the saucepan over medium-high heat. Let the sugar syrup come to a boil. Do not stir the mixture once it starts boiling. You can gently swirl the pan occasionally to ensure even cooking, but avoid stirring with a spoon. You’ll watch as the bubbles form and the mixture eventually starts to change color around the edges.
- Achieve Amber Perfection: Continue to cook, swirling occasionally, until the sugar turns a beautiful amber color. This usually takes about 8-12 minutes, but pay close attention – it can go from perfect to burnt in a matter of seconds! I look for a deep, rich amber, similar to the color of an old copper penny. As soon as it reaches this color, immediately remove it from the heat.
- Add the Cream: Carefully and slowly pour the warm heavy cream into the hot sugar, whisking constantly. Be extremely cautious! The mixture will bubble up vigorously and release a lot of steam. Continue whisking until the caramel is smooth and fully combined.
- Incorporate Butter, Vanilla, and Salt: Add the butter pieces, one at a time, whisking until each piece is fully melted and incorporated before adding the next. Once all the butter is in, stir in the vanilla extract and the flaky sea salt. Give it a taste here – if you like it saltier, feel free to add a tiny bit more!
- Cool the Caramel: Pour the finished salted caramel sauce into a heatproof jar or bowl and let it cool slightly while you prepare the apples. It will thicken considerably as it cools, developing that perfect gooey consistency we want for our Salted Caramel Apple Crumble Bars Fall Treat.
Preparing the Apple Filling:
- Prepare the Apples: First, wash, peel, core, and slice your chosen apples into ¼-inch thick pieces. I find that this thickness ensures they soften nicely during baking without turning to mush. A mandoline can be helpful for consistent slices, but a sharp chef’s knife works perfectly well. Place all the sliced apples into a large mixing bowl.
- Combine with Flavorings: To the apples, add the granulated sugar, all-purpose flour (or cornstarch), ground cinnamon, ground ginger, ground cloves, and fresh lemon juice.
- Toss to Coat: Using a large spoon or your clean hands, gently toss the apples until they are thoroughly coated with the sugar and spice mixture. The flour will help to thicken the juices released from the apples during baking, creating a luscious, not watery, filling. The lemon juice brightens the flavor and prevents the apples from browning too quickly.
- Set Aside: Let the apple mixture sit for about 5-10 minutes while you finish preparing your components. This short resting period allows the sugar to start drawing out some moisture from the apples, creating a little bit of preliminary juice that will cook down beautifully.
Assembling the Salted Caramel Apple Crumble Bars:
- Layer the Apples: Once your pre-baked crust is out of the oven, immediately and evenly spread the prepared apple filling over the warm crust. Try to get a relatively flat layer, avoiding any large mounds, so that everything bakes evenly.
- Drizzle with Caramel: Next, take your slightly cooled salted caramel sauce. It should still be warm enough to drizzle easily, but not so hot that it instantly runs off the apples. Generously drizzle about half of the caramel sauce over the apple layer. I like to create a nice, even pattern, ensuring every bite of these Salted Caramel Apple Crumble Bars Fall Treat gets some of that gooey goodness. Save the other half for serving!
- Top with Crumble: Finally, sprinkle the reserved one-third of the shortbread crumb mixture evenly over the apples and caramel. Don’t press it down; we want a light, crumbly texture on top. This creates that delightful crunch and texture contrast that makes these bars so irresistible.
Baking and Cooling:
- Bake the Bars: Carefully place the pan back into your preheated 375°F (190°C) oven. Bake for 45-55 minutes, or until the topping is golden brown, the apples are tender (you can test with a sharp knife through the topping), and the filling is bubbly around the edges. I always look for a nice rich caramelization on the edges of the apples peeking through the crumble – that’s when you know it’s really singing!
- Cool Completely: This is arguably the most crucial step for perfect bars! Once baked, remove the pan from the oven and place it on a wire rack to cool completely. This means several hours, or even better, overnight at room temperature. I know, the aroma will be absolutely intoxicating, and the temptation to cut into them immediately will be immense, but please resist! Cooling allows the caramel and apple filling to fully set, making for clean, beautiful slices. If you cut them while warm, the filling will be too soft and messy.
- Slice and Serve: Once fully cooled, use the parchment paper overhang to carefully lift the entire slab of bars out of the pan. Place it on a cutting board. Using a sharp knife, cut the bars into desired sizes – I usually go for 12-16 squares, but you could do smaller rectangles for a party. Drizzle the remaining salted caramel sauce generously over the individual bars right before serving. This enhances the “Salted Caramel Apple Crumble Bars Fall Treat” experience, making them extra decadent and beautiful.
- Storage: Store any leftover bars in an airtight container at room temperature for up to 3 days, or in the refrigerator for up to 5 days. You can even gently warm them up for a few seconds in the microwave to get that gooey caramel experience again! Enjoy these delightful autumn treats!
Conclusion:
Well, my friend, we’ve reached the grand finale, and I truly hope you’re feeling inspired to whip up a batch of these extraordinary treats! If there’s one recipe I urge you to try this season, it’s this one. Why, you ask? Because these aren’t just any apple bars; they are the quintessential Salted Caramel Apple Crumble Bars Fall Treat that will absolutely redefine your autumn baking. Imagine the perfect harmony of tender, cinnamon-spiced apples, enrobed in a luscious, gooey salted caramel sauce, all nestled beneath a buttery, crisp crumble topping, and finally, anchored by a rich, shortbread-like crust. Every single bite is a symphony of textures and flavors – the tartness of the apples cutting through the sweetness of the caramel, the satisfying crunch of the crumble contrasting with the soft, yielding fruit. It’s comfort food elevated, a dessert that feels both familiar and incredibly special, promising to fill your home with the most intoxicating aromas and your heart with pure joy. Trust me, once you taste these, you’ll understand why they’re destined to become a cherished tradition in your household, year after year. This is more than just a dessert; it’s an experience waiting to happen.
Now, while these bars are absolutely divine straight out of the pan once cooled, let’s talk about taking them to the next level with some serving suggestions and creative variations. For an unparalleled dessert experience, I highly recommend serving them slightly warm. A generous scoop of vanilla bean ice cream melting into the warm, caramel-y goodness is pure bliss, creating a decadent sauce that’s simply irresistible. Alternatively, a dollop of freshly whipped cream, perhaps infused with a hint of maple or cinnamon, would also be magnificent. And for those cozy evenings, a mug of hot coffee or spiced chai tea makes the perfect companion, enhancing the rich flavors. Don’t forget a final sprinkle of flaky sea salt right before serving to really make that salted caramel sing! It truly brightens every bite and elevates the entire profile of the dessert. Consider garnishing with a few fresh apple slices or a dusting of confectioners’ sugar for an extra touch of elegance.
Make It Your Own: Delightful Variations to Explore
One of the beautiful things about baking is the freedom to experiment, and this recipe is incredibly forgiving and adaptable. Don’t be afraid to put your own spin on these delightful bars! If apples aren’t your only fall fruit fancy, consider swapping out half of them for ripe, juicy pears, or even a mix of berries if you’re making them outside of autumn for a different fruity dimension. For the crumble topping, you could add a handful of chopped pecans or walnuts for an extra layer of nutty crunch, or perhaps a touch of rolled oats for a chewier texture that adds a wholesome feel. Spice-wise, while cinnamon is classic, a pinch of ground cardamom, nutmeg, or allspice could add an intriguing warmth and complexity to the apple filling. Feeling ambitious with your caramel? A splash of bourbon or a hint of pure vanilla bean paste can elevate a homemade version to gourmet status, adding depth and a sophisticated edge. And if you’re catering to dietary needs, a good quality gluten-free all-purpose flour blend can easily be substituted for the flour in both the crust and the crumble, ensuring everyone can enjoy this amazing treat without compromise. You could even bake them in individual ramekins for a more elegant, plated dessert experience, making them perfect for dinner parties or special occasions. The possibilities are truly endless, limited only by your imagination and what fresh ingredients call to you!
Your Turn: Dive In and Share Your Culinary Adventure!
So, what are you waiting for? I’m genuinely excited for you to experience the magic of these bars firsthand. Seriously, clear your schedule, gather your ingredients, and get ready to fill your kitchen with the most incredible aromas. Baking these isn’t just about the final product; it’s about the process – the meditative peeling of apples, the satisfying crunch of mixing the crumble, the anticipation as the flavors meld in the oven. It’s a true labor of love that rewards you tenfold with every scrumptious bite. I am absolutely confident that these bars will become a cherished part of your seasonal baking repertoire, bringing smiles and warmth to everyone who tries them. Once you’ve baked and savored these beautiful creations, I would absolutely love to hear all about your experience! Did you stick to the original, or did you try one of the delightful variations? What was your favorite part – the gooey caramel, the crisp crumble, or the tender apples? Please, don’t hesitate to share your thoughts, your successes, and even your creative tweaks in the comments below. Better yet, snap a photo of your masterpiece and share it with us! Your feedback and stories inspire me and other home bakers, making our culinary community even stronger and more delicious. Happy baking, my friends, and enjoy every single incredible bite!

Chewy Salted Caramel Apple Crumble Bars – Perfect Fall Treat
These Salted Caramel Apple Crumble Bars perfectly marry classic comfort with modern indulgence, featuring spiced apples, luscious salted caramel, and a buttery crumble topping. A delightful balance of sweet, tart, and salty notes with irresistible textures, ideal for fall gatherings.
Ingredients
-
1 cup (2 sticks) unsalted butter, melted
-
1 1/2 cups granulated sugar
-
1 teaspoon vanilla extract
-
1/2 teaspoon salt
-
2 1/2 cups all-purpose flour
-
3 cups peeled and thinly sliced apples (about 3 medium)
-
1/2 cup salted caramel sauce
-
1 teaspoon ground cinnamon
-
1/4 teaspoon ground nutmeg
Instructions
-
Step 1
Preheat oven to 375°F (190°C). Line a 9×13-inch baking pan with parchment paper, leaving an overhang on the longer sides for easy lifting. -
Step 2
In a large bowl, combine the melted butter, 1 cup of the granulated sugar, vanilla extract, 1/2 teaspoon salt, and 2 1/2 cups all-purpose flour. Mix until the ingredients are well combined and resemble coarse, moist crumbs. Reserve about one-third of this mixture for the topping. -
Step 3
Press the remaining two-thirds of the crumble mixture firmly and evenly into the bottom of the prepared baking pan to form the crust. Bake for 15 minutes, or until the edges are lightly golden. -
Step 4
While the crust is pre-baking, in a separate large bowl, combine the 3 cups peeled and thinly sliced apples with the remaining 1/2 cup granulated sugar, 1 teaspoon ground cinnamon, and 1/4 teaspoon ground nutmeg. Toss gently until the apples are thoroughly coated. -
Step 5
Once the pre-baked crust is out of the oven, immediately and evenly spread the prepared apple filling over the warm crust. Drizzle about 1/4 cup of the salted caramel sauce generously over the apple layer. Finally, sprinkle the reserved one-third of the crumble mixture evenly over the apples and caramel. -
Step 6
Carefully place the pan back into the preheated 375°F (190°C) oven. Bake for 45-55 minutes, or until the topping is golden brown, the apples are tender (test with a sharp knife), and the filling is bubbly around the edges. -
Step 7
Remove the pan from the oven and place it on a wire rack to cool completely. This is crucial for the bars to set properly and for clean slices; allow at least 2-3 hours, or ideally overnight, at room temperature. Once fully cooled, use the parchment paper overhang to carefully lift the entire slab of bars out of the pan. Place on a cutting board and cut into 12-16 desired-sized bars. Drizzle the remaining 1/4 cup of salted caramel sauce over the individual bars right before serving. Store leftovers in an airtight container.
Important Information
Nutrition Facts (Per Serving)
It is important to consider this information as approximate and not to use it as definitive health advice.
Allergy Information
Please check ingredients for potential allergens and consult a health professional if in doubt.