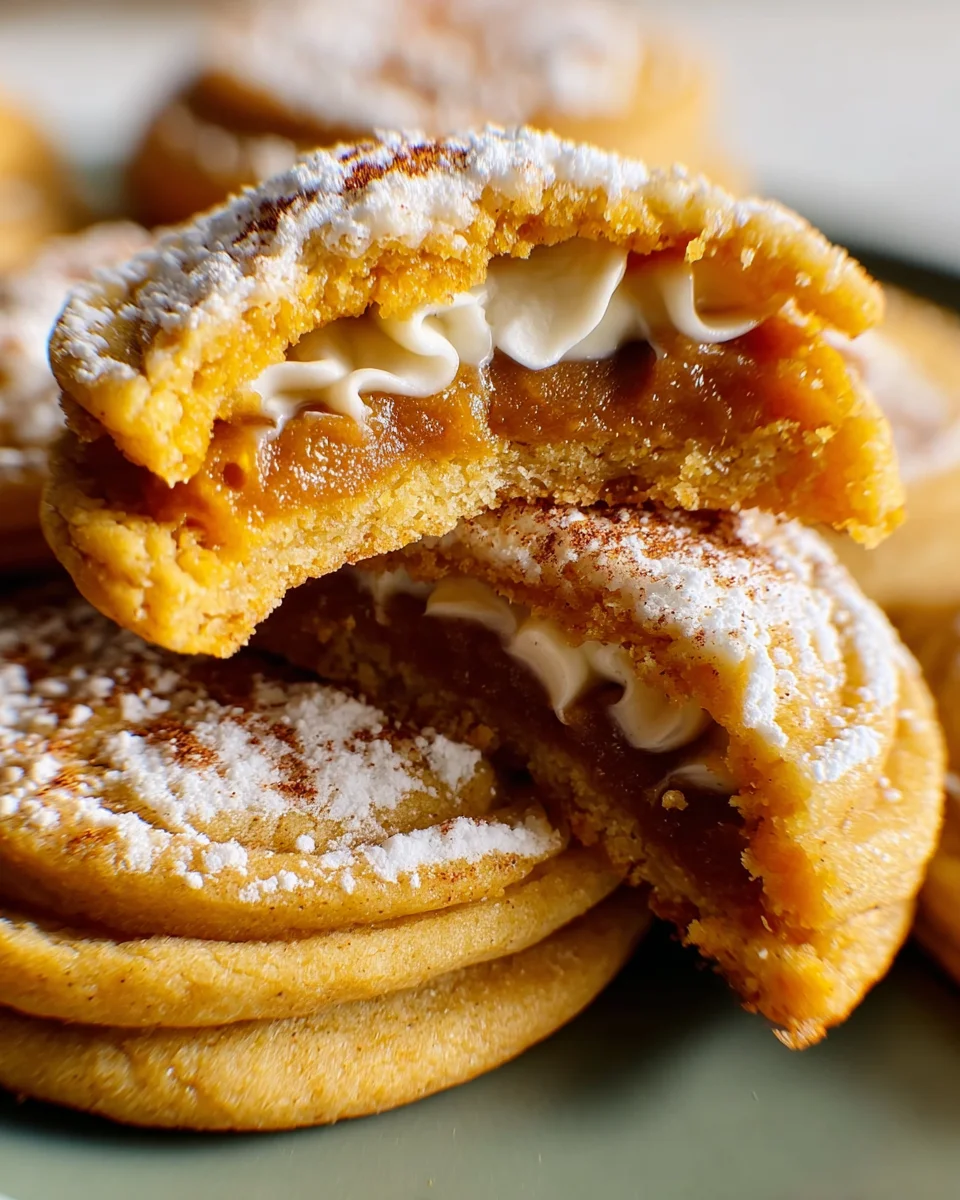
Pumpkin Pie Cookies are here to revolutionize your autumn baking, offering all the beloved flavors of a classic pumpkin pie wrapped up in a delightful, convenient cookie package. Forget the lengthy process of rolling out crusts and baking a whole pie; these cookies deliver that comforting, spiced pumpkin essence in every soft, chewy bite. As someone who adores the rich history and cultural significance of traditional pumpkin pie, especially around the fall holidays, I find myself constantly seeking new ways to enjoy its quintessential taste. This recipe provides just that – a modern, incredibly accessible twist on a timeless American dessert.
Why You’ll Fall in Love with Pumpkin Pie Cookies
People absolutely adore these treats because they perfectly capture the warm spices and creamy texture of a slice of pie, but with the added convenience and shareability of a cookie. Imagine the soft, pillowy texture infused with cinnamon, nutmeg, and ginger, often topped with a luscious cream cheese frosting – truly irresistible! They are the ultimate crowd-pleaser, perfect for potlucks, lunchboxes, or simply a cozy evening indulgence. I am incredibly excited for you to discover the joy and ease of making these incredible Pumpkin Pie Cookies for yourself.

Ingredients:
-
For the Pumpkin Pie Cookies:
- 2 ½ cups (300g) all-purpose flour: I always recommend using a good quality, unbleached all-purpose flour for the best texture in our pumpkin pie cookies. Sifting it beforehand can make a noticeable difference in the lightness of the cookies, ensuring no lumps interrupt the perfect pumpkin dough.
- 1 teaspoon baking soda: This helps our pumpkin pie cookies rise beautifully and contributes to that soft, chewy interior we all love. Make sure it’s fresh for optimal leavening power.
- ½ teaspoon baking powder: Working in conjunction with baking soda, baking powder provides an extra lift, giving our pumpkin pie cookies that wonderful cake-like tenderness while maintaining their shape.
- 2 teaspoons ground cinnamon: A cornerstone spice for any pumpkin dessert, cinnamon brings warmth and depth to our cookies. You can adjust this slightly to your preference for a bolder spice flavor.
- 1 teaspoon ground ginger: Essential for that characteristic pumpkin pie spice blend, ginger adds a lovely zing and aromatic quality to our pumpkin pie cookies.
- ½ teaspoon ground nutmeg: Freshly grated nutmeg, if you have it, will elevate the flavor immensely, but pre-ground works perfectly fine. It’s crucial for that authentic pumpkin pie taste.
- ¼ teaspoon ground cloves: A little goes a long way with cloves! It provides a potent, warm, and slightly peppery note that completes our spice profile, truly making these taste like pumpkin pie.
- ½ teaspoon salt: Don’t skip the salt! It’s vital for balancing the sweetness and enhancing all the other wonderful flavors in our pumpkin pie cookies.
- 1 cup (226g) unsalted butter, softened: Make sure your butter is truly at room temperature – soft enough to indent with your finger, but not melted. This is key for creaming it properly with the sugars, creating air pockets for a light cookie.
- 1 cup (200g) granulated sugar: Provides sweetness and helps create a crispier edge on the cookies, contrasting beautifully with the soft interior.
- ½ cup (110g) packed light brown sugar: Brown sugar adds moisture, depth of flavor, and a wonderful chewiness to our pumpkin pie cookies, thanks to its molasses content.
- 1 large egg: The egg acts as a binder, holding all our ingredients together and adding richness. Ensure it’s also at room temperature for better emulsification.
- 1 teaspoon vanilla extract: A good quality vanilla extract is non-negotiable! It enhances all the sweet and spiced flavors, making our pumpkin pie cookies irresistible.
- 1 cup (240g) pumpkin puree (not pumpkin pie filling): This is the star ingredient for our pumpkin pie cookies! Make sure to use plain pumpkin puree. The canned version is convenient; just ensure it’s not the pre-spiced pie filling, as that would throw off our carefully balanced spice blend.
-
For the Cream Cheese Glaze:
- 4 ounces (113g) cream cheese, softened: Just like butter, room temperature cream cheese is essential for a smooth, lump-free glaze. It gives that signature tangy sweetness reminiscent of pumpkin pie with whipped cream.
- ¼ cup (56g) unsalted butter, softened: Combining butter with cream cheese creates a richer, more stable glaze that pipes beautifully or spreads smoothly over our pumpkin pie cookies.
- 2 cups (240g) powdered sugar (confectioners’ sugar), sifted: Sifting is crucial here to prevent lumps, ensuring a silky-smooth glaze. This provides the primary sweetness for our topping.
- 1 teaspoon vanilla extract: To complement the creamy tang of the cream cheese and butter, and to echo the vanilla in the cookies themselves.
- 1-3 tablespoons milk or heavy cream: Use this to achieve your desired glaze consistency. Start with one tablespoon and add more slowly until it’s thick enough to hold its shape but still spreadable.
Preparing the Pumpkin Cookie Dough:
- Combine Dry Ingredients: In a medium bowl, I start by whisking together the 2 ½ cups all-purpose flour, 1 teaspoon baking soda, ½ teaspoon baking powder, 2 teaspoons ground cinnamon, 1 teaspoon ground ginger, ½ teaspoon ground nutmeg, ¼ teaspoon ground cloves, and ½ teaspoon salt. Make sure these are thoroughly combined; I often use a whisk to really aerate them and ensure all the spices are evenly distributed throughout what will become our amazing pumpkin pie cookies. Set this aside.
- Cream Butter and Sugars: In the bowl of a stand mixer fitted with the paddle attachment, or using a large bowl with a hand mixer, I combine the 1 cup softened unsalted butter with 1 cup granulated sugar and ½ cup packed light brown sugar. I beat these together on medium speed for about 3-5 minutes, until the mixture is light, fluffy, and noticeably pale. This step is crucial for incorporating air into the dough, which contributes to the soft texture of our pumpkin pie cookies. Scrape down the sides of the bowl as needed to ensure everything is evenly mixed.
- Add Wet Ingredients: Next, I crack in the large egg and beat it into the creamed butter and sugar mixture until it’s just combined. Then, I stir in the 1 teaspoon vanilla extract. Finally, I add the 1 cup pumpkin puree, mixing on low speed until it’s fully incorporated. The mixture might look a little curdled at first, but don’t worry, it will come together beautifully. It’s important not to overmix at this stage; just combine until smooth.
- Combine Wet and Dry: With the mixer on low speed, I gradually add the dry ingredients mixture to the wet ingredients, about a third at a time, mixing until just combined after each addition. I make sure to stop mixing as soon as no streaks of flour remain. Overmixing the dough can lead to tough pumpkin pie cookies, and we definitely want ours to be wonderfully soft and tender. The dough will be quite soft and sticky at this point.
- Chill the Dough: This step is absolutely critical for the best pumpkin pie cookies! I scrape the dough into a clean bowl, cover it tightly with plastic wrap, and refrigerate it for at least 1 hour, or up to 24 hours. Chilling helps the flour fully hydrate, allowing the flavors to meld, and it also firms up the dough, making it much easier to scoop and preventing the cookies from spreading too much during baking.
Baking Your Perfect Pumpkin Pie Cookies:
- Preheat Oven and Prepare Baking Sheets: About 15-20 minutes before I’m ready to bake, I preheat my oven to 375°F (190°C). I line two large baking sheets with parchment paper or silicone baking mats. This ensures the pumpkin pie cookies don’t stick and helps them bake evenly without burning the bottoms.
- Scoop the Dough: I use a medium cookie scoop (about 1.5-2 tablespoons) to portion out the chilled pumpkin cookie dough. If you don’t have a scoop, you can use two spoons. I drop rounded scoops onto the prepared baking sheets, spacing them about 2 inches apart to allow for spreading. The dough will be soft but much more manageable after chilling.
- Bake the Pumpkin Pie Cookies: I bake one sheet at a time in the preheated oven for 10-12 minutes. I look for the edges to be lightly golden and the centers to appear set. The cookies will still be quite soft when they come out of the oven, and that’s perfectly normal. They will firm up as they cool. Baking them just right is key to achieving that soft, cake-like texture that makes these pumpkin pie cookies so delightful.
- Cool the Cookies: Once baked, I remove the baking sheets from the oven and let the pumpkin pie cookies cool on the sheets for about 5 minutes. This allows them to firm up enough to handle without breaking. After 5 minutes, I carefully transfer the cookies to a wire rack to cool completely. It’s absolutely essential that the pumpkin pie cookies are completely cool before glazing them; otherwise, the glaze will melt right off!
Crafting the Creamy Dream Glaze:
- Beat Cream Cheese and Butter: While the cookies are cooling, I prepare the cream cheese glaze. In a medium bowl, using a hand mixer or a stand mixer with the paddle attachment, I beat together the 4 ounces softened cream cheese and ¼ cup softened unsalted butter. I beat them on medium speed until the mixture is completely smooth and creamy, with no lumps of cream cheese remaining. This usually takes 2-3 minutes.
- Add Powdered Sugar and Vanilla: I gradually add the 2 cups sifted powdered sugar to the cream cheese mixture, beating on low speed until it’s fully incorporated. Then, I stir in the 1 teaspoon vanilla extract.
- Achieve Desired Consistency: Now comes the part where I adjust the glaze to perfection. I start by adding 1 tablespoon of milk or heavy cream and beat until smooth. If the glaze is too thick for my liking, I’ll add more milk, half a tablespoon at a time, until it reaches a smooth, spreadable, yet thick consistency. I want it to be thick enough to sit nicely on top of our pumpkin pie cookies without running off, but thin enough to spread easily. A good test is to lift the beaters; the glaze should fall in a thick ribbon.
Assembling and Enjoying Your Pumpkin Pie Cookies:
- Glaze the Cooled Cookies: Once the pumpkin pie cookies are completely cool, I either spread a generous dollop of the cream cheese glaze onto each cookie using an offset spatula or the back of a spoon. Alternatively, for a neater look, I sometimes transfer the glaze to a piping bag fitted with a round tip and pipe a swirl or a simple dollop on top. I find that a good amount of glaze really makes these pumpkin pie cookies feel special and utterly delicious.
- Optional Garnish: For an extra touch of warmth and presentation, I often sprinkle a tiny pinch of ground cinnamon or nutmeg over the top of each glazed pumpkin pie cookie. Sometimes, if I’m feeling fancy, I’ll even add a finely chopped pecan for a bit of textural contrast. This isn’t just for looks; it really enhances the overall “pumpkin pie” experience.
- Set the Glaze: I let the glazed pumpkin pie cookies sit at room temperature for about 15-20 minutes, or until the glaze has slightly set. This makes them easier to handle and prevents smudging.
- Storage: These amazing pumpkin pie cookies are best enjoyed fresh, but they will keep well. I store them in an airtight container at room temperature for up to 3 days, or in the refrigerator for up to a week. If refrigerating, I usually let them come to room temperature for about 15-20 minutes before serving, as the glaze and cookie will soften slightly and the flavors will be more prominent. They are truly a comforting treat that captures all the best parts of a pumpkin pie in a delightful cookie form.
Conclusion:
And so, we arrive at the sweet finish of our culinary journey together. I truly hope you’re feeling inspired and ready to bring these incredible treats to life in your own kitchen! What we’ve crafted here isn’t just another cookie; it’s a tiny, tender masterpiece, a delightful amalgamation of everything we adore about the autumn season and its most iconic dessert. From the moment you pull them from the oven, filling your home with an intoxicating aroma of warm spices and sweet pumpkin, you’ll understand why these are an absolute game-changer.
I genuinely believe these cookies are a must-try for everyone, whether you’re a seasoned baker or just starting your journey. They strike that perfect balance: wonderfully impressive in flavor and texture, yet remarkably straightforward to make. Imagine biting into a cloud-like cookie that melts in your mouth, bursting with the comforting, complex flavors of cinnamon, nutmeg, ginger, and cloves, all perfectly complementing the rich, earthy sweetness of pumpkin. It’s like experiencing a slice of your favorite pumpkin pie, but in a convenient, handheld form, complete with that irresistible, slightly crisp edge and a soft, chewy interior. These are not just cookies; they are a celebration of fall, a hug in edible form. They offer all the beloved elements of a traditional pumpkin pie without the fuss of a crust, making them an ideal choice for last-minute gatherings or simply a cozy evening indulgence. They’re soft, moist, and utterly addictive, embodying the very essence of comfort food.
Elevate Your Cookie Experience: Serving Suggestions & Creative Variations
Now that you’re convinced these belong in your baking repertoire, let’s talk about how to enjoy them to the fullest and even get a little creative! These amazing treats are absolutely divine served warm, fresh from the oven, allowing their spices and soft texture to truly shine. I love them with a tall glass of cold milk, a steaming mug of coffee, or a cozy cup of spiced chai tea. For an extra touch of indulgence, try them à la mode with a scoop of vanilla bean ice cream – the contrast of warm cookie and cold, creamy ice cream is simply heavenly. You could also crumble one over a bowl of plain Greek yogurt for a delightful breakfast or snack.
But don’t stop there! The beauty of this recipe lies in its versatility. For those who love a bit of crunch, consider folding in a handful of finely chopped pecans or walnuts into the dough; they add a wonderful textural contrast and a nutty depth of flavor. If you’re a chocolate enthusiast, white chocolate chips are a spectacular addition, their creamy sweetness pairing exquisitely with the pumpkin and spices. Dark chocolate chips also work beautifully for a more intense, sophisticated flavor profile. You could also experiment with a simple glaze: a maple glaze made with powdered sugar and maple syrup, or a tangy cream cheese frosting, would elevate these treats to bakery-level status, making them perfect for holiday platters or as thoughtful homemade gifts. For those who enjoy a little extra kick, a pinch more ginger or a dash of cardamom can deepen the spice notes even further. I encourage you to make these Pumpkin Pie Cookies your own; feel free to play with the mix-ins and toppings to suit your personal taste and dietary preferences. For instance, a gluten-free flour blend can often be substituted successfully, and many plant-based butter alternatives work wonderfully for a dairy-free version, opening up these delights to even more friends and family.
So, there you have it – my heartfelt encouragement to dive in! Don’t hesitate. Gather your ingredients, preheat your oven, and prepare to fill your home with the most wonderful, comforting aromas of the season. I promise you, these are going to be a new favorite. I am genuinely excited for you to experience the joy of baking and tasting these extraordinary cookies. Once you’ve made them, please come back and share your experience with me. I love hearing about your kitchen adventures, your successes, and any creative twists you might have added. Your feedback is what makes this community so vibrant and inspiring. Happy baking, my friends!
Pumpkin Pie Sandwich Cookies with No-Bake Filling
Revolutionize your autumn baking with these delightful Pumpkin Pie Sandwich Cookies. Soft, simple cookies are filled with a luscious, spiced no-bake pumpkin cream cheese filling, offering all the beloved flavors of classic pumpkin pie in a convenient, shareable cookie package.
Ingredients
Instructions
Important Information
Nutrition Facts (Per Serving)
It is important to consider this information as approximate and not to use it as definitive health advice.
Allergy Information
Please check ingredients for potential allergens and consult a health professional if in doubt.