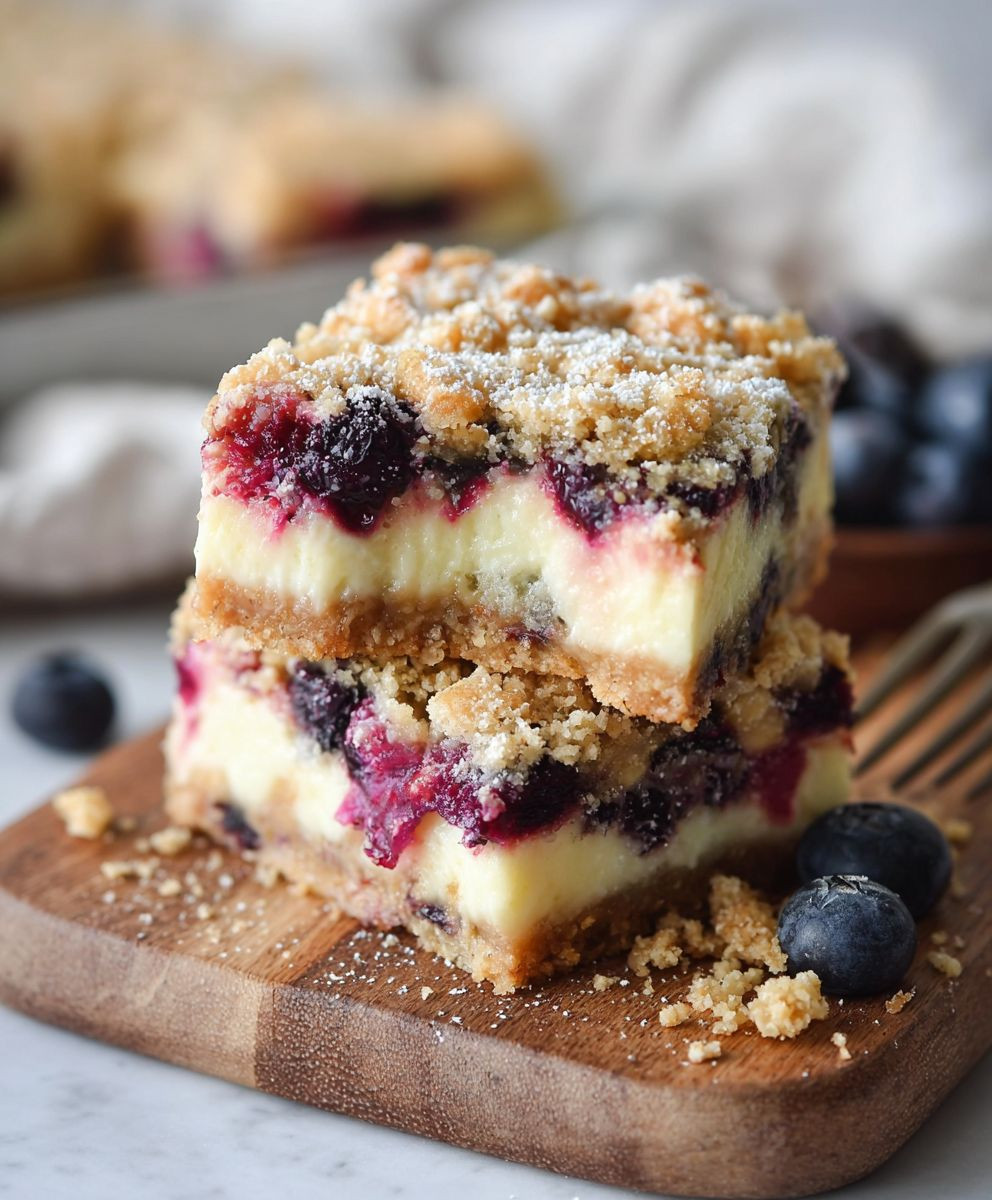
Blueberry Cream Cheese Bars: Prepare to be utterly captivated by this delightful dessert that perfectly balances tangy cream cheese with bursts of sweet, juicy blueberries! Imagine sinking your teeth into a buttery, crumbly crust, followed by a creamy, decadent filling studded with plump blueberries that practically explode with flavor. This isn’t just a dessert; it’s an experience.
While the exact origins of cream cheese bars are somewhat debated, the combination of cream cheese and fruit in baked goods has a long and rich history, particularly in American cuisine. Think of the classic cheesecake, a close cousin to these bars, which has been enjoyed in various forms for centuries. The addition of blueberries, a native North American fruit, elevates this dessert to a truly special treat, celebrating the bounty of the land.
What makes these Blueberry Cream Cheese Bars so irresistible? It’s the symphony of textures and flavors. The buttery shortbread crust provides a satisfying crunch, while the creamy filling melts in your mouth. The blueberries add a delightful sweetness and a touch of tartness that cuts through the richness of the cream cheese. Plus, they’re incredibly easy to make, making them perfect for potlucks, bake sales, or simply a delightful treat for yourself. Whether you’re a seasoned baker or a novice in the kitchen, this recipe is sure to become a new favorite!

Ingredients:
- For the Crust:
- 1 ½ cups all-purpose flour
- ½ cup (1 stick) cold unsalted butter, cut into cubes
- ¼ cup granulated sugar
- ¼ teaspoon salt
- 3-5 tablespoons ice water
- For the Cream Cheese Filling:
- 8 ounces cream cheese, softened
- ½ cup granulated sugar
- 1 large egg
- 1 teaspoon vanilla extract
- ½ teaspoon lemon zest (optional, but highly recommended!)
- For the Blueberry Topping:
- 2 cups fresh blueberries (or frozen, thawed and drained)
- ¼ cup granulated sugar
- 2 tablespoons cornstarch
- 1 tablespoon lemon juice
- Optional Streusel Topping:
- ¼ cup all-purpose flour
- 2 tablespoons packed light brown sugar
- 2 tablespoons cold unsalted butter, cut into small pieces
- ¼ teaspoon ground cinnamon (optional)
Preparing the Crust:
- Combine Dry Ingredients: In a large bowl, whisk together the flour, sugar, and salt. This ensures the salt is evenly distributed, which is crucial for flavor.
- Cut in the Butter: Add the cold, cubed butter to the flour mixture. Use a pastry blender or your fingertips to cut the butter into the flour until the mixture resembles coarse crumbs. The key here is to work quickly so the butter stays cold. Cold butter is what creates those flaky layers in the crust. If you don’t have a pastry blender, you can use two knives to cut the butter in a criss-cross motion.
- Add Ice Water: Gradually add the ice water, one tablespoon at a time, mixing gently after each addition. The amount of water you need will vary depending on the humidity and the flour you’re using. Stop adding water when the dough just comes together and is slightly moist but not sticky. Be careful not to overmix, as this will develop the gluten in the flour and result in a tough crust.
- Form the Dough: Gently gather the dough into a ball. Flatten it into a disc, wrap it in plastic wrap, and refrigerate for at least 30 minutes. This chilling time allows the gluten to relax, making the crust easier to roll out and preventing it from shrinking during baking.
- Roll Out the Dough: Preheat your oven to 375°F (190°C). Lightly grease and flour an 8×8 inch baking pan. On a lightly floured surface, roll out the chilled dough to fit the bottom of the prepared pan. If the dough is sticking, add a little more flour to the surface.
- Press into Pan: Carefully transfer the rolled-out dough to the prepared pan and press it evenly into the bottom and slightly up the sides.
- Pre-bake the Crust: Prick the bottom of the crust several times with a fork. This prevents the crust from puffing up during pre-baking. Bake the crust for 10-12 minutes, or until it is lightly golden brown. This pre-baking step ensures that the crust is fully cooked and doesn’t become soggy from the filling.
Making the Cream Cheese Filling:
- Cream Together Cream Cheese and Sugar: In a medium bowl, beat the softened cream cheese and sugar together with an electric mixer until smooth and creamy. Make sure your cream cheese is truly softened; otherwise, you’ll end up with lumps in your filling.
- Add Egg and Vanilla: Beat in the egg and vanilla extract until well combined. Don’t overbeat at this stage, as this can incorporate too much air into the filling, causing it to puff up and then deflate during baking.
- Add Lemon Zest (Optional): If using, stir in the lemon zest. The lemon zest adds a bright, citrusy flavor that complements the blueberries and cream cheese beautifully.
Preparing the Blueberry Topping:
- Combine Ingredients: In a medium saucepan, combine the blueberries, sugar, cornstarch, and lemon juice.
- Cook the Topping: Cook over medium heat, stirring constantly, until the mixture thickens and the blueberries burst, about 5-7 minutes. The cornstarch helps to thicken the topping, creating a glossy and flavorful sauce.
- Let Cool Slightly: Remove from heat and let the blueberry topping cool slightly while you prepare the cream cheese filling. This prevents the hot topping from melting the cream cheese filling.
Assembling and Baking the Bars:
- Pour Cream Cheese Filling: Pour the cream cheese filling over the pre-baked crust, spreading it evenly.
- Spoon Blueberry Topping: Spoon the blueberry topping evenly over the cream cheese filling. You can swirl the topping into the cream cheese filling for a marbled effect, if desired.
- Prepare Streusel Topping (Optional): If using, in a small bowl, combine the flour, brown sugar, cold butter, and cinnamon (if using). Use a pastry blender or your fingertips to cut the butter into the flour mixture until it resembles coarse crumbs.
- Sprinkle Streusel Topping: Sprinkle the streusel topping evenly over the blueberry topping.
- Bake the Bars: Bake in the preheated oven for 30-35 minutes, or until the filling is set and the crust and streusel topping (if using) are golden brown. The center of the filling should be slightly jiggly but not liquid.
- Cool Completely: Let the bars cool completely in the pan on a wire rack before cutting into squares. This is important because the filling will continue to set as it cools. If you cut the bars while they’re still warm, they will be messy and difficult to handle.
- Chill (Optional): For even cleaner cuts, chill the bars in the refrigerator for at least 30 minutes before serving. This will firm up the filling even further.
Tips and Variations:
- Use High-Quality Ingredients: The better the quality of your ingredients, the better the taste of your bars. Use good quality butter, cream cheese, and fresh blueberries for the best results.
- Don’t Overbake: Overbaking will result in a dry and crumbly crust and a tough filling. Bake until the filling is set but still slightly jiggly in the center.
- Adjust Sweetness: Adjust the amount of sugar in the blueberry topping to your liking, depending on the sweetness of the blueberries.
- Add Other Berries: Feel free to substitute or add other berries to the blueberry topping, such as raspberries, strawberries, or blackberries.
- Lemon or Orange Zest: Experiment with different citrus zests in the cream cheese filling or blueberry topping. Orange zest would also be delicious!
- Nuts: Add chopped nuts, such as pecans or walnuts, to the streusel topping for added flavor and texture.
- Gluten-Free Option: To make these bars gluten-free, use a gluten-free all-purpose flour blend in the crust and streusel topping.
- Freezing Instructions: These bars can be frozen for up to 2 months. Wrap them tightly in plastic wrap and then in foil. Thaw in the refrigerator before serving.
Enjoy your delicious Blueberry Cream Cheese Bars!
Conclusion:
Well, there you have it! These Blueberry Cream Cheese Bars are truly something special, and I genuinely believe they deserve a spot in your regular baking rotation. Why? Because they’re the perfect trifecta of flavors and textures: the buttery, crumbly base, the tangy and creamy cheesecake filling, and the burst of sweet, juicy blueberries. It’s a symphony in every bite!
But beyond the incredible taste, what makes these bars a must-try is their versatility. They’re elegant enough to serve at a brunch or afternoon tea, yet casual enough to enjoy as a simple weeknight dessert. Plus, they’re surprisingly easy to make! No complicated techniques or fancy equipment required. Just a few simple steps and you’ll have a batch of these beauties ready to impress.
And speaking of versatility, don’t be afraid to get creative with your serving suggestions and variations! A dollop of whipped cream or a scoop of vanilla ice cream elevates these bars to a whole new level of indulgence. For a more sophisticated touch, try drizzling them with a lemon glaze or a white chocolate ganache.
Looking for variations? Absolutely! While I’m partial to blueberries, you can easily swap them out for other berries like raspberries, blackberries, or even strawberries. You could also add a sprinkle of chopped nuts to the crust for extra crunch, or a hint of lemon zest to the cream cheese filling for a brighter flavor. Consider adding a thin layer of blueberry jam between the crust and the cream cheese filling for an extra burst of blueberry flavor. Or, for a truly decadent treat, swirl in some Nutella or peanut butter into the cream cheese filling before baking. The possibilities are endless!
These Blueberry Cream Cheese Bars are also fantastic for meal prepping. They keep well in the refrigerator for several days, making them a perfect make-ahead dessert for parties or gatherings. You can even freeze them for longer storage! Just wrap them individually in plastic wrap and store them in a freezer-safe container. When you’re ready to enjoy them, simply thaw them in the refrigerator overnight.
I’ve poured my heart into perfecting this recipe, and I’m so excited for you to try it. I truly believe that once you taste these bars, you’ll be hooked! They’re the perfect balance of sweet, tangy, and creamy, and they’re sure to become a family favorite.
So, what are you waiting for? Gather your ingredients, preheat your oven, and get ready to bake up a batch of these irresistible Blueberry Cream Cheese Bars. I promise you won’t regret it!
And most importantly, I want to hear about your experience! Did you try any variations? Did you serve them to rave reviews? Share your photos and stories with me in the comments below. I can’t wait to see your creations and hear what you think! Happy baking!
Blueberry Cream Cheese Bars: The Ultimate Recipe and Baking Guide
Easy blueberry cream cheese bars with a buttery crust, creamy filling, and sweet blueberry topping. Streusel optional.
Ingredients
- 1 ½ cups all-purpose flour
- ½ cup (1 stick) cold unsalted butter, cut into cubes
- ¼ cup granulated sugar
- ¼ teaspoon salt
- 3-5 tablespoons ice water
- 8 ounces cream cheese, softened
- ½ cup granulated sugar
- 1 large egg
- 1 teaspoon vanilla extract
- ½ teaspoon lemon zest (optional)
- 2 cups fresh blueberries (or frozen, thawed and drained)
- ¼ cup granulated sugar
- 2 tablespoons cornstarch
- 1 tablespoon lemon juice
- ¼ cup all-purpose flour
- 2 tablespoons packed light brown sugar
- 2 tablespoons cold unsalted butter, cut into small pieces
- ¼ teaspoon ground cinnamon (optional)
Instructions
- In a large bowl, whisk together the flour, sugar, and salt.
- Cut in the cold, cubed butter using a pastry blender or your fingertips until the mixture resembles coarse crumbs.
- Gradually add the ice water, one tablespoon at a time, mixing gently after each addition, until the dough just comes together and is slightly moist but not sticky.
- Gently gather the dough into a ball, flatten it into a disc, wrap it in plastic wrap, and refrigerate for at least 30 minutes.
- Preheat oven to 375°F (190°C). Lightly grease and flour an 8×8 inch baking pan.
- On a lightly floured surface, roll out the chilled dough to fit the bottom of the prepared pan.
- Carefully transfer the rolled-out dough to the prepared pan and press it evenly into the bottom and slightly up the sides.
- Prick the bottom of the crust several times with a fork.
- Bake the crust for 10-12 minutes, or until it is lightly golden brown.
- In a medium bowl, beat the softened cream cheese and sugar together with an electric mixer until smooth and creamy.
- Beat in the egg and vanilla extract until well combined.
- If using, stir in the lemon zest.
- In a medium saucepan, combine the blueberries, sugar, cornstarch, and lemon juice.
- Cook over medium heat, stirring constantly, until the mixture thickens and the blueberries burst, about 5-7 minutes.
- Remove from heat and let the blueberry topping cool slightly.
- Pour the cream cheese filling over the pre-baked crust, spreading it evenly.
- Spoon the blueberry topping evenly over the cream cheese filling.
- If using streusel, in a small bowl, combine the flour, brown sugar, cold butter, and cinnamon (if using). Cut the butter into the flour mixture until it resembles coarse crumbs.
- Sprinkle the streusel topping evenly over the blueberry topping.
- Bake in the preheated oven for 30-35 minutes, or until the filling is set and the crust and streusel topping (if using) are golden brown.
- Let the bars cool completely in the pan on a wire rack before cutting into squares.
- Chill in the refrigerator for at least 30 minutes before serving for cleaner cuts (optional).
Notes
- Use high-quality ingredients for the best flavor.
- Don’t overbake the bars. Bake until the filling is set but still slightly jiggly in the center.
- Adjust the amount of sugar in the blueberry topping to your liking.
- Substitute or add other berries to the blueberry topping.
- Experiment with different citrus zests in the cream cheese filling or blueberry topping.
- Add chopped nuts to the streusel topping.
- Use a gluten-free all-purpose flour blend for a gluten-free option.
- These bars can be frozen for up to 2 months. Wrap them tightly in plastic wrap and then in foil. Thaw in the refrigerator before serving.