Apple Samoas might just be the most ingenious dessert mash-up you’ll encounter this season! Imagine everything you adore about that iconic caramel-drizzled, coconut-flaked, chocolate-striped cookie, but with a delightful, autumnal twist. I’m incredibly excited to present a recipe that takes the beloved flavors of fall – crisp, spiced apples – and marries them perfectly with the irresistible decadence of a classic Samoas cookie. This isn’t just another apple dessert; it’s a culinary revelation that respects the original’s charm while introducing a fresh, seasonal vibrancy.
The original Samoas cookie holds a special place in many hearts, known for its intricate layers of shortbread, caramel, toasted coconut, and dark chocolate. Our rendition, the Apple Samoas, pays homage to that beloved profile by infusing it with the comforting warmth of baked apples and fragrant spices like cinnamon and nutmeg. People absolutely adore this dish not only for its familiar yet innovative taste but also for its stunning presentation and satisfying textures – from the tender, spiced apple base to the chewy coconut and the rich chocolate finish. It’s a guaranteed showstopper that brings a cozy, gourmet touch to any gathering, perfect for those crisp autumn evenings or festive holiday tables.

Ingredients:
- For the Apple Base:
- 3-4 medium-sized firm, crisp apples (I love using Honeycrisp, Gala, or even Granny Smith for a lovely tart counterpoint to the sweetness. Choose what you enjoy most!)
- 1 tablespoon fresh lemon juice (to prevent browning)
- For the Homemade Caramel Sauce:
- 1 cup granulated sugar
- 1/4 cup water (just enough to moisten the sugar)
- 1/2 cup heavy cream (warmed slightly in the microwave or a small saucepan for easier incorporation)
- 4 tablespoons unsalted butter (cut into 4 pieces, at room temperature)
- 1 teaspoon pure vanilla extract
- 1/2 teaspoon sea salt (or to taste, a pinch can really elevate the caramel!)
- For the Toasted Coconut:
- 2 cups sweetened shredded coconut
- For the Chocolate Drizzle:
- 6 ounces good quality semi-sweet or dark chocolate (I prefer baking bars or chocolate chips, whatever melts smoothly)
- 1 teaspoon coconut oil (or neutral oil, like vegetable oil, to help with melting and consistency)
Preparing the Apples: The Crisp Foundation for Your Apple Samoas
- Choose Your Apples Wisely: The beauty of these Apple Samoas starts with the right apple. I always gravitate towards apples that are naturally crisp and have a good balance of sweetness and a hint of tartness. Honeycrisp or Gala are fantastic for their firm texture, which holds up beautifully to the toppings. If you prefer a sharper contrast to the rich caramel and chocolate, a Granny Smith apple would be an excellent choice. Their firm flesh and vibrant tartness really make the other flavors pop!
- Wash and Prepare: Begin by thoroughly washing your selected apples under cool running water. Pat them dry completely with a clean kitchen towel. A dry surface is crucial, especially when you’re preparing them for toppings.
- Core and Slice: Using an apple corer, carefully remove the core from each apple. If you don’t have an apple corer, simply slice the apples into quarters, then carefully cut out the core section from each quarter. Next, slice the apples into rounds or half-moon shapes, about 1/4 to 1/3 inch thick. I find this thickness perfect; it’s substantial enough to provide a satisfying bite but not so thick that it becomes unwieldy to eat. Aim for uniformity so each Apple Samoa has a consistent base.
- Prevent Browning: As you slice the apples, immediately toss them gently with the fresh lemon juice. This simple step is a game-changer as it prevents enzymatic browning, keeping your Apple Samoas looking fresh and appealing. Don’t drench them, just a light coating is all you need. Arrange the prepared apple slices on a parchment-lined baking sheet or a large platter. This makes them easy to access for assembly and helps ensure they don’t stick.
- Optional Gentle Softening (Chef’s Note): While I love the fresh, crisp bite of raw apple in my Apple Samoas, some might prefer a slightly softer base, reminiscent of a baked apple. If this is your preference, you can very lightly sauté the apple slices in a tiny bit of butter for about 1-2 minutes per side until just barely tender-crisp, or bake them at 350°F (175°C) for 5-7 minutes. Be careful not to overcook; they should still have some structural integrity. However, for a truly authentic “Samoa” experience where the cookie provides the crunch, keeping the apple fresh and crisp is usually my go-to!
Crafting the Perfect Caramel: The Heart of Your Apple Samoas
- Prepare Your Station: Before you start making the caramel, have all your ingredients measured and ready to go. Caramel-making moves quickly, and you won’t have time to measure things once the sugar starts to color. Make sure your warmed heavy cream and butter pieces are at arm’s reach. Also, have a whisk and a heat-resistant spatula ready.
- Start the Sugar Syrup (Wet Method): In a heavy-bottomed saucepan (this is important for even heat distribution and preventing scorching), combine the granulated sugar and water. Stir gently with a spoon or spatula just until the sugar is moistened. Avoid stirring excessively once it starts to boil, as this can cause crystallization.
- Cook the Sugar: Place the saucepan over medium-high heat. Allow the mixture to come to a boil. Do not stir the sugar once it begins to boil. If you see sugar crystals forming on the sides of the pan, you can gently brush them down with a pastry brush dipped in water. Watch the sugar mixture intently. It will first become clear, then start to bubble vigorously, and finally, the edges will begin to turn a beautiful amber color.
- Achieve the Right Color: Continue to cook, swirling the pan occasionally (do not stir!), until the sugar turns a rich, deep amber color. This usually takes about 8-12 minutes, but it varies depending on your stovetop. This is the most crucial step! A pale caramel will lack flavor, while an overly dark caramel will taste burnt and bitter. Aim for a color similar to a copper penny. As soon as it reaches this color, remove the pan from the heat immediately.
- Incorporate the Butter: Carefully and quickly add the pieces of room-temperature unsalted butter to the hot sugar. The mixture will bubble up vigorously, so be cautious! Whisk continuously until the butter is fully melted and incorporated. The butter helps stabilize the caramel and adds richness.
- Add the Warm Cream: Now, slowly pour the warmed heavy cream into the caramel mixture while continuously whisking. Again, the mixture will bubble up and seize slightly, which is completely normal. Keep whisking until the caramel becomes smooth and homogenous. Warming the cream beforehand helps prevent the mixture from seizing too much and makes for a smoother, quicker incorporation.
- Finish with Flavor: Once smooth, whisk in the pure vanilla extract and sea salt. The salt is incredibly important here; it balances the sweetness and deepens the flavor of the caramel beautifully. Taste and adjust the salt if needed – a little more can make a big difference!
- Cool the Caramel: Pour the finished caramel sauce into a heatproof bowl or jar. Allow it to cool at room temperature for at least 30-45 minutes, or until it has thickened to a spreadable consistency. As it cools, it will continue to thicken. You want it thick enough to cling to the apples without running off, but still soft and luscious. If it becomes too thick, you can gently warm it in a microwave for 10-15 seconds or over a very low heat on the stovetop, stirring until it reaches the desired consistency. This homemade caramel is truly what elevates your “Apple Samoas” to gourmet status!
Toasting the Coconut to Golden Perfection: The Signature Crunch
- Oven Method (My Preferred for Evenness): Preheat your oven to 300°F (150°C). Spread the sweetened shredded coconut in an even layer on a large, parchment-lined baking sheet. Parchment paper is your friend here, as it prevents sticking and makes for easy cleanup.
- Toast with Vigilance: Place the baking sheet in the preheated oven. Bake for 10-15 minutes, stirring every 3-5 minutes with a spatula. Coconut can go from perfectly golden to burnt in a matter of seconds, so do not walk away! You’re looking for a beautiful, even golden-brown color and a wonderfully fragrant aroma.
- Stovetop Method (Quicker, but Requires More Attention): Alternatively, you can toast the coconut in a large, dry skillet over medium-low heat. Add the shredded coconut to the skillet and spread it out evenly. Cook, stirring constantly, for 5-10 minutes, until it turns golden brown. Again, watch it like a hawk, as it toasts very quickly on the stovetop.
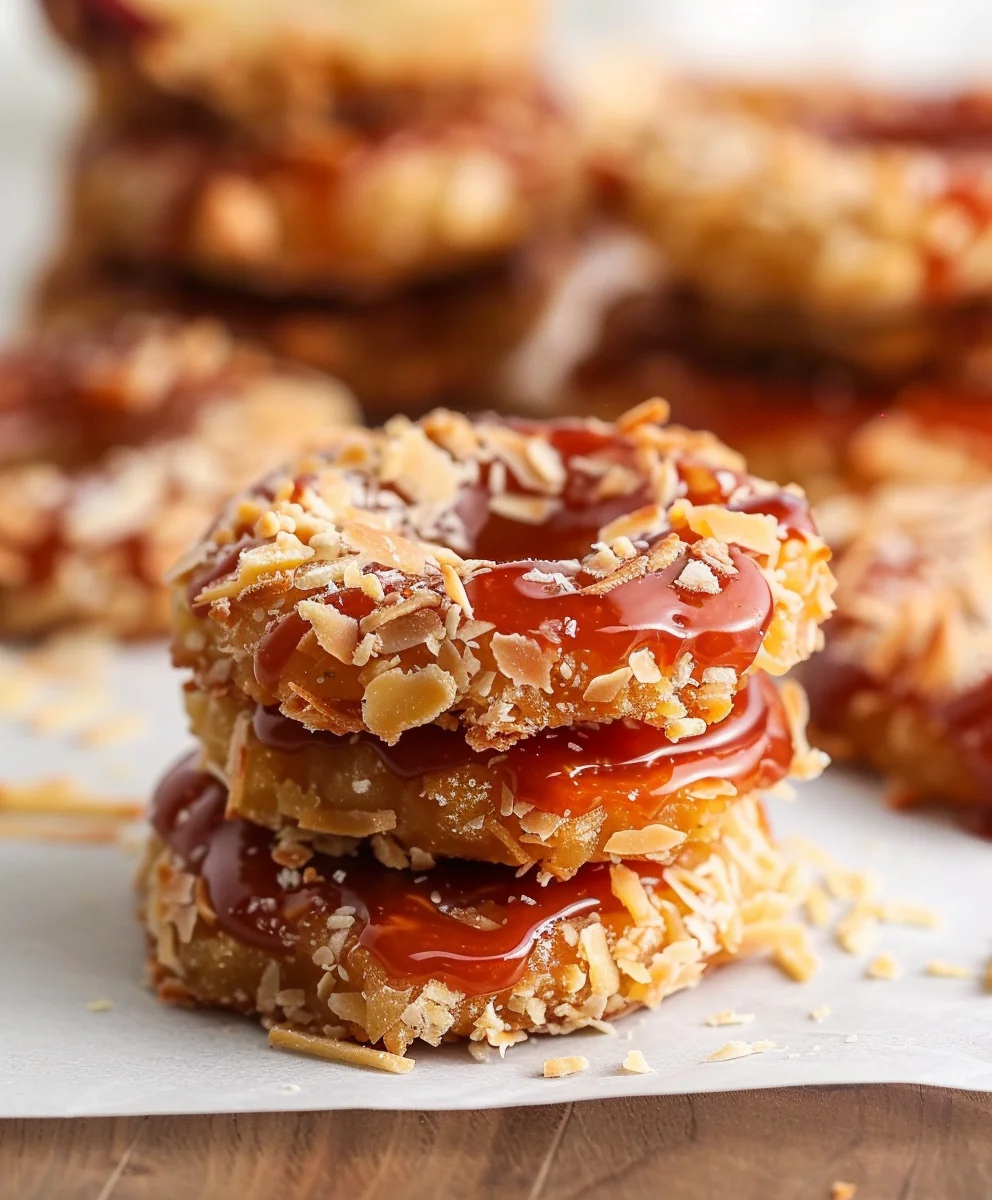
- Cool Down: Once toasted, immediately remove the coconut from the hot baking sheet or skillet and transfer it to a plate or shallow bowl to cool completely. This prevents it from continuing to cook and ensures it stays nice and crisp. The toasted coconut is absolutely essential for capturing that iconic “Samoas” flavor and texture in our “Apple Samoas.”
The Chocolate Drizzle: The Final Flourish for Your Apple Samoas
- Choose Your Chocolate: For the chocolate drizzle, I recommend using a good quality semi-sweet or dark chocolate. The better the chocolate, the smoother the melt and the richer the flavor. Chocolate chips work well, but baking bars tend to melt more smoothly.
- Melt the Chocolate (Double Boiler Method): My preferred method for melting chocolate is a double boiler. Set a heatproof bowl over a saucepan of simmering water, ensuring the bottom of the bowl does not touch the water. Add the chocolate and coconut oil to the bowl. Stir occasionally until the chocolate is completely melted and smooth. The coconut oil helps thin the chocolate slightly, making it easier to drizzle and giving it a lovely sheen.
- Melt the Chocolate (Microwave Method): If you’re short on time, you can use the microwave. Place the chocolate and coconut oil in a microwave-safe bowl. Microwave in 30-second intervals, stirring thoroughly after each interval, until the chocolate is mostly melted. Then, stir vigorously until completely smooth. Be very careful not to overheat, as chocolate can seize and become unusable.
- Prepare for Drizzling: Once the chocolate is perfectly melted and smooth, transfer it to a disposable piping bag, a small ziploc bag with a tiny corner snipped off, or a spoon for freehand drizzling. Having a controlled way to apply the chocolate will make your “Apple Samoas” look professionally finished.
Assembling Your Apple Samoas: Bringing It All Together
- Line Up Your Station: Arrange your prepared apple slices on your parchment-lined baking sheets or platters. Make sure they are not touching so you have ample space to work with each one. Have your cooled caramel sauce, toasted coconut, and melted chocolate ready. This assembly line approach makes the process smooth and enjoyable.
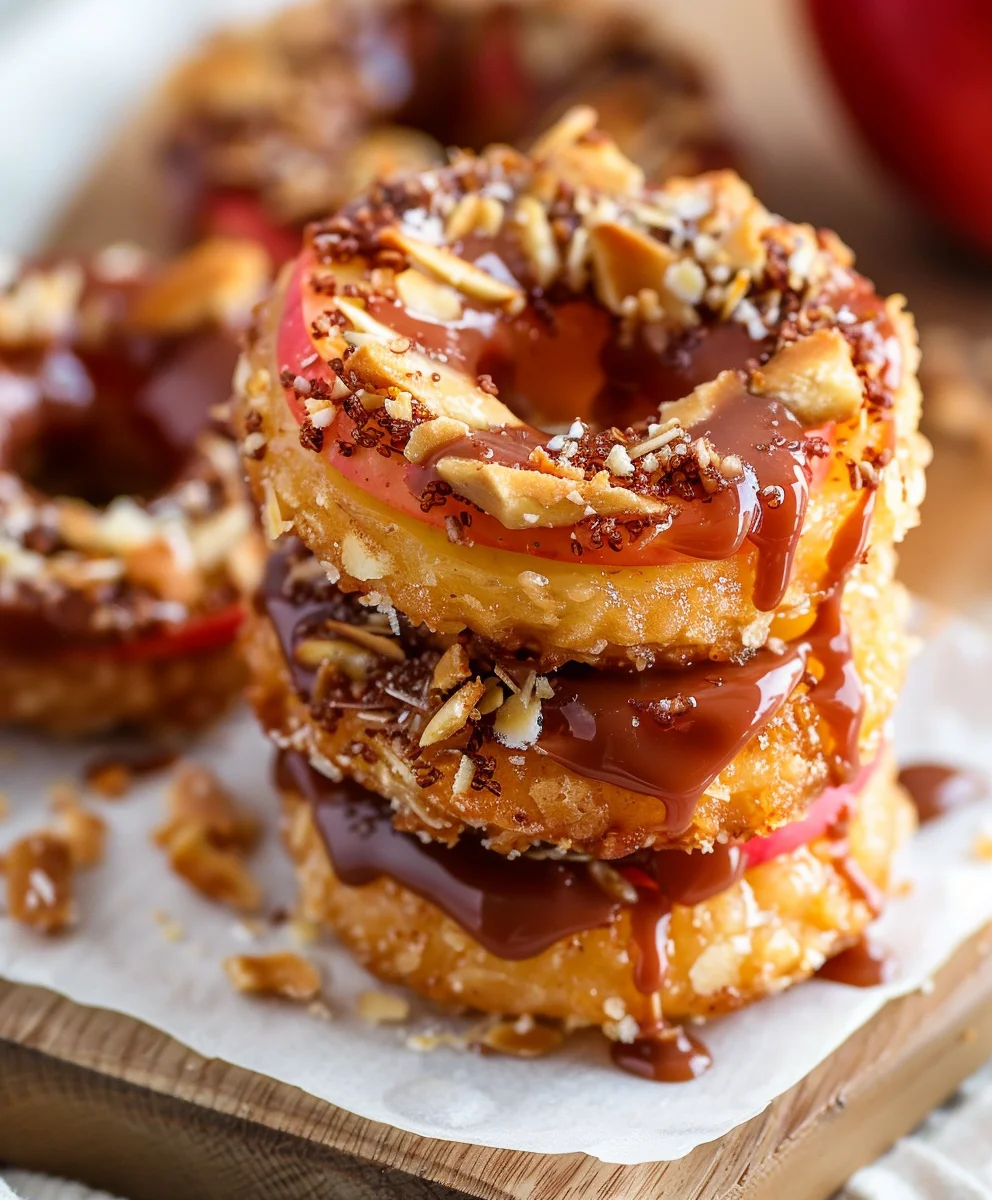
- Caramel Layer: Take a small spoon or a small offset spatula and generously spread a layer of the cooled, thickened caramel sauce over the top of each apple slice. You want enough caramel to provide a substantial flavor and sticky base, but not so much that it’s difficult to handle. Aim for an even coating that covers most of the apple surface, leaving a small border if desired. The “Apple Samoas” truly come alive with this rich, buttery caramel!
- Coconut Adhesion: Immediately after applying the caramel, gently press the caramel-coated side of each apple slice into your bowl of toasted coconut. Alternatively, you can sprinkle the toasted coconut generously over the caramel. Lightly pat the coconut to ensure it adheres well. You want a good, thick layer of that fragrant, crunchy coconut. This is where the magic of the “Apple Samoas” truly shines, mimicking the iconic texture of the original cookie.
- The Signature Drizzle: Now for the artistic part! Hold your piping bag or ziploc bag with the melted chocolate a few inches above the coconut-coated apple slices. Drizzle the chocolate back and forth over the top of each “Apple Samoa” in a decorative pattern, creating those distinct chocolate stripes. You can do zig-zags, straight lines, or even a lattice pattern – whatever you find most appealing. If using a spoon, a delicate flick of the wrist will create beautiful thin lines.
- Chill to Set: Once all your “Apple Samoas” are assembled, place the baking sheets or platters into the refrigerator. Chill for at least 20-30 minutes, or until the caramel and chocolate have fully set. This step is crucial for ensuring everything holds together beautifully and makes them much easier to handle and eat.
- Serving and Storage: Serve your delightful “Apple Samoas” chilled or at room temperature. They are best enjoyed fresh, but if you have any leftovers, store them in an airtight container in the refrigerator for up to 2-3 days. The apples will soften slightly over time, but the flavors will still be wonderfully delicious. These are truly a show-stopping treat that combine healthy fruit with indulgent dessert flavors, making them a perfect twist on a classic!
Conclusion:
Well, friends, we’ve reached the sweet end of our journey, and I truly hope you’re as excited as I am about this incredible recipe. If there’s one thing I want you to take away from our time together, it’s that this isn’t just another dessert; it’s a culinary experience waiting to happen. I poured my heart into perfecting every detail, ensuring that each bite delivers that perfect balance of textures and flavors. We’re talking about the comforting warmth of baked apples, the delightful chewiness of caramel, the satisfying crunch of toasted coconut, and the decadent richness of chocolate. It’s a symphony for your taste buds, an unexpected delight that will undoubtedly earn you rave reviews from anyone lucky enough to try it. This recipe truly stands out, transforming simple, wholesome ingredients into something truly extraordinary and memorable. It’s the kind of treat that makes you close your eyes and savor the moment, a little slice of pure joy in every bite. I genuinely believe it’s destined to become a new favorite in your baking repertoire, a go-to for special occasions and everyday indulgence alike.
What makes this particular creation so irresistible and an absolute must-try? It’s the harmonious fusion of familiar comfort with an exciting, gourmet twist. We’ve taken beloved flavors and elevated them to new heights, creating something that feels both nostalgic and refreshingly innovative. The way the tender apple mingles with the buttery, sweet caramel, perfectly complemented by the slightly exotic toastiness of the coconut, is nothing short of magical. And let’s not forget that drizzle of chocolate – it ties everything together with an elegant flourish, adding a touch of sophisticated indulgence. It’s a dessert that not only tastes incredible but also looks stunning, making it perfect for impressing guests or simply treating yourself to something truly special.
Now, let’s talk about how you can enjoy this masterpiece! While these treats are absolutely divine on their own, perhaps with a cup of freshly brewed coffee or a soothing herbal tea, don’t be afraid to elevate the experience further. Imagine serving them slightly warm, fresh from the oven, alongside a scoop of premium vanilla bean ice cream. The cold, creamy ice cream melting into the warm, gooey caramel and apple is a sensation you won won’t soon forget. A dollop of lightly sweetened whipped cream would also be an exquisite pairing, adding an airy counterpoint to the rich flavors. For a more sophisticated dessert experience, consider a small drizzle of high-quality balsamic glaze over the plate before serving; the subtle acidity can wonderfully cut through the sweetness, enhancing the overall profile.
But the beauty of this recipe extends beyond simple serving suggestions; it also offers incredible versatility for variations. Feeling a little adventurous? Try experimenting with different types of apples. While I love the crispness of Honeycrisp or Granny Smith, a sweeter Fuji or Gala could offer a softer, fruitier base. You could also play with the spices – a pinch of nutmeg or allspice alongside the cinnamon would add another layer of autumnal warmth. For those who adore nuts, a sprinkle of finely chopped pecans or walnuts, toasted alongside the coconut, would introduce an extra layer of crunch and nutty depth. If you’re a dark chocolate enthusiast, switch out the milk chocolate drizzle for a rich, bittersweet alternative. Or, for a truly decadent twist, consider adding a sprinkle of sea salt flakes just after the chocolate drizzle sets; the salty-sweet combination is utterly divine and addictive. The possibilities are truly endless, allowing you to tailor this incredible dessert to your personal preferences and creativity.
So, my dear readers, what are you waiting for? This is more than just a recipe; it’s an invitation to create something truly special in your own kitchen. I implore you to roll up your sleeves, gather your ingredients, and dive into the delightful process of making these incredible treats. Experience firsthand the joy of crafting something so utterly delicious, something that perfectly captures that nostalgic yet innovative essence. Whether you’re making them for a cozy evening at home, a festive gathering, or just because you deserve a treat, I promise you won’t be disappointed. These Apple Samoas are a revelation, offering a harmonious blend of flavors and textures that will captivate your senses. Once you’ve had the pleasure of tasting them, I would absolutely love to hear all about your experience! Please share your thoughts, your successes, and any creative variations you come up with. Tag me, tell your friends, post your pictures – let’s spread the joy of these amazing Apple Samoas far and wide! Happy baking, and enjoy every single delightful bite!
Apple Samoas Recipe
A delightful and easy twist on the classic Samoas cookie, featuring crisp apple slices topped with a creamy nut butter and maple syrup mixture, toasted coconut, and a chocolate drizzle. This recipe combines the beloved flavors of fall with the irresistible decadence of a Samoas, perfect for a quick and satisfying treat.
Ingredients
-
1 Honeycrisp or Pink Lady apple
-
⅓ cup unsweetened shredded coconut
-
3 Tablespoons almond butter, cashew butter, or seed butter
-
½ Tablespoon maple syrup
-
2 Tablespoons chocolate chips
-
½ teaspoon coconut oil
Instructions
-
Step 1
Wash, core, and slice one apple into ¼-⅓ inch rounds. Toss with fresh lemon juice to prevent browning. -
Step 2
Toast ⅓ cup shredded coconut in a dry skillet over medium-low heat or in a 300°F (150°C) oven for 5-10 minutes until golden brown. Stir frequently, then transfer to a plate to cool completely. -
Step 3
In a small bowl, mix 3 Tablespoons almond butter (or cashew/seed butter) with ½ Tablespoon maple syrup until smooth. -
Step 4
Melt 2 Tablespoons chocolate chips with ½ teaspoon coconut oil using a double boiler or microwave until smooth. -
Step 5
Spread the nut butter mixture evenly over each apple slice. Gently press the coated side into the toasted coconut to adhere. Drizzle with the melted chocolate in a decorative pattern. -
Step 6
Place the assembled Apple Samoas on a parchment-lined platter and chill in the refrigerator for 20-30 minutes until the toppings are set. Serve chilled or at room temperature. Store leftovers in an airtight container in the refrigerator for up to 2-3 days.
Important Information
Nutrition Facts (Per Serving)
It is important to consider this information as approximate and not to use it as definitive health advice.
Allergy Information
Please check ingredients for potential allergens and consult a health professional if in doubt.