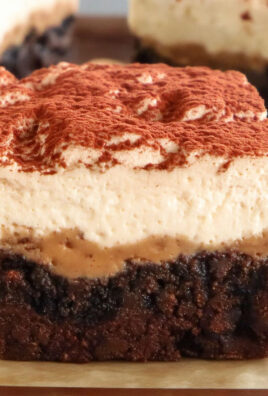
Cookie Butter Cheesecake Cups. Prepare to fall in love with a dessert that perfectly marries the creamy tang of classic cheesecake with the warm, spiced delight of cookie butter. Imagine sinking your spoon into a luscious, smooth filling, rich with the distinct caramel notes of your favorite spread, all nestled into convenient, individual portions. This recipe promises not just a treat for your taste buds, but also an elegant solution for entertaining or simply indulging a sweet craving!
The star ingredient, cookie butter, traces its origins back to Europe, specifically Belgium and the Netherlands, where spiced shortcrust cookies known as Speculoos or Biscoff have been a beloved tradition, especially during the holiday season. Transformed into a spread, its unique flavor profile—a delicate blend of cinnamon, nutmeg, ginger, and cloves—has since captured hearts globally. When this irresistible flavor meets the timeless appeal of a New York-style cheesecake, something truly magical happens.
People adore these delightful Cookie Butter Cheesecake Cups for countless reasons. Beyond their unique and sophisticated taste, they offer unparalleled convenience; no messy slicing is required, making them perfect for parties, potlucks, or an effortless individual dessert. The contrast of the silky cheesecake with the occasional crunch of cookie pieces (if you choose to swirl them in!) creates an irresistible texture sensation that keeps everyone coming back for more. I truly believe you’ll find this a delightful addition to your dessert repertoire!

Ingredients:
- For the Speculoos Crust:
- 1 ½ cups (approximately 180g) crushed speculoos cookies (such as Biscoff, about 25-30 cookies)
- ¼ cup (56g) unsalted butter, melted
- 1 tablespoon granulated sugar (optional, for a touch more sweetness and structure)
- For the Cookie Butter Cheesecake Filling:
- 24 ounces (three 8-ounce blocks) full-fat cream cheese, completely softened at room temperature
- ¾ cup (150g) granulated sugar
- 2 large eggs, at room temperature
- 1 teaspoon pure vanilla extract
- ½ cup (128g) smooth cookie butter (such as Biscoff spread), melted slightly if very firm
- ¼ cup (60g) sour cream or full-fat plain Greek yogurt, at room temperature
- 1 tablespoon all-purpose flour (my secret ingredient for preventing cracks!)
- Pinch of fine sea salt
- For the Topping & Garnish:
- ½ cup smooth cookie butter, gently melted for drizzling
- Whipped cream (optional, homemade or store-bought)
- Extra crushed speculoos cookies or cookie crumbs (optional, for a pretty sprinkle)
Preparing the Speculoos Crust
- Preheat Oven and Prepare Muffin Tin: My very first step is always to get the oven ready and the muffin tin prepared. I preheat my oven to 325°F (160°C). Then, I line a standard 12-cup muffin tin with paper liners. I often use high-quality, grease-resistant liners, or even double up on standard liners, to ensure these gorgeous Cookie Butter Cheesecake Cups release easily and maintain their shape perfectly.
- Crush the Speculoos Cookies: In a medium bowl, I combine the finely crushed speculoos cookies, the melted unsalted butter, and the optional granulated sugar. To get those perfectly fine crumbs, I usually pop the cookies into a food processor and pulse until they resemble fine sand. If you don’t have a food processor, a heavy-duty zip-top bag and a rolling pin work wonderfully – it’s a great way to release a little stress! The key here is consistency; fine crumbs bind better and create a more uniform crust. The melted butter acts as the glue, holding everything together, and the sugar adds a subtle crispness.
- Form the Crusts: Now, I take about 1-2 tablespoons of the crumb mixture and evenly distribute it into the bottom of each prepared muffin liner. Using the back of a spoon or a small, flat-bottomed measuring cup, I press the crumbs down very firmly into an even, compact layer. This is a crucial step! A well-pressed crust won’t crumble when you lift your Cookie Butter Cheesecake Cups from their liners. It creates a stable and delicious foundation for our creamy filling.
- Pre-bake the Crusts: I bake the crusts in the preheated oven for just 5-7 minutes. This short baking time helps to set the butter and makes the crust wonderfully crisp, preventing it from becoming soggy once the wet cheesecake filling is added. After baking, I remove the muffin tin from the oven and place it on a wire rack to allow the crusts to cool completely. It’s important for the crusts to be cool before adding the filling, as a warm crust can prematurely melt the filling and affect the final texture.
Making the Cookie Butter Cheesecake Filling
- Beat the Cream Cheese: In a large mixing bowl, using an electric mixer fitted with a paddle attachment (or a hand mixer), I beat the softened full-fat cream cheese on medium speed. This takes about 2-3 minutes, and I continue until it’s incredibly smooth, creamy, and completely lump-free. This step is paramount! If your cream cheese isn’t at true room temperature, you’ll end up with stubborn lumps, and your cheesecake won’t be as smooth and luxurious as we want for these Cookie Butter Cheesecake Cups. I make sure to frequently scrape down the sides and bottom of the bowl with a rubber spatula to ensure every bit of cream cheese is incorporated and smoothed out.
- Add Sugar Gradually: Next, I gradually add the granulated sugar to the cream cheese, beating on medium-low speed until it’s just combined and the mixture is smooth, usually about 1-2 minutes. I’m very careful not to overmix at this stage. Incorporating too much air into the batter can lead to expansion during baking, followed by contraction and potential cracking as the cheesecake cools. We want beautiful, pristine Cookie Butter Cheesecake Cups!
- Incorporate Eggs Carefully: I add the large eggs one at a time, beating on the lowest speed after each addition just until the yolk disappears and is fully incorporated. Again, it is vital not to overmix the eggs. Overmixing at this stage is the leading cause of cracks in cheesecakes. We’re aiming for a silky-smooth batter, not a fluffy one. Scrape down the bowl after each egg to ensure everything is evenly blended.
- Fold in Flavorings and Stabilizers: Finally, I stir in the pure vanilla extract, the slightly melted smooth cookie butter, the room temperature sour cream (or Greek yogurt), the all-purpose flour, and a pinch of fine sea salt. The sour cream adds a delightful tang and ensures a rich, moist texture, complementing the sweetness of the cookie butter beautifully. The tablespoon of all-purpose flour is my special ingredient; it acts as a stabilizer, providing a bit of structure that helps prevent the cheesecake from cracking as it bakes and cools. I mix these ingredients on low speed until they are just combined and the batter is homogeneous. One last scrape of the bowl with my spatula ensures every speck of flavor is perfectly integrated into what will become exquisite Cookie Butter Cheesecake Cups.
Baking the Cookie Butter Cheesecake Cups
- Fill the Crusts: I carefully spoon or scoop the smooth cheesecake filling evenly over the cooled speculoos crusts in the muffin tin. I fill each liner almost to the very top, leaving just a tiny bit of space for expansion. Using an ice cream scoop can be incredibly helpful for achieving even portions and keeping your workspace tidy. This ensures each of your Cookie Butter Cheesecake Cups is uniformly delicious.
- Bake the Cheesecakes: I place the muffin tin into the preheated 325°F (160°C) oven and bake for 20-25 minutes. The baking time can vary slightly depending on your oven, so I always keep a close eye on them. You’ll know your Cookie Butter Cheesecake Cups are perfectly baked when the edges appear set and slightly puffed, but the centers still have a very slight jiggle to them when you gently shake the muffin tin. This indicates that they are cooked through but will continue to set as they cool, ensuring a creamy, not dry, texture. Overbaking is a common pitfall and can lead to cracks and a dense texture, so trust the jiggle!
- Gradual Cooling Process: Once baked, I turn off the oven and immediately prop the oven door open a few inches. I leave the cheesecake cups inside the gradually cooling oven for an additional 15-20 minutes. This slow, gentle cooling prevents a sudden temperature drop, which is a major culprit for cheesecake cracks. After this period, I remove the muffin tin from the oven and transfer it to a wire rack to allow the Cookie Butter Cheesecake Cups to cool completely to room temperature. This gradual cooling is critical for maintaining their smooth, unblemished surface.
- Thorough Chilling: This is arguably the most important step for achieving perfectly set, flavorful Cookie Butter Cheesecake Cups. Once completely cool at room temperature, I transfer the muffin tin to the refrigerator and chill the cheesecakes for a minimum of 4 hours, but ideally, I let them chill overnight. Chilling allows the cheesecake to firm up properly, consolidates all those wonderful flavors, and gives them that iconic dense, creamy texture we all love. Patience is truly a virtue during this chilling phase – do not rush it!
Chilling and Assembling Your Cookie Butter Cheesecake Cups
- Remove from Muffin Tin: Once your Cookie Butter Cheesecake Cups are thoroughly chilled and set, I gently lift each one out of the muffin tin. The paper liners make this process incredibly easy, allowing for individual servings that are both neat and convenient to handle. If you doubled up on liners, you can peel off the outer one for a more refined presentation, or leave both for added sturdiness, especially if you’re transporting them.
- Prepare Cookie Butter Drizzle: For the ultimate topping, I gently warm the remaining ½ cup of smooth cookie butter. My preferred method is to place it in a microwave-safe bowl and heat it in 15-second intervals, stirring well after each, until it reaches a smooth, pourable consistency. Be careful not to overheat it, as it can become too thin or even seize. Alternatively, you can place the jar of cookie butter in a bowl of warm water for a few minutes until it’s liquid enough to drizzle. We’re aiming for that luscious, glossy finish.
- Drizzle and Garnish: Now for the grand finale! I generously drizzle the melted cookie butter over the top of each chilled Cookie Butter Cheesecake Cup. You can use a spoon to create rustic swirls, or for more precision, transfer the melted cookie butter into a small piping bag or a Ziploc bag with a tiny corner snipped off. For an extra touch of indulgence and visual appeal, I often add a dollop of freshly whipped cream on top, followed by a sprinkle of additional crushed speculoos cookies. These garnishes not only enhance the visual presentation but also add delightful textural contrast and amplify that beloved speculoos flavor. Each bite of these Cookie Butter Cheesecake Cups should be an experience!
Serving Suggestions and Tips for Perfect Cookie Butter Cheesecake Cups
- Optimal Serving Temperature: While these Cookie Butter Cheesecake Cups are undeniably best served cold, I sometimes like to let them sit out at room temperature for about 10-15 minutes before serving. This slight warming allows the cheesecake to soften just a touch, enhancing its creamy texture and bringing out the full depth of the rich cookie butter flavor. They make for a truly fantastic individual dessert, perfect for gatherings, potlucks, or simply as a special treat for yourself and your loved ones after a delicious meal.
- Storage Guidelines: Any leftover Cookie Butter Cheesecake Cups should be stored in an airtight container in the refrigerator. They will remain wonderfully fresh and delicious for up to 5 days. In my experience, the flavors often meld and deepen over time, making them almost even better on the second or third day! Always ensure they are covered to prevent them from drying out or absorbing any unwanted odors from other items in your refrigerator.
- Excellent Make-Ahead Option: This recipe is an absolute dream for meal prepping or entertaining! You can prepare the entire batch of Cookie Butter Cheesecake Cups, bake them, and chill them thoroughly overnight. Then, on the day you plan to serve them, simply add the final cookie butter drizzle and any desired garnishes right before your guests arrive. This strategy significantly reduces stress on the day of your event, allowing you more time to focus on other preparations or simply to relax and enjoy the occasion.
- Creative Variations and Flavor Enhancements: If you’re feeling a bit adventurous and want to put your own spin on these already amazing Cookie Butter Cheesecake Cups, consider a few delightful variations. For an added layer of sweetness and textural intrigue, you could gently fold in some finely chopped white chocolate chips or even a sprinkle of toasted pecans into the cheesecake batter just before baking. A small swirl of raspberry or cherry jam on top of the cookie butter drizzle would offer a lovely contrasting fruity tartness. Another idea is to mix a tiny bit of flaky sea salt into your cookie butter drizzle to create a delightful salted cookie butter effect. The beauty of these individual cheesecake cups lies in their adaptability, allowing you to customize them while still enjoying the core, irresistible flavor of cookie butter cheesecake.
- Troubleshooting Common Cheesecake Issues:
Preventing Cracks in Your Cookie Butter Cheesecake Cups:
The dreaded crack is the bane of many a cheesecake baker. To ensure your Cookie Butter Cheesecake Cups remain beautifully smooth, remember these critical tips:
- Room Temperature Ingredients: Always, always ensure your cream cheese and eggs are at true room temperature. This is fundamental for a smooth, lump-free batter.
- Avoid Overmixing: This cannot be stressed enough, especially after adding the eggs. Overmixing incorporates too much air, which expands in the oven and then collapses, causing cracks. Mix just until combined.
- Gradual Cooling: Sudden temperature changes are a prime culprit. Utilizing the oven cooling method (leaving them in the turned-off oven with the door ajar) is incredibly effective for a gentle transition.
- Thorough Chilling: Proper chilling allows the cheesecake structure to fully set and firm up without stress, which helps prevent cracks from forming later.
Addressing Crust Sticking to Liners:
If you find your delicious speculoos crust is sticking, you might not have pressed it firmly enough, or the quality of your paper liners might be the issue. Using high-quality, grease-resistant liners, or even doubling up on standard liners, can make a significant difference. Also, ensuring the crust is fully cooled after its pre-bake helps the butter set, making it less likely to stick.
Achieving a Smooth Cookie Butter Drizzle:
For that perfect, glossy finish on your Cookie Butter Cheesecake Cups, melt the cookie butter gently. If it gets too hot, it can become oily or seize up. Short bursts in the microwave or a warm water bath are ideal. If it does become too thick, a tiny splash of neutral oil (like canola or vegetable) or a bit of milk, stirred in vigorously, can often help to restore its smooth, drizzly consistency.
- Enjoying Your Delicious Creation: Ultimately, crafting these Cookie Butter Cheesecake Cups is a delightful culinary journey. The harmonious blend of the crisp, spiced speculoos crust, the impossibly rich and creamy cookie butter-infused cheesecake filling, and the luxurious cookie butter drizzle on top creates a dessert that is truly irresistible. I sincerely hope you find as much joy in making and sharing these delightful treats as I do. They are an absolute crowd-pleaser and a perfect, sophisticated way to satisfy any sweet craving.
Conclusion:
And just like that, we’ve reached the sweet end of our journey, but truly, it’s just the beginning of a delicious adventure for you! I genuinely hope you’ve enjoyed learning how to create these sensational Cookie Butter Cheesecake Cups. I’m absolutely convinced that once you try them, they’ll instantly become a cherished go-to in your dessert repertoire. Why are they a must-try? Because they masterfully combine the irresistible, spiced caramel notes of cookie butter with the creamy, tangy lusciousness of a classic cheesecake, all wrapped up in a perfectly portioned, adorable package. They’re everything you love about cheesecake, without the fuss of slicing a large cake, making them ideal for gatherings, dinner parties, or simply a luxurious treat for yourself after a long day.
The beauty of these mini cheesecakes lies not just in their phenomenal taste, but also in their relative ease of preparation and stunning presentation. You get that gourmet dessert parlor vibe right in your own kitchen, with minimal effort. The rich, velvety texture of the cheesecake filling, set against the delightful crunch of the cookie crust, creates a symphony of textures that’s simply addictive. And let’s not forget that distinctive cookie butter flavor – it’s a warm hug in dessert form, comforting yet sophisticated, appealing to almost every palate. Whether you’re a seasoned baker or just dipping your toes into the world of desserts, these cups offer a rewarding and incredibly satisfying baking experience. They truly encapsulate indulgence without intimidation.
Serving Up Sweet Perfection: Ideas and Variations
Once your delectable Cookie Butter Cheesecake Cups are perfectly chilled and ready, the fun doesn’t have to stop there! While they are absolutely divine on their own, a few simple additions can elevate them even further. I love serving them straight from the refrigerator, ensuring that firm, creamy texture is at its peak. For a touch of elegance, a dollop of freshly whipped cream on top is always a winner. You can even sweeten the cream lightly and add a whisper of vanilla extract to complement the cookie butter perfectly. Another fantastic idea is to drizzle a little extra melted cookie butter over each cup just before serving – the warm, glossy drizzle against the cold cheesecake is a visual and taste sensation. Or, for a lovely textural contrast and an extra layer of flavor, crush a few extra speculoos cookies and sprinkle them over the whipped cream or directly on the cheesecake surface. Imagine the slight crunch with every bite!
Don’t be afraid to get creative with your garnishes! A dusting of cinnamon or nutmeg can enhance the spiced notes of the cookie butter, or for a pop of color and freshness, a few fresh berries like raspberries or blueberries can provide a delightful tart counterpoint to the sweetness. For those who love a bit of chocolate, a light shaving of dark chocolate over the top would be absolutely divine. If you’re feeling adventurous with variations, you could try experimenting with the crust – while the speculoos cookie crust is quintessential, a graham cracker crust or even an Oreo crust could offer an interesting twist. For a truly decadent spin, consider folding in some mini chocolate chips or finely chopped nuts into the cheesecake batter itself before baking. These tiny culinary tweaks ensure that your Cookie Butter Cheesecake Cups can be customized to suit any mood or occasion, proving their versatility and enduring appeal.
Your Turn: Bake, Share, and Inspire!
Now that you have all the tools and inspiration, it’s your moment to shine in the kitchen! I genuinely encourage you to roll up your sleeves, gather your ingredients, and embark on the joyous journey of making these incredible Cookie Butter Cheesecake Cups. There’s an immense satisfaction that comes from creating something so delicious and beautiful with your own hands. Don’t be shy – treat yourself, impress your family, or delight your friends with these perfectly portioned marvels. I promise you, the smiles and compliments you’ll receive will be worth every moment of effort. Baking should be an enjoyable, fulfilling experience, and this recipe, I believe, embodies that spirit perfectly.
Once you’ve experienced the magic of these cheesecake cups, I would absolutely love to hear about it! Please, come back and share your experiences. Did you try a fun variation? What was your favorite part of making them? How did your guests react? Your feedback, photos, and stories inspire me and our entire community of fellow food enthusiasts. Let’s build a tapestry of shared culinary adventures. Happy baking, my friends, and get ready to fall head over heels for these truly irresistible Cookie Butter Cheesecake Cups!
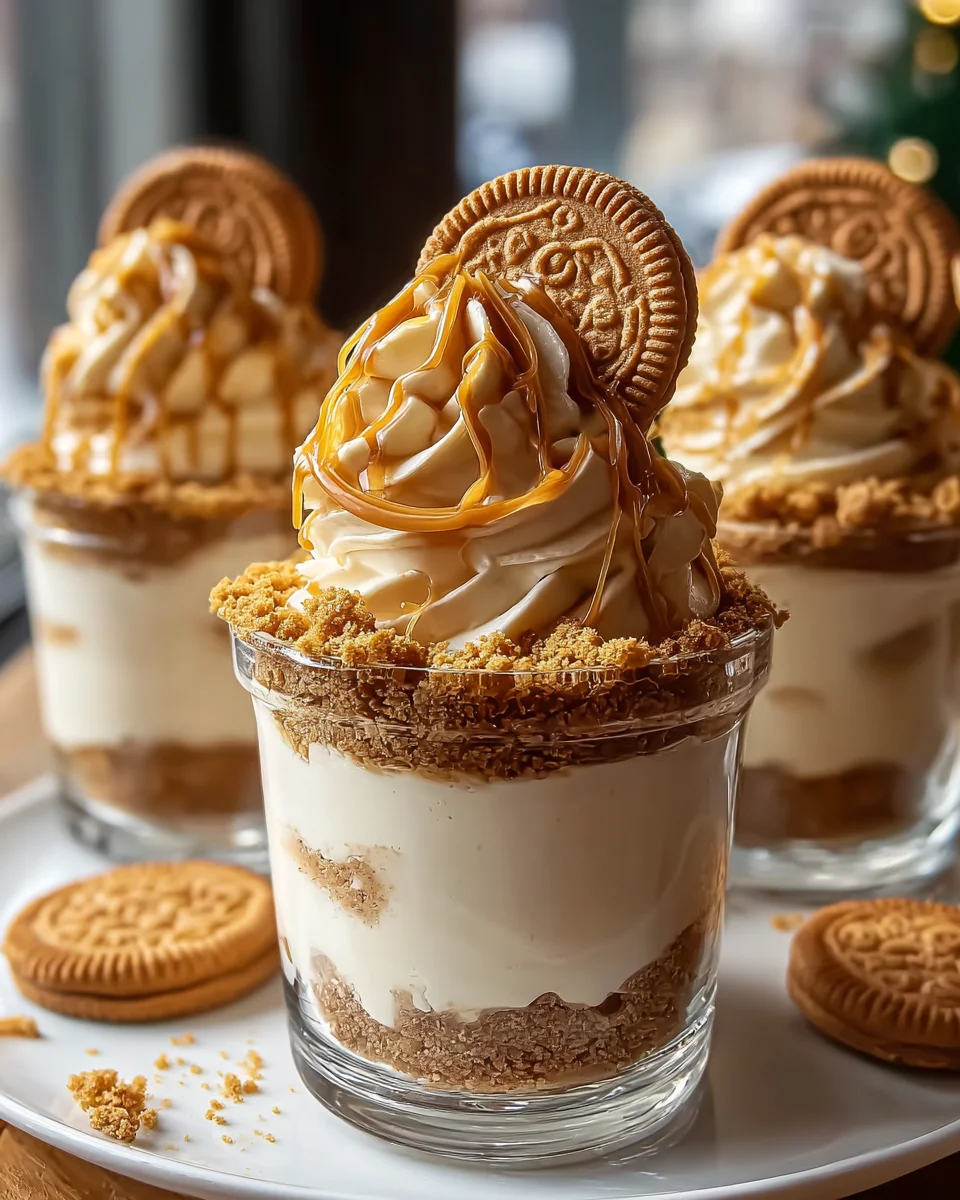
Cookie Butter Cheesecake Cups
They’re rich, creamy, and no-bake, layered with buttery cookie crumbs, fluffy cheesecake mousse, and swirls of cookie butter in every bite. Served in individual cups, they’re perfect for parties, holiday treats, or just a cozy night at home when you’re craving something sweet but simple.
Ingredients
Instructions
Important Information
Nutrition Facts (Per Serving)
It is important to consider this information as approximate and not to use it as definitive health advice.
Allergy Information
Please check ingredients for potential allergens and consult a health professional if in doubt.