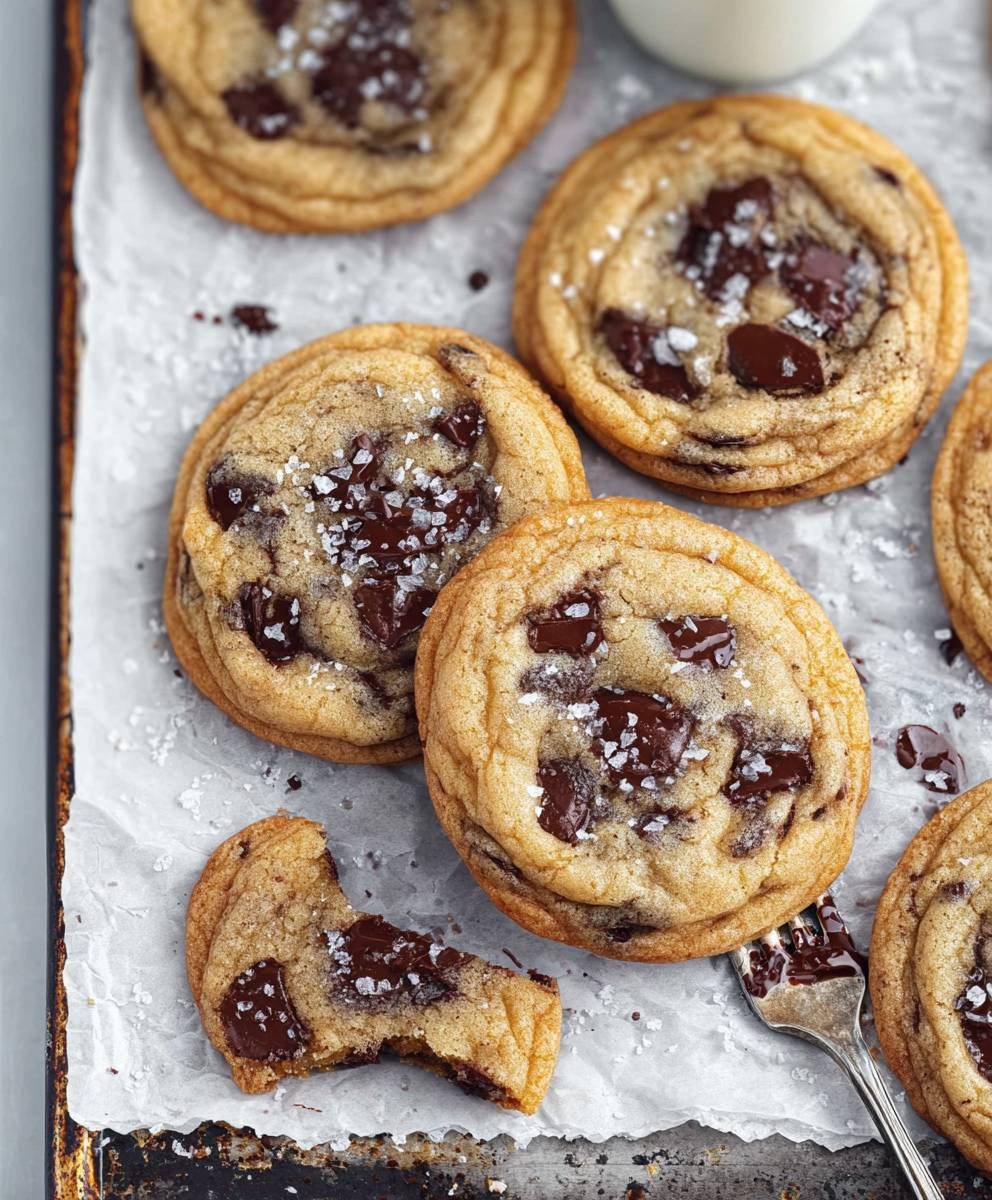
Best chocolate chip cookies, is there really such a thing? Well, I’m here to tell you, yes! And I’m about to share my secret weapon for achieving chocolate chip cookie perfection. Imagine sinking your teeth into a warm, gooey cookie, the rich chocolate melting on your tongue, the buttery dough practically dissolving in your mouth. That, my friends, is the promise of this recipe.
The humble chocolate chip cookie, a true American classic, has a surprisingly recent history. Legend has it that Ruth Graves Wakefield, of the Toll House Inn in Massachusetts, invented the cookie in the 1930s when she chopped up a Nestle chocolate bar and added it to her butter cookie dough. Whether that’s entirely true or not, the chocolate chip cookie quickly became a beloved treat, spreading across the nation and eventually the world.
What makes the best chocolate chip cookies so irresistible? It’s the perfect combination of textures – a slightly crisp edge giving way to a soft, chewy center. It’s the comforting aroma that fills your kitchen as they bake. And, of course, it’s the sheer joy of biting into a warm, chocolate-studded masterpiece. This recipe delivers on all fronts. It’s easy to follow, uses simple ingredients, and guarantees a batch of cookies that will disappear faster than you can say “chocolate chip.” So, grab your mixing bowl, preheat your oven, and let’s get baking!

Ingredients:
- 2 1/4 cups all-purpose flour
- 1 teaspoon baking soda
- 1 teaspoon salt
- 1 cup (2 sticks) unsalted butter, softened
- 3/4 cup granulated sugar
- 3/4 cup packed brown sugar
- 1 teaspoon vanilla extract
- 2 large eggs
- 2 cups chocolate chips (semi-sweet or your favorite)
- 1 cup chopped walnuts or pecans (optional)
Preparing the Dough:
Alright, let’s get started! First things first, we need to get all our dry ingredients combined. This ensures that the baking soda and salt are evenly distributed throughout the dough, which is crucial for the perfect cookie texture and flavor.
- Combine Dry Ingredients: In a medium bowl, whisk together the flour, baking soda, and salt. Whisking is important here, as it helps to aerate the flour and prevent any clumps of baking soda from forming. Set this bowl aside for now.
Now, for the wet ingredients! This is where the magic happens, and we start building that rich, buttery flavor that makes chocolate chip cookies so irresistible.
- Cream Butter and Sugars: In a large bowl (or the bowl of your stand mixer), cream together the softened butter, granulated sugar, and brown sugar until light and fluffy. This usually takes about 3-5 minutes with an electric mixer. The mixture should be noticeably lighter in color and have a smooth, almost whipped texture. Don’t rush this step! Properly creaming the butter and sugar incorporates air into the dough, which contributes to a softer, chewier cookie.
Pro Tip: Make sure your butter is truly softened, but not melted. It should be soft enough to easily press a finger into, but still hold its shape. If the butter is too melted, the cookies will spread too thin while baking.
- Add Vanilla and Eggs: Beat in the vanilla extract until combined. Then, add the eggs one at a time, beating well after each addition. Make sure each egg is fully incorporated before adding the next. This helps to create a smooth and emulsified dough.
Time to bring the wet and dry ingredients together! We’ll do this gradually to prevent overmixing, which can lead to tough cookies.
- Combine Wet and Dry Ingredients: Gradually add the dry ingredients to the wet ingredients, mixing on low speed until just combined. Be careful not to overmix! Overmixing develops the gluten in the flour, resulting in a tougher cookie. Stop mixing as soon as you no longer see streaks of flour.
And finally, the best part – adding the chocolate chips (and nuts, if you’re using them)!
- Stir in Chocolate Chips and Nuts: Stir in the chocolate chips and nuts (if using) until evenly distributed throughout the dough. I like to use a spatula for this step to avoid overmixing.
Chilling the Dough (Optional but Recommended):
This step is optional, but I highly recommend it! Chilling the dough allows the flavors to meld together and also helps to prevent the cookies from spreading too thin while baking. Trust me, it makes a difference!
- Chill the Dough: Cover the bowl with plastic wrap and refrigerate for at least 30 minutes, or up to 24 hours. The longer you chill the dough, the more flavorful and chewy the cookies will be.
Pro Tip: If you’re short on time, even 30 minutes of chilling will make a noticeable difference. But if you have the time, chilling the dough overnight is ideal.
Baking the Cookies:
Alright, the moment we’ve all been waiting for – baking those delicious cookies!
- Preheat Oven: Preheat your oven to 375°F (190°C).
While the oven is preheating, let’s get the dough ready to bake.
- Prepare Baking Sheets: Line baking sheets with parchment paper or silicone baking mats. This prevents the cookies from sticking and makes cleanup a breeze.
Now, for shaping the cookies. You can use a cookie scoop for uniform cookies, or just use a spoon to drop rounded tablespoons of dough onto the prepared baking sheets.
- Drop Dough onto Baking Sheets: Drop rounded tablespoons of dough onto the prepared baking sheets, leaving about 2 inches between each cookie. This allows the cookies to spread without running into each other.
Pro Tip: For perfectly round cookies, gently press down on the dough balls with the bottom of a glass before baking. You can also sprinkle a few extra chocolate chips on top for a more appealing look.
- Bake: Bake for 9-11 minutes, or until the edges are golden brown and the centers are still slightly soft. The baking time will vary depending on your oven, so keep a close eye on them.
Important: Don’t overbake the cookies! They will continue to cook slightly as they cool on the baking sheet.
- Cool: Let the cookies cool on the baking sheets for a few minutes before transferring them to a wire rack to cool completely. This allows them to firm up slightly and prevents them from breaking.
Serving and Storing:
Congratulations, you’ve just baked a batch of amazing chocolate chip cookies! Now it’s time to enjoy them.
Serving: Serve the cookies warm or at room temperature. They’re delicious on their own, or with a glass of milk or a scoop of ice cream.
Storing: Store the cookies in an airtight container at room temperature for up to 3 days. They can also be frozen for longer storage. To freeze, place the cooled cookies in a single layer on a baking sheet and freeze until solid. Then, transfer them to a freezer bag or container. They can be frozen for up to 2 months.
Enjoy! I hope you enjoy these cookies as much as I do! They’re perfect for any occasion, from a simple afternoon snack to a special celebration.
Conclusion:
And there you have it! These aren’t just any chocolate chip cookies; they’re a symphony of textures and flavors that will redefine your cookie expectations. From the crisp edges to the gooey center, every bite is an experience. I truly believe this recipe is a must-try because it delivers that perfect balance of sweet and salty, soft and chewy, that we all crave in a truly exceptional cookie. It’s the kind of cookie that brings back childhood memories while simultaneously elevating your current baking game.
But what truly sets these apart is their versatility. While they’re absolutely divine on their own, warm from the oven, consider serving them with a scoop of vanilla bean ice cream for an extra decadent treat. Or, crumble them over a bowl of creamy yogurt for a delightful breakfast or snack. For a truly indulgent experience, try sandwiching a scoop of your favorite ice cream between two cookies – instant ice cream sandwich perfection!
If you’re feeling adventurous, there are endless variations you can explore. Swap out the semi-sweet chocolate chips for dark chocolate chunks for a richer, more intense flavor. Add a sprinkle of sea salt on top before baking to enhance the sweetness and create a delightful salty-sweet contrast. Or, incorporate chopped nuts like walnuts or pecans for added texture and a nutty flavor. For a hint of spice, try adding a pinch of cinnamon or nutmeg to the dough. You could even add a tablespoon of instant espresso powder to the dough for a mocha-flavored cookie. The possibilities are truly endless!
These cookies are also fantastic for gifting. Imagine presenting a beautifully wrapped box of these freshly baked treats to a friend, neighbor, or loved one. It’s a simple gesture that speaks volumes and is guaranteed to bring a smile to their face. They’re also perfect for bake sales, potlucks, or any occasion where you want to impress with your baking skills.
I’ve poured my heart and soul into perfecting this recipe, and I’m confident that you’ll love it as much as I do. It’s more than just a recipe; it’s an invitation to create moments of joy and connection with those you care about. It’s about the simple pleasure of sharing a warm, delicious cookie with someone special.
So, what are you waiting for? Preheat your oven, gather your ingredients, and get ready to experience the magic of these incredible best chocolate chip cookies. I promise you won’t be disappointed.
And most importantly, I want to hear about your experience! Did you try the recipe? Did you make any variations? What did you think? Share your photos, comments, and feedback in the comments section below. I can’t wait to see your creations and hear your stories. Happy baking! Let me know if you have any questions, and I’ll do my best to help. I’m excited for you to try these!
Best Chocolate Chip Cookies: The Ultimate Recipe Guide
Soft, chewy chocolate chip cookies with golden edges. Optional walnuts or pecans add a delightful crunch.
Ingredients
- 2 1/4 cups all-purpose flour
- 1 teaspoon baking soda
- 1 teaspoon salt
- 1 cup (2 sticks) unsalted butter, softened
- 3/4 cup granulated sugar
- 3/4 cup packed brown sugar
- 1 teaspoon vanilla extract
- 2 large eggs
- 2 cups chocolate chips (semi-sweet or your favorite)
- 1 cup chopped walnuts or pecans (optional)
Instructions
- Combine Dry Ingredients: In a medium bowl, whisk together the flour, baking soda, and salt. Set aside.
- Cream Butter and Sugars: In a large bowl (or stand mixer), cream together the softened butter, granulated sugar, and brown sugar until light and fluffy (3-5 minutes).
- Add Vanilla and Eggs: Beat in the vanilla extract until combined. Add the eggs one at a time, beating well after each addition.
- Combine Wet and Dry Ingredients: Gradually add the dry ingredients to the wet ingredients, mixing on low speed until just combined. Do not overmix.
- Stir in Chocolate Chips and Nuts: Stir in the chocolate chips and nuts (if using) until evenly distributed.
- Chill the Dough (Optional): Cover the bowl with plastic wrap and refrigerate for at least 30 minutes, or up to 24 hours.
- Preheat Oven: Preheat your oven to 375°F (190°C).
- Prepare Baking Sheets: Line baking sheets with parchment paper or silicone baking mats.
- Drop Dough onto Baking Sheets: Drop rounded tablespoons of dough onto the prepared baking sheets, leaving about 2 inches between each cookie.
- Bake: Bake for 9-11 minutes, or until the edges are golden brown and the centers are still slightly soft.
- Cool: Let the cookies cool on the baking sheets for a few minutes before transferring them to a wire rack to cool completely.
Notes
- Butter: Ensure butter is softened, not melted.
- Creaming: Properly creaming the butter and sugar incorporates air, leading to softer cookies.
- Chilling: Chilling the dough is highly recommended for flavor development and to prevent excessive spreading.
- Overmixing: Avoid overmixing the dough after adding the dry ingredients to prevent tough cookies.
- Baking Time: Baking time may vary depending on your oven. Watch closely to avoid overbaking.
- Serving: Serve warm or at room temperature.
- Storing: Store in an airtight container at room temperature for up to 3 days or freeze for up to 2 months.