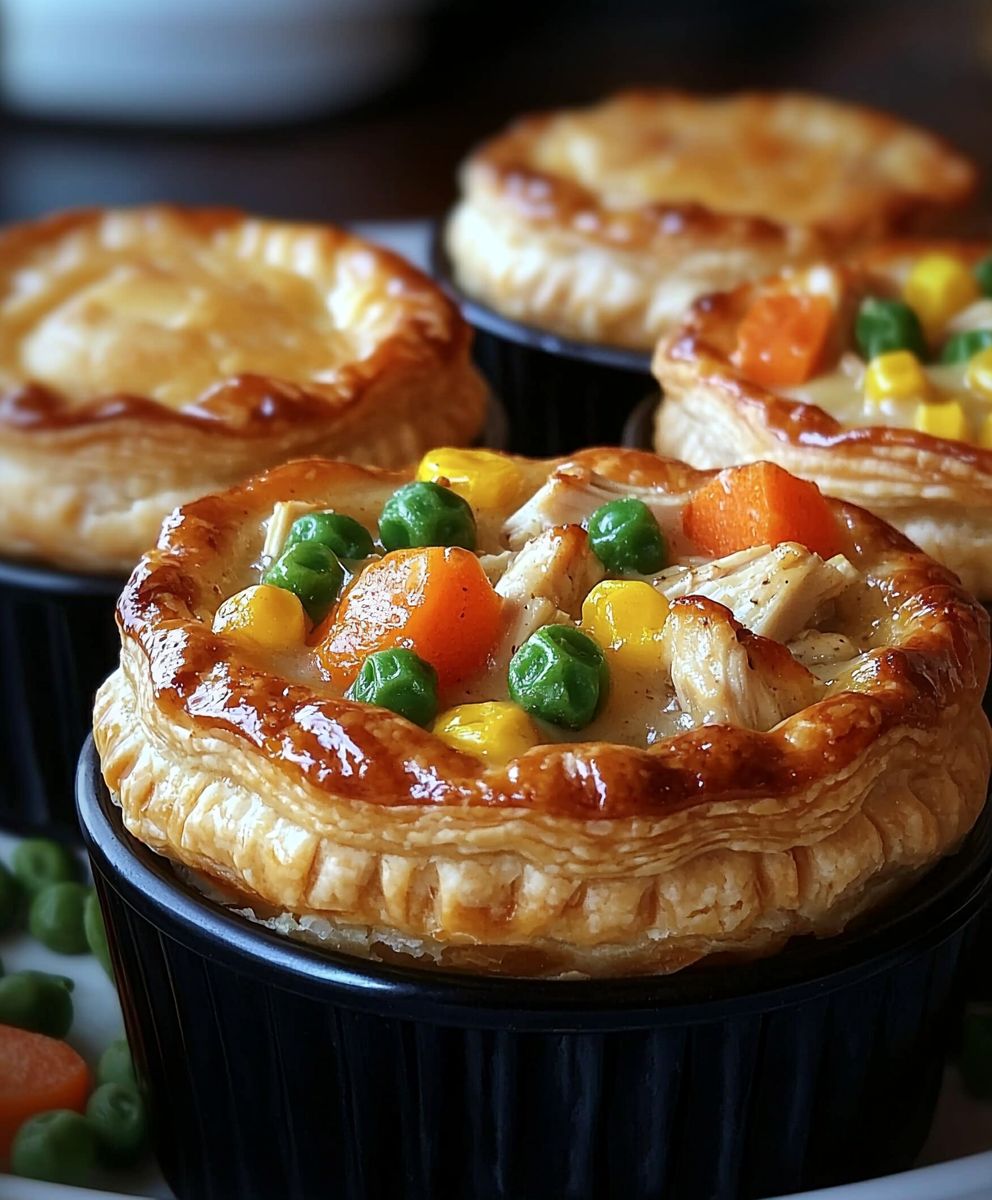
Chicken Pot Pie Muffins: the ultimate comfort food, miniaturized and ready in a fraction of the time! Forget spending hours crafting a traditional pot pie; these delightful muffins deliver all the creamy, savory goodness you crave in a perfectly portioned, grab-and-go format.
The concept of a pot pie, a savory filling encased in a flaky crust, has roots stretching back to ancient Greece. However, the version we know and love today, with its rich gravy and tender vegetables, truly blossomed in medieval England. It was a way to use leftover meats and vegetables, transforming them into a hearty and satisfying meal. While the traditional pot pie is a labor of love, these Chicken Pot Pie Muffins offer a modern twist, making this classic dish accessible even on the busiest weeknights.
What’s not to love? The creamy, flavorful filling, bursting with tender chicken and colorful vegetables, is perfectly complemented by a golden, flaky crust. The individual muffin format makes them incredibly convenient for lunchboxes, quick dinners, or even appetizers. Plus, they’re undeniably fun to eat! Whether you’re a seasoned cook or a kitchen novice, these muffins are guaranteed to be a crowd-pleaser. Get ready to experience the comforting flavors of chicken pot pie in a brand new, irresistibly delicious way!

Ingredients:
- For the Filling:
- 1 tablespoon olive oil
- 1 cup chopped onion
- 1 cup chopped carrots
- 1 cup chopped celery
- 1 pound boneless, skinless chicken breasts, cooked and diced (about 2 cups)
- 1 cup frozen peas
- 1 cup frozen corn
- 1/2 cup all-purpose flour
- 3 cups chicken broth
- 1/2 cup heavy cream
- 1 teaspoon dried thyme
- 1/2 teaspoon dried rosemary
- 1/4 teaspoon salt, or to taste
- 1/4 teaspoon black pepper, or to taste
- For the Biscuit Topping:
- 2 cups all-purpose flour
- 1 tablespoon baking powder
- 1 teaspoon salt
- 1/2 cup (1 stick) cold unsalted butter, cut into cubes
- 3/4 cup milk
- 1 large egg, beaten (for egg wash)
Preparing the Chicken Pot Pie Filling:
- Sauté the Vegetables: First, grab a large skillet or pot and heat the olive oil over medium heat. Add the chopped onion, carrots, and celery. Cook, stirring occasionally, until the vegetables are softened, about 5-7 minutes. You want them to be tender but not browned. This step is crucial for building a flavorful base for our pot pie filling.
- Add the Chicken and Vegetables: Now, add the diced cooked chicken, frozen peas, and frozen corn to the skillet. Stir everything together to combine. Make sure the chicken is evenly distributed among the vegetables.
- Create the Roux: Sprinkle the flour over the chicken and vegetables. Stir well to coat everything evenly. This will help thicken the sauce later on. Cook for about 1 minute, stirring constantly, to cook out the raw flour taste. Don’t skip this step, or your filling might taste a bit floury!
- Add the Broth and Cream: Gradually pour in the chicken broth, stirring constantly to prevent lumps from forming. Bring the mixture to a simmer. Once simmering, reduce the heat to low and stir in the heavy cream, dried thyme, and dried rosemary. Season with salt and pepper to taste.
- Simmer and Thicken: Let the filling simmer for about 10-15 minutes, or until the sauce has thickened to your desired consistency. Stir occasionally to prevent sticking. The sauce should be thick enough to coat the back of a spoon. If it’s too thick, add a little more chicken broth. If it’s too thin, continue simmering until it thickens up.
- Cool the Filling: Remove the filling from the heat and let it cool slightly while you prepare the biscuit topping. This will prevent the biscuit topping from becoming soggy. You can even prepare the filling a day ahead and store it in the refrigerator. Just make sure to reheat it slightly before assembling the muffins.
Making the Biscuit Topping:
- Combine Dry Ingredients: In a large bowl, whisk together the flour, baking powder, and salt. Make sure the baking powder is fresh, as this is what will give our biscuits their rise.
- Cut in the Butter: Add the cold, cubed butter to the flour mixture. Using a pastry blender or your fingertips, cut the butter into the flour until the mixture resembles coarse crumbs. The butter should be in small pieces, about the size of peas. This is what creates those flaky layers in the biscuits. The colder the butter, the better!
- Add the Milk: Gradually add the milk to the flour and butter mixture, stirring gently until just combined. Be careful not to overmix the dough, as this will result in tough biscuits. The dough should be slightly sticky.
- Shape the Biscuits: Lightly flour a clean surface. Turn the dough out onto the floured surface and gently pat it into a 1-inch thick rectangle. Use a 2 1/2-inch biscuit cutter or a knife to cut out circles. You should get about 12 biscuits. If you don’t have a biscuit cutter, you can simply cut the dough into squares.
Assembling and Baking the Chicken Pot Pie Muffins:
- Preheat Oven and Prepare Muffin Tin: Preheat your oven to 400°F (200°C). Grease or line a 12-cup muffin tin with paper liners.
- Fill the Muffin Cups: Spoon the cooled chicken pot pie filling into each muffin cup, filling them about 3/4 full. Don’t overfill them, or the filling will spill over during baking.
- Top with Biscuits: Place a biscuit on top of each muffin cup, gently pressing it down slightly.
- Egg Wash (Optional): Brush the tops of the biscuits with the beaten egg. This will give them a beautiful golden-brown color and a slightly glossy finish.
- Bake: Bake for 20-25 minutes, or until the biscuits are golden brown and the filling is bubbly. Keep an eye on them, as baking times may vary depending on your oven.
- Cool and Serve: Let the muffins cool in the muffin tin for a few minutes before transferring them to a wire rack to cool slightly. Serve warm and enjoy! These are best served fresh, but they can be stored in the refrigerator for up to 3 days. Reheat them in the oven or microwave before serving.
Conclusion:
And there you have it! These Chicken Pot Pie Muffins are truly a must-try recipe for anyone craving comfort food in a convenient, adorable package. From the flaky, golden crust to the savory, creamy filling bursting with tender chicken and vegetables, every bite is a little piece of pot pie perfection. I know, I know, I might be biased, but I genuinely believe these are a game-changer for weeknight dinners, potlucks, or even a fun lunchbox treat.
What makes these muffins so special? It’s the combination of ease and flavor. Forget spending hours wrestling with a full-sized pot pie crust. These muffins come together quickly using store-bought puff pastry, saving you precious time without sacrificing that signature flaky texture. Plus, the individual portions are perfect for portion control and make serving a breeze. No more messy slicing!
But the best part? They’re incredibly versatile! Feel free to customize the filling to your liking. Don’t have peas on hand? Substitute green beans or corn. Want to add a little kick? A pinch of red pepper flakes or a dash of hot sauce will do the trick. You can even swap out the chicken for turkey or leftover rotisserie chicken for an even faster meal.
Serving Suggestions and Variations:
* Serve these muffins warm with a side salad for a complete and satisfying meal. A simple green salad with a light vinaigrette complements the richness of the pot pie perfectly.
* For a heartier meal, pair them with a bowl of creamy tomato soup. The combination is classic and comforting.
* Consider adding a sprinkle of fresh herbs, like parsley or thyme, on top of the muffins before baking for an extra touch of flavor and visual appeal.
* For a vegetarian option, replace the chicken with sautéed mushrooms or chickpeas. You can also add other vegetables like sweet potatoes or butternut squash for a heartier filling.
* If you’re feeling adventurous, try using different types of cheese in the filling. Gruyere, cheddar, or even a little bit of goat cheese would add a unique and delicious twist.
* For a fun twist, use biscuit dough instead of puff pastry for a more rustic and slightly sweeter muffin.
* These muffins are also great for meal prepping! Bake a batch on the weekend and enjoy them throughout the week for lunch or dinner. They reheat beautifully in the oven or microwave.
I’m so confident that you’ll love these Chicken Pot Pie Muffins as much as I do. They’re the perfect blend of comfort, convenience, and customization. I truly believe this recipe will become a staple in your kitchen.
So, what are you waiting for? Grab your ingredients, preheat your oven, and get ready to bake up a batch of these delicious muffins. I can’t wait to hear what you think!
And most importantly, don’t forget to share your creations! Snap a photo of your finished muffins, tag me on social media (if applicable), and let me know what variations you tried. I’m always looking for new and exciting ways to make this recipe even better. Happy baking! I am sure that you will enjoy this Chicken Pot Pie Muffins recipe.
Chicken Pot Pie Muffins: A Delicious & Easy Recipe
Individual chicken pot pies baked in muffin tins, topped with flaky homemade biscuits. A comforting and easy meal perfect for weeknights!
Ingredients
- 1 tablespoon olive oil
- 1 cup chopped onion
- 1 cup chopped carrots
- 1 cup chopped celery
- 1 pound boneless, skinless chicken breasts, cooked and diced (about 2 cups)
- 1 cup frozen peas
- 1 cup frozen corn
- 1/2 cup all-purpose flour
- 3 cups chicken broth
- 1/2 cup heavy cream
- 1 teaspoon dried thyme
- 1/2 teaspoon dried rosemary
- 1/4 teaspoon salt, or to taste
- 1/4 teaspoon black pepper, or to taste
- 2 cups all-purpose flour
- 1 tablespoon baking powder
- 1 teaspoon salt
- 1/2 cup (1 stick) cold unsalted butter, cut into cubes
- 3/4 cup milk
- 1 large egg, beaten (for egg wash)
Instructions
- Heat the olive oil in a large skillet or pot over medium heat. Add the chopped onion, carrots, and celery. Cook, stirring occasionally, until the vegetables are softened, about 5-7 minutes.
- Add the diced cooked chicken, frozen peas, and frozen corn to the skillet. Stir to combine.
- Sprinkle the flour over the chicken and vegetables. Stir well to coat. Cook for about 1 minute, stirring constantly.
- Gradually pour in the chicken broth, stirring constantly to prevent lumps. Bring to a simmer. Reduce heat to low and stir in the heavy cream, dried thyme, and dried rosemary. Season with salt and pepper to taste.
- Let the filling simmer for about 10-15 minutes, or until the sauce has thickened to your desired consistency. Stir occasionally.
- Remove from heat and let cool slightly while you prepare the biscuit topping.
- In a large bowl, whisk together the flour, baking powder, and salt.
- Add the cold, cubed butter to the flour mixture. Using a pastry blender or your fingertips, cut the butter into the flour until the mixture resembles coarse crumbs.
- Gradually add the milk to the flour and butter mixture, stirring gently until just combined. Be careful not to overmix the dough.
- Lightly flour a clean surface. Turn the dough out onto the floured surface and gently pat it into a 1-inch thick rectangle. Use a 2 1/2-inch biscuit cutter or a knife to cut out circles. You should get about 12 biscuits. If you don’t have a biscuit cutter, you can simply cut the dough into squares.
- Preheat your oven to 400°F (200°C). Grease or line a 12-cup muffin tin with paper liners.
- Spoon the cooled chicken pot pie filling into each muffin cup, filling them about 3/4 full.
- Place a biscuit on top of each muffin cup, gently pressing it down slightly.
- Brush the tops of the biscuits with the beaten egg.
- Bake for 20-25 minutes, or until the biscuits are golden brown and the filling is bubbly.
- Let the muffins cool in the muffin tin for a few minutes before transferring them to a wire rack to cool slightly. Serve warm.
Notes
- For the best biscuit texture, use very cold butter and avoid overmixing the dough.
- You can prepare the filling a day ahead and store it in the refrigerator. Reheat slightly before assembling.
- If the filling is too thick, add a little more chicken broth. If it’s too thin, continue simmering until it thickens up.
- Baking times may vary depending on your oven.
- These are best served fresh, but they can be stored in the refrigerator for up to 3 days. Reheat them in the oven or microwave before serving.