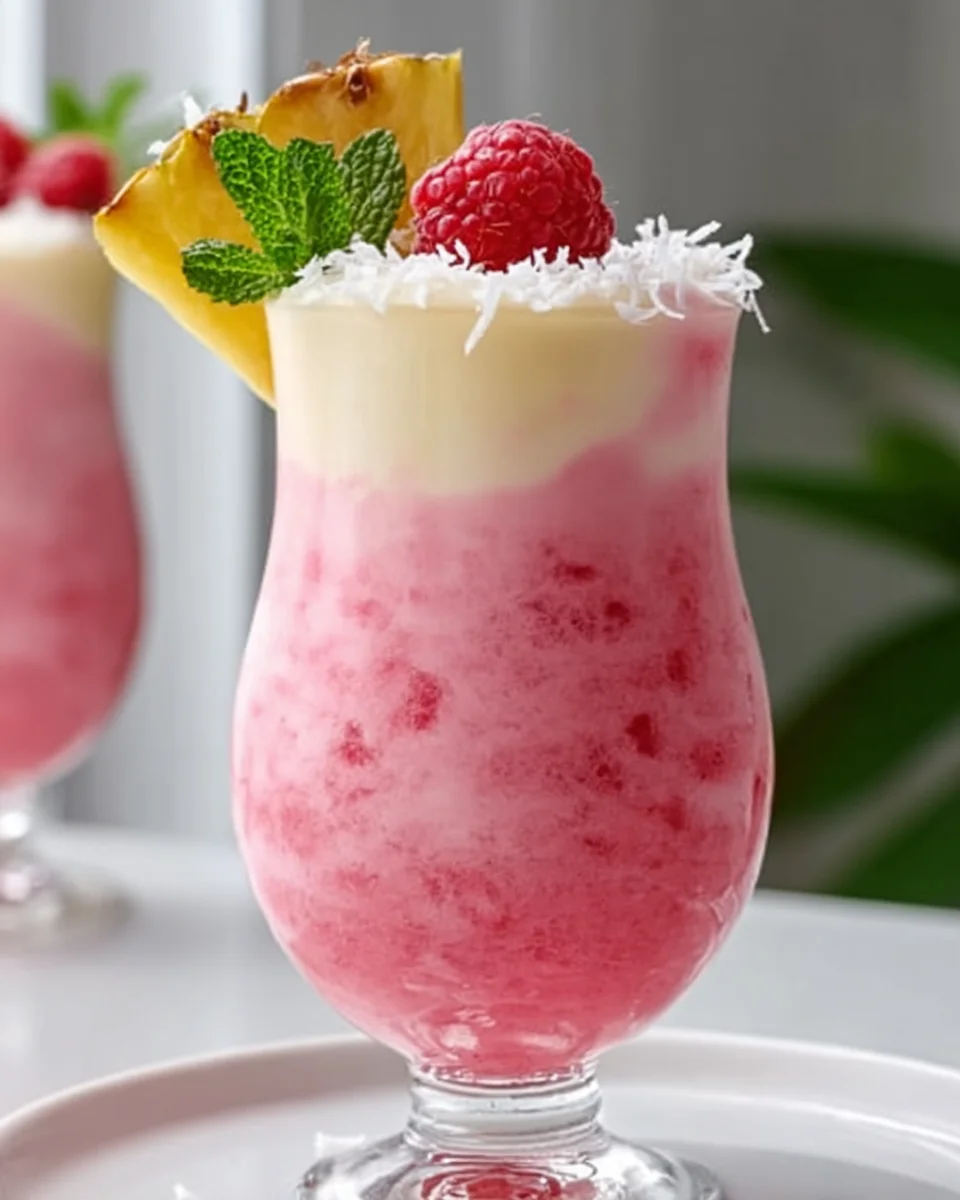
Raspberry Colada Twist – doesn’t that just sound like a sip of pure joy, a vibrant escape from the everyday? Imagine the sun on your skin, the gentle rustle of palm trees, and the perfect blend of creamy coconut, tangy pineapple, and the surprising, sweet burst of fresh raspberries. This isn’t just a drink; it’s an invitation to a mini-vacation in a glass, promising a refreshing indulgence that’s both familiar and exhilaratingly new.
While the classic Piña Colada hails from the sun-drenched shores of Puerto Rico, beloved globally for its quintessential tropical flavor, we’re always looking for ways to elevate and refresh our favorite traditions. This innovative twist honors that rich heritage while introducing a delightful new dimension. It’s a celebration of classic flavors reimagined for the modern palate, proving that some things, like paradise, can indeed get even better.
People adore this particular concoction for so many reasons. The luscious creaminess of coconut milk perfectly balances the bright acidity of pineapple, creating that iconic colada base we all crave. But it’s the addition of fresh, vibrant raspberries that truly elevates it, offering a beautiful ruby hue and an irresistible sweet-tart kick that transforms it into something truly special. The Raspberry Colada Twist offers a taste experience that is both familiar and excitingly new, incredibly refreshing, and surprisingly easy to whip up. Whether you’re hosting a summer gathering or simply treating yourself to a moment of blissful indulgence, this drink is guaranteed to delight with its vibrant flavor profile and smooth, icy texture.

Ingredients:
Creating this delightful Raspberry Colada Twist is an absolute joy, and gathering your ingredients thoughtfully is the first step towards a truly magnificent dessert. I always find that having everything prepped and measured makes the cooking process so much smoother and more enjoyable. Here’s what you’ll need to bring this tropical dream to life:
- For the Graham Cracker Crust:
- 1 ½ cups (approximately 18-20 sheets) graham cracker crumbs, finely crushed
- ½ cup (1 stick or 113g) unsalted butter, melted
- ¼ cup granulated sugar (optional, but I find it adds a lovely touch of sweetness and helps with crispness)
- Pinch of salt
- For the Creamy Coconut-Pineapple Filling:
- 2 (8-ounce or 226g each) blocks full-fat cream cheese, softened to room temperature
- 1 cup (240ml) heavy cream, chilled
- ¾ cup powdered sugar (confectioners’ sugar), sifted
- 1 (20-ounce or 567g) can crushed pineapple in juice, very well drained
- ½ cup sweetened shredded coconut, lightly toasted (optional, but highly recommended for enhanced flavor)
- 1 teaspoon pure vanilla extract
- ½ teaspoon coconut extract (optional, for an extra tropical punch)
- Zest of 1 lime (about 1 tablespoon), finely grated
- For the Vibrant Raspberry Swirl:
- 2 cups (about 250g) fresh or frozen raspberries (if using frozen, do not thaw completely)
- ½ cup granulated sugar
- 2 tablespoons fresh lemon juice
- 1 tablespoon cornstarch
- 2 tablespoons cold water
- For Garnish:
- Fresh raspberries
- Toasted coconut flakes
- Small lime wedges or extra lime zest
- Fresh mint sprigs
Equipment You’ll Need:
Having the right tools at hand truly makes a difference, ensuring your Raspberry Colada Twist comes together effortlessly. Here’s my go-to list of essential kitchen equipment for this recipe:
- 9-inch springform pan
- Large mixing bowls (at least two)
- Medium saucepan
- Rubber spatula
- Whisk
- Electric mixer (handheld or stand mixer with a paddle attachment)
- Measuring cups and spoons
- Fine-mesh sieve
- Parchment paper
- Aluminum foil (optional, for water bath or covering)
- Rolling pin or food processor (for graham cracker crumbs)
- Small serving knife or offset spatula
Preparing the Crust:
The foundation of our Raspberry Colada Twist is a perfectly crisp and buttery graham cracker crust. It’s simple to make but sets the stage for the creamy layers to follow.
-
Prepare the Pan: First things first, grab your 9-inch springform pan. I like to lightly grease the bottom with a bit of butter or non-stick spray, then line the bottom with a circle of parchment paper. This simple step makes releasing the cheesecake a breeze later on. Secure the springform sides over the parchment paper base. This ensures a clean removal and prevents sticking, which can be such a frustration when you’re ready to serve.
-
Crush the Graham Crackers: You want super fine crumbs here. The easiest way to achieve this is in a food processor, pulsing until the crackers are reduced to a fine, sandy texture. If you don’t have a food processor, no worries! Place the graham crackers in a large zip-top bag, seal it, and use a rolling pin to crush them until uniformly fine. This might take a little arm work, but it’s quite satisfying! Once crushed, transfer the crumbs to a medium mixing bowl.
-
Combine with Butter and Sugar: Add the granulated sugar (if using) and a pinch of salt to the graham cracker crumbs. Give it a quick stir to combine everything evenly. Then, pour in the melted unsalted butter. Use a rubber spatula or a fork to mix it thoroughly. You’re looking for the crumbs to be uniformly moistened, resembling wet sand. When you press a handful together, it should hold its shape. If it feels too dry, you can add another tablespoon of melted butter, but be careful not to make it greasy.
-
Press into the Pan: Transfer the buttered crumbs into your prepared springform pan. Now, this part requires a firm hand. Use the bottom of a flat-bottomed glass, a measuring cup, or your fingers to press the crumbs firmly and evenly across the bottom of the pan. The goal is a compact, uniform layer. I often use my knuckles to get into the edges, ensuring there are no loose spots. A solid crust is crucial for holding our creamy filling.
-
Chill the Crust: Once pressed, pop the pan into the refrigerator for at least 30 minutes. This chilling time is important; it allows the butter to solidify and bind the crumbs together, preventing a crumbly mess when you slice into your cheesecake. Don’t skip this step! It’s a small wait for a much better result.
Crafting the Raspberry Swirl:
The vibrant and tangy raspberry swirl is the “twist” in our Raspberry Colada Twist, cutting through the richness of the coconut-pineapple filling with its bright, fruity notes. This is where the magic really starts to happen!
-
Cook the Raspberries: In a medium saucepan, combine the raspberries (fresh or frozen) and the granulated sugar. Place the saucepan over medium heat. As the raspberries warm up, they will start to break down and release their juices. Stir frequently with a rubber spatula or a wooden spoon, mashing the berries gently against the side of the pan to help them break down further. You want to cook this mixture for about 5-7 minutes, until the sugar has dissolved and the berries have softened into a chunky sauce. It should look saucy and smell absolutely divine.
-
Strain for Smoothness: For a truly elegant swirl, I prefer to remove the seeds. Place a fine-mesh sieve over a clean bowl. Pour the cooked raspberry mixture into the sieve. Using your rubber spatula, press the mixture firmly against the mesh, pushing all the luscious raspberry pulp and juice through into the bowl below. You’ll be left with a smooth, seedless raspberry purée. Discard the seeds and any remaining solids in the sieve. This step is optional, but it gives the swirl a more luxurious texture.
-
Thicken the Swirl: Return the smooth raspberry purée to the cleaned saucepan. In a small separate bowl, whisk together the cornstarch and cold water to create a smooth slurry. Make sure there are no lumps! Bring the raspberry purée to a gentle simmer over medium-low heat. Once it’s simmering, slowly pour in the cornstarch slurry while whisking continuously. Continue to whisk and cook for another 1-2 minutes, until the mixture thickens to a consistency similar to a pourable jam or thick syrup. It should coat the back of a spoon. This thickening ensures the swirl holds its shape beautifully within the cheesecake.
-
Cool the Swirl: Remove the thickened raspberry swirl from the heat. Transfer it to a clean bowl and let it cool completely to room temperature. This is a very important step! If you add warm or hot raspberry purée to your cream cheese mixture, it will cause the filling to curdle or become too runny, compromising the texture of your cheesecake. To speed up the cooling process, you can place the bowl in an ice bath or refrigerate it, stirring occasionally, until it’s completely cool, which usually takes about 30-45 minutes. Patience here is key for a perfect swirl!
Mixing the Coconut-Pineapple Cream Cheese Filling:
This is the heart of our Raspberry Colada Twist – a lusciously creamy, tropical-flavored filling that perfectly complements the tart raspberry swirl. The texture and flavor are simply irresistible!
-
Prepare the Pineapple: The key to a firm cheesecake is to remove as much moisture as possible from the pineapple. Open your can of crushed pineapple and pour it into a fine-mesh sieve set over a bowl. Press down firmly on the pineapple with a spoon or spatula to extract as much liquid as you possibly can. I often let it sit for 15-20 minutes, pressing it periodically, until no more liquid drains out. This step is critical; excess moisture will make your filling runny. You should be left with about 1 cup of very well-drained crushed pineapple.
-
Toast the Coconut (Optional but Recommended): If you’re using sweetened shredded coconut, I highly recommend toasting it. Spread the coconut flakes evenly on a baking sheet. Bake in a preheated oven at 300°F (150°C) for 5-10 minutes, stirring occasionally, until lightly golden and fragrant. Keep a close eye on it, as coconut can burn quickly! Let it cool completely before adding to the filling. This intensifies the coconut flavor and adds a lovely textural element.
-
Whip the Heavy Cream: In a large, chilled mixing bowl (I like to pop my bowl and whisk attachment in the freezer for 10-15 minutes beforehand), pour in the cold heavy cream. Using an electric mixer, start on low speed and gradually increase to high. Whip the cream until stiff peaks form. This means when you lift the whisk, the cream holds its shape firmly and doesn’t droop. Be careful not to over-whip, or it will become grainy. Set the whipped cream aside in the refrigerator to keep it cold and firm.
-
Cream the Cream Cheese and Sugar: In another large mixing bowl, place the softened full-fat cream cheese and the sifted powdered sugar. Using your electric mixer with the paddle attachment (or clean beaters), beat the cream cheese and sugar on medium speed until the mixture is completely smooth, light, and fluffy, with no lumps whatsoever. This usually takes about 3-5 minutes. It’s important for the cream cheese to be at room temperature to prevent lumps and ensure a silky-smooth consistency.
-
Add Flavorings: To the creamed cheese mixture, add the vanilla extract, coconut extract (if using), and the finely grated lime zest. Beat on low speed until just combined. The lime zest really brightens up the tropical flavors and adds a fantastic aromatic lift. Give it a taste – you should already be able to get a hint of that delicious colada vibe!
-
Fold in Pineapple and Coconut: Gently fold in the very well-drained crushed pineapple and the toasted shredded coconut (if using) into the cream cheese mixture. Use a rubber spatula and be gentle to avoid overmixing. You want these ingredients to be evenly distributed throughout the mixture. The chunky pineapple adds a wonderful texture and burst of flavor that’s quintessential to the colada experience.
-
Incorporate Whipped Cream: Finally, retrieve your whipped cream from the refrigerator. Add about one-third of the whipped cream to the cream cheese mixture and gently fold it in to lighten the base. Then, add the remaining whipped cream and fold it in until just combined. Use a gentle, sweeping motion, lifting from the bottom of the bowl. The goal here is to maintain as much of the air in the whipped cream as possible, which gives the filling its light and airy texture. Do not overmix, or the filling will lose its fluffiness. You’ll have a beautifully airy, tropical-scented filling ready for assembly!
Assembling Your Raspberry Colada Twist:
Now comes the moment of truth – bringing all these wonderful components together to create our stunning Raspberry Colada Twist. This is where the magic really happens, layer by layer!
-
Prepare for Assembly: Take your chilled graham cracker crust out of the refrigerator. Ensure your creamy coconut-pineapple filling is ready, and your raspberry swirl is completely cooled to room temperature. Having everything at the right temperature and consistency is crucial for a successful assembly.
-
Layer the Filling: Carefully spoon about two-thirds of the coconut-pineapple cream cheese filling over the chilled crust. Use an offset spatula or the back of a spoon to gently spread the filling evenly across the bottom of the pan, making sure it reaches the edges. Try to create a smooth, level surface, as this will be the base for your beautiful swirl.
-
Add the Raspberry Swirl: Now for the “twist”! Drizzle about half of the cooled raspberry swirl in dollops or lines over the top of the cream cheese filling. Don’t be shy, but don’t drown it either. You want distinct pockets of raspberry. Reserve about half of the swirl for the top layer, as this will create a more dramatic effect.
-
Top with Remaining Filling: Carefully spoon the remaining one-third of the coconut-pineapple cream cheese filling over the raspberry dots. Gently spread it out to cover the raspberry layer completely. This requires a delicate touch to avoid mixing the layers too much. Try to spread it from the center outwards, feathering it towards the edges.
-
Create the Final Swirl: Once the top layer of cream cheese filling is smooth, drizzle the remaining cooled raspberry swirl over the top. Now, for the artistic part: take a butter knife or a skewer and gently swirl the raspberry purée into the cream cheese filling. Use gentle, sweeping motions to create beautiful patterns. You can do zig-zags, figure-eights, or random swirls – whatever looks appealing to you. The key is not to over-swirl, as you want distinct streaks of raspberry and white, not a uniformly pink mixture. This is what truly makes it a “twist” and so visually appealing.
-
Chill for Setting: Once your masterpiece is swirled, cover the springform pan loosely with plastic wrap or aluminum foil. Transfer the cheesecake to the refrigerator and chill for a minimum of 6-8 hours, but ideally overnight. This extended chilling time is absolutely essential for the cheesecake to firm up properly, allowing all the flavors to meld beautifully and ensuring it holds its shape when sliced. Do not rush this step! A well-chilled cheesecake is a happy cheesecake.
Serving and Garnish:
After hours of patient chilling, your Raspberry Colada Twist is ready for its grand reveal! This final stage is all about presentation, making it as delightful to the eyes as it is to the palate.
-
Release from Pan: When you’re ready to serve, carefully remove the cheesecake from the refrigerator. Run a thin, sharp knife around the inner edge of the springform pan to loosen the cheesecake from the sides. This helps ensure a clean release. Then, gently unlatch and remove the springform ring. If you lined the bottom with parchment paper, you can slide the cheesecake onto a serving platter by carefully detaching the bottom of the pan, or simply serve it directly on the springform base if it’s aesthetically pleasing.
-
Slice with Precision: For clean slices, I recommend using a long, sharp knife. For each slice, dip the knife in hot water and wipe it clean with a kitchen towel before making the cut. This simple trick prevents the filling from sticking and creates beautifully smooth edges. Repeat this process for every slice. This level of detail elevates the serving experience for your guests or family.
-
Garnish with Flair: Arrange a few fresh raspberries artfully on top of each slice or around the perimeter of the whole cheesecake. Sprinkle a generous amount of toasted coconut flakes over the top for added texture and intensified coconut flavor. For an extra touch of tropical elegance, add a small lime wedge to the side of each slice or grate a little more fresh lime zest over the top. A sprig of fresh mint leaf can also add a pop of color and freshness. The garnishes aren’t just for looks; they enhance the overall flavor and aroma, truly completing the Raspberry Colada Twist experience.
-
Serve and Enjoy: Serve your stunning Raspberry Colada Twist immediately to enjoy its cool, creamy texture and vibrant flavors. It’s a perfect dessert for warm weather, entertaining, or just as a delightful treat any time you crave a taste of the tropics with a berry twist.
Tips for the Perfect Raspberry Colada Twist:
Achieving perfection with your Raspberry Colada Twist is easily within reach with a few helpful pointers. I’ve learned these tips over time, and they really make a difference in the final outcome:
-
Room Temperature Cream Cheese is Non-Negotiable:
I cannot stress this enough! Softened cream cheese (sitting out for at least an hour or two) is crucial for a smooth, lump-free filling. Cold cream cheese will result in a lumpy texture that no amount of beating can fully fix. Trust me on this one; planning ahead makes all the difference.
-
Drain the Pineapple Thoroughly:
This is another critical step. Crushed pineapple, while delicious, carries a lot of moisture. If you don’t drain it incredibly well, your cheesecake filling will be too wet and won’t set properly. Press it firmly in a sieve until you think it’s dry, then press it again! The less liquid, the firmer your cheesecake.
-
Don’t Overmix the Filling:
Once you’ve incorporated the whipped cream, fold gently. Overmixing can deflate the whipped cream, leading to a dense rather than light and airy filling. We want that beautiful, fluffy texture that melts in your mouth.
-
Chill, Chill, Chill!:
Patience truly is a virtue with no-bake cheesecakes. The 6-8 hours (or preferably overnight) of chilling allows the flavors to meld and, more importantly, the filling to fully set. Trying to slice it too early will result in a gooey, unappealing mess. A well-chilled cheesecake is the secret to perfect slices.
-
Customize Your Swirl:
While I’ve used raspberries for this delightful Raspberry Colada Twist, feel free to experiment with other berries! A mango purée, a passion fruit coulis, or even a mixed berry blend could offer an interesting variation. Just ensure any fruit purée is thickened and cooled before adding it to the filling.
-
Consider a Water Bath (Optional for Baking):
While this is a no-bake recipe, if you were adapting it for a baked cheesecake version, a water bath would be essential to prevent cracks and ensure even baking. For our no-bake version, just ensure your ingredients are at the right temperature and you follow the chilling instructions precisely.
-
Storage:
This cheesecake stores beautifully! Keep any leftovers covered tightly with plastic wrap in the refrigerator for up to 3-4 days. The flavors often deepen overnight, making it just as delicious (if not more so!) on subsequent days.
Following these tips will ensure your Raspberry Colada Twist is a show-stopping dessert that tastes as incredible as it looks. Happy baking (or rather, no-baking)!
Conclusion:
So there you have it, my friends! We’ve journeyed through the creation of what I truly believe is not just a recipe, but an experience – a vibrant, refreshing, and utterly delightful escape from the everyday. This delightful concoction, with its captivating colors and irresistible aroma, isn’t just another dish; it’s a celebration of fresh flavors and simple pleasures that I’ve poured my heart into perfecting. I genuinely feel it stands out for several compelling reasons, making it an absolute must-try for anyone looking to add a spark of joy to their culinary adventures.
From the very first sip or bite, you’ll be captivated by the perfect symphony of sweet, tangy, and creamy notes. It strikes that elusive balance, offering a refreshing escape without being overly heavy or cloying. The lightness yet richness truly sets it apart, creating a sensation that lingers pleasantly on the palate. It’s the kind of treat that elicits immediate smiles and nods of approval, making it an absolute crowd-pleaser for any occasion, big or small. Trust me when I say, this isn’t just a recipe you try once; it’s one you’ll want to revisit again and again, becoming a cherished part of your culinary repertoire. Despite its sophisticated taste profile, the preparation is surprisingly straightforward, proving that you don’t need complex techniques to achieve extraordinary results. This makes it perfect for both seasoned home cooks looking for a new favorite and aspiring chefs eager to impress without the stress.
Now that you’re armed with the knowledge to craft this masterpiece, let’s talk about taking it even further. While absolutely divine on its own, I’ve discovered a few ways to enhance the experience or adapt it to different tastes and moments. For an elegant touch, always consider a garnish. A sprig of fresh mint adds a lovely aromatic contrast and a pop of green, instantly elevating its visual appeal. A few extra fresh raspberries, perhaps skewered on a small cocktail pick, or a generous sprinkle of toasted coconut flakes will enhance both the presentation and the textural complexity. Don’t underestimate the power of these small details!
Endless Possibilities and Perfect Pairings
Thinking about an adult twist? A splash of high-quality white rum or even a coconut-flavored rum would transform this into the ultimate tropical cocktail, perfect for a relaxed evening gathering or a lively weekend celebration. For those seeking a delicious non-alcoholic option, it’s already perfect as is, making it a fantastic treat for everyone, including kids’ parties or daytime refreshments. But why stop there? You could easily blend in half a banana for an extra creamy, smoothie-like consistency, or swap out the raspberries entirely for fresh mango or pineapple chunks to create an entirely new tropical sensation. Imagine a ‘Mango Colada Dream’ or a ‘Pineapple Paradise Puree’ – the possibilities for delicious experimentation are truly endless!
This recipe isn’t just for dessert; it can be a delightful breakfast smoothie to kickstart your day, a refreshing afternoon pick-me-up when you need a little boost, or even the star of a vibrant brunch menu. Serve it in elegant stemmed glasses for a fancy dinner party to truly impress your guests, or in casual tumblers for a laid-back backyard BBQ or picnic. It’s incredibly versatile and adapts beautifully to any setting. You could even turn it into delicious frozen popsicles for a fun, kid-friendly summer treat! Just pour the mixture into your favorite popsicle molds and freeze for a few hours. These frozen delights are a fantastic way to enjoy the refreshing goodness on a blazing hot day, offering a wonderfully cooling and flavorful experience.
I genuinely hope you feel inspired to dive into your kitchen and give this a try. There’s immense satisfaction in creating something so delicious from scratch, and I promise you, the reward is truly worth every moment. Imagine yourself enjoying a cool glass of this vibrant treat, perhaps on a sunny afternoon, feeling the stress melt away with every delightful sip. This isn’t just about following instructions; it’s about making it your own, infusing it with your personal touch, and discovering new favorites that perfectly suit your palate.
I’m incredibly excited for you to experience the unique charm of this recipe. Whether you stick precisely to the original or experiment with your own creative spin, I’m confident that the Raspberry Colada Twist will become a cherished recipe in your household. It’s more than just a drink or a dessert; it’s an invitation to savor the moment and celebrate the simple, yet profound, joy of delicious food and drink. Once you’ve made it, please, please, please come back and share your experience with me and our wonderful community! What did you love most about it? Did you try any exciting variations? Post your photos, tell us about your triumphs, and even your learning moments. Your feedback and creativity fuel my passion, and I absolutely adore hearing how my recipes brighten your day. Let’s build a delicious conversation together!
So, go ahead, gather your ingredients, put on some cheerful music, and get ready to create something truly special. I can’t wait to hear all about your delicious journey with this fantastic recipe!
Virgin Raspberry Colada Twist
A vibrant escape from the everyday, this Virgin Raspberry Colada Twist perfectly blends creamy coconut, tangy pineapple, and the surprising, sweet burst of fresh raspberries. It’s a refreshing, indulgent tropical bliss that’s both familiar and exhilaratingly new, celebrating classic flavors reimagined for a modern palate. This creamy frozen drink with a pop of berry brightness is a must-try!
Ingredients
Instructions
Important Information
Nutrition Facts (Per Serving)
It is important to consider this information as approximate and not to use it as definitive health advice.
Allergy Information
Please check ingredients for potential allergens and consult a health professional if in doubt.