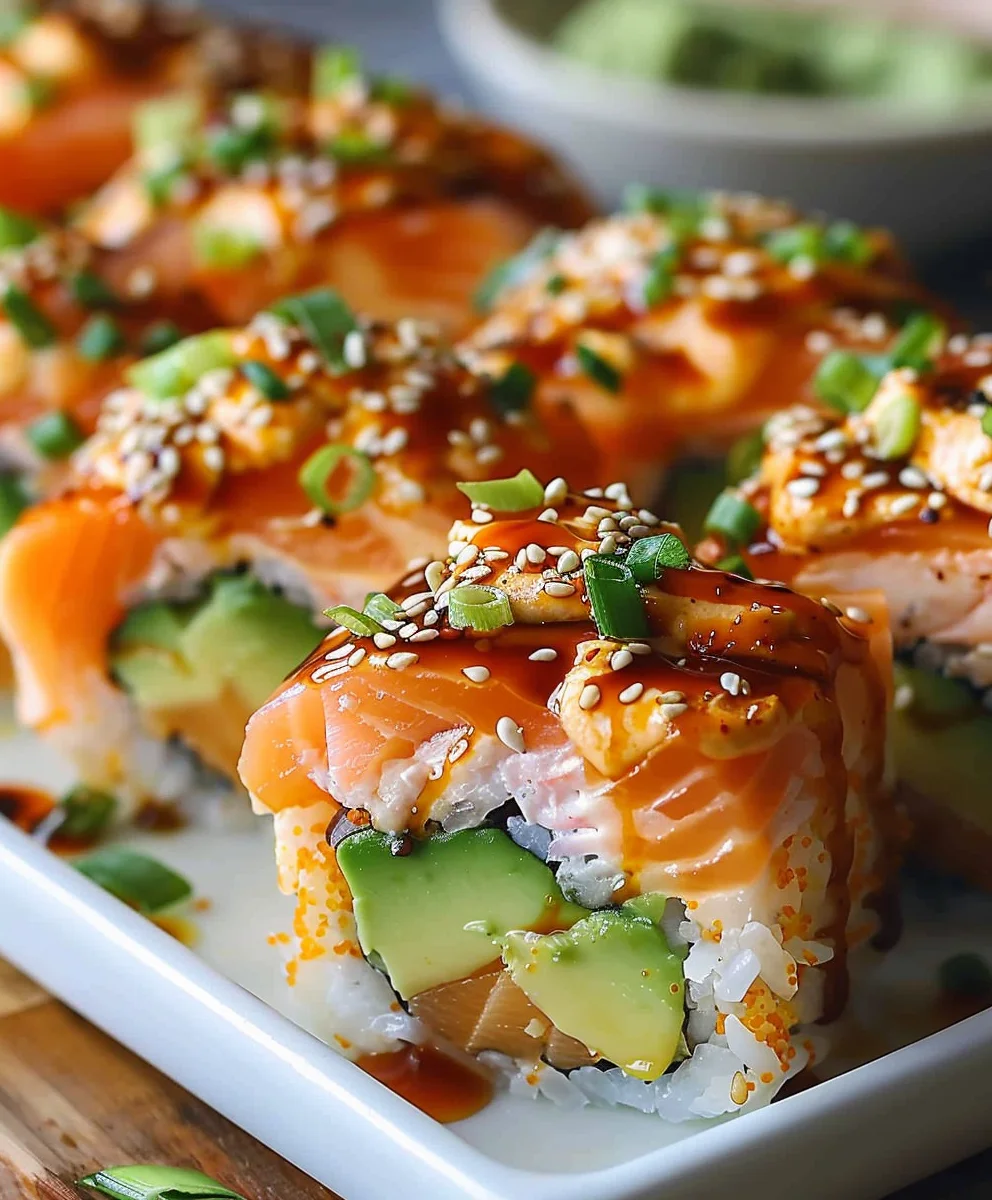
Spicy Salmon Sushi Bake is more than just a dish; it’s a culinary revelation that has taken kitchens by storm, offering all the vibrant flavors of your favorite sushi roll without the intricate rolling technique. Imagine a warm, deconstructed sushi experience, where layers of perfectly seasoned rice meet a rich, creamy, and wonderfully spicy salmon mixture, all baked to golden perfection. This ingenious creation, which gained immense popularity through social media, is a brilliant fusion, blending the comforting warmth of a casserole with the fresh, exciting profile of Japanese-inspired cuisine. It’s a testament to how culinary traditions can evolve, making sophisticated flavors accessible and enjoyable for the home cook.
People adore this dish not only for its incredible taste – that perfect balance of umami, spice, and creaminess – but also for its delightfully contrasting textures, from the slightly crispy rice edges to the tender, flaky salmon. Furthermore, its convenience as an easy-to-prepare, crowd-pleasing meal makes this Spicy Salmon Sushi Bake an absolute must-try. I promise, it will quickly become a beloved staple in your recipe repertoire.

Ingredients:
- For the Sushi Rice:
- 2 cups sushi-grade short-grain rice (I find this particular rice holds its texture beautifully, ensuring our bake isn’t mushy but perfectly tender with a slight chew).
- 2 ½ cups cold water (the precise water-to-rice ratio is absolutely crucial for achieving perfectly cooked, fluffy sushi rice).
- ¼ cup rice vinegar (unseasoned is my strong preference, as we’ll be carefully seasoning it ourselves to create that signature sushi flavor profile).
- 2 tablespoons granulated sugar (this perfectly balances the tang of the vinegar, adding a subtle sweetness that rounds out the rice’s flavor).
- 1 teaspoon salt (an essential flavor enhancer that brings out all the wonderful tastes in the rice mixture).
- 1 tablespoon sesame oil (this isn’t just for flavor; it adds a wonderful nutty aroma and helps prevent the rice from sticking, making it easier to handle).
- For the Spicy Salmon Filling:
- 1 ½ pounds sushi-grade salmon fillet, skin removed (using high-quality, fresh salmon is non-negotiable for the best flavor and texture in this dish!).
- 1 tablespoon olive oil (perfect for brushing our salmon before baking, ensuring it stays moist and develops a lovely exterior).
- ½ teaspoon garlic powder (a subtle but essential aromatic that complements the salmon without overpowering its natural taste).
- ¼ teaspoon black pepper (freshly ground, if you have it, really does make a noticeable difference in freshness and zest).
- ¼ teaspoon salt (just enough to properly season the salmon before it goes into the oven, highlighting its rich flavor).
- For the Spicy Mayo:
- ½ cup Japanese mayonnaise (Kewpie mayo is my absolute go-to for its incredibly rich, creamy, and distinct umami flavor – it makes all the difference!).
- 2-4 tablespoons sriracha (this is where you can truly customize the heat; start with 2 and add more if you’re feeling brave and want a real kick!).
- 1 tablespoon soy sauce (adds a vital layer of depth, saltiness, and a savory umami punch to our mayo).
- 1 teaspoon sesame oil (it echoes the flavor we’ve added to the rice, cleverly tying all the components of our dish together harmoniously).
- 1 teaspoon sugar (a tiny pinch of sweetness helps to balance the spiciness and acidity, making the mayo incredibly well-rounded).
- 1 teaspoon fresh lime juice (a burst of zesty freshness that brightens up the entire spicy mayo, cutting through the richness beautifully).
- For the Toppings & Garnish:
- 4-5 sheets roasted seaweed snacks or nori sheets, cut into small rectangles or squares (these are absolutely perfect for scooping up bites of our bake, adding a satisfying crunch and salty ocean flavor!).
- 2 tablespoons toasted sesame seeds (a classic sushi topping for a reason; they add a wonderful nutty crunch and visual appeal).
- 2-3 green onions, thinly sliced (for a fresh, crisp, and mildly oniony bite that cuts through the richness).
- ½ avocado, thinly sliced or diced (optional, but highly recommended for its creamy texture and rich, buttery flavor that beautifully complements the salmon).
- Furikake seasoning (optional, but if you have it, sprinkle it generously for an extra layer of savory umami, crunch, and a burst of flavor!).
- Additional sriracha and Japanese mayo for drizzling (because, honestly, who can resist a little extra artistic flair and a final burst of flavor?).
Preparing the Sushi Rice Base
- Rinse the Rice Thoroughly: My first step, and a crucial one, is to rinse our sushi rice. I place the 2 cups of sushi-grade short-grain rice into a fine-mesh sieve or a large bowl. Then, I run cold water over the rice, gently swirling it with my hand. You’ll notice the water becoming quite cloudy – this is the excess starch, and we want to get rid of most of it! I continue rinsing and draining until the water runs mostly clear, which typically takes about 5-7 thorough rinses. This rinsing step is absolutely vital for achieving that distinct, perfectly non-gummy, fluffy sushi rice texture that we all love and expect in a high-quality Spicy Salmon Sushi Bake.
- Cook the Rice to Perfection: Next, I transfer the rinsed rice to a medium saucepan that has a very tight-fitting lid. I add 2 ½ cups of cold water to the pot. I then bring the water to a rapid boil over medium-high heat. As soon as it reaches a rolling boil, I immediately reduce the heat to the absolute lowest setting, cover the pot tightly, and let it gently simmer for precisely 15 minutes. Please, resist the overwhelming urge to lift the lid during this cooking time! Doing so releases the steam that’s essential for cooking the rice properly. After the 15 minutes are up, I remove the pot from the heat, but I leave it still covered, allowing it to sit undisturbed for another 10-15 minutes. This crucial resting period allows the rice to steam thoroughly and absorb every last bit of remaining moisture, resulting in perfectly cooked grains.
- Prepare the Sushi Vinegar Mixture: While our rice is busy cooking and steaming, I like to get ahead and prepare our seasoning mixture. In a small microwave-safe bowl (or a small saucepan if you prefer), I combine the ¼ cup rice vinegar, 2 tablespoons granulated sugar, and 1 teaspoon salt. I then microwave it for about 30-60 seconds, or gently heat it on the stovetop, until both the sugar and salt are completely dissolved. I make sure to stir it really well to ensure everything is perfectly incorporated. This wonderfully tangy, subtly sweet, and salty mixture is exactly what gives sushi rice its iconic, distinct flavor.
- Season and Cool the Rice: Once the rice has had its full resting time, I gently transfer it to a large, non-metallic bowl. A wooden or glass bowl is always ideal here, as metal can sometimes react with the vinegar. I then pour the freshly prepared sushi vinegar mixture evenly over the hot rice. Using a rice paddle or a wooden spoon, I very gently fold and “cut” the rice, being extremely careful not to mash the delicate grains. My goal is to separate the individual grains while coating each one beautifully with the vinegar mixture. As I do this, I like to gently fan the rice with a small hand fan or even a piece of cardboard for a few minutes. This simple trick helps to cool the rice quickly and gives it that beautiful, desirable glossy finish. Finally, I stir in 1 tablespoon of sesame oil at this stage; it not only adds a lovely nutty note but also helps prevent the rice from sticking together excessively. Your perfectly seasoned sushi rice is now ready to form the utterly delicious and comforting base of our incredible Spicy Salmon Sushi Bake! I set it aside to cool slightly before the next step.
Preparing the Spicy Salmon Filling
- Bake the Salmon Perfectly: I start by preheating my oven to a steady 400°F (200°C). Then, I line a baking sheet with parchment paper – trust me, this makes cleanup so much easier! I place the 1 ½ pounds of sushi-grade salmon fillet onto the prepared baking sheet. I drizzle it with 1 tablespoon of olive oil and then evenly sprinkle it with ½ teaspoon of garlic powder, ¼ teaspoon of freshly ground black pepper, and ¼ teaspoon of salt. I gently rub these seasonings into the salmon, making sure every part is coated. I bake it for 12-15 minutes, or until the salmon is completely cooked through and flakes easily with a fork. Keep in mind that the cooking time might vary slightly depending on the exact thickness of your fillet. For me, I aim for salmon that’s just cooked through, still wonderfully moist and incredibly tender – it’s key for the best texture in our bake.
- Flake the Baked Salmon: Once the salmon is perfectly baked, I carefully remove it from the oven and let it cool just slightly – enough to handle comfortably. Using two forks, I gently flake the salmon into bite-sized pieces. I often do this directly on the baking sheet to save on dishes, or I transfer it to a medium bowl. I make sure there are no large, stubborn chunks, as we’re aiming for a consistent, satisfying texture in our filling. If your fillet still has skin, now is the time to discard it. This beautifully flaky salmon is truly going to be the undeniable star of our homemade Spicy Salmon Sushi Bake!
- Prepare the Irresistible Spicy Mayo: In a separate, clean medium bowl, I combine ½ cup of Japanese mayonnaise (I cannot stress enough how much better Kewpie is for this dish!), 2-4 tablespoons of sriracha (I usually start with 2 and taste, then bravely add more until it hits my ideal spice level!), 1 tablespoon of soy sauce, 1 teaspoon of sesame oil, 1 teaspoon of sugar, and 1 teaspoon of fresh lime juice. I whisk all of these ingredients together until the mixture is perfectly smooth, luscious, and wonderfully creamy. I always take a moment to taste it and adjust the sriracha or lime juice to my personal preference. This is precisely where the “spicy” in our glorious Spicy Salmon Sushi Bake truly bursts into life and develops its incredible flavor!
- Combine Salmon and Spicy Mayo: Now for the delicious marriage of flavors! I add the beautifully flaked salmon directly to the bowl containing our creamy, spicy mayo. Then, I very gently fold the salmon into the sauce until every single piece is beautifully coated and glistening. It’s important to be careful not to mash the salmon too much during this process; we still want those lovely, distinct flakes of fish to maintain their texture. This vibrant mixture should now look incredibly appetizing and smell absolutely divine!
Assembling and Baking the Spicy Salmon Sushi Bake
- Prepare Your Baking Dish: Before I begin layering, I lightly grease a 9×13 inch baking dish (or any similar-sized oven-safe dish you have on hand) with a tiny bit of sesame oil or a quick spray of non-stick cooking spray. This small step is really helpful in preventing the rice from sticking to the bottom, and it also adds another layer of that wonderful, subtle sesame flavor.
- Create the First Rice Layer: Now it’s time to build! I evenly spread all of our perfectly seasoned sushi rice into the bottom of the prepared baking dish. Using hands that I’ve slightly dampened with water, or a rice paddle, I gently but firmly press the rice down into an even, compact layer. The goal here is for it to be compact enough to hold its shape beautifully once baked and served, but not overly dense or squashed. This forms the absolutely essential, flavorful foundation of our magnificent Spicy Salmon Sushi Bake.
- Add the Spicy Salmon Layer: Next, I carefully spoon the entire spicy salmon mixture evenly over the rice layer. I then gently spread it out to ensure it completely covers the rice from edge to edge. Again, I press it down just lightly so that it starts to meld beautifully with the rice layer beneath it. This ensures every bite will be packed with flavor.
- Optional Toppings Before Baking: This is my favorite stage to add some extra texture and an additional layer of flavor before baking! I sprinkle about half of the toasted sesame seeds generously over the salmon layer. If I’m using furikake seasoning, I’ll also sprinkle a very generous amount here. These toppings will toast up wonderfully in the oven, intensifying their flavors and adding a delightful crunch to the final dish.
- Bake the Sushi Bake to Perfection: I carefully place the baking dish into our preheated 400°F (200°C) oven. I let it bake for approximately 15-20 minutes, or until the top layer is beautifully golden brown and you can see it bubbling enticingly around the edges. You’ll definitely notice a truly delightful aroma starting to fill your entire kitchen – that’s your sign that it’s almost ready! We’re aiming for that perfect balance of slightly crispy edges and warm, incredibly savory salmon in the middle. The baking process is fantastic because it helps to meld all the distinct flavors together and subtly toasts the rice on the bottom, creating a wonderful texture contrast that makes this Spicy Salmon Sushi Bake so utterly irresistible and incredibly satisfying.
Finishing Touches and Serving Your Spicy Salmon Sushi Bake
- Rest and Garnish: Once our incredible Spicy Salmon Sushi Bake is baked to perfection, I very carefully remove it from the oven. I then let it rest for a good 5-10 minutes. This short but important resting period allows the distinct layers to set slightly, which makes it considerably easier to cut and serve without everything falling apart. While it’s resting, I quickly gather all my remaining fresh toppings, getting them ready for the grand finale.
- Add Fresh Toppings: Now for the visual and flavor boost! I generously sprinkle the thinly sliced green onions over the entire surface of the bake. If I’m using fresh avocado, I meticulously arrange the beautiful slices or diced pieces aesthetically on top, creating a vibrant contrast. I then sprinkle the remaining toasted sesame seeds for an extra pop of nutty flavor and undeniable visual appeal. If I want even more savory umami goodness, now is absolutely the time for another sprinkle of furikake – it just adds that extra special something!
- The Ultimate Drizzle: For the absolute ultimate presentation and a final, powerful flavor boost, I love to drizzle extra Japanese mayonnaise and sriracha in a stylish crisscross pattern over the very top. This artistic touch not only looks absolutely fantastic and professional but also adds a final, rich layer of creaminess and that signature spice that truly elevates the entire dish, making it look as good as it tastes.
- Serve It Up and Enjoy: With a sharp knife, I carefully cut the Spicy Salmon Sushi Bake into neat squares or rectangles directly in the baking dish. I usually aim for about 12-16 pieces, depending on how generous I want each serving to be. I serve it warm, directly from the dish, encouraging everyone to scoop a piece onto one of the crispy roasted seaweed snacks or nori squares. The combination of the warm, savory bake with the crisp, salty seaweed is an absolute delight – a symphony of textures and flavors in every bite! It’s truly an interactive, incredibly satisfying, and memorably delicious meal, perfect for sharing and creating wonderful memories with friends and family. Enjoy every single, delicious, spicy, salmon-packed bite of your fantastic homemade Spicy Salmon Sushi Bake!
Conclusion:
Well, my friends, we’ve reached the delicious culmination of our culinary adventure! If you’ve followed along with this recipe, you now hold the keys to creating a dish that is truly a revelation. I honestly believe this isn’t just another meal; it’s an experience, a delightful fusion that brings the excitement of sushi into the comforting embrace of a warm, baked casserole. It’s the kind of dish that transforms a regular evening into something special, a weekend gathering into a memorable feast. The incredible balance of textures and flavors in this Spicy Salmon Sushi Bake is what truly sets it apart. We’re talking about perfectly seasoned rice, tender, flaky salmon, and that signature creamy, spicy kick that lingers delightfully on your palate.
What makes this particular recipe an absolute must-try, in my humble opinion, is its ingenious simplicity combined with its profound deliciousness. You get all the sophisticated, satisfying flavors you crave from a sushi bar, but without the intricate rolling techniques or the need for pristine raw fish expertise. It’s accessible gourmet, if you will! The way the rice develops a slightly crisp bottom layer while remaining fluffy on top, the luscious salmon blend that’s both rich and zesty, and the vibrant garnishes – it all comes together in a symphony of taste and texture. It’s truly a dish that punches above its weight, delivering maximum flavor with minimal fuss. Plus, the aroma that fills your kitchen as it bakes? Absolutely intoxicating and promises something spectacular is about to emerge from the oven. This recipe simplifies the complexity of sushi while amplifying its most beloved elements.
Now, let’s talk about enjoying your masterpiece. While it’s utterly fantastic straight from the oven, there are so many wonderful ways to serve and personalize your Spicy Salmon Sushi Bake. My absolute favorite method is to scoop generous portions onto sheets of toasted nori seaweed. The crispness of the nori provides a fantastic textural contrast to the soft bake, and it mimics the hand-roll experience beautifully. You can make little bundles, or simply use it as a scoop! For a lighter, fresher approach, try serving it in crisp lettuce cups – butter lettuce or gem lettuce work wonderfully – offering a refreshing crunch that balances the richness. Don’t forget those essential garnishes: a generous sprinkle of sliced green onions, a dusting of toasted sesame seeds (both white and black for visual appeal!), and a drizzle of extra sriracha mayo for those who crave an additional fiery punch. If you want to go all out, a few slices of fresh avocado or a dollop of tobiko (flying fish roe) can elevate the presentation and add even more layers of flavor and texture. Think of it as your culinary canvas, ready for your personal touch!
And the beauty doesn’t stop there, my friends, because this recipe is also incredibly versatile, inviting you to experiment and make it your very own. Don’t have salmon on hand? Cooked tuna, shredded imitation crab, or even baked shrimp would be fantastic alternatives. For a vegetarian twist, consider using baked tofu or marinated mushrooms that are sautéed and crumbled for a similar texture. Feel free to adjust the spice level to your preference; add more sriracha for a serious kick, or dial it back with less if you prefer a milder flavor, perhaps even mixing it with a bit of sweet chili sauce. You could even introduce a hint of sweetness with a touch of unagi sauce drizzled over the top before serving, which creates a wonderful sweet and savory dynamic. Want more veggies? Finely diced cucumber, a sprinkle of shredded carrots, or even some edamame could be mixed into the rice layer before baking for added freshness, crunch, and nutritional value. The possibilities are truly endless, and that’s what makes home cooking so exciting – it’s all about tailoring it to your taste buds and whatever ingredients you have on hand to make it uniquely yours.
So, what are you waiting for? I wholeheartedly encourage you to roll up your sleeves, gather your ingredients, and give this extraordinary recipe a try. Trust me, the joy of pulling that golden-brown, bubbling dish from the oven and savoring your first bite is an experience you won’t soon forget. It’s a moment of culinary triumph that’s wonderfully rewarding and surprisingly easy to achieve. Once you’ve whipped up your own batch, I would absolutely love to hear about it! Please don’t hesitate to share your experiences, your clever variations, or even photos of your creations. Tag me on social media, leave a comment below, or drop me an email – your feedback and shared kitchen adventures truly inspire me and help this community grow. Let’s celebrate the deliciousness together and spread the word about this fantastic, easy-to-make dish!
Happy baking, happy eating, and remember: life’s too short for bland food. Dive into the world of flavor with this incredible dish, and let your taste buds rejoice!

Spicy Salmon Sushi Bake
Experience the vibrant flavors of your favorite sushi roll without the intricate rolling technique. This warm, deconstructed sushi dish features layers of perfectly seasoned rice, a creamy and wonderfully spicy salmon mixture, and melted mozzarella, all baked to golden perfection. It’s a convenient, crowd-pleasing meal blending comfort food with Japanese-inspired cuisine.
Ingredients
-
2 cups cooked sushi rice
-
1 tablespoon rice vinegar
-
½ teaspoon sugar
-
½ teaspoon salt
-
12 oz skinless salmon fillet, cooked and flaked
-
¼ cup mayonnaise
-
2 tablespoons Sriracha sauce
-
1 tablespoon soy sauce
-
1 teaspoon sesame oil
-
½ cup shredded mozzarella cheese
-
2 sheets roasted seaweed (nori), cut into small squares
-
2 green onions, thinly sliced
-
1 tablespoon toasted sesame seeds
Instructions
-
Step 1
In a large non-metallic bowl, gently fold the cooked sushi rice with 1 tablespoon rice vinegar, ½ teaspoon sugar, and ½ teaspoon salt until evenly coated. Set aside to cool slightly. -
Step 2
Preheat oven to 400°F (200°C). Place the 12 oz skinless salmon fillet on a parchment-lined baking sheet. Bake for 12-15 minutes, or until cooked through and easily flaked with a fork. Let cool slightly, then flake into bite-sized pieces. -
Step 3
In a separate bowl, whisk together ¼ cup mayonnaise, 2 tablespoons Sriracha sauce, 1 tablespoon soy sauce, and 1 teaspoon sesame oil until smooth. Add the flaked salmon to this mixture and gently fold until fully coated. -
Step 4
Lightly grease a 9×13 inch baking dish. Evenly spread the seasoned sushi rice into the bottom, pressing gently to form a compact layer. Spread the spicy salmon mixture over the rice. Sprinkle ½ cup shredded mozzarella cheese and half of the toasted sesame seeds over the salmon layer. -
Step 5
Bake in the preheated oven for 15-20 minutes, or until the top is golden brown and bubbling enticingly around the edges. Remove from oven and let rest for 5-10 minutes. -
Step 6
Garnish with thinly sliced green onions and the remaining toasted sesame seeds. Cut into squares and serve warm, encouraging everyone to scoop a piece onto one of the crispy roasted seaweed snacks or nori squares.
Important Information
Nutrition Facts (Per Serving)
It is important to consider this information as approximate and not to use it as definitive health advice.
Allergy Information
Please check ingredients for potential allergens and consult a health professional if in doubt.