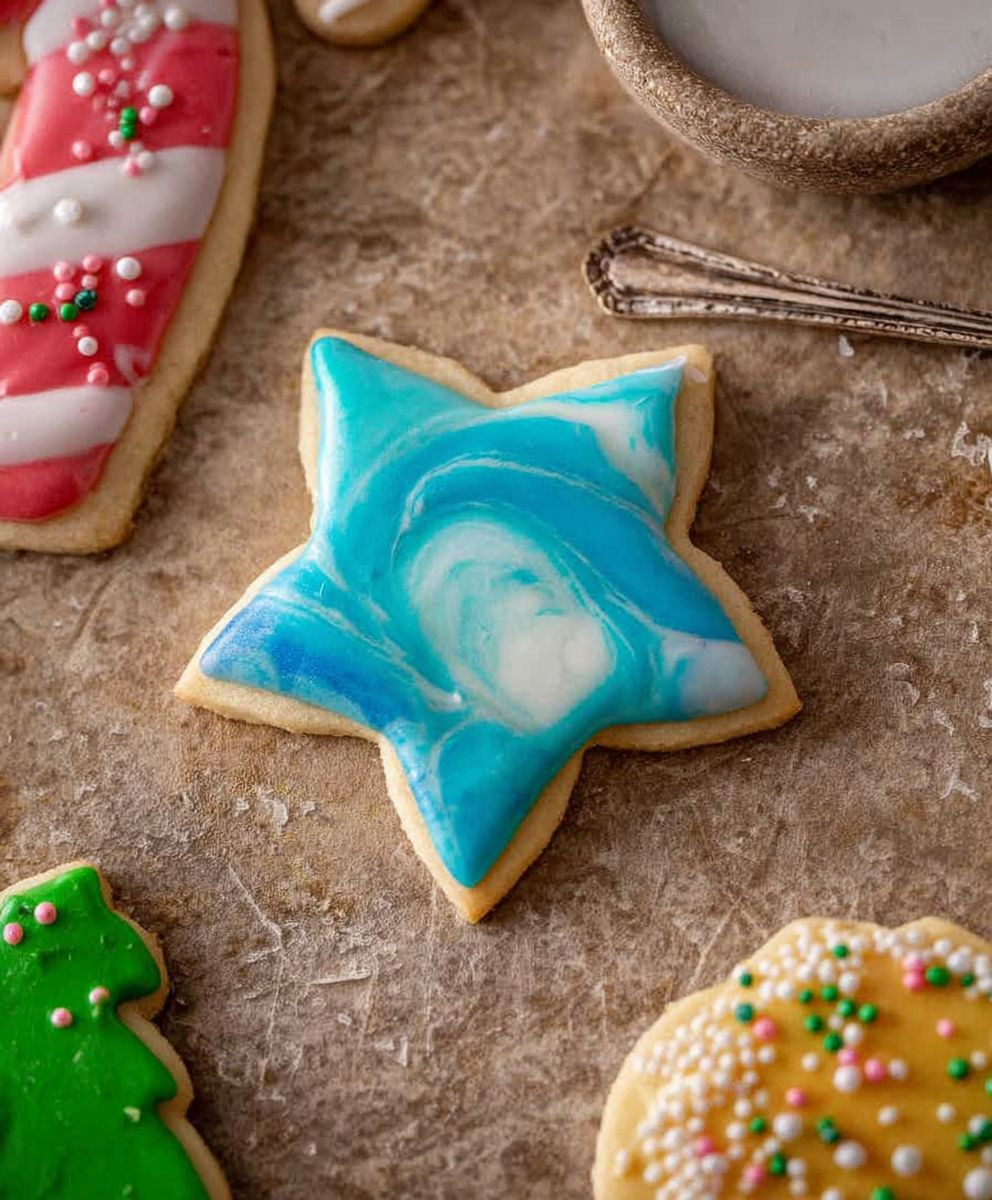
Sugar cookie icing that hardens to a smooth, glossy finish is the secret weapon of every holiday baker! Have you ever admired those picture-perfect sugar cookies, wondering how they achieve that flawless, almost porcelain-like surface? The answer lies in mastering the art of royal icing, a technique that transforms humble sugar cookies into edible masterpieces.
Royal icing, with its roots tracing back to the Elizabethan era, was initially used for elaborate cake decorations. Over time, it found its way onto cookies, offering a blank canvas for intricate designs and vibrant colors. It’s more than just a topping; it’s a tradition, a way to express creativity and share joy during festive seasons.
What makes sugar cookie icing that hardens so beloved? It’s the perfect combination of aesthetics and practicality. The hardened icing not only creates a beautiful, professional-looking finish, but it also seals the cookie, keeping it fresh for longer. Plus, the smooth, slightly sweet taste complements the buttery flavor of the cookie perfectly. Whether you’re a seasoned baker or a beginner, mastering this technique will elevate your sugar cookie game and impress your friends and family. Let’s dive into the secrets of achieving that perfect, hardened sugar cookie icing!

Ingredients:
- 2 cups (240g) powdered sugar, sifted
- 4-6 tablespoons milk (start with 4 and add more as needed)
- 1/2 teaspoon vanilla extract (or other flavoring, like almond or lemon)
- Gel food coloring (various colors, as desired)
- Optional: 1 tablespoon light corn syrup (for extra shine and smoothness)
- Optional: Sprinkles, edible glitter, or other decorations
Preparing the Royal Icing:
Alright, let’s get started on making this royal icing! It’s surprisingly simple, but getting the consistency just right is key. Don’t worry, I’ll walk you through it.
- Sift the Powdered Sugar: This is a crucial step! Sifting the powdered sugar removes any lumps, ensuring a smooth and even icing. Trust me, you don’t want any gritty bits in your beautiful cookies. Use a fine-mesh sieve and gently tap the side to help the sugar pass through.
- Combine Sugar and Milk: In a large bowl (or the bowl of your stand mixer), add the sifted powdered sugar and 4 tablespoons of milk. If you’re using a stand mixer, use the paddle attachment. If you’re mixing by hand, a sturdy whisk will do the trick.
- Mix Until Smooth: Begin mixing on low speed (or gently whisking by hand) until the sugar and milk start to come together. Gradually increase the speed to medium and continue mixing until the icing is smooth and glossy. This should take about 2-3 minutes.
- Adjust Consistency: This is where things get a little tricky, but don’t panic! The ideal consistency for royal icing is somewhere between toothpaste and glue. It should be thick enough to hold its shape but thin enough to spread easily.
- Too Thick: If the icing is too thick, add milk, one teaspoon at a time, mixing well after each addition, until you reach the desired consistency. Be careful not to add too much milk at once, as it’s easier to thin it out than to thicken it back up.
- Too Thin: If the icing is too thin, add more sifted powdered sugar, one tablespoon at a time, mixing well after each addition, until you reach the desired consistency. Again, add gradually to avoid making it too thick.
A good test is the “10-second rule.” Drop a spoonful of icing back into the bowl. It should take about 10 seconds for the surface to become smooth again. If it takes longer, it’s too thick. If it disappears immediately, it’s too thin.
- Add Flavoring: Once you’ve achieved the right consistency, add the vanilla extract (or your flavoring of choice). Mix well to incorporate.
- Add Corn Syrup (Optional): If you want your icing to have a beautiful shine and a smoother texture, add the light corn syrup. Mix well until fully incorporated.
Coloring the Icing:
Now for the fun part – adding color! Gel food coloring is the best choice for royal icing because it’s highly concentrated and won’t change the consistency as much as liquid food coloring. Remember, a little goes a long way!
- Divide the Icing: Divide the icing into separate bowls, depending on how many colors you want to create. I usually use small bowls or ramekins.
- Add Food Coloring: Add a tiny drop of gel food coloring to each bowl. Use a toothpick or the end of a small spoon to transfer the coloring.
- Mix Thoroughly: Mix the food coloring into the icing until it’s evenly distributed. Start with a small amount of coloring and add more gradually until you achieve the desired shade. Remember, the color will deepen slightly as the icing sits.
- Adjust Color as Needed: If the color is too light, add another drop of food coloring. If it’s too dark, you can try adding a tiny bit of white icing to lighten it.
Preparing for Decorating:
Before you start decorating, you’ll need to get everything ready. This includes preparing your piping bags (if you’re using them) and gathering your decorations.
- Prepare Piping Bags (Optional): If you’re using piping bags, fit them with the desired tips. I recommend using a small round tip for outlining and flooding, and smaller tips for detail work. If you don’t have piping bags, you can use zip-top bags with a small corner snipped off.
- Fill Piping Bags: Carefully spoon the colored icing into the piping bags. Don’t overfill them, as they can be difficult to handle. Twist the top of the bag to seal it.
- Gather Decorations: Have your sprinkles, edible glitter, or other decorations ready to go. It’s helpful to have them in small bowls or containers for easy access.
- Prepare Your Cookies: Make sure your sugar cookies are completely cool before you start decorating. This will prevent the icing from melting or running.
Decorating Your Sugar Cookies:
Okay, the moment we’ve been waiting for! Let’s decorate those cookies. Remember, practice makes perfect, so don’t be discouraged if your first few attempts aren’t exactly what you envisioned. Just have fun with it!
- Outline the Cookie: Using a piping bag fitted with a small round tip (or a zip-top bag with a small corner snipped off), outline the edge of the cookie with icing. This will create a dam to contain the flood icing.
- Flood the Cookie: Thin the remaining icing with a few drops of milk until it reaches a “flood consistency.” This means it should be thin enough to spread easily but not so thin that it runs off the cookie. Use a spoon or squeeze bottle to fill in the outlined area with the thinned icing.
- Pop Air Bubbles: If you see any air bubbles in the icing, use a toothpick or scribe tool to gently pop them. This will create a smooth, even surface.
- Add Decorations: While the icing is still wet, add your sprinkles, edible glitter, or other decorations. The decorations will adhere to the wet icing.
- Add Details (Optional): Once the base layer of icing has dried slightly (about 30 minutes), you can add details with a thicker consistency icing. This could include lines, dots, swirls, or other intricate designs.
- Let the Icing Dry Completely: This is the most important step! Allow the icing to dry completely before stacking or packaging the cookies. This can take several hours, or even overnight, depending on the humidity and the thickness of the icing. The icing should be hard to the touch.
Troubleshooting:
Sometimes, things don’t go exactly as planned. Here are a few common problems and how to fix them:
- Icing is too thick: Add milk, one teaspoon at a time, until you reach the desired consistency.
- Icing is too thin: Add sifted powdered sugar, one tablespoon at a time, until you reach the desired consistency.
- Icing is cracking: This can happen if the icing dries too quickly. Try adding a little bit of glycerin to the icing to help it retain moisture. You can also try covering the cookies with plastic wrap while they dry.
- Colors are bleeding: This can happen if you use too much liquid food coloring. Stick to gel food coloring and use it sparingly.
- Icing is not hardening: Make sure you’re using enough powdered sugar and not too much liquid. Also, ensure the cookies are drying in a cool, dry place. High humidity can prevent the icing from hardening properly.
Tips for Success:
Here are a few extra tips to help you achieve sugar cookie icing perfection:
- Use high-quality ingredients: The better the ingredients, the better the icing will taste and look.
- Sift the powdered sugar: This is essential for a smooth, lump-free icing.
- Adjust the consistency gradually: Add milk or powdered sugar a little at a time until you reach the desired consistency.
- Use gel food coloring: It’s more concentrated and won’t change the consistency of the icing as much as liquid food coloring.
- Let the icing dry completely: This is crucial for preventing smudging and ensuring that the decorations stay in place.
- Practice makes perfect: Don’t be discouraged if your first few attempts aren’t perfect. Just keep practicing and you’ll get the

Conclusion:
And there you have it! This recipe for sugar cookie icing that hardens is truly a game-changer, especially if you’re tired of smudged masterpieces and sticky fingers. I’ve been using this method for years, and it consistently delivers beautiful, professional-looking results. The key is the balance of ingredients and following the steps carefully, but trust me, the effort is absolutely worth it.
Why is this a must-try? Because it takes the stress out of decorating! No more worrying about your intricate designs melting or getting ruined before you can even display them. This icing hardens to a smooth, glossy finish that’s not only visually appealing but also protects your cookies, making them perfect for gifting, shipping, or simply enjoying without making a mess. Plus, the flavor is fantastic – a delicate sweetness that complements any sugar cookie recipe.
But the fun doesn’t stop there! Feel free to get creative with your decorations. This icing is a blank canvas just waiting for your artistic touch. Use different food colorings to create vibrant hues, experiment with various piping tips for intricate designs, or add sprinkles, edible glitter, or even small candies for extra flair.
Serving Suggestions and Variations:
* For a festive touch, add a few drops of peppermint extract to the icing during the holidays.
* If you prefer a slightly tangier flavor, substitute a tablespoon of lemon juice for some of the milk.
* Want to make chocolate sugar cookies? Add a tablespoon of cocoa powder to the dry ingredients in the icing recipe for a delicious chocolate glaze.
* These cookies are fantastic served with a warm cup of coffee or tea. They also make a delightful addition to any dessert platter.
* Consider packaging them in decorative tins or cellophane bags for a thoughtful and homemade gift.
* For a fun activity with kids, let them decorate their own cookies using this icing. It’s a great way to spend quality time together and unleash their creativity.I’m confident that this recipe will become a staple in your baking repertoire. It’s reliable, versatile, and produces stunning results every time. The ability to create cookies with icing that hardens opens up a whole new world of decorating possibilities.
So, what are you waiting for? Gather your ingredients, preheat your oven, and get ready to create some edible masterpieces! I’m so excited for you to try this recipe and experience the joy of perfectly decorated sugar cookies.
And most importantly, I want to hear about your experience! Did you try any variations? What designs did you create? Share your photos and stories in the comments below. I can’t wait to see your creations and learn from your experiences. Happy baking! Let me know if you have any questions, and I’ll do my best to help. I hope you find that this recipe for sugar cookie icing that hardens is as helpful and enjoyable as I do!
Sugar Cookie Icing Hardens: The Ultimate Guide to Perfect Results
Easy royal icing for decorating sugar cookies. Achieve perfect consistency and vibrant colors for stunning cookie designs.
Ingredients
- 2 cups (240g) powdered sugar, sifted
- 4-6 tablespoons milk (start with 4 and add more as needed)
- 1/2 teaspoon vanilla extract (or other flavoring, like almond or lemon)
- Gel food coloring (various colors, as desired)
- Optional: 1 tablespoon light corn syrup (for extra shine and smoothness)
- Optional: Sprinkles, edible glitter, or other decorations
Instructions
- Sift the Powdered Sugar: Sift the powdered sugar using a fine-mesh sieve to remove any lumps.
- Combine Sugar and Milk: In a large bowl (or stand mixer bowl), combine sifted powdered sugar and 4 tablespoons of milk.
- Mix Until Smooth: Mix on low speed (or whisk by hand) until combined. Gradually increase speed to medium and mix until smooth and glossy (2-3 minutes).
- Adjust Consistency:
- Too Thick: Add milk, 1 teaspoon at a time, until desired consistency is reached.
- Too Thin: Add sifted powdered sugar, 1 tablespoon at a time, until desired consistency is reached.
- *10-second rule: Drop a spoonful of icing back into the bowl. It should take about 10 seconds for the surface to become smooth again.*
- Add Flavoring: Add vanilla extract (or other flavoring) and mix well.
- Add Corn Syrup (Optional): Add light corn syrup for shine and smoothness. Mix well.
- Divide the Icing: Divide the icing into separate bowls, depending on how many colors you want to create.
- Add Food Coloring: Add a tiny drop of gel food coloring to each bowl.
- Mix Thoroughly: Mix the food coloring into the icing until it’s evenly distributed.
- Adjust Color as Needed: If the color is too light, add another drop of food coloring. If it’s too dark, you can try adding a tiny bit of white icing to lighten it.
- Prepare Piping Bags (Optional): Fit piping bags with desired tips.
- Fill Piping Bags: Carefully spoon the colored icing into the piping bags.
- Gather Decorations: Have your sprinkles, edible glitter, or other decorations ready to go.
- Prepare Your Cookies: Make sure your sugar cookies are completely cool before you start decorating.
- Outline the Cookie: Using a piping bag fitted with a small round tip (or a zip-top bag with a small corner snipped off), outline the edge of the cookie with icing.
- Flood the Cookie: Thin the remaining icing with a few drops of milk until it reaches a “flood consistency.” Use a spoon or squeeze bottle to fill in the outlined area with the thinned icing.
- Pop Air Bubbles: If you see any air bubbles in the icing, use a toothpick or scribe tool to gently pop them.
- Add Decorations: While the icing is still wet, add your sprinkles, edible glitter, or other decorations.
- Add Details (Optional): Once the base layer of icing has dried slightly (about 30 minutes), you can add details with a thicker consistency icing.
- Let the Icing Dry Completely: Allow the icing to dry completely before stacking or packaging the cookies. This can take several hours, or even overnight, depending on the humidity and the thickness of the icing. The icing should be hard to the touch.
Notes
- Getting the right consistency is key. Aim for something between toothpaste and glue.
- Gel food coloring is recommended over liquid food coloring.
- A little food coloring goes a long way.
- Let the icing dry completely before stacking or packaging cookies.
- If icing is cracking, try adding a little bit of glycerin to the icing to help it retain moisture. You can also try covering the cookies with plastic wrap while they dry.
- If colors are bleeding, Stick to gel food coloring and use it sparingly.
- If icing is not hardening, Make sure you’re using enough powdered sugar and not too much liquid. Also, ensure the cookies are drying in a cool, dry place. High humidity can prevent the icing from hardening properly.