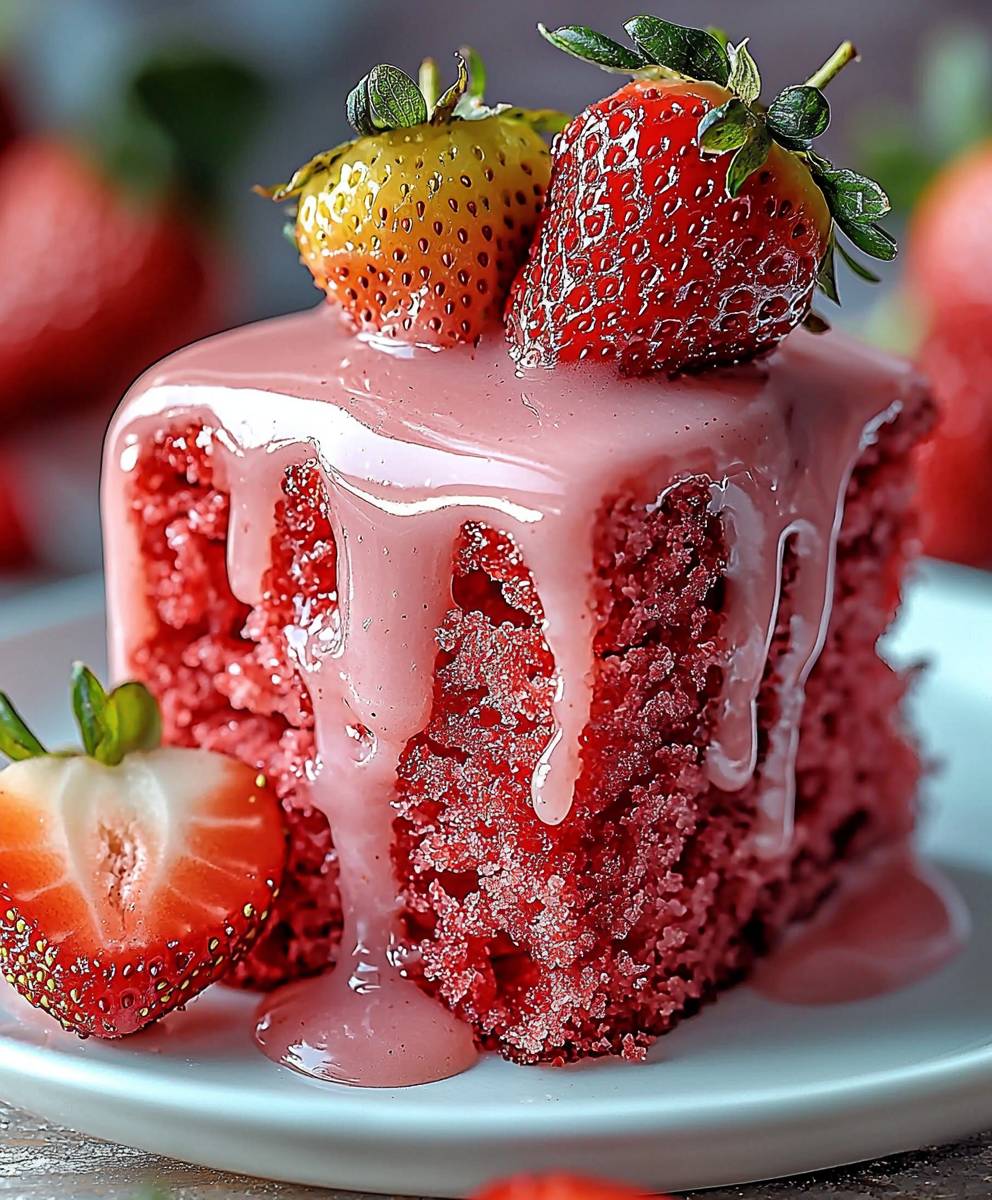
Strawberry Swirl Cake: just the name conjures up images of sunshine, picnics, and pure, unadulterated joy, doesn’t it? Imagine sinking your fork into a slice of moist, tender cake, each bite bursting with the sweet, tangy flavor of fresh strawberries, beautifully swirled throughout a light and airy vanilla base. This isn’t just a cake; it’s a celebration of summer, a nostalgic trip back to childhood, and a guaranteed crowd-pleaser all rolled into one delightful dessert.
While the exact origins of swirled cakes are a bit hazy, the technique of marbling different flavors together has been used in baking for centuries. Think of the classic marble cake, a close cousin to our star today. The beauty of a Strawberry Swirl Cake lies in its simplicity and adaptability. It’s a relatively easy cake to bake, making it perfect for both seasoned bakers and those just starting their culinary journey.
But why do people adore this particular cake so much? Beyond its stunning visual appeal, the combination of flavors and textures is simply irresistible. The sweetness of the vanilla cake perfectly complements the tartness of the strawberries, creating a harmonious balance that dances on your taste buds. The moist, tender crumb ensures every bite is a delight. Plus, it’s incredibly versatile! Serve it as a show-stopping centerpiece at a summer barbecue, a comforting treat on a rainy afternoon, or a special dessert for any occasion. Trust me, once you try this recipe, it will quickly become a family favorite!

Ingredients:
- For the Cake:
- 2 ½ cups all-purpose flour
- 2 teaspoons baking powder
- ½ teaspoon baking soda
- ½ teaspoon salt
- 1 cup (2 sticks) unsalted butter, softened
- 1 ¾ cups granulated sugar
- 2 large eggs
- 1 teaspoon vanilla extract
- 1 cup buttermilk
- For the Strawberry Swirl:
- 1 pound fresh strawberries, hulled and quartered
- ¼ cup granulated sugar
- 1 tablespoon lemon juice
- 1 teaspoon cornstarch
- Red food coloring (optional, for a more vibrant color)
- For the Cream Cheese Frosting:
- 8 ounces cream cheese, softened
- ½ cup (1 stick) unsalted butter, softened
- 4 cups powdered sugar
- 1 teaspoon vanilla extract
- 2-4 tablespoons milk or heavy cream (for desired consistency)
Preparing the Strawberry Swirl:
- Macerate the Strawberries: In a medium saucepan, combine the quartered strawberries and ¼ cup of granulated sugar. Let this mixture sit for about 15-20 minutes. This process, called maceration, draws out the natural juices from the strawberries, creating a flavorful base for our swirl. You’ll notice the strawberries become softer and release a beautiful, ruby-red liquid.
- Cook the Strawberry Mixture: Place the saucepan over medium heat. Bring the strawberry mixture to a simmer, stirring occasionally. Once simmering, reduce the heat to low and continue to cook for about 10-15 minutes, or until the strawberries have softened significantly and the mixture has thickened slightly. Be careful not to burn the mixture; stir frequently. The goal is to create a jam-like consistency.
- Thicken with Cornstarch: In a small bowl, whisk together the lemon juice and cornstarch until smooth. This prevents lumps from forming when you add it to the hot strawberry mixture. Pour the cornstarch slurry into the saucepan and stir constantly. Continue to cook for another 1-2 minutes, or until the mixture has thickened to your desired consistency. Remember, it will thicken further as it cools.
- Puree the Strawberry Swirl: Remove the saucepan from the heat and let the strawberry mixture cool slightly. Once slightly cooled, transfer the mixture to a blender or food processor. Pulse until smooth. If you prefer a chunkier swirl, you can leave some small pieces of strawberry. If you want a more vibrant red color, add a few drops of red food coloring at this stage. I usually add just a tiny bit to enhance the natural color.
- Cool Completely: Pour the pureed strawberry swirl into a bowl and cover it with plastic wrap, pressing the plastic wrap directly onto the surface of the swirl to prevent a skin from forming. Refrigerate for at least 30 minutes, or until completely cooled. This is crucial because you don’t want to add warm strawberry swirl to your cake batter, as it could affect the texture.
Preparing the Cake Batter:
- Preheat and Prepare Pans: Preheat your oven to 350°F (175°C). Grease and flour two 9-inch round cake pans. You can also use baking spray with flour. This ensures that the cakes release easily from the pans after baking. Alternatively, you can line the bottoms of the pans with parchment paper rounds for extra insurance.
- Combine Dry Ingredients: In a medium bowl, whisk together the flour, baking powder, baking soda, and salt. Whisking ensures that the ingredients are evenly distributed, which is essential for a light and airy cake.
- Cream Butter and Sugar: In a large bowl, using an electric mixer, cream together the softened butter and granulated sugar until light and fluffy. This usually takes about 3-5 minutes. Creaming the butter and sugar incorporates air into the mixture, which contributes to the cake’s tender crumb.
- Add Eggs and Vanilla: Beat in the eggs one at a time, mixing well after each addition. Then, stir in the vanilla extract. Make sure the eggs are at room temperature; this helps them emulsify properly with the butter and sugar.
- Alternate Wet and Dry Ingredients: Gradually add the dry ingredients to the wet ingredients, alternating with the buttermilk, beginning and ending with the dry ingredients. Mix until just combined. Be careful not to overmix the batter, as this can develop the gluten in the flour and result in a tough cake. I usually add the dry ingredients in three additions and the buttermilk in two additions.
Swirling and Baking the Cake:
- Divide the Batter: Divide the cake batter evenly between the two prepared cake pans.
- Add the Strawberry Swirl: Drop spoonfuls of the cooled strawberry swirl over the top of each cake layer. Use a knife or skewer to gently swirl the strawberry mixture into the batter. Be careful not to over-swirl, as this can muddy the colors and create a less defined swirl. I like to create a marbled effect.
- Bake the Cakes: Bake for 30-35 minutes, or until a wooden skewer inserted into the center of the cake comes out clean. The baking time may vary depending on your oven, so keep an eye on the cakes.
- Cool the Cakes: Let the cakes cool in the pans for 10 minutes before inverting them onto a wire rack to cool completely. Make sure the cakes are completely cool before frosting, or the frosting will melt.
Preparing the Cream Cheese Frosting:
- Cream Cheese and Butter: In a large bowl, using an electric mixer, cream together the softened cream cheese and butter until smooth and creamy. Make sure both the cream cheese and butter are at room temperature to prevent lumps in the frosting.
- Add Powdered Sugar: Gradually add the powdered sugar, one cup at a time, mixing on low speed until combined. Mixing on low speed prevents the powdered sugar from creating a cloud of dust.
- Add Vanilla and Milk: Stir in the vanilla extract. Then, add the milk or heavy cream, one tablespoon at a time, until the frosting reaches your desired consistency. I prefer a slightly thicker frosting, so I usually only add 2 tablespoons of milk.
Assembling the Cake:
- Level the Cakes (Optional): If the cakes have domed on top, use a serrated knife to level them. This will create a more even surface for frosting.
- Frost the First Layer: Place one cake layer on a serving plate or cake stand. Spread a generous layer of cream cheese frosting over the top.
- Add the Second Layer: Carefully place the second cake layer on top of the frosting.
- Frost the Entire Cake: Frost the top and sides of the cake with the remaining cream cheese frosting. You can create a smooth finish or a more rustic, textured look.
- Chill (Optional): For easier slicing, chill the cake in the refrigerator for at least 30 minutes before serving. This allows the frosting to set.
- Garnish (Optional): Garnish the cake with fresh strawberries, strawberry slices, or a drizzle of strawberry sauce. You can also sprinkle some powdered sugar on top for a more elegant look.
Conclusion:
This Strawberry Swirl Cake isn’t just another cake recipe; it’s a guaranteed crowd-pleaser, a burst of summer in every bite, and a surprisingly simple way to impress your friends and family. From the moist, tender crumb to the vibrant ribbons of strawberry goodness, this cake offers a delightful balance of flavors and textures that will leave everyone wanting more. I truly believe this is a must-try recipe for any home baker, regardless of your skill level.
But why is it so special? Well, beyond the obvious deliciousness, it’s the versatility that really sets it apart. The base cake is incredibly adaptable, meaning you can easily tweak it to suit your preferences. Not a fan of strawberries? No problem! Try swirling in raspberry jam, blueberry compote, or even a tangy lemon curd for a completely different, yet equally amazing, experience. The possibilities are truly endless!
And speaking of possibilities, let’s talk serving suggestions. While this Strawberry Swirl Cake is perfectly delicious on its own, a few simple additions can elevate it to the next level. A dollop of freshly whipped cream, lightly sweetened with vanilla extract, is always a classic choice. For a more decadent treat, try serving it with a scoop of vanilla bean ice cream or a drizzle of warm chocolate sauce. If you’re feeling fancy, you could even create a strawberry shortcake-inspired dessert by layering slices of the cake with macerated strawberries and whipped cream.
For a lighter touch, consider dusting the cake with powdered sugar or serving it with a side of fresh berries. It’s also fantastic with a cup of coffee or tea for an afternoon treat. And don’t forget about brunch! This cake is the perfect addition to any brunch spread, adding a touch of sweetness and elegance to your table.
Variations are also encouraged! If you’re looking for a gluten-free option, simply substitute the all-purpose flour with a gluten-free blend. You can also add a touch of almond extract to the batter for a subtle nutty flavor. For a richer cake, try using brown butter instead of melted butter. And if you’re feeling adventurous, you could even add a layer of cream cheese frosting for an extra decadent treat.
I’ve poured my heart into perfecting this recipe, and I’m confident that you’ll love it as much as I do. It’s a recipe that’s meant to be shared, enjoyed, and adapted to your own personal tastes. So, what are you waiting for? Gather your ingredients, preheat your oven, and get ready to bake up a batch of this irresistible Strawberry Swirl Cake.
I truly encourage you to give this recipe a try. I’m so excited for you to experience the joy of baking and sharing this delicious cake with your loved ones. And most importantly, I want to hear about your experience! Did you make any modifications? What did your family and friends think? Share your photos and stories with me in the comments below. I can’t wait to see your creations and hear all about your baking adventures! Happy baking!
Strawberry Swirl Cake: A Delicious & Easy Recipe
A delightful strawberry swirl cake with a tangy cream cheese frosting. This cake features a moist vanilla base, a homemade strawberry swirl, and a luscious cream cheese frosting.
Ingredients
- 2 ½ cups all-purpose flour
- 2 teaspoons baking powder
- ½ teaspoon baking soda
- ½ teaspoon salt
- 1 cup (2 sticks) unsalted butter, softened
- 1 ¾ cups granulated sugar
- 2 large eggs
- 1 teaspoon vanilla extract
- 1 cup buttermilk
- 1 pound fresh strawberries, hulled and quartered
- ¼ cup granulated sugar
- 1 tablespoon lemon juice
- 1 teaspoon cornstarch
- Red food coloring (optional, for a more vibrant color)
- 8 ounces cream cheese, softened
- ½ cup (1 stick) unsalted butter, softened
- 4 cups powdered sugar
- 1 teaspoon vanilla extract
- 2-4 tablespoons milk or heavy cream (for desired consistency)
Instructions
- In a medium saucepan, combine the quartered strawberries and ¼ cup of granulated sugar. Let sit for 15-20 minutes.
- Place the saucepan over medium heat. Bring the strawberry mixture to a simmer, stirring occasionally. Reduce the heat to low and continue to cook for 10-15 minutes, or until the strawberries have softened significantly and the mixture has thickened slightly. Stir frequently.
- In a small bowl, whisk together the lemon juice and cornstarch until smooth. Pour the cornstarch slurry into the saucepan and stir constantly. Continue to cook for another 1-2 minutes, or until the mixture has thickened to your desired consistency.
- Remove the saucepan from the heat and let the strawberry mixture cool slightly. Transfer the mixture to a blender or food processor. Pulse until smooth. If desired, add a few drops of red food coloring.
- Pour the pureed strawberry swirl into a bowl and cover it with plastic wrap, pressing the plastic wrap directly onto the surface of the swirl. Refrigerate for at least 30 minutes, or until completely cooled.
- Preheat your oven to 350°F (175°C). Grease and flour two 9-inch round cake pans.
- In a medium bowl, whisk together the flour, baking powder, baking soda, and salt.
- In a large bowl, using an electric mixer, cream together the softened butter and granulated sugar until light and fluffy (3-5 minutes).
- Beat in the eggs one at a time, mixing well after each addition. Then, stir in the vanilla extract.
- Gradually add the dry ingredients to the wet ingredients, alternating with the buttermilk, beginning and ending with the dry ingredients. Mix until just combined.
- Divide the cake batter evenly between the two prepared cake pans.
- Drop spoonfuls of the cooled strawberry swirl over the top of each cake layer. Use a knife or skewer to gently swirl the strawberry mixture into the batter.
- Bake for 30-35 minutes, or until a wooden skewer inserted into the center of the cake comes out clean.
- Let the cakes cool in the pans for 10 minutes before inverting them onto a wire rack to cool completely.
- In a large bowl, using an electric mixer, cream together the softened cream cheese and butter until smooth and creamy.
- Gradually add the powdered sugar, one cup at a time, mixing on low speed until combined.
- Stir in the vanilla extract. Then, add the milk or heavy cream, one tablespoon at a time, until the frosting reaches your desired consistency.
- If the cakes have domed on top, use a serrated knife to level them.
- Place one cake layer on a serving plate or cake stand. Spread a generous layer of cream cheese frosting over the top.
- Carefully place the second cake layer on top of the frosting.
- Frost the top and sides of the cake with the remaining cream cheese frosting.
- For easier slicing, chill the cake in the refrigerator for at least 30 minutes before serving.
- Garnish the cake with fresh strawberries, strawberry slices, or a drizzle of strawberry sauce.
Notes
- Make sure all refrigerated ingredients (butter, cream cheese, eggs, buttermilk) are at room temperature for best results.
- Don’t overmix the cake batter, as this can lead to a tough cake.
- Cool the strawberry swirl completely before adding it to the cake batter to prevent the batter from becoming too liquid.
- Adjust the amount of milk or heavy cream in the frosting to achieve your desired consistency.
- For a more intense strawberry flavor, you can add a teaspoon of strawberry extract to the cake batter.