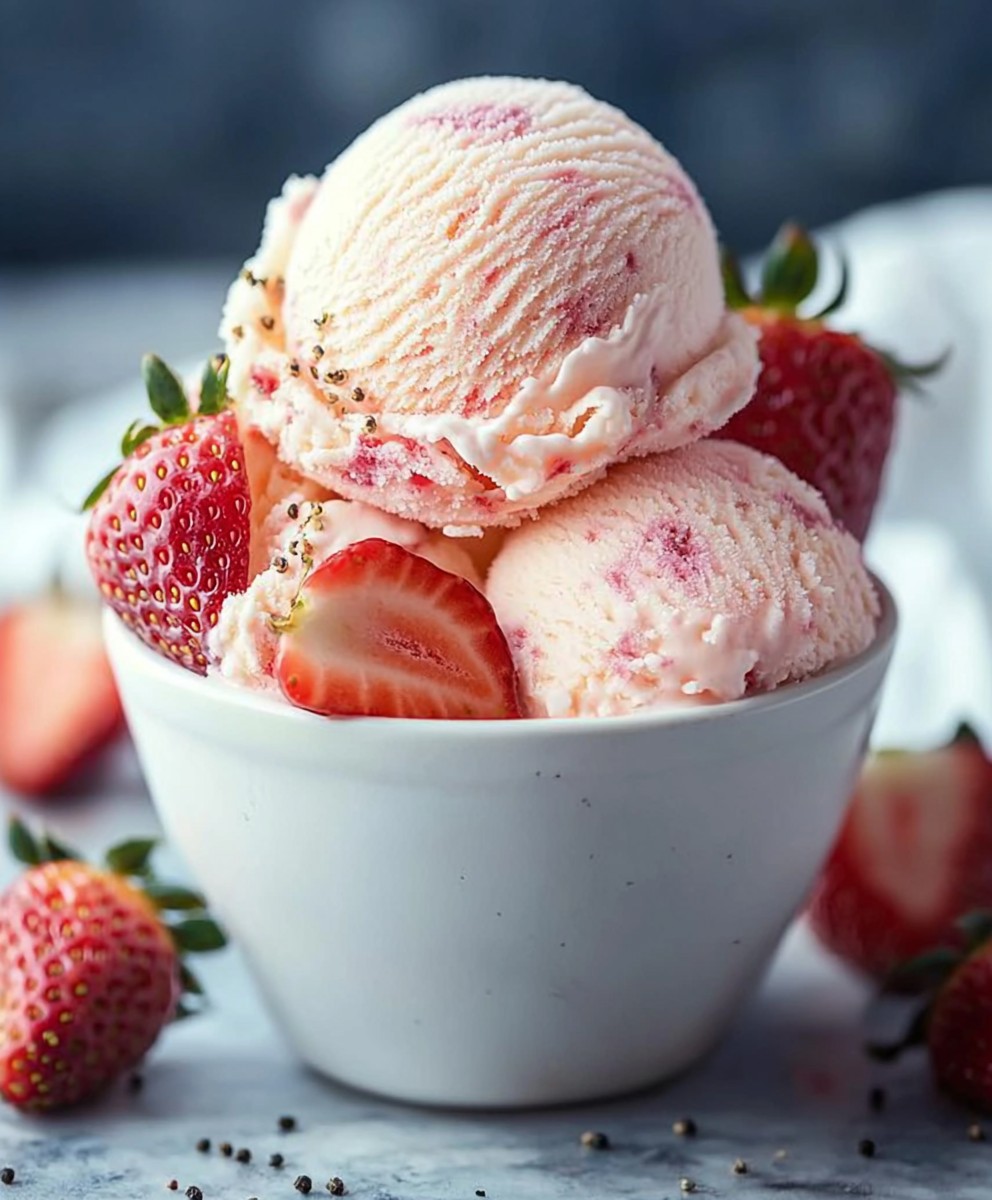
Strawberry Ice Cream, oh, the very words conjure up images of sunny afternoons, laughter, and pure, unadulterated joy! But what if I told you that you could capture that feeling in a homemade batch, bursting with fresh strawberry flavor, and ready in just a few simple steps? Forget the store-bought stuff – we’re diving headfirst into a world of creamy, dreamy, homemade goodness.
While the exact origins of ice cream are debated, frozen desserts have been enjoyed for centuries. Some historians trace early versions back to ancient China and Rome. However, the modern ice cream we know and love really took off in the 17th century, becoming a treat enjoyed by European royalty and eventually making its way to America. Strawberries, with their vibrant color and sweet-tart taste, quickly became a favorite addition, transforming a simple frozen dessert into something truly special.
What is it about Strawberry Ice Cream that makes it so universally appealing? Perhaps it’s the perfect balance of sweet and tangy, the smooth, melt-in-your-mouth texture, or the sheer nostalgia it evokes. For me, it’s all of the above! Plus, let’s be honest, there’s something incredibly satisfying about creating a dessert from scratch, knowing exactly what ingredients are going into it. So, grab your apron, gather your strawberries, and let’s make some magic!

Ingredients:
- 2 cups (480ml) heavy cream, cold
- 1 cup (240ml) whole milk
- ¾ cup (150g) granulated sugar
- Pinch of salt
- 1 teaspoon pure vanilla extract
- 1 pound (450g) fresh strawberries, hulled and sliced
- 2 tablespoons lemon juice
- Optional: 1-2 tablespoons vodka or other clear spirit (to prevent ice crystals)
Preparing the Strawberry Base:
- First, we need to macerate the strawberries. This helps to draw out their juices and intensify their flavor. In a medium bowl, combine the sliced strawberries with the lemon juice and ¼ cup (50g) of the granulated sugar. Gently stir to combine.
- Cover the bowl with plastic wrap and let it sit at room temperature for at least 30 minutes, or up to 2 hours. The longer they sit, the more flavorful the strawberry base will be. You’ll notice the strawberries release a lot of their juices, creating a beautiful, syrupy mixture.
- After the maceration period, transfer the strawberry mixture to a blender or food processor. Pulse until the strawberries are mostly smooth, but still have a little bit of texture. We don’t want a completely smooth puree; a little bit of strawberry chunkiness is what makes this ice cream so special.
- Taste the strawberry puree. If it’s too tart, you can add a little more sugar, a teaspoon at a time, until you reach your desired sweetness. Remember that the cold temperature will dull the sweetness slightly, so it’s okay if it tastes a little sweeter than you might normally prefer.
- Strain the strawberry puree through a fine-mesh sieve into a clean bowl. This step is optional, but it helps to remove any seeds and create a smoother ice cream. Use a spatula to press the puree against the sieve, extracting as much liquid as possible. Discard the solids left in the sieve.
- Cover the strained strawberry puree and refrigerate it for at least 1 hour, or preferably overnight. This allows the flavors to meld together and the puree to chill completely, which is crucial for making smooth ice cream.
Preparing the Ice Cream Base:
- In a separate medium bowl, whisk together the heavy cream, whole milk, the remaining ½ cup (100g) of granulated sugar, salt, and vanilla extract until the sugar is completely dissolved. Make sure there are no gritty sugar granules left at the bottom of the bowl.
- If you’re using vodka or another clear spirit, add it to the cream mixture now. The alcohol helps to prevent ice crystals from forming, resulting in a smoother, creamier ice cream. Don’t worry, you won’t taste the alcohol in the finished product.
- Cover the cream mixture and refrigerate it for at least 1 hour, or preferably overnight. This allows the mixture to chill completely, which is essential for proper freezing.
Churning the Ice Cream:
- Once both the strawberry puree and the cream mixture are thoroughly chilled, it’s time to churn the ice cream. Make sure your ice cream maker bowl has been properly frozen according to the manufacturer’s instructions. This usually involves freezing it for at least 24 hours.
- Pour the chilled cream mixture into the frozen ice cream maker bowl. Turn on the ice cream maker and let it churn for about 15-20 minutes, or until the mixture thickens to the consistency of soft-serve ice cream.
- While the ice cream base is churning, gently stir the chilled strawberry puree to loosen it up.
- Once the ice cream base has reached the soft-serve consistency, slowly pour the chilled strawberry puree into the ice cream maker while it’s still churning. Let it churn for another 5-10 minutes, or until the strawberry puree is fully incorporated and the ice cream has thickened further.
- Keep an eye on the consistency of the ice cream. You want it to be thick and creamy, but not too hard. If it starts to look too icy, stop churning immediately.
Freezing and Serving:
- Once the ice cream has reached your desired consistency, transfer it to an airtight container. I like to use a freezer-safe container with a tight-fitting lid to prevent freezer burn.
- Gently press a piece of plastic wrap directly onto the surface of the ice cream before sealing the container. This helps to prevent ice crystals from forming on the surface.
- Freeze the ice cream for at least 2-3 hours, or preferably overnight, to allow it to harden completely. This is called “ripening” the ice cream, and it’s an important step for developing the best flavor and texture.
- Before serving, let the ice cream sit at room temperature for about 5-10 minutes to soften slightly. This will make it easier to scoop.
- Scoop the strawberry ice cream into bowls or cones and enjoy! You can garnish it with fresh strawberries, whipped cream, chocolate shavings, or any other toppings you like.
Tips for the Best Strawberry Ice Cream:
- Use the freshest, ripest strawberries you can find. The quality of the strawberries will directly impact the flavor of the ice cream.
- Don’t over-churn the ice cream. Over-churning can result in a grainy texture.
- Chill all of your ingredients thoroughly. This is crucial for making smooth, creamy ice cream.
- If you don’t have an ice cream maker, you can still make this recipe! Simply combine all of the ingredients in a freezer-safe container and freeze for several hours, stirring every 30 minutes to break up ice crystals. This method will result in a slightly icier texture, but it’s still delicious.
- Experiment with different flavors. You can add other fruits, such as raspberries or blueberries, to the strawberry mixture. You can also add spices, such as cinnamon or nutmeg, to the cream mixture.
Variations:
- Strawberry Cheesecake Ice Cream: Add 4 ounces of softened cream cheese to the cream mixture before churning.
- Strawberry Basil Ice Cream: Add a few fresh basil leaves to the strawberry mixture while it’s macerating.
- Vegan Strawberry Ice Cream: Substitute the heavy cream and whole milk with coconut cream and almond milk.
Storage:
Store the strawberry ice cream in an airtight container in the freezer for up to 2 weeks. After that, the texture may start to deteriorate.
Conclusion:
And there you have it! This homemade Strawberry Ice Cream recipe is more than just a dessert; it’s a burst of summer sunshine in every spoonful. I truly believe this is a must-try for anyone who appreciates fresh, vibrant flavors and the simple joy of creating something delicious from scratch. Forget the store-bought stuff loaded with artificial ingredients – this recipe delivers a creamy, dreamy texture and an intense strawberry flavor that you just can’t replicate.
Why is it a must-try? Because it’s incredibly easy! Seriously, if you can blend ingredients and operate an ice cream maker, you’re golden. Plus, the satisfaction of knowing exactly what went into your dessert is priceless. You control the sweetness, the intensity of the strawberry flavor, and the overall quality. It’s a win-win!
But the best part? The taste! The combination of fresh strawberries, cream, and a touch of vanilla creates a symphony of flavors that will have you reaching for seconds (and maybe thirds!). It’s the perfect balance of sweet and tart, creamy and refreshing – everything you could want in a summer treat.
Now, let’s talk serving suggestions and variations because the possibilities are endless! For a classic presentation, scoop it into a waffle cone or a sundae dish and top with whipped cream, fresh strawberries, and a drizzle of chocolate sauce. Or, get a little more creative!
Consider these variations:
* Strawberry Cheesecake Ice Cream: Swirl in some crumbled graham crackers and a dollop of cream cheese frosting for a decadent twist.
* Strawberry Basil Ice Cream: Infuse the cream with fresh basil leaves for a sophisticated and herbaceous flavor.
* Strawberry Rhubarb Ice Cream: Add some cooked rhubarb to the mix for a tangy and slightly tart variation.
* Vegan Strawberry Ice Cream: Substitute the dairy cream with coconut cream or cashew cream for a delicious dairy-free option.
You can also use this Strawberry Ice Cream as a base for milkshakes, smoothies, or even as a topping for waffles or pancakes. Imagine a warm waffle topped with a scoop of this creamy goodness – pure bliss!
I’m so excited for you to try this recipe and experience the magic of homemade ice cream. It’s a fun and rewarding activity that you can enjoy with your family and friends. And trust me, they’ll be impressed!
So, grab your ingredients, dust off your ice cream maker, and get ready to create a truly unforgettable dessert. I’m confident that this Strawberry Ice Cream will become a new favorite in your household.
Once you’ve made it, I would absolutely love to hear about your experience! Did you try any of the variations? Did you add any special ingredients? What did your family and friends think? Share your photos and stories in the comments below. I can’t wait to see your creations and hear all about your ice cream adventures! Happy churning!
Strawberry Ice Cream: The Ultimate Guide to Homemade Perfection
Homemade strawberry ice cream bursting with fresh strawberry flavor. This creamy and refreshing dessert is perfect for summer!
Ingredients
- 2 cups (480ml) heavy cream, cold
- 1 cup (240ml) whole milk
- ¾ cup (150g) granulated sugar
- Pinch of salt
- 1 teaspoon pure vanilla extract
- 1 pound (450g) fresh strawberries, hulled and sliced
- 2 tablespoons lemon juice
- Optional: 1-2 tablespoons vodka or other clear spirit (to prevent ice crystals)
Instructions
- Macerate the strawberries: In a medium bowl, combine the sliced strawberries with the lemon juice and ¼ cup (50g) of the granulated sugar. Gently stir to combine.
- Cover the bowl with plastic wrap and let it sit at room temperature for at least 30 minutes, or up to 2 hours.
- Transfer the strawberry mixture to a blender or food processor. Pulse until the strawberries are mostly smooth, but still have a little bit of texture.
- Taste the strawberry puree. If it’s too tart, add more sugar, a teaspoon at a time, until you reach your desired sweetness.
- Strain the strawberry puree through a fine-mesh sieve into a clean bowl (optional). Use a spatula to press the puree against the sieve, extracting as much liquid as possible. Discard the solids left in the sieve.
- Cover the strained strawberry puree and refrigerate it for at least 1 hour, or preferably overnight.
- In a separate medium bowl, whisk together the heavy cream, whole milk, the remaining ½ cup (100g) of granulated sugar, salt, and vanilla extract until the sugar is completely dissolved.
- If using vodka or another clear spirit, add it to the cream mixture now.
- Cover the cream mixture and refrigerate it for at least 1 hour, or preferably overnight.
- Make sure your ice cream maker bowl has been properly frozen according to the manufacturer’s instructions.
- Pour the chilled cream mixture into the frozen ice cream maker bowl. Turn on the ice cream maker and let it churn for about 15-20 minutes, or until the mixture thickens to the consistency of soft-serve ice cream.
- While the ice cream base is churning, gently stir the chilled strawberry puree to loosen it up.
- Once the ice cream base has reached the soft-serve consistency, slowly pour the chilled strawberry puree into the ice cream maker while it’s still churning. Let it churn for another 5-10 minutes, or until the strawberry puree is fully incorporated and the ice cream has thickened further.
- Keep an eye on the consistency of the ice cream. You want it to be thick and creamy, but not too hard. If it starts to look too icy, stop churning immediately.
- Transfer the ice cream to an airtight container.
- Gently press a piece of plastic wrap directly onto the surface of the ice cream before sealing the container.
- Freeze the ice cream for at least 2-3 hours, or preferably overnight, to allow it to harden completely.
- Before serving, let the ice cream sit at room temperature for about 5-10 minutes to soften slightly.
- Scoop the strawberry ice cream into bowls or cones and enjoy! Garnish with fresh strawberries, whipped cream, chocolate shavings, or any other toppings you like.
Notes
- Use the freshest, ripest strawberries you can find.
- Don’t over-churn the ice cream.
- Chill all of your ingredients thoroughly.
- If you don’t have an ice cream maker, you can still make this recipe! Simply combine all of the ingredients in a freezer-safe container and freeze for several hours, stirring every 30 minutes to break up ice crystals. This method will result in a slightly icier texture, but it’s still delicious.
- Experiment with different flavors. You can add other fruits, such as raspberries or blueberries, to the strawberry mixture. You can also add spices, such as cinnamon or nutmeg, to the cream mixture.