Spicy Salmon Sushi Bake has taken the culinary world by storm, transforming the beloved flavors of traditional sushi into an accessible, warm, and utterly irresistible casserole. I remember first discovering this phenomenon, and thinking, “Could something so simple truly capture the magic of a perfectly rolled sushi?” The answer, I quickly learned, is a resounding yes!
This dish emerged as a brilliant solution for enjoying deconstructed sushi at home, gaining particular popularity as a fun and shareable meal, especially during times when gathering with friends needed a touch of culinary creativity. It’s a fantastic way to enjoy the vibrant tastes and textures we adore in sushi without the intricate rolling process. People absolutely adore the convenience, the delightful combination of creamy, spicy, and savory notes, and the satisfying texture that comes with baked rice and fresh salmon. It’s also incredibly customizable, making it perfect for pleasing a variety of palates.
Get ready to embark on a delicious journey with our Spicy Salmon Sushi Bake recipe. You’ll find that this version perfectly balances heat with rich umami, ensuring every spoonful is an adventure for your taste buds. It’s a dish that truly delivers on flavor and fun, perfect for your next gathering or a cozy night in!

Ingredients:
- For the Sushi Rice Layer:
- 3 cups uncooked short-grain sushi rice. I always recommend a good quality Japanese short-grain rice for the best texture and stickiness.
- 3 ½ cups cold water, plus extra for rinsing. The precise water-to-rice ratio is crucial for perfectly cooked sushi rice.
- ⅓ cup seasoned rice vinegar. Make sure it’s the seasoned variety, which typically has sugar and salt already incorporated. If you only have unseasoned, you’ll need to adjust by adding extra sugar and salt to taste.
- 2 tablespoons granulated sugar. This helps to balance the tanginess of the vinegar and gives the rice that classic sushi sweetness.
- 1 teaspoon fine sea salt. Essential for enhancing the flavor of the rice.
- 1 tablespoon toasted sesame oil. A little drizzle adds a lovely nutty aroma to the rice base.
- For the Spicy Salmon Filling:
- 1 ½ pounds fresh salmon fillet, skinless and boneless. Opt for a nice, vibrant pink fillet. You can use Atlantic or Sockeye salmon, whatever you prefer!
- ¾ cup Japanese mayonnaise (Kewpie brand is highly recommended!). Its richer, tangier flavor is truly superior for this recipe.
- ¼ cup Sriracha sauce. Adjust this amount based on your preferred spice level. If you like it extra fiery, go for more!
- 1 tablespoon low-sodium soy sauce. This adds a depth of umami to the filling.
- 1 tablespoon toasted sesame oil. Another touch of nutty goodness for the salmon mixture.
- 2 tablespoons chopped green onions (scallions), plus more for garnish. These add a fresh, mild oniony bite.
- ½ teaspoon garlic powder. A little goes a long way to enhance the savory notes.
- ½ teaspoon onion powder. Complements the garlic powder beautifully.
- Optional: 2 tablespoons masago or tobiko (fish roe). This adds a wonderful pop of texture and briny flavor.
- For Assembling and Topping:
- 10-12 sheets roasted seaweed (nori), cut into quarters or snack-size pieces. These are essential for scooping up the bake!
- 2 ripe avocados, thinly sliced or diced. Creamy avocado is a perfect counterpoint to the spicy salmon.
- 1 English cucumber, thinly sliced or julienned (optional, but highly recommended for freshness).
- 2 tablespoons toasted sesame seeds, for garnish. Adds visual appeal and a pleasant crunch.
- Extra Sriracha or chili oil, for drizzling (optional). For those who crave an extra kick at the table.
- Fresh cilantro or extra green onions, for garnish (optional).
Preparing the Perfect Sushi Rice Base
-
Rinsing the Rice:
First things first, let’s get that sushi rice ready! Place the 3 cups of uncooked short-grain sushi rice into a large bowl. Cover it generously with cold water. Using your hands, gently swirl and rub the rice grains together. You’ll notice the water will become very cloudy – that’s the excess starch! Carefully drain the cloudy water, then repeat this rinsing process about 5-7 times, or until the water runs mostly clear. This step is absolutely critical for achieving the ideal sticky-but-not-mushy texture for sushi rice. If you skip it, your rice will be too starchy and gummy.
-
Cooking the Rice:
Once rinsed, drain the rice thoroughly using a fine-mesh sieve. Transfer the rinsed rice to a medium saucepan with a tight-fitting lid. Add 3 ½ cups of cold water to the saucepan. Bring the water to a boil over medium-high heat. As soon as it boils, reduce the heat to the lowest setting, cover the pot tightly, and let it simmer for exactly 15 minutes. Resist the urge to peek or lift the lid during this time, as it lets out essential steam. After 15 minutes, remove the pot from the heat and let it rest, still covered, for another 10-15 minutes. This steaming period allows the rice to fully absorb the remaining moisture and become perfectly tender.
-
Seasoning the Rice:
While the rice is resting, prepare your sushi vinegar mixture. In a small bowl, combine the ⅓ cup seasoned rice vinegar, 2 tablespoons granulated sugar, and 1 teaspoon fine sea salt. Whisk everything together until the sugar and salt are fully dissolved. You can gently warm this mixture in the microwave for 15-20 seconds if needed, which helps the dissolving process.
- Once the rice has rested, carefully transfer it from the pot to a large, wide, non-metallic bowl or a traditional Japanese hangiri if you have one. Gently fluff the rice with a wooden spoon or a rice paddle. Slowly pour the prepared vinegar mixture evenly over the hot rice. Using a cutting motion with your paddle, gently fold and mix the rice, ensuring every grain is coated with the seasoning. Be careful not to mash the rice; you want to separate the grains while coating them. I like to fan the rice while mixing to help it cool down quickly and give it that characteristic sheen. Continue mixing and fanning until the rice has cooled to room temperature. Finally, drizzle in 1 tablespoon of toasted sesame oil and gently fold it through the seasoned rice. Set aside.
Crafting the Irresistible Spicy Salmon Filling
-
Preparing the Salmon:
Preheat your oven to 375°F (190°C). Place the skinless, boneless salmon fillet on a baking sheet lined with parchment paper. Season lightly with salt and pepper. Bake for 12-15 minutes, or until the salmon is cooked through and flakes easily with a fork. The exact baking time will depend on the thickness of your fillet. You’re looking for an internal temperature of 145°F (63°C) for food safety. Alternatively, you can poach or steam the salmon if you prefer. Once cooked, let the salmon cool slightly.
-
Flaking the Salmon:
Once the salmon is cool enough to handle, transfer it to a medium mixing bowl. Using a fork, gently flake the salmon into small, bite-sized pieces. I prefer a mix of larger flakes and smaller bits for a nice textural variety in the bake. Remove any small bones that might have been missed.
-
Mixing the Spicy Sauce:
In a separate small bowl, combine the ¾ cup Japanese mayonnaise, ¼ cup Sriracha sauce, 1 tablespoon low-sodium soy sauce, 1 tablespoon toasted sesame oil, ½ teaspoon garlic powder, and ½ teaspoon onion powder. Whisk everything together until the sauce is completely smooth and well combined. Taste and adjust the Sriracha or soy sauce if needed – this is your chance to customize the spice and saltiness!
-
Combining the Filling:
Pour the prepared spicy mayonnaise sauce over the flaked salmon in the mixing bowl. Add the 2 tablespoons of chopped green onions. If you’re using masago or tobiko, add them now too. Gently fold all the ingredients together until the salmon is evenly coated with the spicy sauce. Be gentle to avoid completely mashing the salmon; you want to maintain some of those lovely flakes. Set this delicious filling aside.
Assembling the Spicy Salmon Sushi Bake
-
Preparing the Baking Dish:
Preheat your oven to 400°F (200°C). Choose a 9×13-inch baking dish for this recipe. For easy removal and serving, I highly recommend lining the baking dish with parchment paper, leaving an overhang on the sides. This creates a sling that makes lifting the entire bake out much simpler later on. You can also lightly grease the dish with a tiny bit of sesame oil if you’re not using parchment.
-
Creating the Rice Layer:
Take your cooled, seasoned sushi rice and press it evenly into the bottom of the prepared baking dish. Use the back of a spoon or your hands (dampen them slightly with water to prevent sticking) to create a firm, compact layer. A tightly packed rice layer is key for the bake to hold its shape when served. Make sure the layer is as even as possible across the entire dish.
-
Adding the Salmon Layer:
Carefully spread the spicy salmon filling evenly over the top of the rice layer. Use a spoon or spatula to smooth it out, making sure it reaches all the way to the edges of the dish. Again, aim for an even layer so that every piece gets a good amount of that incredible salmon goodness.
-
Topping Before Baking (Optional but Recommended):
For an extra layer of flavor and a beautiful golden crust, you can sprinkle a light layer of extra Japanese mayonnaise (drizzled in a zigzag pattern or thinly spread) and a dash of Sriracha over the salmon layer. Some people also like to sprinkle a bit of furikake (Japanese rice seasoning) or extra toasted sesame seeds at this stage.
Baking and Finishing Touches
-
Baking the Sushi Bake:
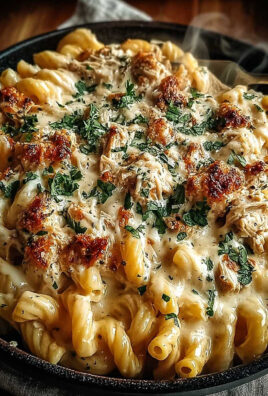
Place the baking dish into your preheated 400°F (200°C) oven. Bake for 15-20 minutes, or until the top is golden brown and slightly caramelized, and you can see the edges of the rice getting a little crispy. The goal here is to heat everything through, develop a lovely crust on top, and meld all those fantastic flavors together. Keep an eye on it to prevent burning. If your oven tends to brown quickly, you might want to switch to the broiler for the last 1-2 minutes for extra crispiness, but watch it like a hawk!
-
Cooling and Slicing:
Once baked, remove the sushi bake from the oven and let it cool for about 5-10 minutes. This short resting period allows the layers to set, making it much easier to slice neatly. Using the parchment paper overhang, carefully lift the entire bake out of the dish and transfer it to a large cutting board.
-
Adding Fresh Toppings:
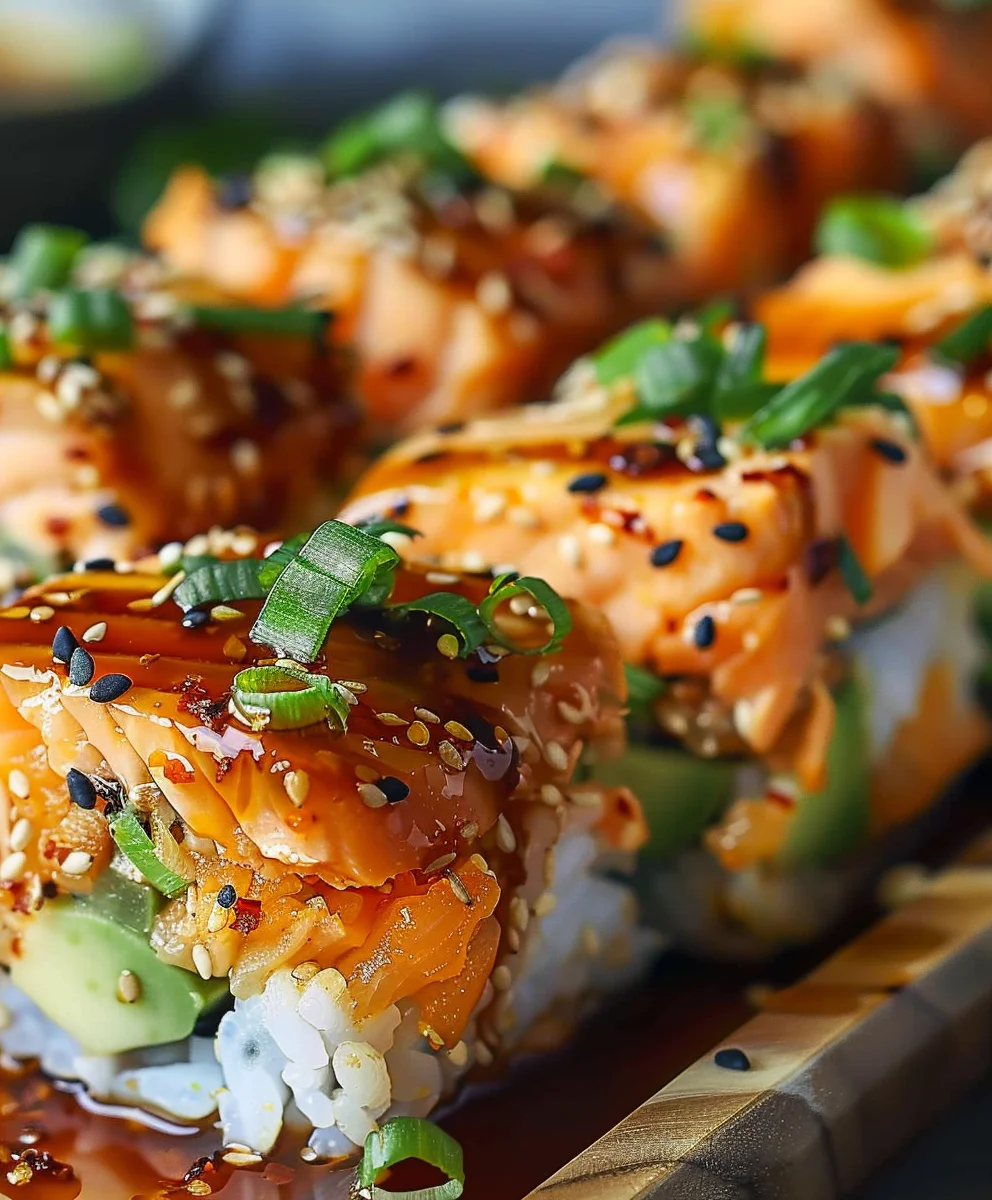
Now for the fresh, vibrant additions! Arrange your thinly sliced or diced avocado and cucumber (if using) beautifully over the top of the warm sushi bake. This not only adds amazing color but also provides a refreshing contrast in texture and flavor. Sprinkle generously with toasted sesame seeds. If you like, add some extra chopped green onions or fresh cilantro for garnish. For a final flourish, you can drizzle a little extra Sriracha or chili oil directly over the top, or have it available at the table for guests to add themselves.
-
Serving Your Spicy Salmon Sushi Bake:
Using a sharp knife, slice the sushi bake into squares or rectangles, much like a lasagna or casserole. The size is entirely up to you – smaller squares for appetizers or larger ones for a main course. The best way to enjoy this is by taking a piece of your baked sushi, placing it on a small piece of nori seaweed, and eating it like a mini taco or hand roll. The crispy seaweed provides that satisfying crunch and classic sushi experience. Encourage everyone to customize their bites with extra soy sauce, wasabi, or pickled ginger if desired. Enjoy the incredible flavors and textures of your homemade Spicy Salmon Sushi Bake!

Conclusion:
Well, my friends, we’ve reached the delicious culmination of our culinary journey! I truly hope you’re as excited as I am about what we’ve just explored. This isn’t just another dinner idea; it’s an experience waiting to happen in your kitchen. I’ve found that the sheer simplicity combined with the explosion of flavors makes this a truly unbeatable dish. The creamy, rich salmon, perfectly seasoned and baked, melting into that bed of vinegared rice, all kissed with that irresistible spicy kick – it’s a symphony for the taste buds that truly transcends expectations. It’s comforting, it’s exciting, and it’s surprisingly easy to achieve, making it a masterpiece even for those who might feel a little intimidated by traditional sushi-making. You’re not just making food; you’re crafting joy, a dish that gathers people around the table and sparks conversation. This is precisely why our Spicy Salmon Sushi Bake isn’t just a recipe; it’s a guaranteed crowd-pleaser and a personal triumph waiting to happen for you. Get ready to fall in love with its irresistible appeal and effortless elegance.
Serving Suggestions and Creative Twists
What I love most about this particular bake is its incredible versatility. It adapts beautifully to various palates and dietary preferences, making it a fantastic choice for any gathering. For serving, my absolute favorite way is to present it with an abundance of crisp nori seaweed sheets, allowing everyone to scoop generous portions onto their nori and create their own mini hand rolls. It’s interactive, fun, and adds that essential umami crunch that truly completes the experience. Beyond nori, consider thin slices of crisp English cucumber, refreshing lettuce cups, or even perfectly ripe avocado slices for a lighter, lower-carb wrapping option. A dollop of extra Sriracha mayo, some creamy avocado, or a sprinkle of toasted sesame seeds can elevate each individual bite even further. Don’t forget a side of tangy pickled ginger to cleanse the palate between bites, and perhaps a bowl of steamed edamame for a complete, delightful meal that feels both wholesome and indulgent. Pair it with a crisp, cold sake, a refreshing Japanese beer, or even a sparkling water with a hint of yuzu or lime for the ultimate dining experience that perfectly complements the rich flavors of the bake.
But let’s truly unleash our creativity, because this recipe is practically begging for your personal touch! If salmon isn’t your only love, feel free to experiment with other proteins. Cooked and flaked tuna (canned or freshly seared), tender shredded imitation crab meat, or even perfectly baked shrimp would make fantastic alternatives or delicious additions to the salmon. For a fantastic plant-based option, consider using seasoned, crumbled and baked tofu or tempeh, ensuring that everyone can enjoy the incredible flavors. Want to dial up the heat for the spice enthusiasts? Add finely diced fresh jalapeños or serrano peppers directly into the salmon mixture before baking, or drizzle some fiery chili oil over the top post-bake. For extra texture and a burst of vibrant flavor, a generous sprinkle of furikake (Japanese rice seasoning) or some bright green finely chopped green onions right before serving adds both visual appeal and a refreshing zing. You could even swap out some of the traditional sushi rice for seasoned brown rice for a nuttier flavor, or cauliflower rice if you’re looking for a low-carb alternative, ensuring that the delicious flavor profile of the bake remains intact while catering to different dietary needs. Imagine a little extra golden crunch from some panko breadcrumbs lightly toasted on top, or a whisper of smoked paprika in the salmon mixture for a different kind of savory depth. The possibilities are truly endless, and that’s the absolute beauty of making this incredible dish uniquely your own.
Your Culinary Adventure Awaits!
So, now it’s truly your turn. I’ve shared all my best tips and creative tricks, and I’m genuinely excited for you to bring this incredible dish to life in your own home. Don’t hesitate, don’t overthink it – just gather your ingredients, follow these simple, straightforward steps, and prepare to impress yourself and everyone lucky enough to share a meal with you. This Spicy Salmon Sushi Bake is so much more than just a meal; it’s an opportunity to create cherished memories, celebrate delicious food, and gather around a table filled with joy. Once you’ve tried it, I absolutely encourage you to share your culinary adventure with me and with your friends and family! Tag me on social media, leave a comment below to tell me all about your experience, or simply share the recipe with someone you know will love it. Your success stories and creative adaptations are what truly inspire me to keep sharing. Happy baking, and most importantly, happy feasting!
Spicy Salmon Sushi Bake: Your New Favorite Dinner!
Transform the beloved flavors of traditional sushi into an accessible, warm, and utterly irresistible casserole with this Spicy Salmon Sushi Bake. Enjoy deconstructed sushi with creamy, spicy, and savory notes, without the intricate rolling process.
Ingredients
-
2 cups cooked sushi rice
-
1 tablespoon rice vinegar
-
½ teaspoon sugar
-
½ teaspoon salt
-
12 oz skinless salmon fillet, cooked and flaked
-
¼ cup mayonnaise
-
2 tablespoons Sriracha sauce
-
1 tablespoon soy sauce
-
1 teaspoon sesame oil
-
½ cup shredded mozzarella cheese
-
2 sheets roasted seaweed (nori), cut into small squares
-
2 green onions, thinly sliced
-
1 tablespoon toasted sesame seeds
Instructions
-
Step 1
In a bowl, gently combine 2 cups cooked sushi rice with 1 tablespoon rice vinegar, ½ teaspoon sugar, and ½ teaspoon salt. Mix until well incorporated and cool. -
Step 2
Preheat oven to 375°F (190°C). Place 12 oz skinless salmon fillet on a baking sheet. Bake for 12-15 minutes, or until cooked through and easily flaked with a fork. Let cool slightly, then flake into bite-sized pieces. -
Step 3
In a separate bowl, whisk together ¼ cup mayonnaise, 2 tablespoons Sriracha sauce, 1 tablespoon soy sauce, and 1 teaspoon sesame oil until smooth. Add the flaked salmon and half of the thinly sliced green onions to the sauce, gently folding to combine. -
Step 4
Preheat oven to 400°F (200°C). Line a 9×13-inch baking dish with parchment paper. Press the seasoned sushi rice evenly into the bottom of the dish to form a compact layer. Spread the spicy salmon filling evenly over the rice. Top with ½ cup shredded mozzarella cheese. -
Step 5
Bake for 15-20 minutes, or until the top is golden brown and bubbly. Remove from oven and let cool for 5-10 minutes. Garnish with the remaining green onions and 1 tablespoon toasted sesame seeds. Slice into squares and serve warm with roasted seaweed (nori) pieces for scooping.
Important Information
Nutrition Facts (Per Serving)
It is important to consider this information as approximate and not to use it as definitive health advice.
Allergy Information
Please check ingredients for potential allergens and consult a health professional if in doubt.