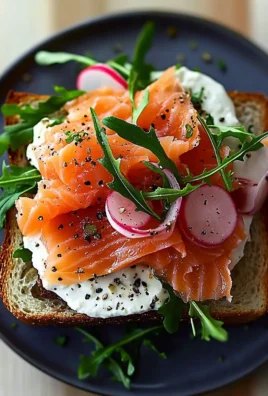
Spicy Salmon Sushi Bake Recipe – a phrase that instantly conjures images of creamy, savory, and perfectly baked deliciousness. Have you ever craved the vibrant flavors and comforting textures of your favorite sushi roll, but found yourself deterred by the intricate art of hand-rolling? What if I told you there’s a truly revolutionary way to enjoy all that sushi goodness with remarkably minimal effort and maximum flavor impact?
Why the Sushi Bake is a Game-Changer
This ingenious dish has captivated home cooks and food enthusiasts alike, transforming the traditional sushi experience into an accessible, deconstructed masterpiece. While its roots can be traced back to the spirit of Japanese cuisine, the sushi bake itself is a brilliant modern fusion, gaining immense popularity, especially during times when dining out wasn’t an option. It’s a celebration of culinary adaptability, allowing us to enjoy the rich, buttery notes of perfectly cooked salmon, harmonized with a fiery kick from spicy mayo, all layered over a bed of impeccably seasoned rice, baked until golden and irresistible.
People absolutely adore this dish not just for its incredible taste and satisfying combination of textures—from the crispy bottom rice layer to the tender salmon and creamy topping—but also for its sheer convenience. There’s no need for specialized tools or expert rolling techniques! Today, I am incredibly excited to guide you through my perfected Spicy Salmon Sushi Bake Recipe, a dish that I promise will become a celebrated staple in your recipe collection, bringing restaurant-quality flavors right into your home kitchen.

Ingredients:
- For the Sushi Rice:
- 2 cups (approximately 400g) uncooked short-grain sushi rice. This is absolutely essential for the right texture!
- 2 ½ cups cold water, plus extra for rinsing.
- ¼ cup rice vinegar (unseasoned is preferred, but seasoned will work in a pinch, just adjust sugar/salt slightly).
- 2 tablespoons granulated sugar.
- 1 teaspoon fine sea salt.
- 1 tablespoon neutral oil (like canola or vegetable oil) for the baking dish.
- For the Salmon Mixture:
- 1.5 lbs (approximately 680g) fresh salmon fillet, skin on or off (your preference, I usually remove it after cooking). Look for a nice, thick fillet.
- 1 tablespoon olive oil or avocado oil.
- ½ teaspoon garlic powder.
- ½ teaspoon onion powder.
- ¼ teaspoon black pepper.
- ¼ teaspoon salt.
- For the Spicy Mayo:
- ½ cup Kewpie mayonnaise. Trust me, this Japanese mayo makes all the difference! Its richer, creamier texture and umami flavor are unmatched.
- 3-4 tablespoons Sriracha, or to taste. If you like it spicier, go for more; if you’re a mild heat fan, start with less.
- 1 tablespoon soy sauce (low sodium is usually best).
- 1 teaspoon toasted sesame oil.
- 1 teaspoon fresh lime juice (optional, but adds a lovely brightness).
- For Assembling and Garnish:
- 4-5 sheets of roasted nori seaweed snacks, cut into squares or strips for serving.
- ½ cup chopped green onions (scallions), for garnish.
- 2 tablespoons toasted sesame seeds, for garnish.
- 1 large ripe avocado, thinly sliced or diced, for serving.
- ½ English cucumber, thinly sliced or diced, for serving.
- Furikake seasoning (optional, but highly recommended for an extra layer of flavor and texture).
- Extra soy sauce, for dipping.
Preparing the Perfect Sushi Rice
- Rinse the Rice Thoroughly: My first step for any Spicy Salmon Sushi Bake Recipe is always the rice. Place the 2 cups of short-grain sushi rice in a large bowl. Fill the bowl with cold water, swish the rice around gently with your hand until the water becomes cloudy. Carefully drain the water. Repeat this rinsing process about 5-7 times, or until the water runs mostly clear. This step is crucial for removing excess starch, which prevents the rice from becoming gummy and helps achieve that distinct, slightly sticky, yet individual grain texture that sushi rice is famous for. Don’t skip it!
- Soak the Rice: After the final rinse, drain the water completely. Add 2 ½ cups of fresh cold water to the rice in the bowl. Let the rice soak for at least 30 minutes, or up to an hour. Soaking allows the rice grains to absorb water evenly before cooking, resulting in more uniformly cooked and tender rice.
- Cook the Rice:
- Rice Cooker Method: Transfer the soaked rice and its soaking water to your rice cooker. Close the lid and select the “sushi rice” or “white rice” setting. Let the cooker do its magic. Once it switches to “keep warm,” let the rice steam undisturbed for another 10-15 minutes before opening the lid.
- Stovetop Method: Transfer the soaked rice and its soaking water to a heavy-bottomed pot with a tight-fitting lid. Bring the water to a rolling boil over medium-high heat. Once boiling, reduce the heat to the lowest setting immediately, cover the pot tightly, and simmer for 15-20 minutes. Resist the urge to lift the lid! This traps the steam necessary for proper cooking. After 15-20 minutes, turn off the heat and let the rice steam, still covered, for another 10-15 minutes.
- Season the Rice: While the rice is still hot and steaming, gently transfer it to a large, non-metallic bowl (a wooden or plastic bowl is ideal, as metal can react with the vinegar). In a small separate bowl, whisk together the ¼ cup rice vinegar, 2 tablespoons sugar, and 1 teaspoon salt until the sugar and salt are fully dissolved. This is your sushi seasoning, or “sushi-zu.”
- Mix and Cool the Rice: Pour the sushi seasoning evenly over the hot rice. Using a rice paddle or a flat wooden spoon, gently fold and cut the seasoning into the rice. Do this with a slicing motion rather than stirring, to avoid mashing the grains. As you mix, fan the rice with a handheld fan or a piece of cardboard to cool it down quickly. This fanning technique not only speeds up cooling but also helps to give the rice a beautiful sheen and slightly firmer texture. Continue mixing and fanning until the rice is glossy, seasoned evenly, and cooled to room temperature, or at least lukewarm. Do not use hot rice for assembly! Set aside.
Cooking and Flaking the Salmon
- Prepare the Salmon: Preheat your oven to 400°F (200°C). Pat the salmon fillet dry with paper towels. If your fillet has skin, you can leave it on for cooking as it helps protect the flesh and makes it easier to handle; you’ll remove it after cooking.
- Season the Salmon: Place the salmon fillet on a baking sheet lined with parchment paper for easy cleanup. Drizzle the salmon with 1 tablespoon of olive oil or avocado oil. Sprinkle evenly with ½ teaspoon garlic powder, ½ teaspoon onion powder, ¼ teaspoon black pepper, and ¼ teaspoon salt. Gently rub the seasonings into the fish.
- Bake the Salmon: Bake the salmon in the preheated oven for 12-18 minutes, depending on the thickness of your fillet. The salmon is cooked through when it flakes easily with a fork and reaches an internal temperature of 145°F (63°C). I usually aim for just cooked through, as it will get another gentle warming in the oven during the bake, ensuring it stays moist.
- Cool and Flake: Remove the salmon from the oven and let it cool slightly on the baking sheet for a few minutes. Once it’s cool enough to handle, use a fork to flake the salmon into bite-sized pieces. If the skin is on, it should peel off easily at this point. Carefully check for and remove any pin bones you might find. Transfer the flaked salmon to a medium-sized mixing bowl.
Crafting the Irresistible Spicy Mayo
- Combine Ingredients: In a small bowl, combine the ½ cup Kewpie mayonnaise, 3-4 tablespoons Sriracha (adjust to your heat preference – if you’re unsure, start with 3 and add more later), 1 tablespoon soy sauce, 1 teaspoon toasted sesame oil, and the optional 1 teaspoon fresh lime juice.
- Whisk Until Smooth: Whisk all the ingredients together vigorously until the sauce is completely smooth, creamy, and uniform in color. Taste and adjust the seasoning if needed. You might want a little more Sriracha for an extra kick, or a touch more soy sauce for umami. This spicy mayo is the heart of our Spicy Salmon Sushi Bake Recipe, so make it perfect for you!
- Mix with Salmon: Add about half of the prepared spicy mayo (approximately ¼ cup) to the flaked salmon in the mixing bowl. Gently fold the mayo into the salmon until all the salmon pieces are lightly coated. This will form a flavorful, moist layer for our bake. Save the remaining spicy mayo for drizzling on top later.
Assembling the Spicy Salmon Sushi Bake
- Prepare the Baking Dish: Preheat your oven to 400°F (200°C). Lightly grease a 9×13-inch baking dish with 1 tablespoon of neutral oil. You can also line it with parchment paper for easier removal and cleanup, leaving an overhang on the sides as “handles.”
- First Layer: Sushi Rice Base: Evenly spread the cooled, seasoned sushi rice across the bottom of the prepared baking dish. Using wet hands or the back of a spoon, gently but firmly press the rice down into an even layer. This creates a solid base for your Spicy Salmon Sushi Bake. Make sure it’s compact so it holds its shape when serving.
- Second Layer: Flavorful Salmon: Carefully spread the spicy salmon mixture over the rice layer, ensuring it’s evenly distributed from edge to edge. Again, gently press it down a bit with the back of a spoon to create a flat, consistent layer.
- Third Layer: Creamy Spicy Mayo: Take the remaining spicy mayo and drizzle it generously over the salmon layer. You can use a spoon for a rustic drizzle, or for a neater application, transfer the mayo to a zip-top bag, snip a tiny corner off, and pipe a decorative zig-zag pattern across the top. This layer will get slightly caramelized and bubbly in the oven, adding incredible flavor and texture.
- Optional Toppings Before Baking: If you love furikake, now is a fantastic time to sprinkle a generous amount over the top of the spicy mayo layer. It will toast slightly in the oven, enhancing its flavor.
Baking to Golden Perfection and Serving
- Bake the Sushi Bake: Place the baking dish in your preheated 400°F (200°C) oven. Bake for 15-20 minutes, or until the edges of the rice are slightly crispy and the top mayo layer is bubbly and beginning to lightly brown.
- Broil for Crispiness: For that ultimate golden-brown, slightly charred top that screams “delicious,” switch your oven to the broiler setting (high). Keep a close eye on it, as broiling can go from perfect to burnt in a matter of seconds! Broil for 2-4 minutes, or until the top of the spicy mayo is beautifully caramelized and lightly browned.
- Rest and Garnish: Remove the Spicy Salmon Sushi Bake from the oven and let it rest for 5-10 minutes. This allows the layers to set slightly, making it easier to cut. While it’s resting, gather your garnishes.
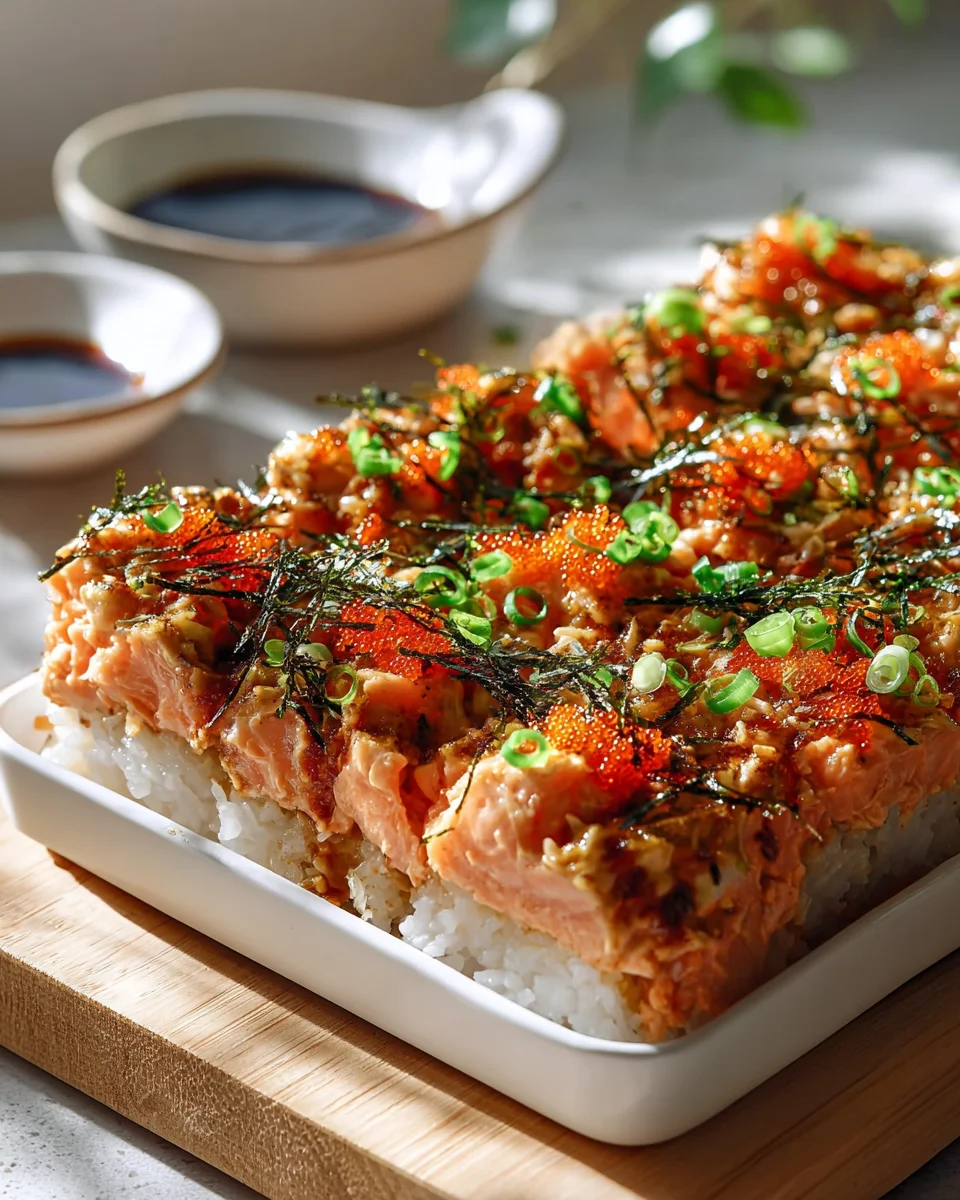
- Slice and Serve: Once rested, cut the sushi bake into squares or rectangles directly in the baking dish. You can serve it directly from the dish, or if you used parchment paper with an overhang, you can carefully lift the entire bake onto a cutting board.
- Final Touches: Garnish each serving generously with fresh chopped green onions, toasted sesame seeds, and extra furikake if desired. Arrange the sliced avocado and cucumber alongside for serving.
- Enjoy! The best way to enjoy this Spicy Salmon Sushi Bake Recipe is by scooping a portion onto a piece of roasted nori seaweed, adding a slice of avocado and cucumber, and then folding it up like a taco or a little bundle. The crunchy nori, creamy avocado, crisp cucumber, and warm, savory salmon rice are an explosion of flavors and textures that you’ll absolutely love. Have extra soy sauce on hand for dipping!
Conclusion:
Well, my friends, we’ve reached the delicious culmination of our culinary journey! I truly hope you’re feeling inspired to whip up this incredible dish because, honestly, it’s an absolute game-changer. This isn’t just another recipe; it’s an experience, a delightful fusion that brings the vibrant flavors of a sushi restaurant right into your home kitchen, without the fuss of rolling. I’m talking about creamy, savory, perfectly flaky salmon, generously coated in a delectable spicy mayo, all nestled atop a bed of seasoned rice that bakes to a satisfying golden crisp. It’s comforting, it’s exciting, and it delivers that sought-after sushi fix in the most approachable way. Trust me when I say that mastering this Spicy Salmon Sushi Bake Recipe will earn you rave reviews from anyone lucky enough to try it.
There’s something uniquely satisfying about preparing a dish that feels gourmet yet is incredibly straightforward. You get all the complex, umami-rich notes you expect from high-quality sushi, but with the added warmth and heartiness of a baked casserole. It’s perfect for a cozy night in, an impressive yet effortless dish for entertaining guests, or even a fun potluck contribution that will undoubtedly stand out. The textural play between the tender salmon, the fluffy rice, and the slightly crisp top layer is simply divine. Every bite is a harmonious blend of spice, creaminess, and fresh ocean flavor that will leave you wanting more. It truly is a testament to how simple ingredients, when combined thoughtfully, can create something truly extraordinary and unforgettable.
Now that you’ve created this masterpiece, let’s talk about making the most of it. While absolutely delicious on its own, I highly recommend serving your sushi bake with an array of fresh nori sheets or crisp lettuce cups. The act of scooping the warm, flavorful mix onto a cool, crunchy wrapper adds another layer of texture and interactive fun to the meal, mimicking the traditional hand roll experience. For an authentic touch, don’t forget the classic accompaniments: a small dish of light soy sauce for dipping, a dollop of pungent wasabi for those who crave an extra kick, and a generous side of vibrant pickled ginger to cleanse your palate between bites. A refreshing cucumber salad, a warm bowl of miso soup, or even a chilled sake or a crisp Japanese beer would make for the perfect culinary companions, elevating your meal into a full-fledged sushi feast. You can even offer extra drizzles of sriracha mayo or a sprinkle of toasted sesame seeds on the side for guests to customize their perfect bite.
One of the aspects I adore most about this recipe is its incredible adaptability. Once you’ve mastered the base, the possibilities for customization are endless! Feel free to get creative with your protein choice; while salmon is magnificent, imagine substituting it with delicate canned tuna, succulent imitation crab, cooked shrimp, or even firm tofu for a vegetarian twist. For added freshness and crunch, consider folding in finely diced cucumber or creamy avocado cubes before baking, or scattering them on top after. If you’re a spice fiend like me, don’t hesitate to amp up the sriracha in the mayo mixture, or even add a pinch of gochujang for a different kind of heat. Some people love a sprinkle of mozzarella or cream cheese within the layers for an extra gooey, rich texture – don’t knock it ’til you’ve tried it! And for toppings, beyond sesame seeds, think about crunchy furikake, thinly sliced green onions, or even some crispy fried shallots for an extra burst of flavor and texture. This recipe is truly a blank canvas for your culinary imagination.
So, what are you waiting for? I genuinely encourage you to dive into your kitchen and give this incredible sushi bake a try. It’s a wonderful opportunity to explore new flavors, impress your loved ones, and discover a truly satisfying dish that will undoubtedly become a regular in your meal rotation. There’s a distinct joy in creating something so delicious and seeing the happy faces around your table. Once you’ve experienced the magic of this dish, I would absolutely love to hear about it! Please don’t be shy; share your creations, your personal twists, and your serving stories in the comments below or on social media. Your experiences inspire me and the entire cooking community. Happy baking, my fellow food enthusiasts, and prepare to fall in love with your new favorite way to enjoy sushi!
Spicy Salmon Sushi Bake: Easy & Delicious Recipe
Enjoy the comforting flavors of a sushi roll in an easy-to-make deconstructed bake. This Spicy Salmon Sushi Bake features seasoned sushi rice, flaky salmon, and a creamy spicy mayo topping, baked until golden and irresistible. Perfect for a crowd, without the hassle of hand-rolling!
Ingredients
Instructions
Important Information
Nutrition Facts (Per Serving)
It is important to consider this information as approximate and not to use it as definitive health advice.
Allergy Information
Please check ingredients for potential allergens and consult a health professional if in doubt.