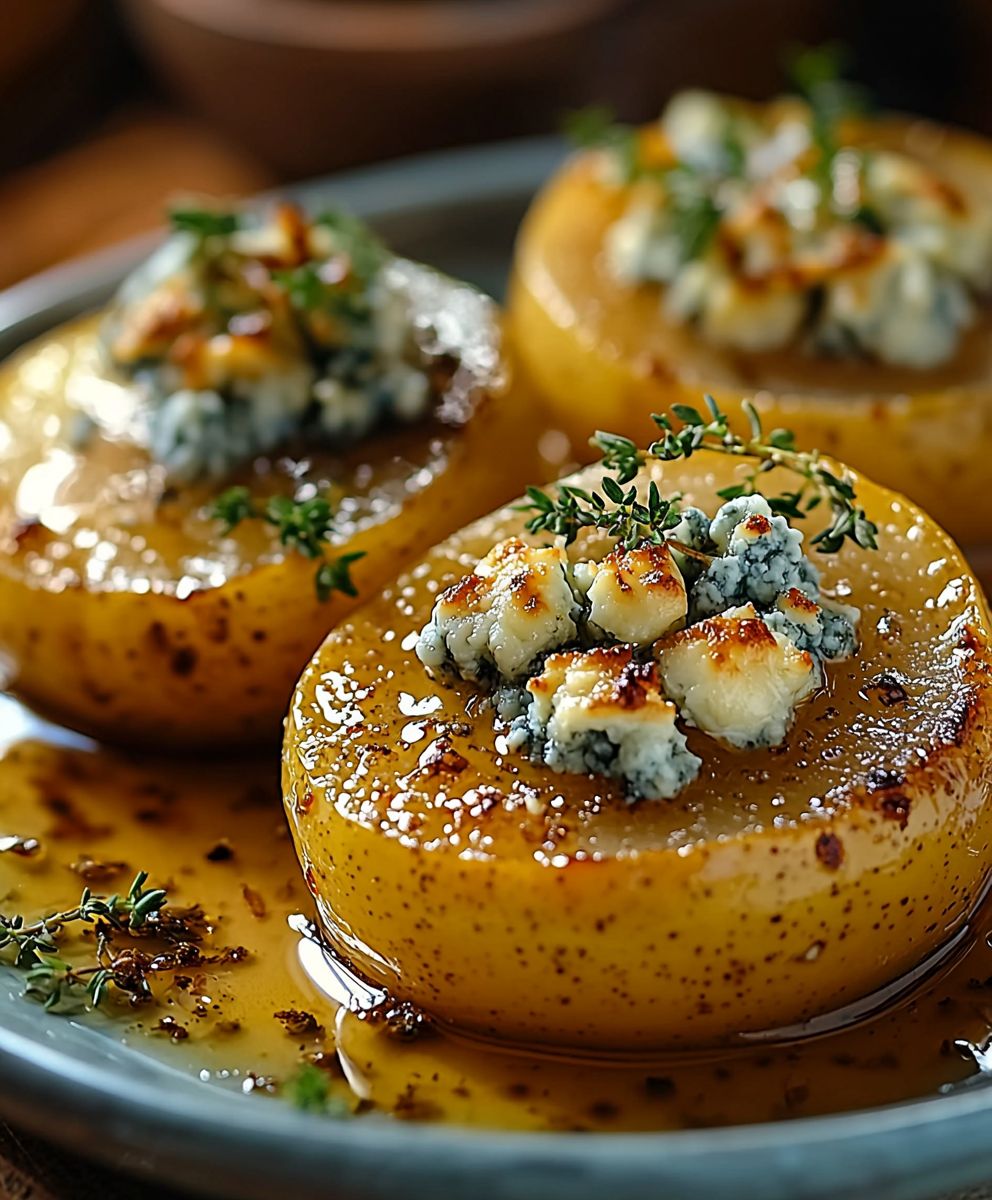
Roasted Pears Blue Cheese – a surprisingly delightful combination that will tantalize your taste buds and leave you craving more! Have you ever considered pairing the sweetness of perfectly roasted pears with the tangy, pungent bite of blue cheese? If not, prepare to be amazed. This elegant yet simple dish is a fantastic appetizer, a sophisticated addition to a cheese board, or even a light dessert that’s sure to impress.
The concept of pairing sweet fruits with savory cheeses has roots stretching back centuries, particularly in European culinary traditions. Think of the classic pairing of apples and cheddar, or grapes and brie. Roasted Pears Blue Cheese elevates this concept to a new level of sophistication. Roasting the pears intensifies their natural sweetness and softens their texture, creating a perfect canvas for the creamy, sharp blue cheese.
People adore this dish for its incredible balance of flavors and textures. The warm, soft pears contrast beautifully with the cool, crumbly cheese. The sweetness is offset by the saltiness, creating a symphony of sensations in every bite. Plus, it’s incredibly easy to prepare, making it perfect for both casual gatherings and more formal occasions. Whether you’re a seasoned foodie or just looking for a simple yet impressive dish, Roasted Pears Blue Cheese is a guaranteed crowd-pleaser. I know you’ll love it!

Ingredients:
- 4 ripe but firm pears (such as Bosc, Anjou, or Comice)
- 4 ounces high-quality blue cheese, crumbled (Roquefort, Gorgonzola, or Stilton work well)
- 1/4 cup chopped walnuts or pecans, toasted
- 2 tablespoons honey, plus more for drizzling
- 2 tablespoons unsalted butter, melted
- 1 tablespoon fresh lemon juice
- 1/4 teaspoon ground cinnamon
- Pinch of ground nutmeg
- Pinch of salt
- Fresh thyme sprigs, for garnish (optional)
- Balsamic glaze, for drizzling (optional)
Preparing the Pears:
- Preheat your oven to 375°F (190°C). This is crucial for even roasting. Make sure your oven is properly preheated before you put the pears in.
- Wash and halve the pears lengthwise. Use a sharp knife to cut the pears in half from stem to blossom end.
- Core the pears. Use a melon baller or a small spoon to carefully remove the core and seeds from each pear half. Try to create a small well in the center of each half, which will hold the blue cheese filling. Be careful not to cut all the way through the pear.
- Prepare the roasting pan. Lightly grease a baking dish or roasting pan with cooking spray or a little bit of melted butter. This will prevent the pears from sticking to the pan during roasting.
- Arrange the pear halves in the prepared pan. Place the pear halves cut-side up in the baking dish, making sure they have a little space between them. This allows for better air circulation and even cooking.
Making the Filling:
- In a small bowl, combine the crumbled blue cheese, chopped nuts, honey, melted butter, lemon juice, cinnamon, nutmeg, and salt. Mix well until all the ingredients are evenly distributed. The mixture should be slightly crumbly but hold together when pressed.
- Taste and adjust the seasoning. Add a little more honey if you prefer a sweeter filling, or a pinch more salt if you want to balance the sweetness.
Stuffing and Roasting the Pears:
- Spoon the blue cheese mixture into the center of each pear half. Pack the filling firmly into the well you created when coring the pears. Make sure each pear half receives an equal amount of filling.
- Drizzle the pears with a little extra honey. This will help caramelize the pears and add a touch of sweetness.
- Roast the pears in the preheated oven for 20-25 minutes, or until the pears are tender and the blue cheese is melted and slightly browned. The exact roasting time will depend on the ripeness of your pears and the accuracy of your oven. Check the pears after 20 minutes by inserting a fork into the flesh. If the fork slides in easily, the pears are done.
- Keep an eye on the blue cheese. If the blue cheese starts to brown too quickly, you can loosely tent the baking dish with aluminum foil to prevent it from burning.
Serving the Roasted Pears:
- Remove the roasted pears from the oven and let them cool slightly before serving. This will prevent you from burning your mouth on the hot cheese.
- Garnish with fresh thyme sprigs (optional). The thyme adds a lovely aroma and a pop of color to the dish.
- Drizzle with balsamic glaze (optional). The balsamic glaze adds a tangy and slightly sweet counterpoint to the richness of the blue cheese and the sweetness of the pears.
- Serve warm as an appetizer, side dish, or dessert. These roasted pears are incredibly versatile and can be enjoyed in a variety of ways.
Tips for Success:
- Choose the right pears. Select pears that are ripe but still firm to the touch. Overripe pears will become mushy during roasting. Bosc, Anjou, and Comice pears are all excellent choices.
- Don’t overfill the pears. If you overfill the pears with the blue cheese mixture, it may spill out during roasting.
- Adjust the roasting time as needed. The roasting time will vary depending on the ripeness of your pears and the accuracy of your oven. Check the pears frequently and adjust the roasting time accordingly.
- Toast the nuts for extra flavor. Toasting the walnuts or pecans before adding them to the filling will enhance their flavor and add a pleasant crunch. To toast the nuts, spread them in a single layer on a baking sheet and bake in a preheated oven at 350°F (175°C) for 5-7 minutes, or until they are lightly browned and fragrant.
- Use high-quality blue cheese. The quality of the blue cheese will greatly impact the flavor of the dish. Choose a high-quality blue cheese that you enjoy. Roquefort, Gorgonzola, and Stilton are all excellent choices.
- Experiment with different toppings. Feel free to experiment with different toppings, such as chopped dates, dried cranberries, or a sprinkle of sea salt.
- Serve with a complementary wine. These roasted pears pair well with a variety of wines, such as a Sauternes, a late-harvest Riesling, or a port wine.
Variations:
- Add a touch of spice. For a little kick, add a pinch of red pepper flakes to the blue cheese mixture.
- Use a different type of cheese. If you’re not a fan of blue cheese, you can substitute it with another type of cheese, such as goat cheese, brie, or mascarpone.
- Add a layer of puff pastry. For a more decadent dessert, wrap each pear half in a sheet of puff pastry before roasting.
- Make it vegan. Use vegan blue cheese alternative and maple syrup instead of honey.
Storage Instructions:
- Store leftover roasted pears in an airtight container in the refrigerator for up to 3 days. Reheat gently in the oven or microwave before serving.
Conclusion:
And there you have it! These Roasted Pears with Blue Cheese are truly a revelation – a harmonious blend of sweet, savory, and creamy textures that will tantalize your taste buds. I genuinely believe this recipe is a must-try for anyone looking to elevate their appetizer game or simply enjoy a sophisticated and satisfying snack. The beauty of this dish lies in its simplicity; it requires minimal effort but delivers maximum flavor impact.
Why is this recipe a must-try? Well, beyond the incredible taste, it’s incredibly versatile. It’s perfect as an elegant starter for a dinner party, a delightful addition to a cheese board, or even a surprisingly delicious light lunch. The combination of the warm, caramelized pears, the tangy bite of the blue cheese, and the subtle crunch of the walnuts creates a symphony of sensations that will leave you wanting more. Plus, it’s visually stunning! The golden-brown pears, speckled with blue cheese and walnuts, make for a beautiful presentation that’s sure to impress your guests.
But the fun doesn’t stop there! Feel free to experiment with different variations to suit your preferences. For a sweeter twist, drizzle a little honey or maple syrup over the pears before roasting. If you’re not a fan of walnuts, pecans or almonds would work just as well. And if you’re feeling adventurous, try adding a sprinkle of fresh thyme or rosemary for an herbaceous note.
Serving Suggestions:
* Serve these roasted pears warm as an appetizer with a glass of crisp white wine, like a Sauvignon Blanc or Pinot Grigio.
* Add them to a salad with mixed greens, a balsamic vinaigrette, and some grilled chicken or salmon for a complete and satisfying meal.
* Crumble them over crostini with a drizzle of balsamic glaze for a quick and easy snack.
* For a decadent dessert, serve them with a scoop of vanilla ice cream or a dollop of whipped cream.
Variations to Explore:
* Cheese Swap: Not a blue cheese fan? Try using Gorgonzola, goat cheese, or even a creamy brie.
* Nutty Alternatives: Substitute the walnuts with pecans, almonds, or pistachios for a different textural and flavor profile.
* Sweet Enhancements: Drizzle with honey, maple syrup, or agave nectar for added sweetness.
* Herbaceous Touch: Sprinkle with fresh thyme, rosemary, or sage for an aromatic twist.
* Balsamic Boost: Drizzle with balsamic glaze after roasting for a tangy and sweet finish.
I’m so excited for you to try this recipe and discover the magic of Roasted Pears Blue Cheese for yourself! It’s a dish that’s sure to become a new favorite in your repertoire. Don’t be afraid to get creative and personalize it to your liking. The possibilities are endless!
Once you’ve had a chance to make these delicious roasted pears, I would absolutely love to hear about your experience. Share your photos and comments on social media using [Your Recipe Hashtag] or leave a review on the recipe page. Let me know what variations you tried and how they turned out. Your feedback is invaluable and helps me continue to create recipes that you’ll love. Happy cooking!
Roasted Pears Blue Cheese: A Delicious & Easy Recipe
Sweet and savory roasted pears filled with creamy blue cheese, crunchy nuts, and a touch of honey. A perfect appetizer, side, or dessert!
Ingredients
- 4 ripe but firm pears (such as Bosc, Anjou, or Comice)
- 4 ounces high-quality blue cheese, crumbled (Roquefort, Gorgonzola, or Stilton work well)
- 1/4 cup chopped walnuts or pecans, toasted
- 2 tablespoons honey, plus more for drizzling
- 2 tablespoons unsalted butter, melted
- 1 tablespoon fresh lemon juice
- 1/4 teaspoon ground cinnamon
- Pinch of ground nutmeg
- Pinch of salt
- Fresh thyme sprigs, for garnish (optional)
- Balsamic glaze, for drizzling (optional)
Instructions
- Preheat: Preheat your oven to 375°F (190°C).
- Prepare Pears: Wash and halve the pears lengthwise. Core the pears using a melon baller or small spoon, creating a well for the filling.
- Prepare Pan: Lightly grease a baking dish or roasting pan. Arrange pear halves cut-side up in the pan.
- Make Filling: In a small bowl, combine crumbled blue cheese, chopped nuts, honey, melted butter, lemon juice, cinnamon, nutmeg, and salt. Mix well. Taste and adjust seasoning as needed.
- Stuff Pears: Spoon the blue cheese mixture into the center of each pear half, packing firmly. Drizzle with extra honey.
- Roast: Roast in the preheated oven for 20-25 minutes, or until the pears are tender and the blue cheese is melted and slightly browned. If the cheese browns too quickly, tent with foil.
- Cool & Serve: Remove from oven and let cool slightly. Garnish with fresh thyme sprigs and drizzle with balsamic glaze (optional). Serve warm.
Notes
- Choose ripe but firm pears.
- Don’t overfill the pears.
- Adjust roasting time as needed.
- Toast the nuts for extra flavor.
- Use high-quality blue cheese.
- Experiment with different toppings.
- Serve with a complementary wine.
- For a little kick, add a pinch of red pepper flakes to the blue cheese mixture.
- If you’re not a fan of blue cheese, you can substitute it with another type of cheese, such as goat cheese, brie, or mascarpone.
- For a more decadent dessert, wrap each pear half in a sheet of puff pastry before roasting.
- Use vegan blue cheese alternative and maple syrup instead of honey.
- Store leftover roasted pears in an airtight container in the refrigerator for up to 3 days. Reheat gently in the oven or microwave before serving.