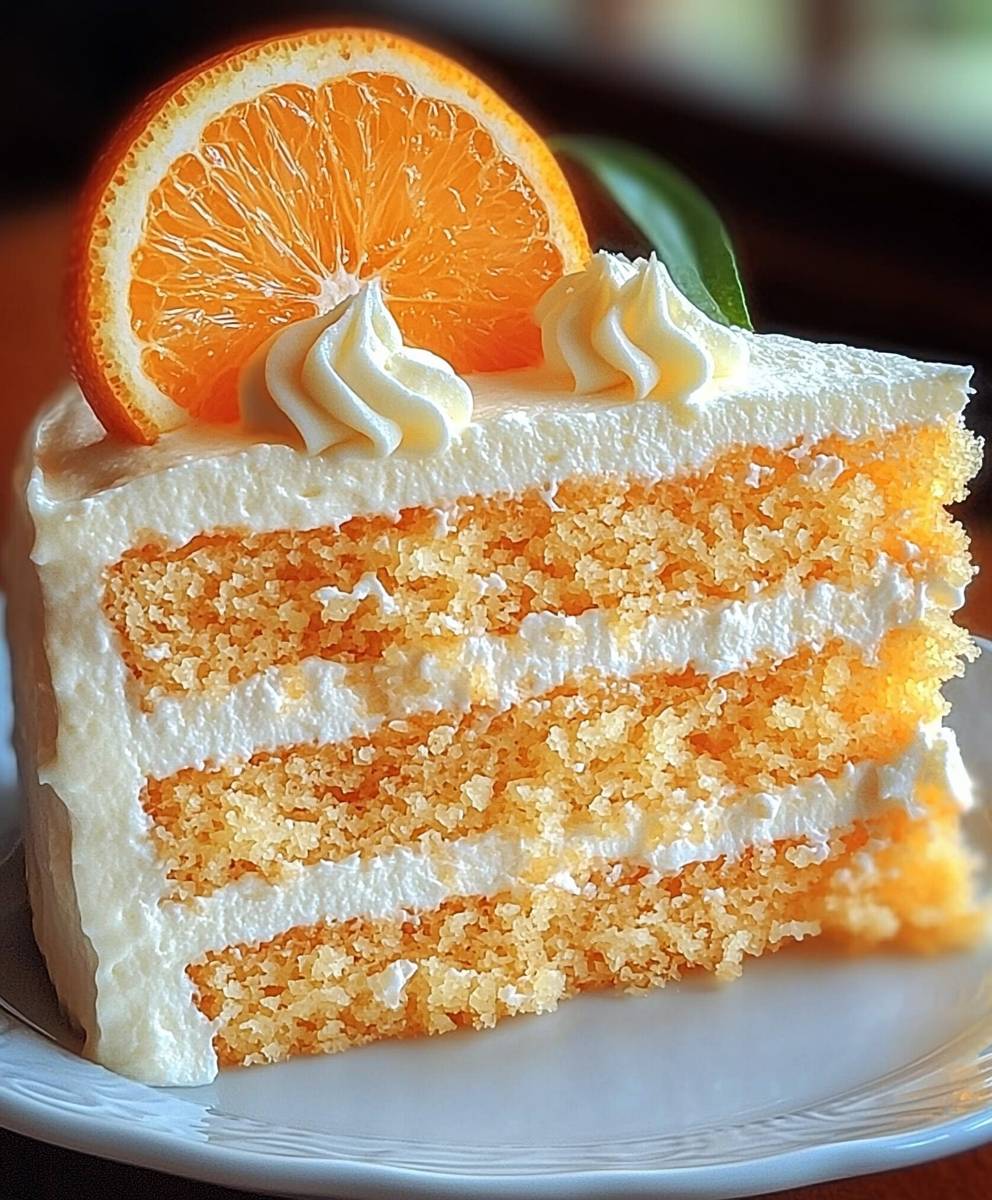
Orange Creamsicle Cake: just the name conjures up memories of long summer days and the sweet, tangy delight of that iconic frozen treat. But what if you could capture that nostalgic flavor in a slice of cake? Imagine a dessert that perfectly balances the bright citrus notes of orange with the creamy, dreamy sweetness of vanilla. That’s exactly what this recipe delivers!
While the Orange Creamsicle itself might be a relatively modern invention, the combination of citrus and cream has a long and delicious history in desserts around the world. From Italian orange ricotta cake to classic British lemon posset, the pairing is a timeless testament to flavor harmony. Our Orange Creamsicle Cake takes that classic combination and elevates it to new heights with a light, fluffy crumb and a melt-in-your-mouth frosting.
People adore this cake for so many reasons. First, the taste is simply irresistible – a burst of sunshine in every bite! The texture is equally appealing, offering a delightful contrast between the moist cake and the smooth, creamy frosting. Plus, while it looks impressive, this cake is surprisingly easy to make, making it perfect for both special occasions and everyday indulgences. Get ready to experience a taste of childhood bliss with every slice!

Ingredients:
- For the Cake:
- 2 1/2 cups all-purpose flour
- 1 tablespoon baking powder
- 1/2 teaspoon baking soda
- 1/4 teaspoon salt
- 1 cup (2 sticks) unsalted butter, softened
- 1 3/4 cups granulated sugar
- 3 large eggs
- 1 teaspoon vanilla extract
- 1 cup buttermilk
- 1/2 cup orange juice, freshly squeezed
- 2 tablespoons orange zest, finely grated
- For the Orange Creamsicle Filling:
- 8 ounces cream cheese, softened
- 1/2 cup (1 stick) unsalted butter, softened
- 3 cups powdered sugar
- 1/4 cup orange juice, freshly squeezed
- 1 tablespoon orange zest, finely grated
- 1 teaspoon vanilla extract
- For the Orange Creamsicle Frosting:
- 1 cup (2 sticks) unsalted butter, softened
- 4 cups powdered sugar
- 1/4 cup heavy cream
- 1/4 cup orange juice, freshly squeezed
- 1 tablespoon orange zest, finely grated
- 1 teaspoon vanilla extract
- Optional: Orange food coloring (gel is best)
Preparing the Cake Layers:
- Preheat and Prep: I always start by preheating my oven to 350°F (175°C). While the oven is heating, grease and flour three 9-inch round cake pans. This is crucial to prevent the cakes from sticking! I like to use baking spray with flour already in it for extra insurance.
- Dry Ingredients: In a large bowl, whisk together the flour, baking powder, baking soda, and salt. Whisking ensures everything is evenly distributed, which is key for a consistent cake texture.
- Cream Butter and Sugar: In a separate large bowl (or the bowl of your stand mixer), cream together the softened butter and granulated sugar until light and fluffy. This usually takes about 3-5 minutes. Don’t rush this step; it’s important for incorporating air into the batter.
- Add Eggs: Beat in the eggs one at a time, making sure each egg is fully incorporated before adding the next. Then, stir in the vanilla extract.
- Alternate Wet and Dry: Gradually add the dry ingredients to the wet ingredients, alternating with the buttermilk, beginning and ending with the dry ingredients. So, it’s dry, wet, dry, wet, dry. Mix until just combined. Be careful not to overmix, as this can lead to a tough cake.
- Add Orange Goodness: Stir in the orange juice and orange zest until evenly distributed. The zest really adds a punch of orange flavor!
- Divide and Bake: Divide the batter evenly among the prepared cake pans. I like to use a kitchen scale to ensure each pan has the same amount of batter, resulting in even layers. Bake for 25-30 minutes, or until a wooden skewer inserted into the center comes out clean.
- Cool Completely: Let the cakes cool in the pans for 10 minutes before inverting them onto a wire rack to cool completely. Make sure they are completely cool before frosting, or the frosting will melt!
Making the Orange Creamsicle Filling:
- Cream Cheese and Butter: In a large bowl (or the bowl of your stand mixer), cream together the softened cream cheese and butter until smooth and creamy. Make sure both are at room temperature to avoid lumps.
- Add Powdered Sugar: Gradually add the powdered sugar, one cup at a time, beating well after each addition. This prevents a powdered sugar cloud!
- Orange Flavor Boost: Stir in the orange juice, orange zest, and vanilla extract until smooth and creamy. Taste and adjust the sweetness or orange flavor as needed. I sometimes add a tiny pinch of salt to balance the sweetness.
Preparing the Orange Creamsicle Frosting:
- Cream Butter: In a large bowl (or the bowl of your stand mixer), cream the softened butter until light and fluffy. This usually takes about 3-5 minutes.
- Add Powdered Sugar: Gradually add the powdered sugar, one cup at a time, beating well after each addition. Again, go slow to avoid a mess!
- Add Liquids: Add the heavy cream, orange juice, orange zest, and vanilla extract. Beat until smooth and creamy. If the frosting is too thick, add a little more heavy cream. If it’s too thin, add a little more powdered sugar.
- Optional Color: If desired, add a few drops of orange food coloring (gel is best) to achieve a vibrant orange color. Start with a small amount and add more until you reach your desired shade.
Assembling the Orange Creamsicle Cake:
- Level the Cakes: If the cake layers are uneven, use a serrated knife to level the tops. This will ensure a stable and even cake.
- First Layer: Place one cake layer on a serving plate or cake stand.
- Filling Time: Spread half of the orange creamsicle filling evenly over the first cake layer.
- Second Layer: Carefully place the second cake layer on top of the filling.
- More Filling: Spread the remaining orange creamsicle filling evenly over the second cake layer.
- Final Layer: Place the final cake layer on top of the filling.
- Crumb Coat: Apply a thin layer of frosting over the entire cake. This is called a crumb coat and helps to seal in any loose crumbs. Refrigerate the cake for 30 minutes to allow the crumb coat to set.
- Final Frosting: After the crumb coat has set, frost the entire cake with the remaining orange creamsicle frosting. You can create swirls, smooth it out, or get creative with your decorating!
- Chill and Serve: Refrigerate the cake for at least 30 minutes before serving. This allows the frosting to set and the flavors to meld together.
Conclusion:
This Orange Creamsicle Cake is more than just a dessert; it’s a burst of sunshine on a plate, a nostalgic trip back to childhood summers, and a guaranteed crowd-pleaser all rolled into one delicious package. From the vibrant citrus aroma that fills your kitchen as it bakes to the creamy, dreamy texture that melts in your mouth, every element of this cake is designed to delight. It’s the perfect balance of tangy orange and sweet vanilla, creating a flavor profile that’s both refreshing and comforting.
Why is this a must-try? Because it’s surprisingly easy to make! Don’t let the impressive presentation fool you; this recipe is straightforward and uses readily available ingredients. Plus, it’s incredibly versatile. Need a show-stopping dessert for a birthday party? This cake is it. Looking for a sweet treat to brighten up a weeknight dinner? This cake fits the bill. Want to impress your friends with your baking skills? Look no further! The moist crumb, the vibrant orange flavor, and the creamy frosting combine to create a truly unforgettable experience.
But the best part? You can easily customize it to your liking! For a more intense orange flavor, try adding a tablespoon of orange zest to the batter. If you’re a fan of cream cheese frosting, swap out the vanilla buttercream for a tangy cream cheese version. Want to add a little crunch? Sprinkle some chopped pecans or walnuts on top. Feeling adventurous? Try adding a layer of orange marmalade between the cake layers for an extra burst of flavor.
Serving Suggestions and Variations:
* Serve chilled for the ultimate refreshing experience.
* Garnish with fresh orange slices or candied orange peel.
* Pair with a scoop of vanilla ice cream or a dollop of whipped cream.
* For a lighter version, use a reduced-fat cake mix and frosting.
* Make it a mini-cake by baking the batter in muffin tins.
* Add a splash of orange liqueur to the frosting for an adult twist.
* Consider a dusting of powdered sugar for a simple, elegant finish.
* For a truly decadent treat, drizzle with melted white chocolate.
I truly believe that this Orange Creamsicle Cake will become a new favorite in your household. It’s a recipe that’s sure to bring smiles and create lasting memories. The combination of the bright, citrusy orange and the smooth, creamy vanilla is simply irresistible. It’s a cake that’s perfect for any occasion, from casual gatherings to special celebrations.
So, what are you waiting for? Gather your ingredients, preheat your oven, and get ready to bake up a slice of sunshine! I’m confident that you’ll love this recipe as much as I do. And once you’ve tried it, I’d love to hear about your experience. Share your photos, your variations, and your thoughts in the comments below. Let’s spread the joy of this delicious Orange Creamsicle Cake far and wide! Happy baking! I can’t wait to see what you create!
Orange Creamsicle Cake: A Deliciously Dreamy Recipe
A moist and flavorful three-layer cake bursting with orange creamsicle flavor! Features a tangy orange cake, creamy orange filling, and luscious orange frosting.
Ingredients
- 2 1/2 cups all-purpose flour
- 1 tablespoon baking powder
- 1/2 teaspoon baking soda
- 1/4 teaspoon salt
- 1 cup (2 sticks) unsalted butter, softened
- 1 3/4 cups granulated sugar
- 3 large eggs
- 1 teaspoon vanilla extract
- 1 cup buttermilk
- 1/2 cup orange juice, freshly squeezed
- 2 tablespoons orange zest, finely grated
- 8 ounces cream cheese, softened
- 1/2 cup (1 stick) unsalted butter, softened
- 3 cups powdered sugar
- 1/4 cup orange juice, freshly squeezed
- 1 tablespoon orange zest, finely grated
- 1 teaspoon vanilla extract
- 1 cup (2 sticks) unsalted butter, softened
- 4 cups powdered sugar
- 1/4 cup heavy cream
- 1/4 cup orange juice, freshly squeezed
- 1 tablespoon orange zest, finely grated
- 1 teaspoon vanilla extract
- Optional: Orange food coloring (gel is best)
Instructions
- Preheat and Prep: Preheat oven to 350°F (175°C). Grease and flour three 9-inch round cake pans.
- Dry Ingredients: In a large bowl, whisk together the flour, baking powder, baking soda, and salt.
- Cream Butter and Sugar: In a separate large bowl (or stand mixer), cream together the softened butter and granulated sugar until light and fluffy (3-5 minutes).
- Add Eggs: Beat in the eggs one at a time, then stir in the vanilla extract.
- Alternate Wet and Dry: Gradually add the dry ingredients to the wet ingredients, alternating with the buttermilk, beginning and ending with the dry ingredients. Mix until just combined.
- Add Orange Goodness: Stir in the orange juice and orange zest until evenly distributed.
- Divide and Bake: Divide the batter evenly among the prepared cake pans. Bake for 25-30 minutes, or until a wooden skewer inserted into the center comes out clean.
- Cool Completely: Let the cakes cool in the pans for 10 minutes before inverting them onto a wire rack to cool completely.
- Cream Cheese and Butter: In a large bowl (or stand mixer), cream together the softened cream cheese and butter until smooth and creamy.
- Add Powdered Sugar: Gradually add the powdered sugar, one cup at a time, beating well after each addition.
- Orange Flavor Boost: Stir in the orange juice, orange zest, and vanilla extract until smooth and creamy. Taste and adjust as needed.
- Cream Butter: In a large bowl (or stand mixer), cream the softened butter until light and fluffy (3-5 minutes).
- Add Powdered Sugar: Gradually add the powdered sugar, one cup at a time, beating well after each addition.
- Add Liquids: Add the heavy cream, orange juice, orange zest, and vanilla extract. Beat until smooth and creamy. Adjust consistency with more cream or powdered sugar as needed.
- Optional Color: If desired, add orange food coloring (gel is best) to achieve desired shade.
- Level the Cakes: If the cake layers are uneven, use a serrated knife to level the tops.
- First Layer: Place one cake layer on a serving plate or cake stand.
- Filling Time: Spread half of the orange creamsicle filling evenly over the first cake layer.
- Second Layer: Carefully place the second cake layer on top of the filling.
- More Filling: Spread the remaining orange creamsicle filling evenly over the second cake layer.
- Final Layer: Place the final cake layer on top of the filling.
- Crumb Coat: Apply a thin layer of frosting over the entire cake. Refrigerate for 30 minutes to allow the crumb coat to set.
- Final Frosting: After the crumb coat has set, frost the entire cake with the remaining orange creamsicle frosting.
- Chill and Serve: Refrigerate the cake for at least 30 minutes before serving.
Notes
- Make sure all ingredients (butter, cream cheese) are softened for best results.
- Don’t overmix the cake batter, as this can lead to a tough cake.
- Cool the cake layers completely before frosting to prevent the frosting from melting.
- A kitchen scale is helpful for dividing the cake batter evenly among the pans.
- Gel food coloring is recommended for a vibrant orange color in the frosting.