No Bake Protein Bars are an absolute game-changer in the world of healthy snacking, and I’m thrilled to share my favorite recipe with you today. Have you ever found yourself in need of a quick energy boost, something truly satisfying and nutritious, but without the time or desire to turn on the oven? That’s precisely where these incredible bars come in! In our increasingly fast-paced lives, the demand for convenient yet wholesome food options has never been higher. While the concept of a “protein bar” might seem like a modern invention, reflecting our current collective focus on fitness and mindful eating, the ingenuity of combining nourishing ingredients into an easily portable form is truly brilliant.
The Unbeatable Appeal of Homemade No Bake Protein Bars
People simply adore these delightful No Bake Protein Bars because they offer the perfect trifecta: incredible taste, a delightfully chewy texture, and unparalleled convenience. Imagine a snack that genuinely curbs cravings, fuels your body effectively, and can be whipped up in mere minutes, absolutely no baking required! It’s the ultimate solution for pre-workout fuel, a post-workout recovery treat, or simply a smart, anytime snack that keeps you feeling full and energized throughout your busy day. This recipe for No Bake Protein Bars is designed to be customizable, allowing you to avoid unhealthy additives found in many store-bought varieties and embrace homemade goodness instead!

Ingredients:
Making delicious homemade No Bake Protein Bars is not only incredibly satisfying but also allows you to control exactly what goes into your body. Here’s a detailed look at the ingredients I love to use to create truly fantastic, wholesome bars.
- 1 cup Creamy Natural Peanut Butter: I always opt for natural peanut butter with no added sugars or oils. Its rich, creamy texture acts as the primary binder for our No Bake Protein Bars, holding everything together beautifully. If you have a peanut allergy or simply prefer another flavor, almond butter or cashew butter work wonderfully as well. Just ensure it’s smooth and drippy, not too thick, as this affects the final consistency of your bars. This ingredient brings healthy fats and an extra boost of protein, making our bars hearty and fulfilling.
- 1/2 cup Honey or Maple Syrup: This serves a dual purpose: it’s our main sweetener and another crucial binding agent. For a truly vegan option, 100% pure maple syrup is your best friend. If you don’t mind using honey, its distinct flavor pairs exceptionally well with peanut butter and chocolate. Both options provide that touch of sweetness we crave in a snack, balancing the savory notes of the nuts and protein powder. You can adjust this amount slightly based on your sweetness preference, but remember it plays a vital role in texture.
- 1/2 cup Protein Powder (Vanilla or Chocolate Recommended): This is the star of our No Bake Protein Bars, providing the significant protein punch. I typically use a high-quality whey protein isolate, but a plant-based protein powder (like pea or rice protein) works just as well if you’re looking for a vegan alternative. Vanilla protein powder offers a versatile base, allowing other flavors to shine, while chocolate protein powder will give you a richer, dessert-like bar. Make sure to choose a brand you enjoy the taste of, as its flavor will be prominent.
- 1 cup Rolled Oats (Gluten-Free if Preferred): Rolled oats add structure, fiber, and a satisfying chewiness to our No Bake Protein Bars. They’re a fantastic source of complex carbohydrates, providing sustained energy. If you have gluten sensitivities, opt for certified gluten-free rolled oats. I don’t recommend instant oats as they absorb liquid too quickly and can make the bars mushy; old-fashioned rolled oats give the best texture.
- 1/4 cup Chia Seeds: These tiny powerhouses are incredible for boosting fiber, omega-3 fatty acids, and providing an extra layer of binding. When they come into contact with moisture, chia seeds form a gel, helping to hold our No Bake Protein Bars together firmly while adding a delightful subtle crunch. They also contribute to that feeling of fullness, making these bars a great snack.
- 1/4 cup Flax Meal (Ground Flaxseeds): Another nutritional superstar, flax meal adds fiber, lignans, and even more healthy omega-3s. Like chia seeds, it also acts as an additional binder due to its gelling properties, ensuring your bars don’t crumble. I prefer flax meal over whole flaxseeds for better nutrient absorption and a smoother texture in the bars.
- 1/2 teaspoon Fine Sea Salt: Don’t skip the salt! It’s not just for savory dishes. A small amount of salt truly elevates the flavors in sweet recipes, especially when chocolate and peanut butter are involved. It balances the sweetness and brings out the nutty, rich notes, making every bite of your No Bake Protein Bars more enjoyable.
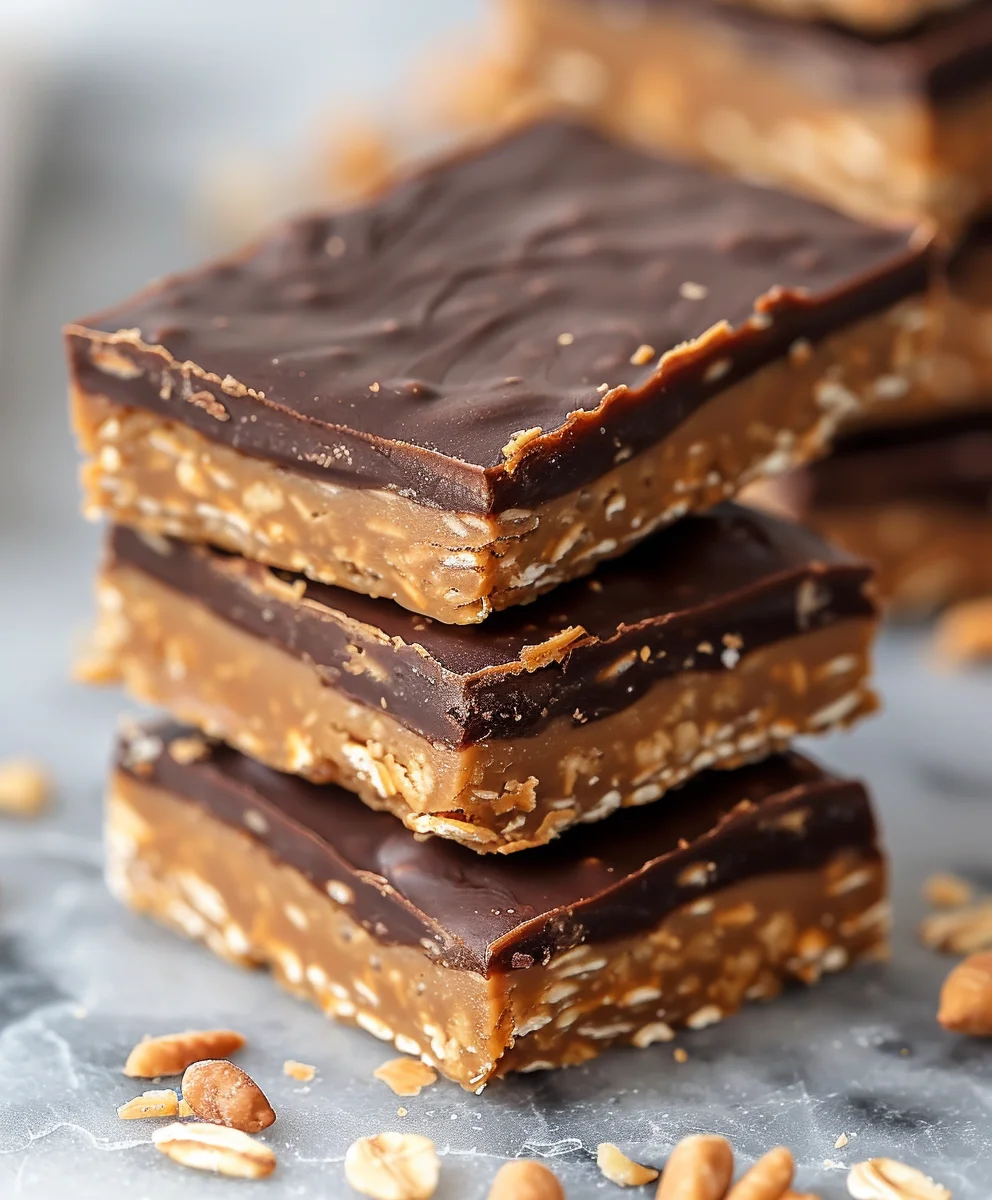
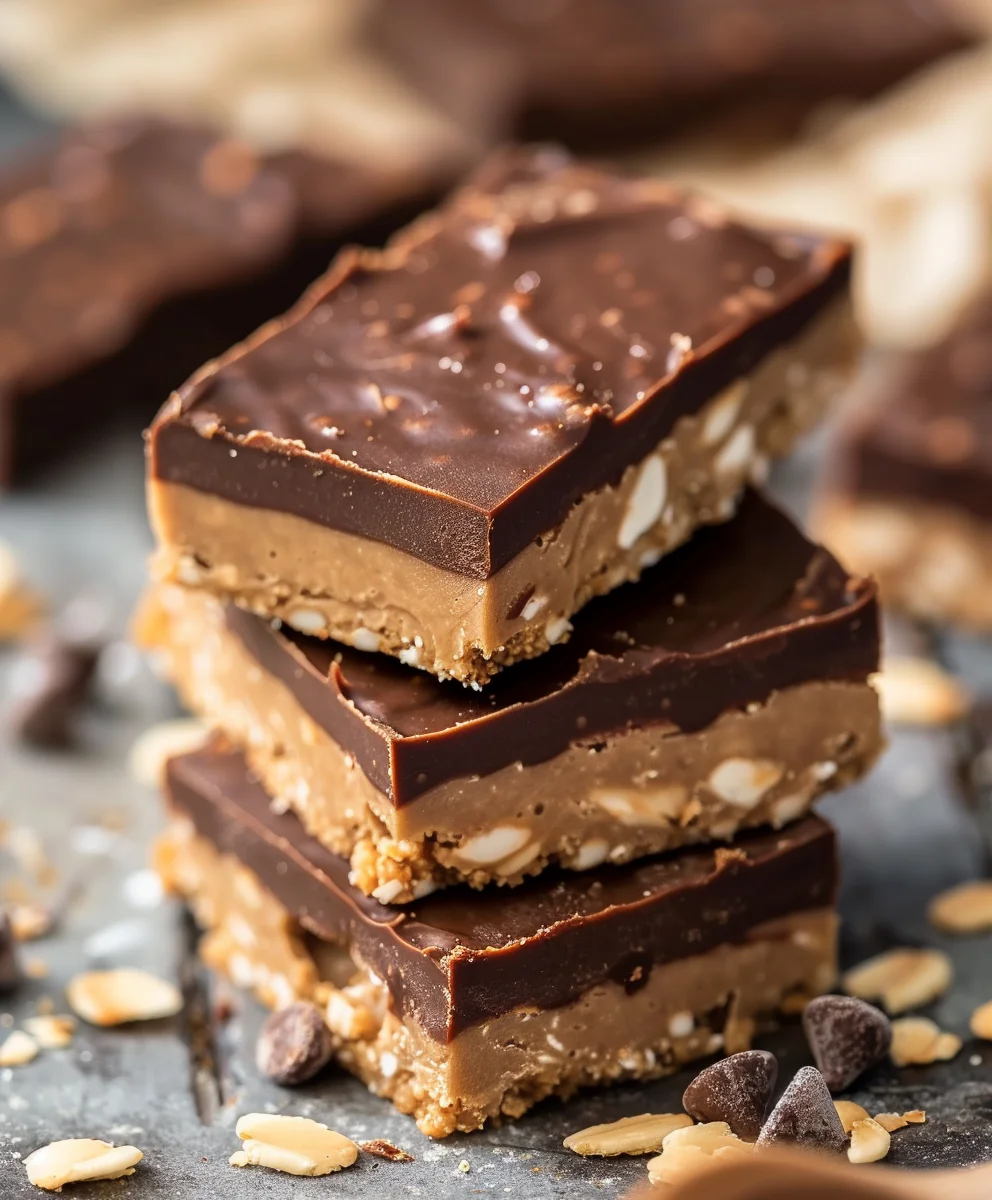
- 1/4 cup Mini Chocolate Chips (Optional but Highly Recommended): Because who doesn’t love a little chocolate? Mini chocolate chips distribute evenly throughout the bars, ensuring a delightful chocolatey burst in almost every bite. You can use dark chocolate, milk chocolate, or even white chocolate chips, depending on your preference. For a truly healthy option, look for dairy-free or low-sugar varieties. This addition makes these No Bake Protein Bars feel like a real treat.
- 2-4 tablespoons Unsweetened Almond Milk (or Water), as needed: This is our “secret weapon” for adjusting the consistency. Sometimes, depending on the protein powder or the exact creaminess of your peanut butter, the mixture might be a bit too dry or crumbly. A little splash of almond milk (or even plain water) can bring it to that perfect pliable, yet firm, consistency needed to press into a pan. Add it one tablespoon at a time until you reach your desired texture.
Equipment You’ll Need:
Having the right tools makes the process of creating these No Bake Protein Bars smooth and enjoyable. You likely have most of these in your kitchen already!
- 8×8 inch Baking Dish or Square Pan: This size is ideal for creating bars that are a good thickness. A 9×9 inch pan will also work, but your bars will be slightly thinner.
- Parchment Paper: Absolutely essential for easy removal of the bars from the pan and minimal cleanup.
- Large Mixing Bowl: You’ll need plenty of space to combine all those wonderful ingredients.
- Sturdy Spatula or Wooden Spoon: For mixing the dense mixture thoroughly and pressing it firmly into the pan.
- Measuring Cups and Spoons: Accuracy is key for consistent results in our No Bake Protein Bars.
Preparation Phase: Gathering Your Tools and Creating the Base
This initial stage sets the foundation for your delicious No Bake Protein Bars. Taking a moment to prepare your workspace and get the base ingredients ready ensures a seamless process once you start mixing.
- Prepare Your Pan: My first step is always to line an 8×8 inch baking dish or square pan with parchment paper. I like to leave an overhang on two opposite sides, creating little “handles” that will make lifting the set bars out of the pan incredibly easy later on. This simple trick makes cutting the bars so much more convenient and saves you from scraping them out of the pan. Don’t skip the parchment paper for these No Bake Protein Bars; it’s a game-changer for clean removal!
- Melt the Peanut Butter and Sweetener: In a large, microwave-safe mixing bowl, combine the 1 cup of creamy natural peanut butter and the 1/2 cup of honey or maple syrup. I prefer to use the microwave for this step, heating the mixture in 30-second intervals on medium power, stirring well after each interval. It usually takes about 1 to 2 minutes total. The goal here is to achieve a smooth, pourable consistency where the peanut butter and sweetener are fully incorporated and warm, but not boiling hot. This warm base is crucial because it helps to effectively bind all the dry ingredients together, ensuring your No Bake Protein Bars don’t fall apart. Alternatively, you can use a small saucepan over low heat, stirring constantly until melted and smooth. Just be careful not to scorch the mixture.
The Heart of Your No Bake Protein Bars: Mixing and Combining
Now comes the fun part – bringing all the incredible flavors and textures together. This section is all about thoroughly combining your ingredients to form the perfect, pliable dough for your No Bake Protein Bars.
- Add Dry Ingredients to the Wet Base: Once your peanut butter and sweetener mixture is smooth and warm, it’s time to add the muscle to your No Bake Protein Bars. To the same bowl, add the 1/2 cup of protein powder, 1 cup of rolled oats, 1/4 cup of chia seeds, 1/4 cup of flax meal, and the 1/2 teaspoon of fine sea salt. I usually sprinkle these ingredients evenly over the wet mixture to make initial mixing a little easier.
- Start Mixing Vigorously: Using a sturdy spatula or a wooden spoon, begin to mix all the ingredients together. This part requires a bit of elbow grease! Initially, the mixture might seem dry and crumbly, and you might think it won’t ever come together. Keep stirring and folding from the bottom up, ensuring all the dry ingredients are gradually incorporated into the sticky peanut butter mixture. You’re aiming for a thick, uniform dough. This step is where the “no bake” magic really begins to take shape, as the protein powder and oats start absorbing the liquid.
- Adjust Consistency with Liquid (If Needed): This is a critical step for perfect No Bake Protein Bars. If, after several minutes of vigorous mixing, your mixture still appears too dry or crumbly and doesn’t hold together when you try to press it, it’s time to add a little liquid. I start by adding 1 tablespoon of unsweetened almond milk (or water) at a time, mixing thoroughly after each addition. You might need anywhere from 2 to 4 tablespoons, depending on your specific protein powder (some absorb more liquid than others) and the consistency of your peanut butter. The goal is to reach a dough-like consistency that is sticky enough to hold together when pressed, but not overly wet or gooey. It should feel firm and moldable, like a dense cookie dough. Achieving the right consistency here is key to bars that don’t crumble and hold their shape beautifully.
- Fold in Optional Chocolate Chips: If you’re using them (and I almost always do!), gently fold in the 1/4 cup of mini chocolate chips once the main mixture has reached the desired consistency. Incorporate them just enough so they are evenly distributed without overmixing. This ensures they maintain their shape and don’t melt too much into the warm dough, giving you distinct pockets of chocolatey goodness in your No Bake Protein Bars.
Shaping and Setting: The Final Touches for Perfect Bars
Once your mixture is perfectly combined, the final steps are all about shaping and allowing your No Bake Protein Bars to set, ensuring they are firm and ready to enjoy.
- Press the Mixture into the Prepared Pan: Transfer the entire mixture into your parchment-lined 8×8 inch baking dish. This is where you’ll really shape your No Bake Protein Bars. Using the back of your sturdy spatula, a flat bottom of a glass, or even your clean hands (I sometimes use a piece of wax paper over the top of the mixture if I’m using my hands for extra press), press the mixture down firmly and evenly across the entire surface of the pan. The firmer you press, the more compact and less crumbly your finished No Bake Protein Bars will be. Pay extra attention to the corners and edges to ensure an even thickness throughout. I like to apply a good amount of pressure to really compact it down.
- Chill to Set: Once the mixture is firmly pressed into the pan, cover the pan loosely with plastic wrap or aluminum foil. Transfer the pan to the refrigerator and chill for at least 2 hours, or preferably 4 hours, to allow the bars to fully set. The longer they chill, the firmer they will become, making them much easier to cut and handle. During this time, the fats in the peanut butter will solidify, and the chia and flax seeds will continue to absorb moisture and bind, creating that wonderfully dense and satisfying texture characteristic of great No Bake Protein Bars. Patience is a virtue here, as a well-chilled bar holds its shape perfectly.
- Cut into Bars: After the bars are thoroughly chilled and firm, use the parchment paper overhangs to carefully lift the entire slab out of the baking dish and onto a clean cutting board. Using a sharp knife, trim any slightly uneven edges if desired, then cut the slab into 12 equally sized bars. I typically cut it into 3 strips by 4 strips, yielding nice rectangular bars. You can adjust the size to your preference, creating larger or smaller bars depending on your portion control goals. A sharp, clean knife makes all the difference for neat cuts on these No Bake Protein Bars.
Optional Toppings and Variations: Elevate Your No Bake Protein Bars
While these No Bake Protein Bars are fantastic on their own, a little extra creativity can take them to the next level. Here are some of my favorite ways to customize them:
- Drizzle with Melted Chocolate: For an extra special treat, melt about 1/4 cup of chocolate chips (dark, milk, or white) with a teaspoon of coconut oil until smooth. Once your bars are cut, arrange them on a wire rack over parchment paper and drizzle the melted chocolate over the top. Allow the chocolate to set in the refrigerator for about 15-20 minutes before serving. This adds a beautiful aesthetic and an extra layer of chocolate flavor to your No Bake Protein Bars.
- Sprinkle with Toppings: Before the bars fully set in the fridge, or immediately after drizzling with chocolate, you can sprinkle them with various toppings. Think a pinch of flaky sea salt (which pairs amazingly with chocolate and peanut butter!), chopped nuts (like peanuts, almonds, or walnuts), shredded coconut, or even a sprinkle of extra chia seeds or hemp hearts for an added nutritional boost.
- Nut Butter Swirl: Instead of fully incorporating all the nut butter, you can reserve about 2 tablespoons. Once the mixture is pressed into the pan, dollop the reserved nut butter on top and use a skewer or toothpick to create a decorative swirl before chilling. This creates a lovely visual effect and a burst of concentrated nut butter flavor in your No Bake Protein Bars.
- Flavor Variations:
- Chocolate Lover’s Dream: Use chocolate protein powder and add 2 tablespoons of unsweetened cocoa powder to the dry ingredients for an even deeper chocolate flavor.
- Coconut Delight: Incorporate 1/4 cup of unsweetened desiccated coconut into the mixture for a tropical twist. You could even use coconut oil in place of some of the nut butter (though you may need to adjust other liquids slightly).
- Spice It Up: Add 1/2 teaspoon of cinnamon or a pinch of nutmeg to the dry ingredients, especially if you’re using vanilla protein powder, for a warm and cozy flavor profile.
- Fruity Twist: Mix in 1/4 cup of finely chopped dried fruit like cranberries, raisins, or apricots for added sweetness and chewiness. Just be mindful that these additions can increase the sugar content.
Storage Tips for Your Homemade No Bake Protein Bars
To ensure your No Bake Protein Bars stay fresh and delicious for as long as possible, proper storage is key.
- Refrigeration is Essential: Because these are no-bake and contain nut butter, they will soften at room temperature. Always store your No Bake Protein Bars in an airtight container in the refrigerator. This keeps them firm, fresh, and prevents them from becoming too sticky.
- Layering for Freshness: If you’re stacking multiple bars in your container, I recommend placing a small piece of parchment paper or wax paper between each bar. This prevents them from sticking together, making it easy to grab just one when you need a quick snack.
- Shelf Life: Stored correctly in the refrigerator, your homemade No Bake Protein Bars will stay fresh for up to 7-10 days. The natural ingredients ensure they remain tasty and wholesome for this period.
- Freezing for Longer Storage: For an even longer shelf life, these bars freeze beautifully! Once cut, place the individual bars on a baking sheet lined with parchment paper and freeze for about an hour until solid. Then, transfer them to a freezer-safe airtight container or a heavy-duty freezer bag. They can be stored in the freezer for up to 2-3 months. When you’re ready to enjoy one, simply pull it out of the freezer and let it thaw for 10-15 minutes at room temperature, or enjoy it chilled straight from the fridge if you prefer a firmer texture.
- Portability: When taking your No Bake Protein Bars on the go, especially in warmer weather, consider wrapping them individually in parchment paper or foil. This helps maintain their shape and prevents them from getting too soft before you can enjoy them. They make an excellent pre-workout snack or a mid-afternoon energy boost.
Conclusion:
Well, there you have it, my friends! We’ve journeyed through the simple steps, uncovered the magical ingredients, and now stand at the precipice of a culinary revelation. I truly hope you’re as excited as I am about this incredible recipe. When I first stumbled upon the idea of making my own wholesome snacks, I knew I needed something that ticked all the boxes: delicious, easy, and genuinely good for me. And believe me, this recipe for No Bake Protein Bars not only ticks those boxes but utterly demolishes them!
So, why is this recipe a non-negotiable, must-try addition to your kitchen repertoire? Let me count the ways! First and foremost, the sheer simplicity is a game-changer. Forget about preheating ovens, precise baking times, or complicated techniques. This is a one-bowl wonder that comes together in mere minutes, making it absolutely perfect for those hectic weekdays when time is a luxury you simply don’t have. You can whip up a batch on Sunday afternoon and have nutrient-packed snacks ready for the entire week. It’s the ultimate grab-and-go solution, whether you’re heading out the door for work, hitting the gym, or just need a quick, satisfying bite between meetings. The convenience alone makes these bars worth their weight in gold.
Beyond the ease, the taste and texture are what truly elevate these bars into legendary status. Imagine a delightful blend of rich, natural flavors, perfectly balanced sweetness, and a satisfyingly chewy, yet firm, texture that holds up beautifully. They’re not overly sweet, which I personally love, allowing the natural goodness of the ingredients to shine through. Each bite is a harmonious symphony of nutty, slightly sweet, and utterly delicious notes. You’ll find yourself reaching for these over store-bought alternatives, not just for the health benefits, but for the superior taste that only a homemade creation can offer.
And speaking of health benefits, these bars are a nutritional powerhouse! Packed with protein, healthy fats, and fiber, they are designed to keep you feeling full, energized, and focused. They’re fantastic for post-workout recovery, a mid-afternoon energy boost, or even a guilt-free dessert option. You have complete control over the ingredients, allowing you to choose organic, non-GMO, or allergen-friendly components to suit your specific dietary needs. It’s empowerment in a snack bar!
Elevate Your Snacking Experience: Serving Suggestions & Variations!
Now, let’s talk about how you can make these already fantastic bars even more spectacular, or tailor them to your personal preferences. The beauty of these No Bake Protein Bars lies in their incredible versatility!
- For a Decadent Touch: Before chilling, try drizzling the top with a bit of melted dark chocolate (choose a good quality, high-cocoa percentage for extra antioxidants!). A sprinkle of flaky sea salt on top of the chocolate takes them to a whole new level of gourmet.
- Nutty Adventures: While I love the classic peanut butter, feel free to experiment with other nut butters like almond, cashew, or even sunflower seed butter for a nut-free option. Each will lend a unique flavor profile to your bars.
- Flavor Boosters: A pinch of cinnamon, a dash of cardamom, or a tiny amount of vanilla extract can dramatically enhance the overall aroma and taste. For a zesty twist, add a teaspoon of orange or lemon zest to the mixture – it’s surprisingly refreshing!
- Texture Play: Want more crunch? Fold in some extra chopped nuts, seeds (chia, flax, hemp, pumpkin, or sunflower seeds are all fantastic), or even some shredded coconut. If you prefer a smoother bar, ensure your oats are finely ground before mixing.
- Fruit & Fun: Dried fruits like cranberries, chopped apricots, or finely diced dates can add natural sweetness and chewiness. Just be mindful of the added sugar content if you’re watching that!
- Serving Temperature: While they are best enjoyed chilled straight from the fridge, letting them sit at room temperature for 5-10 minutes can slightly soften them, intensifying some of the flavors and making them a bit chewier.
Your Kitchen, Your Creation!
Seriously, the possibilities are endless! Don’t be afraid to get creative and make this recipe truly your own. Think of my version as the perfect blueprint, ready for your personal touch. These bars are not just food; they’re an expression of your desire for wholesome, delicious, and convenient nutrition.
So, what are you waiting for? I wholeheartedly encourage you to roll up your sleeves, gather your ingredients, and whip up a batch of these sensational No Bake Protein Bars today. Experience the joy of creating something so simple, yet so incredibly satisfying and beneficial. You deserve a snack that tastes amazing and genuinely supports your wellness goals!
Once you’ve made them, I would absolutely love to hear about your experience! Did you stick to the original recipe, or did you put your own unique spin on them? What were your favorite variations? Share your thoughts, triumphs, and delicious photos with us! Your feedback and creativity inspire not only me but also our entire community of enthusiastic home chefs. Go ahead, give them a try – I promise, your taste buds and your body will thank you!
Easy No Bake Protein Bars
Whip up these healthy, delicious, and convenient no-bake protein bars in minutes! Perfect for a quick energy boost, pre/post-workout fuel, or a satisfying snack that keeps you full and energized. No oven required!
Ingredients
-
1 ½ cups creamy no-stir peanut butter
-
¾ cup protein powder (vanilla or chocolate)
-
¼ cup honey or maple syrup
-
1 cup rolled oats
-
¼ cup dark chocolate chips
-
Optional: Sea salt for topping
Instructions
-
Step 1
Line an 8×8 inch pan with parchment paper, ensuring an overhang on two sides for easy lifting. -
Step 2
In a large microwave-safe bowl, combine peanut butter and honey or maple syrup. Microwave in 30-second intervals, stirring until smooth and warm (approx. 1-2 minutes total). -
Step 3
Add protein powder, rolled oats, and dark chocolate chips to the wet mixture. Mix vigorously with a sturdy spatula until a thick, uniform dough forms. -
Step 4
Transfer the mixture to the prepared pan. Press down very firmly and evenly across the entire surface to compact the bars. -
Step 5
Cover loosely and refrigerate for at least 2 hours, or until fully set and firm. -
Step 6
Use the parchment paper overhangs to lift the slab from the pan onto a cutting board. Cut into 12 equally sized bars. Sprinkle with optional sea salt, if desired. -
Step 7
Store bars in an airtight container in the refrigerator for up to 7-10 days, or freeze for up to 2-3 months.
Important Information
Nutrition Facts (Per Serving)
It is important to consider this information as approximate and not to use it as definitive health advice.
Allergy Information
Please check ingredients for potential allergens and consult a health professional if in doubt.