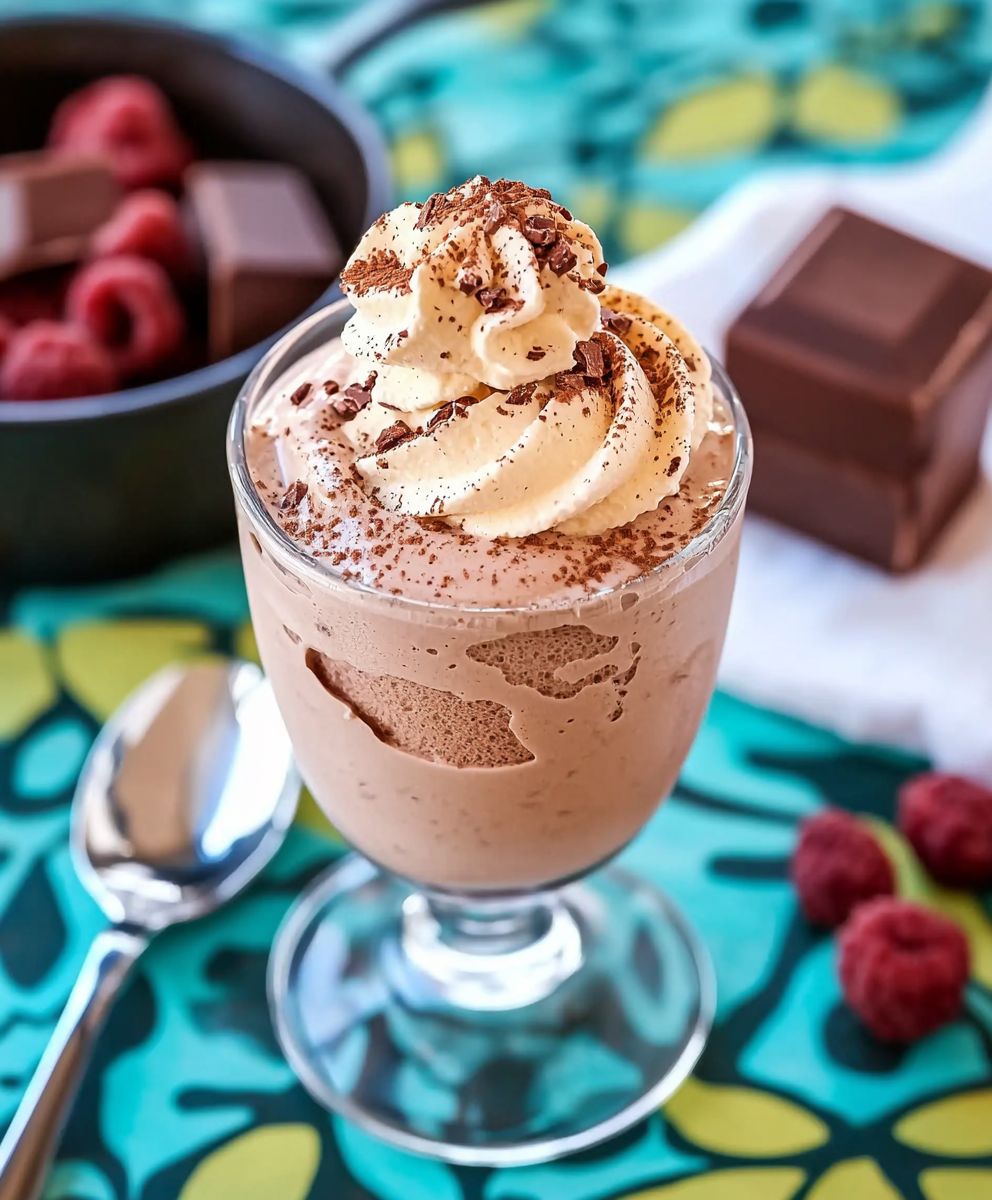
Ninja Creami Copycat Frosty: Craving that iconic, creamy, chocolatey Frosty treat but don’t want to leave the house? Or maybe you’re looking for a healthier, customizable version? Well, you’re in the right place! I’ve cracked the code to creating a perfect Frosty dupe using your Ninja Creami, and trust me, it’s a game-changer.
The original Wendy’s Frosty, with its unique texture somewhere between a milkshake and soft-serve ice cream, has been a beloved American treat since 1969. It’s more than just a dessert; it’s a nostalgic symbol of fast-food indulgence and simple pleasures. But let’s be honest, sometimes we want that familiar comfort without the added sugars and artificial ingredients.
That’s where this Ninja Creami Copycat Frosty recipe comes in! People adore the Frosty for its incredibly smooth, almost velvety texture and its not-too-sweet chocolate flavor that perfectly complements salty fries (don’t deny it, we all do it!). This homemade version captures that essence beautifully, allowing you to control the ingredients and tailor the sweetness to your liking. Plus, it’s incredibly easy to make with your Ninja Creami, making it a quick and satisfying dessert option any time of day. Get ready to experience Frosty bliss without the guilt!

Ingredients:
- 1 (13.5 ounce) can full-fat coconut milk, refrigerated overnight
- 1/4 cup unsweetened cocoa powder
- 1/4 cup granulated sugar (or sweetener of choice, adjust to taste)
- 1 teaspoon vanilla extract
- 1/4 teaspoon salt
- 1/4 cup milk (dairy or non-dairy), for respin
Preparing the Base:
Okay, let’s get started! The key to a super creamy, frosty-like treat in your Ninja Creami is starting with a well-chilled base. That’s why we’re using refrigerated coconut milk. The overnight chill separates the cream from the water, giving us that rich, decadent texture we’re after.
- Scoop out the Coconut Cream: Carefully open your can of refrigerated coconut milk. You’ll notice a thick layer of solidified cream at the top. This is what we want! Using a spoon, scoop out only the thick coconut cream, leaving the watery liquid behind. Try to get as much of the cream as possible, but don’t worry if a little bit of the liquid sneaks in. We just want to prioritize the creamy part.
- Combine Ingredients: In a blender or food processor, combine the scooped-out coconut cream, cocoa powder, sugar (or your preferred sweetener), vanilla extract, and salt.
- Blend Until Smooth: Blend the mixture on high speed until it’s completely smooth and creamy. This might take a minute or two, depending on your blender. Scrape down the sides as needed to ensure everything is fully incorporated. You shouldn’t see any lumps of cocoa powder or sweetener. The mixture should be a beautiful, rich chocolate color.
- Taste and Adjust: Now’s the time to taste your base! If you prefer a sweeter Frosty, add a little more sugar or sweetener. If you want a richer chocolate flavor, add a touch more cocoa powder. Remember to blend again after each adjustment to ensure everything is evenly distributed.
- Pour into Creami Pint: Carefully pour the blended mixture into your Ninja Creami pint container. Leave about an inch of headspace at the top, as the mixture will expand slightly when frozen.
- Freeze for at Least 24 Hours: This is crucial! Place the pint in your freezer and freeze for a minimum of 24 hours. The longer it freezes, the better the texture will be. I usually freeze mine for closer to 36 hours for optimal results. You want it to be completely solid.
Creami Time!
Alright, the moment we’ve been waiting for! Your base is frozen solid, and you’re ready to transform it into a delicious, creamy Frosty. Here’s how to do it:
- Prepare the Creami: Make sure your Ninja Creami machine is clean and ready to go.
- Insert the Pint: Take your frozen pint out of the freezer. Remove the lid and place the pint into the outer bowl of the Creami. Lock the lid onto the outer bowl.
- Install in the Creami: Install the outer bowl assembly into the Ninja Creami machine. Make sure it’s securely locked in place.
- Select the “Ice Cream” Function: Turn on your Ninja Creami and select the “Ice Cream” function. Let the machine do its thing! This process usually takes a few minutes.
- Inspect the Texture: Once the cycle is complete, remove the outer bowl assembly from the machine. Take a look at your creation. It will likely be a bit crumbly or powdery after the first spin. This is perfectly normal!
The Respin:
This is where the magic happens! The respin is what transforms that crumbly mixture into a smooth, creamy Frosty. Don’t skip this step!
- Add Milk: Add about 1/4 cup of milk (dairy or non-dairy) to the pint. This helps to rehydrate the mixture and create that perfect Frosty consistency.
- Respin: Place the outer bowl assembly back into the Ninja Creami machine. Select the “Respin” function. This cycle is shorter than the initial “Ice Cream” cycle.
- Check the Texture Again: After the respin cycle is complete, remove the outer bowl assembly and check the texture of your Frosty. It should now be smooth, creamy, and scoopable. If it’s still a bit crumbly, you can add a tablespoon or two more of milk and respin again.
- Repeat if Necessary: Sometimes, depending on your freezer and the initial freezing time, you might need to respin a third time. Just add a little more milk each time until you achieve the desired consistency. The goal is a smooth, soft-serve-like texture.
Serving and Enjoying:
You’ve done it! Your homemade Ninja Creami Frosty is ready to be enjoyed. Here are a few tips for serving and savoring your creation:
- Scoop and Serve: Scoop your Frosty into a bowl or cup.
- Add Toppings (Optional): Get creative with toppings! Some ideas include chocolate shavings, sprinkles, whipped cream, chocolate syrup, or even a drizzle of peanut butter.
- Enjoy Immediately: The Frosty is best enjoyed immediately, as it will start to melt quickly.
- Storage: If you have any leftovers (which is unlikely!), you can store them in the freezer. However, be aware that the texture will change after being refrozen. You’ll likely need to respin it again before enjoying it.
Tips and Tricks for the Perfect Frosty:
Here are a few extra tips and tricks to help you achieve Frosty perfection every time:
- Coconut Milk Matters: Using full-fat coconut milk is essential for the creamy texture. Light coconut milk won’t work as well.
- Sweetener Options: Feel free to experiment with different sweeteners. Maple syrup, honey, or even sugar substitutes like erythritol or stevia can be used. Just adjust the amount to your liking.
- Cocoa Powder: Use a good quality unsweetened cocoa powder for the best flavor. Dutch-processed cocoa powder will give you a richer, darker chocolate flavor.
- Freezing Time: Don’t rush the freezing process! Freezing for at least 24 hours is crucial for the right texture.
- Respin is Key: Don’t be afraid to respin multiple times if needed. The respin is what transforms the crumbly mixture into a creamy Frosty.
- Adjust Milk as Needed: The amount of milk you need for the respin may vary depending on your freezer and the initial freezing time. Start with 1/4 cup and add more as needed until you achieve the desired consistency.
- Clean the Blade: After each spin, check the Creami blade and clean it if necessary. This will help to ensure that it’s working properly.
- Experiment with Flavors: Once you’ve mastered the basic chocolate Frosty, feel free to experiment with other flavors! Try adding peanut butter, mint extract, or even a swirl of caramel.
- Patience is a Virtue: The Ninja Creami can be a bit finicky, but with a little patience and experimentation, you’ll be making delicious Frostys in no time!
Troubleshooting:
Sometimes things don’t go exactly as planned. Here are a few common issues and how to fix them:
- Frosty is Too Icy: This usually means that the base wasn’t frozen long enough or that there wasn’t enough fat in the mixture. Make sure you’re using full-fat coconut milk and freezing for at least 24 hours. You may also need to add a little more milk during the respin.
- Frosty is Too Crumbly: This usually means that the base is too frozen or that there wasn’t enough liquid in the mixture. Add a little more milk during the respin and respin again.
- Creami is Not Blending Properly: Make sure the pint is securely locked into the outer bowl and that the outer bowl assembly is securely installed in the machine. Also, check the blade to make sure it’s clean and not damaged.
- Frosty is Too Sweet: Reduce the amount of sugar or sweetener in the base.
- Frosty is Not Sweet Enough: Add more sugar or sweetener to the base.
Variations:
Want to mix things up? Here are a few variations to try
Conclusion:
So there you have it! This Ninja Creami Copycat Frosty recipe is truly a game-changer, and I genuinely believe it’s a must-try for anyone craving that classic, creamy, chocolatey goodness without the drive-thru guilt. It’s quick, it’s easy, and the results are unbelievably satisfying. Forget those long lines and mystery ingredients – with just a few simple steps, you can whip up a frosty that rivals the original, right in your own kitchen.
But why is this recipe so special? Well, beyond the sheer convenience and cost-effectiveness, it’s the control you have over the ingredients. You can tailor it to your dietary needs and preferences, using sugar-free sweeteners, different types of milk (almond, oat, coconut – the possibilities are endless!), or even adding a scoop of protein powder for an extra boost. Plus, the texture is absolutely spot-on – that perfect, spoonable, melt-in-your-mouth consistency that defines a truly great frosty.
Serving Suggestions and Variations:
Now, let’s talk about how to take your Ninja Creami Copycat Frosty experience to the next level! While it’s absolutely delicious on its own, there are so many fun and creative ways to enjoy it.
* Classic Combo: Dip your fries in it! Yes, I said it. It’s a classic for a reason, and this homemade version is even better with salty, crispy fries.
* Coffee Kick: Add a shot of espresso or a tablespoon of instant coffee to the mixture before freezing for a mocha-flavored frosty.
* Peanut Butter Bliss: Swirl in a spoonful of peanut butter (or any nut butter!) after spinning for a decadent treat.
* Mint Chocolate Chip: Add a few drops of peppermint extract and some mini chocolate chips after spinning for a refreshing twist.
* Cookies and Cream: Crumble in your favorite chocolate sandwich cookies after spinning for a delightful cookies and cream frosty.
* Adult Version: For a grown-up treat, add a splash of your favorite coffee liqueur or chocolate liqueur after spinning. (Please enjoy responsibly!)
* Toppings Galore: Top your frosty with whipped cream, chocolate shavings, sprinkles, chopped nuts, or a drizzle of chocolate syrup.
The possibilities are truly endless! Don’t be afraid to experiment and create your own signature frosty flavor combinations.
A Must-Try Recipe:
Seriously, this Ninja Creami Copycat Frosty recipe is more than just a dessert; it’s an experience. It’s a chance to recreate a childhood favorite, to indulge in a guilt-free treat, and to impress your friends and family with your culinary skills. It’s also a fantastic way to use your Ninja Creami to its full potential!
I’m so confident that you’ll love this recipe, and I can’t wait to hear about your creations. So, grab your Ninja Creami, gather your ingredients, and get ready to whip up the best frosty you’ve ever tasted.
Share Your Experience!
Once you’ve tried this recipe, please, please, please come back and let me know what you think! Leave a comment below, share your photos on social media (tag me!), and tell me about your favorite variations. I’m always looking for new ideas and inspiration, and I love hearing from you. Happy freezing! I hope you enjoy this recipe as much as I do!
Ninja Creami Copycat Frosty: The Ultimate Homemade Recipe
Creamy, dairy-free chocolate Frosty made with coconut milk in your Ninja Creami. Easy to customize and perfect for a refreshing dessert.
Ingredients
- 1 (13.5 ounce) can full-fat coconut milk, refrigerated overnight
- 1/4 cup unsweetened cocoa powder
- 1/4 cup granulated sugar (or sweetener of choice, adjust to taste)
- 1 teaspoon vanilla extract
- 1/4 teaspoon salt
- 1/4 cup milk (dairy or non-dairy), for respin
Instructions
- Prepare the Base: Carefully open the refrigerated coconut milk and scoop out the thick cream, leaving the watery liquid behind.
- Combine Ingredients: In a blender or food processor, combine the coconut cream, cocoa powder, sugar, vanilla extract, and salt.
- Blend Until Smooth: Blend on high speed until completely smooth and creamy, scraping down the sides as needed.
- Taste and Adjust: Taste and adjust sweetness or chocolate flavor as desired, blending again after each adjustment.
- Pour into Creami Pint: Pour the mixture into a Ninja Creami pint container, leaving about an inch of headspace.
- Freeze: Freeze for a minimum of 24 hours (ideally 36 hours) until completely solid.
- Creami Time: Ensure your Ninja Creami is clean and ready.
- Insert the Pint: Remove the lid and place the frozen pint into the outer bowl of the Creami. Lock the lid onto the outer bowl.
- Install in the Creami: Install the outer bowl assembly into the Ninja Creami machine.
- Select “Ice Cream”: Turn on the Creami and select the “Ice Cream” function.
- Inspect Texture: After the cycle, the mixture will likely be crumbly.
- Add Milk: Add about 1/4 cup of milk (dairy or non-dairy) to the pint.
- Respin: Place the outer bowl assembly back into the Creami and select the “Respin” function.
- Check Texture Again: Check the texture; it should be smooth and creamy. If still crumbly, add a tablespoon or two more of milk and respin again. Repeat if necessary until desired consistency is reached.
- Scoop and Serve: Scoop into a bowl or cup.
- Add Toppings (Optional): Add toppings like chocolate shavings, sprinkles, or whipped cream.
- Enjoy Immediately: Enjoy immediately.
- Storage: Store leftovers in the freezer, but the texture will change. Respin before enjoying again.
Notes
- Using full-fat coconut milk is essential for the creamy texture.
- Experiment with different sweeteners to your liking.
- Use a good quality unsweetened cocoa powder for the best flavor.
- Freezing for at least 24 hours is crucial for the right texture.
- Don’t be afraid to respin multiple times if needed.
- The amount of milk you need for the respin may vary.
- Clean the Creami blade after each spin.
- Experiment with other flavors like peanut butter or mint extract.
- Be patient, the Ninja Creami can be a bit finicky.