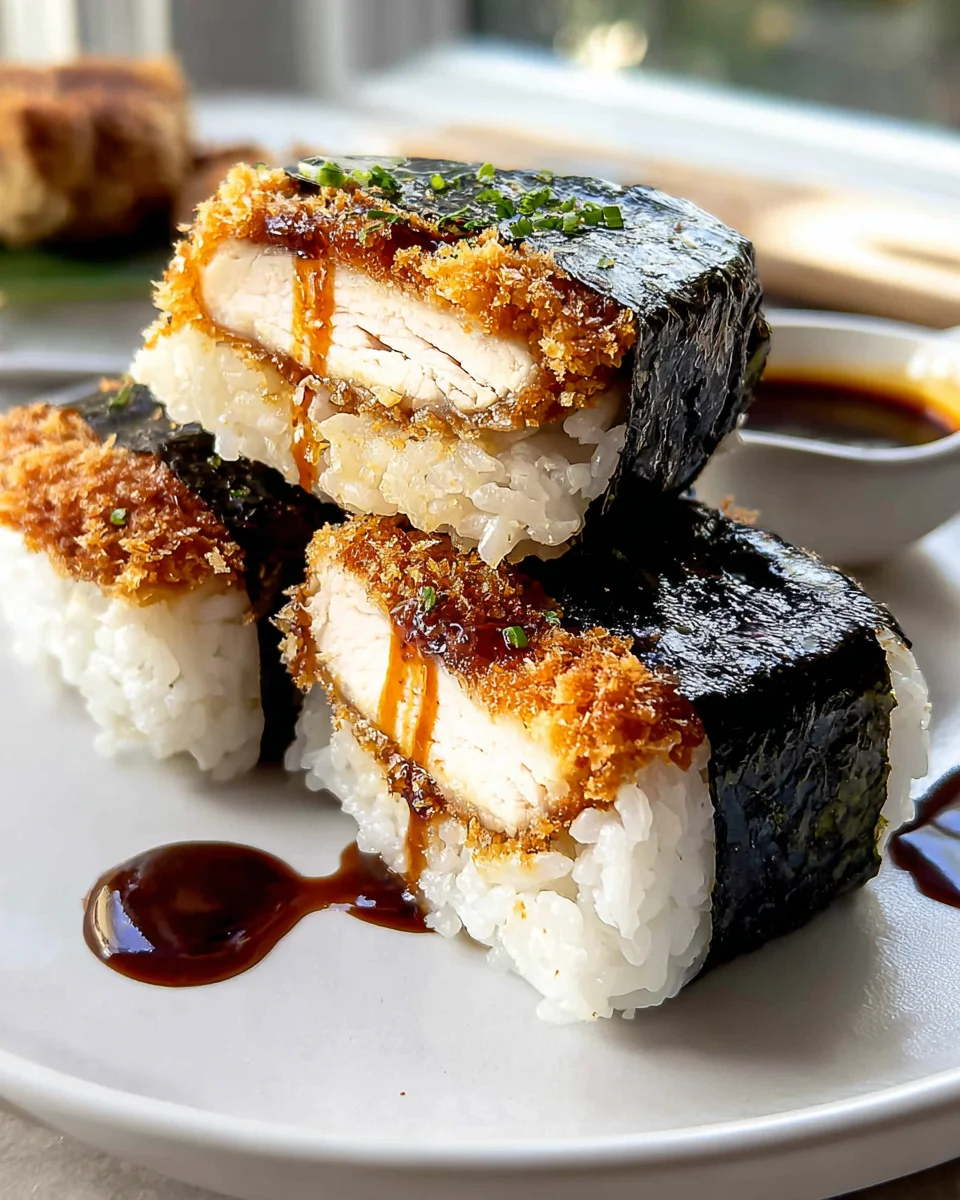
Chicken Katsu Musubi
Oh boy, let me tell you, if you’re looking for a delightful culinary adventure that brings together crispy, savory goodness with the comforting embrace of sticky rice, you’ve hit the jackpot with Chicken Katsu Musubi! This isn’t just any snack; it’s a vibrant taste of Hawaiian comfort food with its roots firmly planted in Japanese culinary traditions, and I’m so excited to share it with you.
What makes Chicken Katsu Musubi so incredibly special? It’s the perfect harmony of textures and flavors in one convenient, handheld package. Imagine biting into a juicy, perfectly golden-brown fried chicken cutlet – our crispy chicken katsu – nestled atop a block of perfectly seasoned sushi rice, all held together with a strip of umami-rich nori seaweed. Sometimes we even drizzle it with a fantastic, savory sauce that adds an extra layer of deliciousness. It’s sweet, savory, crunchy, and satisfying all at once, truly a symphony for your taste buds!
I know you’re going to absolutely love making and eating this dish. Why? Because it’s incredibly versatile – perfect for a quick lunch, a satisfying snack, a picnic item, or even as a crowd-pleasing party appetizer. It’s also just plain fun! There’s something so satisfying about assembling these little flavor bombs. Plus, who doesn’t love a portable meal that’s packed with so much flavor? Get ready to bring a little piece of paradise right into your kitchen with this incredibly delicious and unique creation.

Ingredient Notes
Aloha, fellow food lovers! Get ready to dive into the delightful world of Chicken Katsu Musubi. This isn’t just a snack; it’s a portable, flavorful meal that perfectly balances crispy fried chicken, perfectly seasoned rice, and a savory sauce, all hugged by a strip of nori seaweed. Here are the key ingredients you’ll need, along with some helpful notes and substitutions.
For the Chicken Katsu
- Boneless, Skinless Chicken Thighs or Breasts: I personally lean towards thighs for their juiciness and flavor, but breasts work beautifully if you prefer a leaner option. Just make sure to pound them to an even thickness (about 1/2 inch) for uniform cooking.
- All-Purpose Flour: For the first dredge. It helps the egg adhere to the chicken.
- Eggs: Beaten well, these are the sticky glue for our panko.
- Panko Breadcrumbs: This is a non-negotiable for authentic katsu! Panko (Japanese breadcrumbs) are light, airy, and create an incredibly crispy crust that regular breadcrumbs simply can’t replicate. Do not substitute this if you want that signature crunch.
- Neutral Frying Oil: Vegetable, canola, or grapeseed oil are perfect here. You’ll need enough to deep-fry or pan-fry the chicken until golden.
- Salt and Black Pepper: Simple seasoning for the chicken before breading.
For the Musubi Assembly
- Short-Grain Japanese Rice: This is crucial! Short-grain rice, often labeled “sushi rice,” is naturally sticky, which is essential for forming the musubi. Long-grain or medium-grain rice won’t hold its shape as well. Cook it according to package directions, aiming for perfectly cooked, slightly sticky rice.
- Nori Seaweed Sheets: These dried seaweed sheets wrap around your musubi, holding everything together and adding a fantastic umami flavor. Look for them in the Asian aisle of your grocery store.
- Katsu Sauce: This tangy, sweet, and savory sauce is the heart of the katsu flavor. You can find pre-made Katsu sauce (like Tonkatsu sauce) in most supermarkets. If you can’t find it, you can easily whisk together a quick homemade version: combine ketchup, Worcestershire sauce, soy sauce, a touch of sugar, and a splash of water until you reach your desired consistency and flavor.
- Musubi Press (Recommended): While not strictly an ingredient, a musubi press makes forming these perfect blocks so much easier and more consistent. If you don’t have one, don’t worry! An empty and cleaned spam can, lined with plastic wrap, can work in a pinch.
Substitutions & Variations
- Protein Swap: While chicken is our star, you could absolutely make a delicious Beef Katsu Musubi! Just use thinly sliced beef steak (like sirloin or tenderloin), pounded thin, and follow the same breading and frying process.
- Sauce Personalization: Feel free to customize your katsu sauce. Add a dash of garlic powder, a tiny bit of ginger, or even a splash of apple cider vinegar for extra tang if you’re making it from scratch.
Step-by-Step Instructions
Creating Chicken Katsu Musubi is a fun and rewarding process. I’ll guide you through each step to ensure you get perfectly crispy katsu and beautifully formed musubi every time!
Step 1: Prepare the Chicken Katsu
- Pound the Chicken: Place chicken thighs or breasts between two sheets of plastic wrap. Using a meat mallet or a heavy pan, pound the chicken to an even thickness of about 1/2 inch. This ensures even cooking. Season both sides generously with salt and black pepper.
- Set Up Your Breading Station: Prepare three shallow dishes. In the first, add the all-purpose flour. In the second, whisk the eggs until well combined. In the third, place the panko breadcrumbs.
- Bread the Chicken: Dredge each piece of seasoned chicken in the flour, shaking off any excess. Next, dip it completely into the beaten egg, allowing any excess to drip off. Finally, press the chicken firmly into the panko breadcrumbs, ensuring it’s completely coated. Really press the panko on to get a thick, crispy crust. Set aside on a plate or wire rack.
- Fry the Chicken Katsu: Heat about 1-2 inches of neutral frying oil in a large skillet or deep pot over medium-high heat to about 350°F (175°C). Carefully place the breaded chicken into the hot oil, being careful not to overcrowd the pan (fry in batches if necessary). Fry for 3-5 minutes per side, or until the katsu is golden brown and crispy, and the internal temperature reaches 165°F (74°C).
- Drain and Slice: Transfer the cooked katsu to a wire rack set over a paper towel-lined baking sheet to drain any excess oil. Once slightly cooled, slice each katsu horizontally into strips about 1/2 to 3/4 inch thick.
Step 2: Prepare the Rice
- Cook the Rice: Rinse your short-grain Japanese rice under cold water until the water runs clear. Cook the rice according to your package directions, either in a rice cooker or on the stovetop. The goal is perfectly cooked, sticky rice.
- Keep Warm: Once cooked, keep the rice warm. Warm rice is much easier to work with when forming musubi.
Step 3: Assemble the Musubi
- Prepare Your Station: Have your cooked and sliced chicken katsu, warm rice, katsu sauce, nori sheets, and musubi press (or improvised can/mold) ready.
- Set Up the Nori: Lay a nori sheet flat on your clean work surface. If using a full sheet, you might cut it in half lengthwise, or trim it to fit your desired musubi size, leaving enough length to wrap around.
- First Layer of Rice: Place your musubi press (or can) in the center of the nori strip. Spoon about 1/2 cup of warm rice into the bottom of the press. Use the press lid to compact the rice firmly.
- Add Katsu and Sauce: Carefully remove the press lid. Arrange a few slices of your chicken katsu over the compressed rice. Drizzle a generous amount of Katsu sauce over the chicken.
- Second Layer of Rice (Optional but Recommended): Spoon another 1/4 to 1/2 cup of rice over the katsu and sauce. Place the press lid back on and compact the rice firmly again. The firmer you press, the better your musubi will hold together.
- Remove from Press: Gently lift the musubi press off the formed block of rice and katsu.
- Wrap the Nori: Take one end of the nori strip and fold it over the musubi block, pressing it gently to adhere. Then, take the other end and wrap it over, overlapping slightly. You can moisten the very end of the nori with a tiny bit of water to help it stick.
- Repeat: Continue this process until you’ve used all your chicken katsu and rice.
Step 4: Serve
Serve your Chicken Katsu Musubi immediately while the katsu is still warm and crispy, or pack them up for a delicious on-the-go meal!
Tips & Suggestions
I’ve made my share of musubi, and I’ve picked up a few tricks along the way. Here are my best tips to ensure your Chicken Katsu Musubi is a smashing success:
- Pound it Evenly: When preparing your chicken, aim for an even thickness. This ensures that every part of your katsu cooks at the same rate, preventing dry spots or undercooked sections. Consistency is key for that perfect bite!
- Panko Adhesion is Key: Don’t be shy when coating your chicken in panko. Press those breadcrumbs firmly onto the chicken. The more panko, the crispier your katsu will be. This also helps prevent the breading from falling off during frying.
- Oil Temperature Matters: Maintain a consistent oil temperature (around 350°F or 175°C). If the oil is too cool, the katsu will absorb too much oil and become greasy. If it’s too hot, the breading will burn before the chicken is cooked through. If you don’t have a thermometer, a small piece of breading should sizzle immediately but not aggressively brown when dropped in.
- Don’t Overcrowd the Pan: Frying in batches is crucial. Overcrowding the pan lowers the oil temperature, leading to greasy katsu. Give each piece space to fry beautifully.
- Sticky Rice is Your Friend: The quality of your short-grain Japanese rice and its stickiness directly impacts how well your musubi holds together. Don’t skip rinsing the rice before cooking, and follow the cooking instructions precisely to get that perfect texture.
- Invest in a Musubi Press: Seriously, if you plan on making musubi more than once, a musubi press is a game-changer. It creates uniformly shaped blocks, making assembly quicker and less messy. If you don’t have one, a cleaned-out spam can lined with plastic wrap is an excellent improvisation. Just make sure to press down firmly to compact the rice and katsu well.
- Sauce Customization: While store-bought katsu sauce is convenient, don’t hesitate to whisk up your own. Adjust the sweetness or tanginess to your liking. A little extra Worcestershire sauce for savoriness or a pinch more sugar for sweetness can make all the difference.
- Consider Extra Layers: For an even more complex flavor and texture, some people like to add a thin layer of Japanese mayonnaise, a slice of cheddar cheese (it melts beautifully!), or even a sprinkle of furikake (Japanese rice seasoning) on the rice before adding the katsu.
- Prepare Ahead: You can cook the chicken katsu in advance and reheat it in an air fryer or oven to crisp it up just before assembly. Cook the rice fresh for the best texture.
Storage
Chicken Katsu Musubi is truly best enjoyed fresh, when the katsu is still warm and crispy. However, if you have leftovers or are making them for future enjoyment, here’s how I recommend storing them:
- Room Temperature: If you plan to eat them within a few hours (like for a picnic or lunchbox), wrap each musubi tightly in plastic wrap to prevent the rice from drying out. They should be fine for 3-4 hours at room temperature, especially if packed in a cooler bag.
- Refrigeration: For longer storage, wrap each individual musubi tightly in plastic wrap, then place them in an airtight container. Store them in the refrigerator for up to 1-2 days. The main issue with refrigeration is that the rice can become firm and a bit dry, and the katsu will lose its crispiness.
- Reheating: To reheat, remove the plastic wrap and microwave the musubi for 30-60 seconds, or until just warmed through. Be cautious not to over-microwave, as the rice can become hard and dry. For the katsu, if you’re not planning to eat it immediately after reheating in the microwave, you might carefully remove the katsu from the rice block, reheat it separately in a toaster oven or air fryer for a few minutes to regain some crispiness, and then reassemble or enjoy it with the warmed rice.
- Freezing: I generally do not recommend freezing musubi. The texture of the rice changes significantly upon thawing, becoming mushy or crumbly, and the katsu will lose its desirable crispiness entirely. It’s truly a dish best made fresh or enjoyed shortly after preparation.
Final Thoughts
And there you have it! I truly hope you’ve enjoyed the journey of creating your very own Chicken Katsu Musubi. What makes Chicken Katsu Musubi an absolute standout, in my opinion, is that incredible combination of golden, crispy chicken katsu, perfectly seasoned rice, and a hint of umami from the nori, all bundled into one convenient and utterly delicious package. It’s not just a meal; it’s an experience.
From the satisfying crunch of the katsu to the tender rice and the savory notes that dance on your palate, Chicken Katsu Musubi offers a unique blend of textures and flavors that will undoubtedly become a new favorite. It’s perfect for a satisfying lunch, a delightful snack, or even a fun addition to any gathering. I promise you, once you take that first bite of your homemade Chicken Katsu Musubi, you’ll understand why this recipe is a must-try. Go on, savor the moment, and enjoy your delicious creation!
Homemade Chicken Katsu Musubi: Crispy, Flavorful Lunch Idea

Experience the delightful fusion of crispy fried chicken and sticky rice with this Chicken Katsu Musubi recipe. Perfect for a quick lunch or a satisfying snack, it’s a handheld meal that bursts with flavor!
- Prep Time: 30 mins
- Cook Time: 30 mins
- Total Time: 1 hour
- Yield: 4 servings
- Category: Lunch
- Method: Frying
- Cuisine: Hawaiian/Japanese
Ingredients
- Boneless, Skinless Chicken Thighs or Breasts
- All-Purpose Flour
- Eggs
- Panko Breadcrumbs
- Neutral Frying Oil
- Salt and Black Pepper
- Short-Grain Japanese Rice
- Nori Seaweed Sheets
- Katsu Sauce
- Musubi Press (Recommended)
Instructions
- Pound the Chicken: Place chicken thighs or breasts between two sheets of plastic wrap. Using a meat mallet or a heavy pan, pound the chicken to an even thickness of about 1/2 inch. This ensures even cooking. Season both sides generously with salt and black pepper.
- Set Up Your Breading Station: Prepare three shallow dishes. In the first, add the all-purpose flour. In the second, whisk the eggs until well combined. In the third, place the panko breadcrumbs.
- Bread the Chicken: Dredge each piece of seasoned chicken in the flour, shaking off any excess. Next, dip it completely into the beaten egg, allowing any excess to drip off. Finally, press the chicken firmly into the panko breadcrumbs, ensuring it's completely coated. Really press the panko on to get a thick, crispy crust. Set aside on a plate or wire rack.
- Fry the Chicken Katsu: Heat about 1-2 inches of neutral frying oil in a large skillet or deep pot over medium-high heat to about 350°F (175°C). Carefully place the breaded chicken into the hot oil, being careful not to overcrowd the pan (fry in batches if necessary). Fry for 3-5 minutes per side, or until the katsu is golden brown and crispy, and the internal temperature reaches 165°F (74°C).
- Drain and Slice: Transfer the cooked katsu to a wire rack set over a paper towel-lined baking sheet to drain any excess oil. Once slightly cooled, slice each katsu horizontally into strips about 1/2 to 3/4 inch thick.
- Cook the Rice: Rinse your short-grain Japanese rice under cold water until the water runs clear. Cook the rice according to your package directions, either in a rice cooker or on the stovetop. The goal is perfectly cooked, sticky rice.
- Keep Warm: Once cooked, keep the rice warm. Warm rice is much easier to work with when forming musubi.
- Prepare Your Station: Have your cooked and sliced chicken katsu, warm rice, katsu sauce, nori sheets, and musubi press (or improvised can/mold) ready.
- Set Up the Nori: Lay a nori sheet flat on your clean work surface. If using a full sheet, you might cut it in half lengthwise, or trim it to fit your desired musubi size, leaving enough length to wrap around.
- First Layer of Rice: Place your musubi press (or can) in the center of the nori strip. Spoon about 1/2 cup of warm rice into the bottom of the press. Use the press lid to compact the rice firmly.
- Add Katsu and Sauce: Carefully remove the press lid. Arrange a few slices of your chicken katsu over the compressed rice. Drizzle a generous amount of Katsu sauce over the chicken.
- Second Layer of Rice (Optional but Recommended): Spoon another 1/4 to 1/2 cup of rice over the katsu and sauce. Place the press lid back on and compact the rice firmly again. The firmer you press, the better your musubi will hold together.
- Remove from Press: Gently lift the musubi press off the formed block of rice and katsu.
- Wrap the Nori: Take one end of the nori strip and fold it over the musubi block, pressing it gently to adhere. Then, take the other end and wrap it over, overlapping slightly. You can moisten the very end of the nori with a tiny bit of water to help it stick.
- Repeat: Continue this process until you've used all your chicken katsu and rice.
- Serve: Serve your Chicken Katsu Musubi immediately while the katsu is still warm and crispy, or pack them up for a delicious on-the-go meal!
Nutrition
- Serving Size: 1 musubi
- Calories: 400
- Sugar: 5 g
- Sodium: 600 mg
- Fat: 20 g
- Saturated Fat: 3 g
- Unsaturated Fat: 15 g
- Trans Fat: 0 g
- Carbohydrates: 40 g
- Fiber: 2 g
- Protein: 20 g
- Cholesterol: 150 mg
Keywords: Pound the chicken evenly for uniform cooking. Press panko breadcrumbs firmly for a crispy crust. Maintain oil temperature around 350°F (175°C) for optimal frying. Don't overcrowd the pan. Rinse rice before cooking for the best texture.