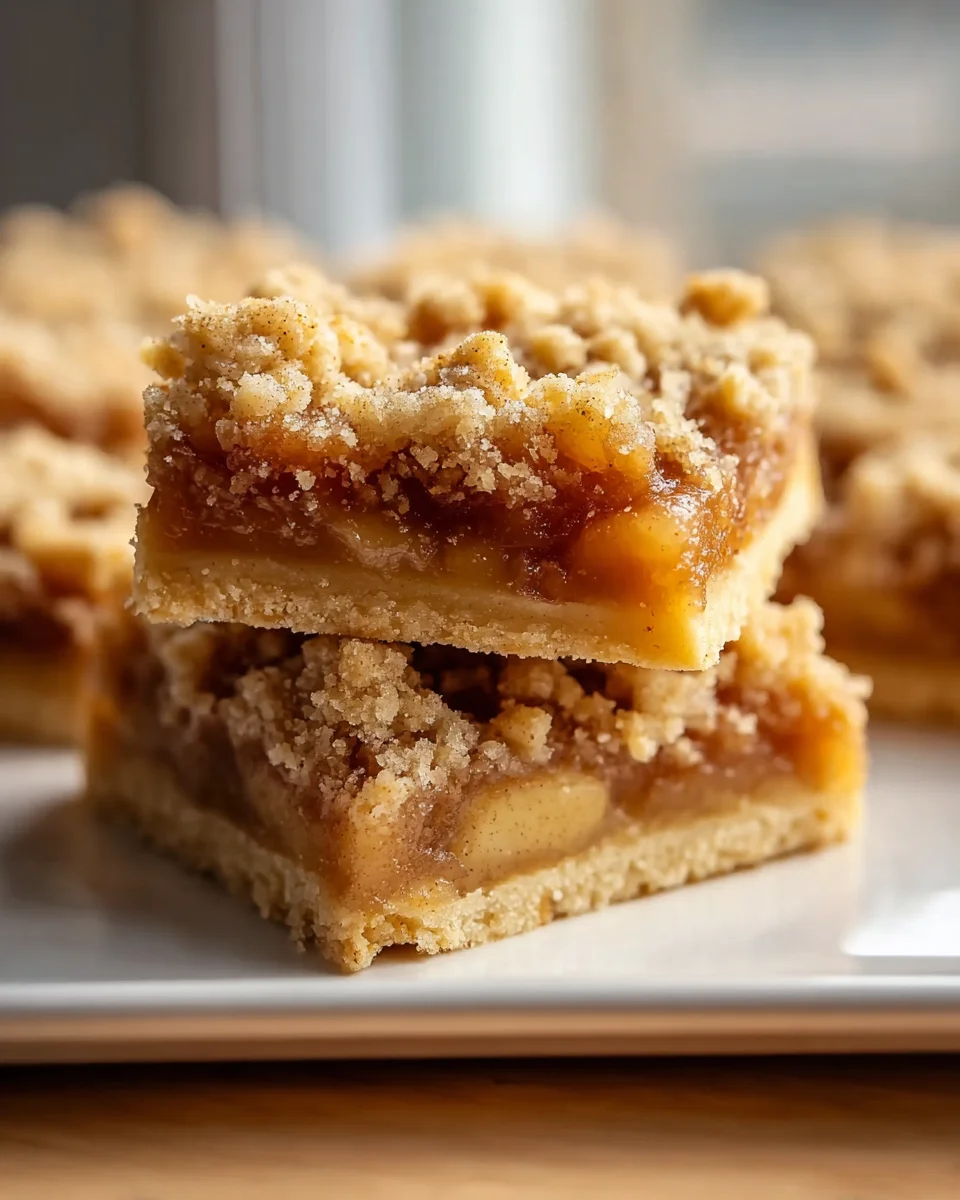
Homemade Apple Crisp Shortbread Bars
Oh my goodness, get ready to fall head over heels for these Homemade Apple Crisp Shortbread Bars! I mean, seriously, what’s not to love when you combine the best parts of a classic apple crisp with the irresistible buttery goodness of shortbread? This isn’t just another dessert; it’s a game-changer that brings together two beloved treats into one glorious, portable package. I’ve been experimenting to create the ultimate fall indulgence, and trust me, this recipe absolutely nails it.
You’re going to adore how these bars deliver on every single level. Imagine a rich, crumbly shortbread crust that just melts in your mouth, perfectly complementing a luscious, spiced apple filling that’s bursting with sweet-tart flavor. Then, to top it all off, we’ve got that irresistible crunchy, golden streusel made with oats, brown sugar, and butter – giving you all the texture and warmth of a traditional apple crisp, but in a much more handheld, shareable form. It’s the kind of comforting bake that makes your kitchen smell incredible and brings smiles to everyone’s faces. Whether you’re bringing them to a potluck, serving them at a family gathering, or simply treating yourself to a cozy evening in, these bars are guaranteed to be a hit. Get ready to bake something truly special!

Ingredient Notes
Crafting the perfect Homemade Apple Crisp Shortbread Bars starts with understanding your ingredients. Each component plays a vital role in achieving that delightful balance of buttery shortbread, tender spiced apples, and crunchy oat topping. Here’s a rundown of what you’ll need and some helpful substitutions.
Shortbread Base Essentials
- Unsalted Butter: This is the star of your shortbread. Use high-quality, cold unsalted butter, cut into cubes. It contributes to the rich, melt-in-your-mouth texture. I always recommend unsalted so you can control the salt level yourself. If you only have salted, simply omit the pinch of salt from the recipe. For a dairy-free version, a good quality plant-based butter substitute works wonderfully.
- All-Purpose Flour: The structure of your shortbread. Measure it correctly by spooning it into your measuring cup and leveling it off. For a gluten-free option, a 1:1 gluten-free baking blend that contains xanthan gum will work seamlessly here, both for the base and the crisp topping.
- Granulated Sugar: Provides sweetness and helps create that signature crisp yet tender shortbread crumb. A touch of powdered sugar can also be used for an even finer texture, though granulated works perfectly well.
- Pinch of Salt: Crucial for balancing the sweetness and enhancing the buttery flavor. Don’t skip it!
- Vanilla Extract (Optional but Recommended): A teaspoon of good quality vanilla extract adds a lovely aromatic depth to your shortbread, complementing the apple flavors beautifully.
Apple Filling Flavors
- Apples: The heart of your bars! I love using a mix of tart and sweet apples for the best flavor and texture. Granny Smith offers tartness and holds its shape well, while Honeycrisp or Fuji provide sweetness and soften nicely. Feel free to use your favorite baking apples. You’ll need about 4-5 medium apples, peeled, cored, and diced into small, uniform pieces (about ½-inch).
- Brown Sugar: Adds a rich, molasses-like sweetness that pairs beautifully with apples and spices. Light brown sugar is my go-to, but dark brown sugar will give a deeper caramel note.
- Cinnamon & Nutmeg: These warm spices are classic companions to apples. I usually use a generous amount of cinnamon and a touch of nutmeg. You could also add a pinch of allspice or a ready-made apple pie spice blend for more complexity.
- Lemon Juice: A squeeze of fresh lemon juice brightens the apple flavor and prevents the apples from browning too quickly. It also balances the sweetness.
- Flour or Cornstarch: This acts as a thickener for the apple filling, preventing it from becoming too watery and making the bars easier to cut. About a tablespoon is usually sufficient.
Crisp Topping Crunch
- Old-Fashioned Rolled Oats: Essential for that classic crisp texture. Quick oats can be used in a pinch, but they won’t provide the same chewy texture.
- All-Purpose Flour: Helps bind the topping together. Again, a 1:1 gluten-free blend works well here if needed.
- Brown Sugar: Adds sweetness and a lovely caramel undertone to the crisp topping.
- Unsalted Butter: Cold and cut into small pieces, just like for the shortbread. It’s cut into the dry ingredients to create those irresistible crumbles.
- Cinnamon: A little extra cinnamon in the topping ties all the layers together with a unified flavor profile.
Step-by-Step Instructions
Making these Homemade Apple Crisp Shortbread Bars is a straightforward process, but following these steps carefully will ensure a perfect result every time. We’ll build them layer by layer, ensuring each component shines.
Step 1: Prepare Your Pan and Preheat Oven
- First things first, preheat your oven to 375°F (190°C).
- Line a 9×13-inch baking pan with parchment paper, leaving an overhang on the longer sides. This will make it incredibly easy to lift the entire slab of bars out of the pan once cooled, making slicing a breeze. Lightly grease the parchment paper for extra insurance against sticking.
Step 2: Make the Shortbread Base
- In a large mixing bowl, using an electric mixer (or by hand with a pastry blender), beat together the cold cubed unsalted butter and granulated sugar until light and fluffy, about 2-3 minutes. If using vanilla, add it in now.
- Gradually add the all-purpose flour and pinch of salt, mixing on low speed until just combined and a dough forms. Be careful not to overmix; you want a tender shortbread.
- Press the shortbread dough evenly into the bottom of your prepared 9×13-inch pan. I find using the bottom of a flat-bottomed glass or my fingertips works best to get a smooth, compact layer.
- Bake the shortbread base for 15-20 minutes, or until the edges are lightly golden. This pre-baking step is crucial for ensuring a crisp, non-soggy shortbread bottom under the moist apple filling.
- Remove from the oven and set aside to cool slightly while you prepare the other layers.
Step 3: Prepare the Apple Filling
- While the shortbread bakes, peel, core, and dice your apples into ½-inch pieces. Place them in a large bowl.
- Add the brown sugar, cinnamon, nutmeg, lemon juice, and flour (or cornstarch) to the diced apples. Toss everything together until the apples are evenly coated.
Step 4: Make the Crisp Topping
- In a separate medium-sized bowl, combine the old-fashioned rolled oats, all-purpose flour, brown sugar, and a pinch of cinnamon. Whisk them together to ensure they’re well mixed.
- Add the cold, cubed unsalted butter to the dry ingredients. Using your fingertips or a pastry blender, cut the butter into the mixture until coarse crumbs form. You want some pea-sized pieces of butter remaining – these will melt and create that wonderful crisp texture.
Step 5: Assemble and Bake the Bars
- Once your shortbread base has slightly cooled from its initial bake, evenly spread the apple filling over the partially baked shortbread layer.
- Generously sprinkle the crisp topping over the apple filling, ensuring an even distribution.
- Return the pan to the preheated oven. Bake for an additional 35-45 minutes, or until the apples are tender (you can test with a knife through the crisp topping) and the crisp topping is golden brown and bubbly.
Step 6: Cool Completely
- This step is absolutely critical for perfect bars! Once baked, remove the pan from the oven and place it on a wire rack to cool completely. This means several hours, or even overnight. Trying to slice them warm will result in a messy, crumbling disaster, as the apple filling and shortbread need time to set.
- Once fully cooled, use the parchment paper overhang to lift the entire slab of bars out of the pan and onto a cutting board. Slice into squares or rectangular bars with a sharp knife.
Tips & Suggestions
Achieving bakery-quality Homemade Apple Crisp Shortbread Bars is all about a few key techniques and considerations. Here are some of my favorite tips and suggestions to help you make the best bars possible.
- Embrace a Mix of Apples: While it’s tempting to use just one kind, combining different apple varieties truly elevates the flavor and texture. A blend of tart (like Granny Smith) and sweet (like Honeycrisp, Fuji, or Gala) apples offers complexity and ensures some apples break down while others maintain a nice bite.
- Don’t Overwork the Shortbread: The secret to tender shortbread is minimal handling. Once the flour is just combined and a dough forms, stop mixing. Overmixing develops the gluten, leading to a tougher shortbread.
- The Pre-Bake is Your Best Friend: Seriously, do not skip pre-baking the shortbread base. This step prevents the shortbread from becoming soggy when the moist apple filling is added, ensuring you get that perfectly crisp and buttery foundation you’re looking for.
- Chilling the Shortbread Dough: If your kitchen is warm or if you find the shortbread dough a bit sticky, you can chill it for 15-20 minutes after pressing it into the pan and before pre-baking. This can help prevent spreading and results in a more defined crust.
- Cold Butter for the Crisp Topping: Just like with the shortbread, cold butter is key for the crisp topping. Cutting cold butter into the dry ingredients creates pockets of butter that melt slowly during baking, resulting in a perfectly crumbly, golden, and truly “crisp” topping.
- Uniform Apple Dicing: Try to dice your apples into similarly sized pieces (around ½-inch). This ensures they cook evenly. No one wants crunchy apples in one bite and mushy ones in another!
- Patience is a Virtue (Especially for Cooling): I cannot stress this enough – allowing the bars to cool completely is crucial for clean, neat slices. The apple filling needs ample time to set up, and the shortbread to firm. If you try to cut them while warm, they’ll likely crumble and fall apart. Resist the urge!
- Enhance the Topping: For an extra layer of flavor and texture, consider adding a handful of chopped pecans or walnuts to your crisp topping mixture. A pinch of flaky sea salt sprinkled over the top before baking can also provide a wonderful contrast to the sweetness.
- Serving Suggestions: These bars are absolutely divine on their own, but if you want to elevate the experience, serve them slightly warmed with a scoop of vanilla bean ice cream, a dollop of fresh whipped cream, or a drizzle of warm caramel sauce.
Storage
Once you’ve gone to the effort of baking these delicious Homemade Apple Crisp Shortbread Bars, you’ll want to store them properly to maintain their freshness and flavor. Here’s how I recommend keeping them in top condition.
- At Room Temperature:
- Once completely cooled, store the bars in an airtight container at room temperature for up to 2-3 days.
- Make sure they are truly cool before covering, as any residual warmth will create condensation and make the bars soggy.
- If stacking, place a piece of parchment paper between layers to prevent sticking.
- In the Refrigerator:
- For longer storage, especially if your kitchen is warm or if you prefer a firmer texture, you can store the bars in an airtight container in the refrigerator for up to 5-7 days.
- Refrigeration helps keep the shortbread base firmer and prevents the apples from spoiling quickly.
- If you prefer them slightly warm, you can gently reheat individual bars in the microwave for 15-30 seconds or in a toaster oven until warmed through.
- Freezing for Longer Storage:
- These bars freeze beautifully, making them excellent for meal prep or for having a treat ready whenever a craving strikes!
- To freeze, ensure the bars are completely cooled.
- You can freeze them as a whole slab (before cutting, or after cutting if you prefer individual portions), or as individual slices.
- Wrap the entire slab or individual slices tightly in plastic wrap, then place them in a freezer-safe airtight container or a heavy-duty freezer bag. This double layer of protection helps prevent freezer burn.
- They can be stored in the freezer for up to 2-3 months.
- To Thaw: Transfer the frozen bars to the refrigerator overnight to thaw. For a quicker thaw, individual bars can be left at room temperature for an hour or two. You can also gently reheat them from frozen in a low oven (around 300°F/150°C) for about 15-20 minutes, or until warmed through, which will help crisp up the topping again.
No matter how you store them, these Homemade Apple Crisp Shortbread Bars are a delightful treat that everyone will love!
Final Thoughts
Well, there you have it! We’ve journeyed through crafting these truly delightful Homemade Apple Crisp Shortbread Bars, and I sincerely believe this recipe is an absolute must-try for everyone. What makes these bars stand out is the exquisite harmony of textures and flavors. Imagine: a rich, buttery shortbread crust that melts in your mouth, perfectly complementing the tender, warmly spiced apple filling, all crowned with that irresistible, crunchy oat crisp. It’s everything you love about classic apple crisp, transformed into a convenient, elegant, and utterly delicious bar.
These Homemade Apple Crisp Shortbread Bars aren’t just a dessert; they’re a comforting hug in edible form. They’re perfect for sharing at a gathering, bringing a touch of homemade warmth to any occasion, or simply enjoying with a cup of tea on a cozy afternoon. The balance of sweet, tart, and comforting spices, combined with that glorious triple-layer experience, will have everyone asking for the recipe. Trust me, once you bake these, they’re sure to become a cherished and frequently requested favorite in your kitchen. Happy baking!
Homemade Apple Crisp Shortbread Bars – Easy & Delicious!

These Homemade Apple Crisp Shortbread Bars combine the best parts of a classic apple crisp with the irresistible buttery goodness of shortbread. Perfect for any occasion, they are a delightful treat that everyone will love!
- Prep Time: 30 mins
- Cook Time: 1 hour
- Total Time: 1 hour 30 minutes
- Yield: 12 servings 1x
- Category: Dessert
- Method: Baking
- Cuisine: American
Ingredients
- 1 cup Unsalted Butter, cold and cut into cubes
- 2 cups All-Purpose Flour
- 1/2 cup Granulated Sugar
- Pinch of Salt
- 1 tsp Vanilla Extract (Optional but Recommended)
- 4–5 medium Apples, peeled, cored, and diced into small pieces (about ½-inch)
- 1/2 cup Brown Sugar
- 1 tsp Cinnamon
- 1/4 tsp Nutmeg
- 1 tbsp Lemon Juice
- 1 tbsp Flour or Cornstarch
- 1 cup Old-Fashioned Rolled Oats
- 1/2 cup Brown Sugar (for topping)
- 1/2 cup All-Purpose Flour (for topping)
- 1/2 tsp Cinnamon (for topping)
- 1/2 cup Unsalted Butter, cold and cut into small pieces (for topping)
Instructions
- Preheat your oven to 375°F (190°C).
- Line a 9×13-inch baking pan with parchment paper, leaving an overhang on the longer sides. Lightly grease the parchment paper.
- In a large mixing bowl, beat together the cold cubed unsalted butter and granulated sugar until light and fluffy, about 2-3 minutes. If using vanilla, add it in now.
- Gradually add the all-purpose flour and pinch of salt, mixing on low speed until just combined and a dough forms.
- Press the shortbread dough evenly into the bottom of your prepared 9×13-inch pan.
- Bake the shortbread base for 15-20 minutes, or until the edges are lightly golden. Remove from the oven and set aside to cool slightly.
- While the shortbread bakes, peel, core, and dice your apples into ½-inch pieces. Place them in a large bowl.
- Add the brown sugar, cinnamon, nutmeg, lemon juice, and flour (or cornstarch) to the diced apples. Toss everything together until the apples are evenly coated.
- In a separate medium-sized bowl, combine the old-fashioned rolled oats, all-purpose flour, brown sugar, and a pinch of cinnamon. Whisk them together.
- Add the cold, cubed unsalted butter to the dry ingredients. Cut the butter into the mixture until coarse crumbs form.
- Once your shortbread base has slightly cooled, evenly spread the apple filling over the partially baked shortbread layer.
- Sprinkle the crisp topping over the apple filling, ensuring an even distribution.
- Return the pan to the preheated oven. Bake for an additional 35-45 minutes, or until the apples are tender and the crisp topping is golden brown and bubbly.
- Once baked, remove the pan from the oven and place it on a wire rack to cool completely. Once fully cooled, lift the entire slab of bars out of the pan and slice into squares or rectangular bars.
Nutrition
- Serving Size: 1 bar
- Calories: 250
- Sugar: 15 g
- Sodium: 50 mg
- Fat: 12 g
- Saturated Fat: 7 g
- Unsaturated Fat: 4 g
- Trans Fat: 0 g
- Carbohydrates: 34 g
- Fiber: 2 g
- Protein: 3 g
- Cholesterol: 30 mg
Keywords: For the best flavor and texture, use a mix of tart and sweet apples. Don't skip the pre-baking of the shortbread base to prevent sogginess.