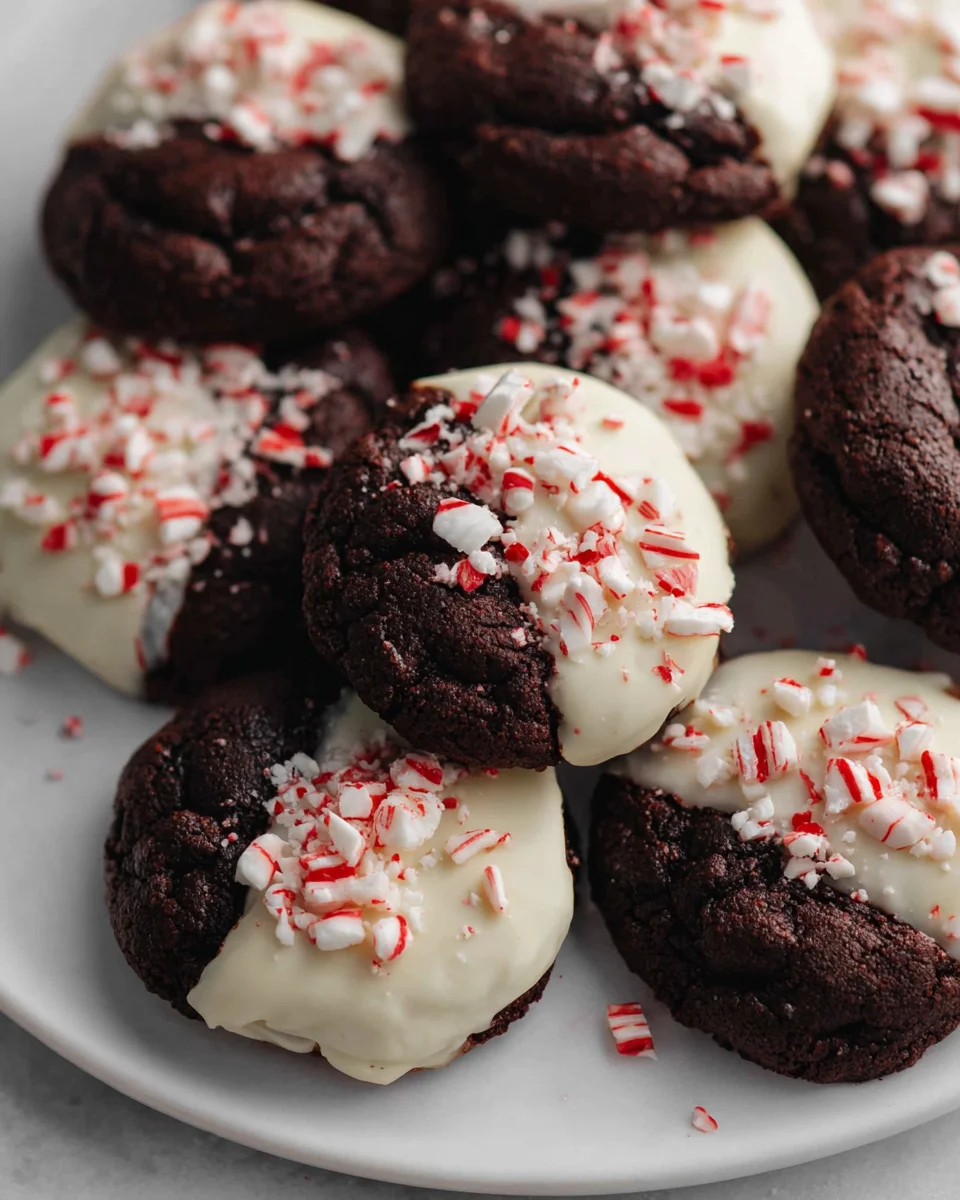
Peppermint Bark Cookies
Oh, hello there, fellow dessert lover! If you’re anything like me, you’re always on the hunt for that perfect holiday treat that’s both festive and ridiculously delicious. Well, I’m thrilled to introduce you to a recipe that’s become an absolute staple in my kitchen: Peppermint Bark Cookies. What makes these cookies so special, you ask? Imagine taking the rich, chewy goodness of your favorite chocolate cookie and marrying it with the irresistible crunch and cool tingle of classic peppermint bark. It’s a match made in heaven!
You are absolutely going to adore these. They’re not just any cookie; they’re a joyful explosion of holiday flavor and texture in every single bite. The deep chocolate cookie provides the perfect base, while the crisp white chocolate topping, studded with vibrant crushed peppermint candies, adds that iconic seasonal flair and a refreshing minty burst. They look incredibly impressive on a holiday platter, make fantastic edible gifts, and are just the thing to cozy up with on a chilly evening. I promise, once you try them, you’ll understand why I’m so excited about this unique twist on a timeless classic. Get ready to bake some serious holiday magic!

Ingredient Notes
Crafting the perfect batch of Peppermint Bark Cookies starts with understanding the star players in your ingredient lineup. I’m so excited for you to try these; they truly capture the essence of the holidays in every bite!
- All-Purpose Flour: This forms the foundational structure of our cookie. I find that a good quality unbleached all-purpose flour works wonderfully, giving us a tender yet sturdy cookie. For those with dietary restrictions, a 1:1 gluten-free baking blend can often be substituted successfully. Just be sure to check the specific brand’s recommendations, as some might require slight adjustments in liquid or chilling time.
- Unsalted Butter: My go-to for baking! Using unsalted butter allows me to control the salt content in the recipe precisely. Make sure your butter is softened to room temperature – not melted, not cold from the fridge. This ensures it creams beautifully with the sugar, creating a light and airy base for our cookies. If you only have salted butter, simply omit the added salt from the recipe.
- Granulated Sugar & Powdered Sugar: We’ll use a combination here for the ideal cookie texture. Granulated sugar provides sweetness and helps with spreading, while a touch of powdered sugar adds a lovely tenderness, creating that melt-in-your-mouth quality we want in a holiday cookie.
- Egg: A single large egg acts as a binder, bringing all our ingredients together and adding richness. Ensure it’s at room temperature for better emulsification with the butter and sugar mixture.
- Peppermint Extract: This is where the magic truly happens for our “Peppermint Bark Cookies”! Don’t skimp on a good quality peppermint extract. I like to use a non-alcohol based one to ensure the flavor is pure and intense without any unwanted bitterness. It infuses the cookie dough with that signature minty zing. Please note that peppermint extract is quite potent, so start with the recommended amount and adjust to your taste if you desire an even bolder peppermint punch.
- Vanilla Extract: While peppermint is the star, a touch of vanilla extract rounds out the flavors beautifully, adding warmth and depth to the cookie base.
- Baking Powder & Salt: Baking powder gives our cookies a little lift and tenderness, preventing them from becoming too dense. Salt, on the other hand, is crucial for balancing the sweetness and enhancing all the other flavors in the dough.
- Good Quality Chocolate (Semi-Sweet/Dark & White): For the bark topping, investing in good quality chocolate makes all the difference. I recommend using baking chocolate bars or high-quality chocolate chips. For the dark chocolate layer, a semi-sweet or dark chocolate (around 60-70% cacao) works best, offering a lovely contrast to the sweetness of the white chocolate. For the white chocolate layer, choose a brand you enjoy the taste of, as it’s a prominent flavor. Avoid “white confectionery coating” if possible, as it often contains less cocoa butter and may not melt or set as nicely.
- Crushed Peppermint Candies/Candy Canes: The quintessential finishing touch! These add a delightful crunch and an extra burst of refreshing peppermint flavor. During the holiday season, you can find bags of pre-crushed peppermint, or you can easily crush your own candy canes in a food processor or by placing them in a sealed bag and gently crushing with a rolling pin.
Step-by-Step Instructions
Let’s get baking! Following these steps will ensure your Peppermint Bark Cookies turn out perfectly, ready to dazzle your taste buds and impress your friends and family.
- Cream Butter and Sugars: In a large mixing bowl, using an electric mixer, cream together the softened unsalted butter, granulated sugar, and powdered sugar on medium speed until the mixture is light, fluffy, and pale in color. This usually takes about 2-3 minutes. Make sure to scrape down the sides of the bowl periodically to ensure everything is well combined.
- Add Wet Ingredients: Beat in the egg, peppermint extract, and vanilla extract until just combined. Be careful not to overmix at this stage; we just want everything incorporated.
- Combine Dry Ingredients: In a separate medium bowl, whisk together the all-purpose flour, baking powder, and salt. This step ensures that the leavening agent and salt are evenly distributed throughout the dough.
- Combine Wet and Dry: Gradually add the dry ingredients to the wet ingredients, mixing on low speed until just combined. Stop mixing as soon as no streaks of flour remain. Overmixing at this stage can lead to tough cookies.
- Chill the Dough: Form the dough into a disk, wrap it tightly in plastic wrap, and refrigerate for at least 1 hour. Chilling is crucial for these cookies as it prevents them from spreading too much in the oven and helps develop their flavor. If you’re in a hurry, 30 minutes in the freezer can work, but an hour in the fridge is ideal.
- Preheat Oven & Prep Pans: While the dough is chilling, preheat your oven to 375°F (190°C). Line two baking sheets with parchment paper or silicone baking mats. This prevents sticking and ensures even baking.
- Scoop and Bake: Remove the chilled dough from the refrigerator. Using a 1.5-tablespoon cookie scoop or by rolling the dough into uniform balls (about 1 inch in diameter), place them about 2 inches apart on the prepared baking sheets.
- Bake Cookies: Bake for 8-10 minutes, or until the edges are lightly golden and the centers are set. The cookies should still look slightly pale in the middle. Do not overbake! This is key for keeping them soft and chewy.
- Cool Cookies: Let the cookies cool on the baking sheets for 5 minutes before carefully transferring them to a wire rack to cool completely. It’s absolutely essential that the cookies are fully cooled before you apply the chocolate topping.
- Melt Dark Chocolate: Once the cookies are cool, prepare your chocolate topping. In a microwave-safe bowl, melt the semi-sweet or dark chocolate in 30-second intervals, stirring well after each, until smooth. Alternatively, use a double boiler over simmering water.
- Apply Dark Chocolate Layer: Dip the top of each cooled cookie into the melted dark chocolate, or spread a thin layer of chocolate over the top with a small offset spatula or butter knife. Place the chocolate-topped cookies back on the parchment-lined baking sheets. Allow this layer to set completely, either at room temperature (about 30 minutes) or by refrigerating for 10-15 minutes.
- Melt White Chocolate: Once the dark chocolate is set, melt the white chocolate using the same method as the dark chocolate. Stir in an additional 1/4 teaspoon of peppermint extract into the melted white chocolate for an extra burst of minty flavor.
- Apply White Chocolate & Peppermint Topping: Spread a layer of white chocolate over the set dark chocolate on each cookie. Immediately and generously sprinkle the crushed peppermint candies over the wet white chocolate. Work quickly as the white chocolate will start to set.
- Set Completely: Let the Peppermint Bark Cookies sit at room temperature for about an hour, or refrigerate for 20-30 minutes, until both chocolate layers are fully set and firm to the touch. Once set, they’re ready to enjoy!
Tips & Suggestions
I want your Peppermint Bark Cookies to be absolutely perfect, so I’ve gathered some of my best tips and tricks to help you along the way. These little insights can make a big difference!
- Don’t Overmix the Dough: This is a golden rule for most cookies, and especially true for these. Overmixing after adding the flour can develop the gluten too much, leading to tough, chewy cookies instead of the tender texture we’re aiming for. Mix only until the flour streaks disappear.
- Chill Time is Your Friend: I know it’s tempting to skip, but chilling the dough is truly essential for these Peppermint Bark Cookies. It allows the butter to firm up, preventing the cookies from spreading too much in the oven. It also gives the flavors time to meld and deepen, resulting in a more flavorful cookie. Don’t rush it!
- Cookie Size Matters: For even baking, try to make your cookie dough balls as uniform in size as possible. A cookie scoop is a fantastic tool for this, ensuring each cookie bakes consistently and looks professional.
- Don’t Overbake: These cookies are best when they’re soft and slightly chewy. Watch them closely in the oven. The edges should be barely golden, and the centers should still look a little soft. They will continue to set as they cool on the baking sheet.
- Quality Chocolate for a Quality Bark: As mentioned in the ingredient notes, the quality of your chocolate really shines through in the finished bark. Opt for good baking chocolate or high-quality chocolate chips. This will result in a smoother melt, a richer flavor, and a better snap when the chocolate sets.
- Melt Chocolate Gently: Whether using a microwave or a double boiler, melt your chocolate slowly and gently. Overheating chocolate can cause it to seize (become thick and clumpy) or burn. When using the microwave, stir frequently between short bursts of heat.
- Ensure Cookies Are Fully Cooled: This cannot be stressed enough! Applying melted chocolate to warm cookies will cause the chocolate to melt and slide right off, creating a mess. Patience is key here.
- Crushing Peppermint Candies: If you’re crushing your own candy canes, place them in a sturdy zip-top bag and use a rolling pin or the flat side of a meat tenderizer. Don’t pulverize them into a fine powder; you want a mix of small pieces and some slightly larger shards for texture.
- Work Quickly with the Topping: Once you’ve applied the white chocolate layer, immediately sprinkle on the crushed peppermint. The white chocolate sets fairly quickly, especially if the cookies are cool, so you want to ensure the peppermint pieces adhere well.
- Get Creative with Drizzle (Optional): For an extra festive touch, after the peppermint bark topping has completely set, you can melt a little more dark or white chocolate and drizzle it decoratively over the top. This adds a beautiful finishing touch, especially if you’re gifting them!
Storage
Proper storage is key to keeping your delicious Peppermint Bark Cookies fresh and tasty, so you can enjoy them for days to come or save some for later. Here’s how I recommend storing them:
- At Room Temperature: Once the chocolate topping has completely set, your Peppermint Bark Cookies can be stored in an airtight container at room temperature for up to 3-5 days. I usually place a sheet of parchment paper between layers of cookies to prevent them from sticking together or the chocolate from getting scratched. Keep them away from direct sunlight or heat, as this can cause the chocolate to melt or bloom (develop a grayish film).
- In the Refrigerator: If your home is particularly warm, or if you want to extend their freshness slightly, you can store these cookies in an airtight container in the refrigerator for up to 1 week. Again, use parchment paper to separate layers. Be aware that refrigeration can sometimes make cookies a little firmer, and the chocolate might feel a bit harder. I often let them come to room temperature for about 15-20 minutes before serving if they’ve been in the fridge, just to soften up a bit.
-
Freezing for Longer Storage: Peppermint Bark Cookies freeze beautifully, making them perfect for make-ahead holiday baking!
- Initial Freeze: Once the chocolate topping is completely set, arrange the cookies in a single layer on a parchment-lined baking sheet. Place the baking sheet in the freezer for about 1-2 hours, or until the cookies are solid. This step prevents them from sticking together when you stack them.
- Transfer to Container: Once frozen solid, transfer the cookies to a freezer-safe airtight container or a heavy-duty freezer bag. You can stack them, but I still recommend placing parchment paper between layers for extra protection.
- Storage Duration: They will keep well in the freezer for up to 1-2 months.
- Thawing: When you’re ready to enjoy them, simply remove the desired number of cookies from the freezer and let them thaw at room temperature for 30 minutes to an hour. They will taste just as fresh as the day you baked them!
- Preventing Chocolate Bloom: Chocolate bloom is when the chocolate develops a grayish or whitish film on its surface. While harmless, it can affect the appearance. It’s often caused by temperature fluctuations during storage. Storing them in a cool, consistent temperature (either room temp or fridge) and in an airtight container helps to prevent this.
Final Thoughts
There’s something truly special about these Peppermint Bark Cookies, and I’m so excited for you to experience them. I just adore how the deep, fudgy chocolate base perfectly complements the cool burst of peppermint, all topped with that delightful, crunchy candy bark. These aren’t just any cookies; they’re a festive sensation that brings pure joy with every bite! I promise you, once you whip up a batch, you’ll see exactly why these Peppermint Bark Cookies are an absolute must-try. They’re ideal for holiday gatherings, a thoughtful homemade gift, or simply for treating yourself to a moment of pure, refreshing deliciousness. Trust me, you’re going to love them!
Holiday Peppermint Bark Cookies: Simple, Delicious Recipe

These Peppermint Bark Cookies combine rich chocolate cookie goodness with a refreshing peppermint bark topping. Perfect for holiday gatherings or cozy nights in, they are sure to impress everyone!
- Prep Time: 15 mins
- Cook Time: 10 mins
- Total Time: 25 minutes
- Yield: 24 cookies 1x
- Category: Dessert
- Method: Baking
- Cuisine: American
Ingredients
- 2 1/4 cups All-Purpose Flour
- 1 cup Unsalted Butter, softened
- 3/4 cup Granulated Sugar
- 1/4 cup Powdered Sugar
- 1 large Egg
- 1 teaspoon Peppermint Extract
- 1 teaspoon Vanilla Extract
- 1 teaspoon Baking Powder
- 1/2 teaspoon Salt
- 8 ounces Good Quality Semi-Sweet or Dark Chocolate
- 8 ounces Good Quality White Chocolate
- 1 cup Crushed Peppermint Candies or Candy Canes
Instructions
- In a large mixing bowl, using an electric mixer, cream together the softened unsalted butter, granulated sugar, and powdered sugar on medium speed until the mixture is light, fluffy, and pale in color, about 2-3 minutes.
- Beat in the egg, peppermint extract, and vanilla extract until just combined, being careful not to overmix.
- In a separate medium bowl, whisk together the all-purpose flour, baking powder, and salt.
- Gradually add the dry ingredients to the wet ingredients, mixing on low speed until just combined. Stop mixing as soon as no streaks of flour remain.
- Form the dough into a disk, wrap it tightly in plastic wrap, and refrigerate for at least 1 hour.
- While the dough is chilling, preheat your oven to 375°F (190°C) and line two baking sheets with parchment paper.
- Remove the chilled dough from the refrigerator. Using a 1.5-tablespoon cookie scoop or by rolling the dough into uniform balls (about 1 inch in diameter), place them about 2 inches apart on the prepared baking sheets.
- Bake for 8-10 minutes, or until the edges are lightly golden and the centers are set. The cookies should still look slightly pale in the middle.
- Let the cookies cool on the baking sheets for 5 minutes before carefully transferring them to a wire rack to cool completely.
- In a microwave-safe bowl, melt the semi-sweet or dark chocolate in 30-second intervals, stirring well after each, until smooth.
- Dip the top of each cooled cookie into the melted dark chocolate, or spread a thin layer of chocolate over the top with a small offset spatula or butter knife. Place the chocolate-topped cookies back on the parchment-lined baking sheets and allow this layer to set completely.
- Once the dark chocolate is set, melt the white chocolate using the same method as the dark chocolate and stir in an additional 1/4 teaspoon of peppermint extract.
- Spread a layer of white chocolate over the set dark chocolate on each cookie and immediately sprinkle the crushed peppermint candies over the wet white chocolate.
- Let the Peppermint Bark Cookies sit at room temperature for about an hour, or refrigerate for 20-30 minutes, until both chocolate layers are fully set and firm to the touch.
Nutrition
- Serving Size: 1 cookie
- Calories: 150
- Sugar: 10 g
- Sodium: 50 mg
- Fat: 7 g
- Saturated Fat: 4 g
- Unsaturated Fat: 2 g
- Trans Fat: 0 g
- Carbohydrates: 20 g
- Fiber: 1 g
- Protein: 2 g
- Cholesterol: 20 mg
Keywords: Chilling the dough is essential to prevent spreading and enhance flavor. Use good quality chocolate for the best results, and ensure cookies are fully cooled before applying chocolate topping.