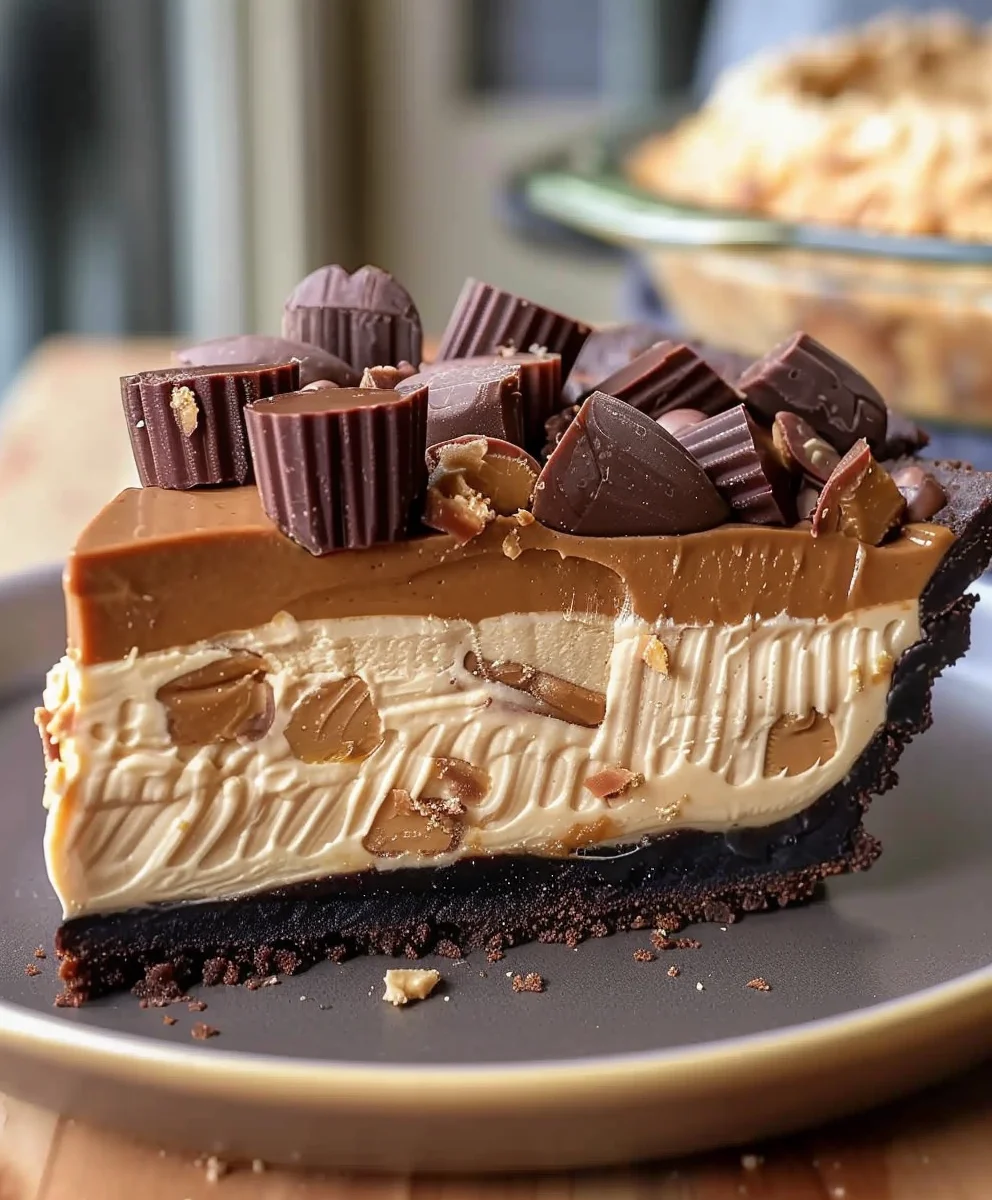
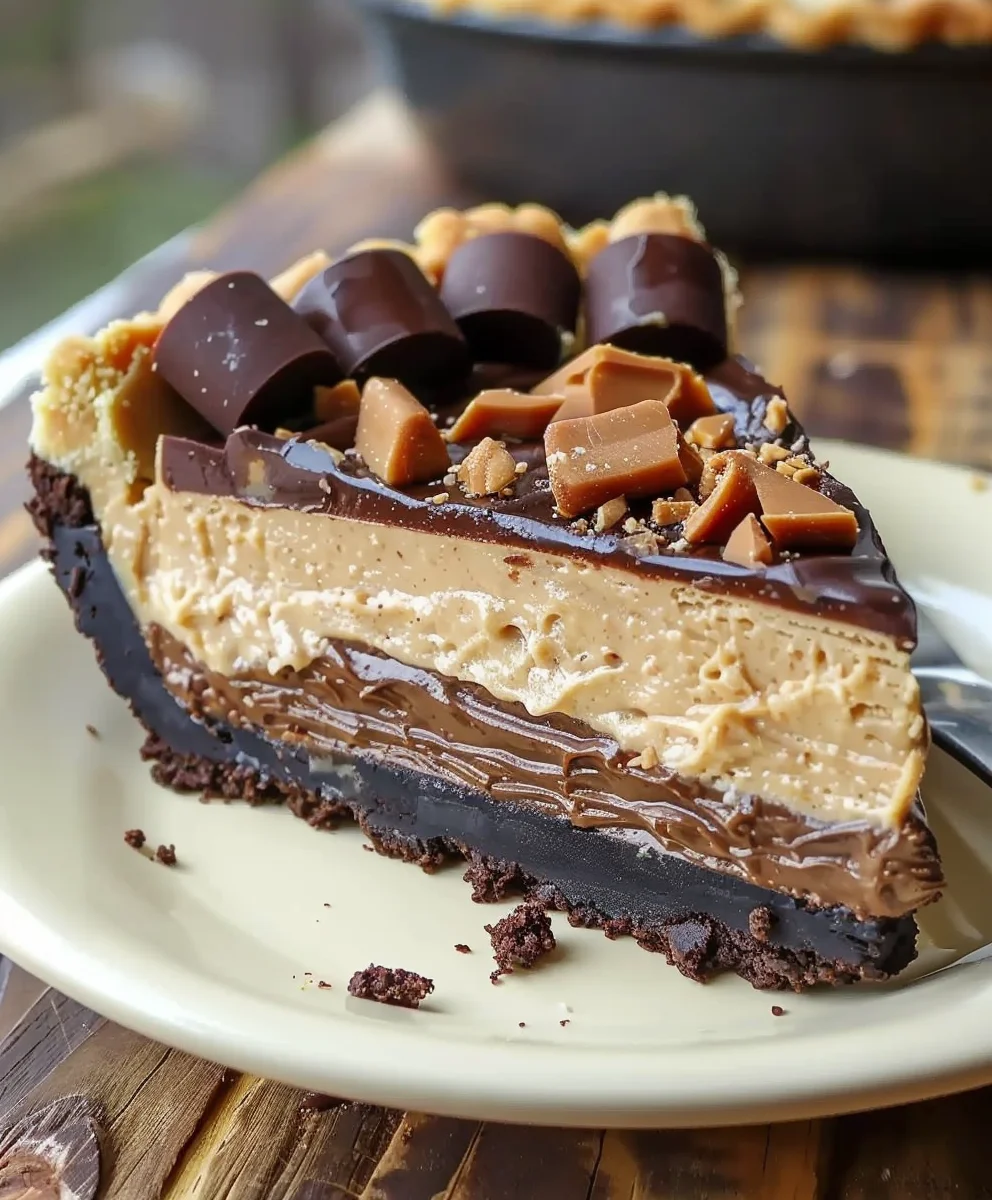
Giant Reeses Peanut Butter Cup Pie is not just a dessert; it’s a dream come true for anyone who cherishes the iconic chocolate and peanut butter pairing. Imagine an indulgent, creamy peanut butter filling nestled in a rich chocolate crust, crowned with an abundance of chopped Reese’s Peanut Butter Cups. This magnificent creation elevates a beloved candy into a show-stopping dessert that promises to captivate every palate.
The Reese’s Peanut Butter Cup has held a special place in our hearts since its introduction in 1928, a testament to the enduring appeal of its perfectly balanced sweet and salty flavors. This pie pays homage to that timeless classic, transforming a simple treat into an extraordinary culinary experience. People adore this dish for its undeniably rich taste, the delightful interplay of smooth, velvety peanut butter and crisp chocolate, and the comforting nostalgia it evokes. It’s a feast for the senses – visually stunning, exquisitely textured, and utterly delicious.
I am absolutely thrilled to share the recipe for this spectacular Giant Reeses Peanut Butter Cup Pie. It’s the ultimate crowd-pleaser, perfect for celebrations, potlucks, or simply as a well-deserved treat after a long week. Prepare yourself for a dessert that is not only easy to assemble but also guarantees gasps of delight from everyone who takes a bite. Get ready to embark on a sweet adventure that will undoubtedly become a treasured favorite in your kitchen.

Ingredients:
For the Decadent Chocolate Cookie Crust:
- ½ pound (approximately 225 grams or about 36-40 standard cookies) chocolate sandwich cookies, such as Oreos, with their cream filling intact. I find that using the whole cookie, cream and all, really adds to the richness and binds beautifully.
- ½ cup (1 stick or 113 grams) unsalted butter, melted. Unsalted butter gives us control over the sodium content, which I always prefer in desserts.
For the Creamy, Dreamy Peanut Butter Filling:
- 8 ounces (226 grams) full-fat cream cheese, softened to room temperature. This is crucial for a smooth, lump-free filling!
- 1 ½ cups (about 380 grams) creamy peanut butter. I always recommend using a good quality, commercial brand like Jif or Skippy for consistency, as natural peanut butter can separate and affect the texture.
- 1 ½ cups (180 grams) powdered sugar (also known as confectioners’ sugar), sifted. Sifting prevents lumps and ensures a silky-smooth filling.
- 1 teaspoon pure vanilla extract. Don’t skimp on the vanilla; it truly enhances all the other flavors.
- 1 ¾ cups (about 420 ml) cold heavy cream (also called heavy whipping cream). This will be whipped to create a light and airy base for our filling.
For the Silky Chocolate Ganache Topping:
- 1 cup (about 170 grams) semi-sweet chocolate chips or finely chopped semi-sweet chocolate. High-quality chocolate makes a noticeable difference here.
- ½ cup (120 ml) heavy cream.
- 1 tablespoon unsalted butter, at room temperature (optional, but I find it adds a lovely sheen and richness).
For the Grand Garnish:
- 1 ½ cups (about 18-24 miniature or 8-10 regular-sized) Reese’s Peanut Butter Cups, roughly chopped. This is where the “Giant Reeses Peanut Butter Cup Pie” truly comes to life!
Optional Equipment I Highly Recommend:
- 9-inch (23 cm) pie plate, preferably deep dish.
- Food processor for crushing cookies.
- Electric mixer (stand mixer with paddle attachment or hand mixer) for the filling.
- Rubber spatula for folding and scraping.
- Wire rack for cooling.
A Note on Preparation:
Before you begin, make sure your cream cheese is completely at room temperature, which can take an hour or two on the counter. Also, ensure your heavy cream for the filling is very cold, as this helps it whip up light and fluffy. These small details contribute significantly to the overall success of your magnificent Giant Reeses Peanut Butter Cup Pie.
Preparing the Chocolate Cookie Crust
- Crush the Cookies: Start by transforming your chocolate sandwich cookies into fine crumbs. The easiest way to do this is in a food processor. Simply place the whole cookies, cream filling and all, into the bowl of your food processor and pulse until they are very fine crumbs, resembling coarse sand. If you don’t have a food processor, you can place the cookies in a large Ziploc bag, seal it, and crush them with a rolling pin or the bottom of a heavy pan until equally fine. Consistency is key here for an even crust.
- Combine with Butter: Transfer the cookie crumbs to a medium-sized bowl. Pour the ½ cup of melted unsalted butter over the crumbs. Mix thoroughly with a fork or spatula until all the crumbs are moistened and resemble wet sand. Every crumb should be coated to ensure the crust holds together well.
- Press into Pie Plate: Pour the buttered crumbs into your 9-inch pie plate. Using the bottom of a flat glass or your clean fingers, press the mixture firmly and evenly into the bottom and up the sides of the pie plate. Take your time to ensure it’s packed tightly and uniformly. This firm packing prevents the crust from crumbling when you slice into your pie. I like to make sure the edge is just a little thicker for extra stability and a nice, defined border.
- Bake (Optional but Recommended) or Chill: While some recipes skip this, I highly recommend baking the crust for a few minutes. Preheat your oven to 350°F (175°C). Bake the pressed crust for 8-10 minutes. This helps to set the butter and makes the crust sturdier and less prone to getting soggy from the filling. Once baked, remove it from the oven and let it cool completely on a wire rack. If you prefer a no-bake option, simply place the pressed crust in the freezer for at least 30 minutes to firm up before adding the filling. A properly set crust is the foundation of a great pie!
Crafting the Irresistible Peanut Butter Filling
- Cream the Cream Cheese: In a large mixing bowl (or the bowl of a stand mixer fitted with the paddle attachment), beat the softened full-fat cream cheese on medium speed until it is light, fluffy, and completely smooth. This should take about 2-3 minutes. Scrape down the sides of the bowl occasionally to ensure no lumps remain. This step is vital for a silky-smooth filling without any grainy texture.
- Add Peanut Butter and Vanilla: Add the creamy peanut butter and vanilla extract to the creamed cream cheese. Continue beating on medium speed until well combined and smooth, again scraping down the sides of the bowl as needed. The mixture will be thick and wonderfully fragrant with that classic peanut butter aroma.
- Incorporate Powdered Sugar: Gradually add the sifted powdered sugar to the peanut butter mixture, beating on low speed until just combined. Then, increase the speed to medium and beat until the mixture is fully incorporated and smooth. Be careful not to overbeat at this stage; we just want it combined.
- Whip the Heavy Cream: In a separate, very clean and cold bowl (preferably a metal bowl chilled in the freezer for a few minutes), whip the 1 ¾ cups of cold heavy cream. Start on low speed and gradually increase to high. Whip until stiff peaks form. You’re looking for cream that holds its shape beautifully and doesn’t droop. This usually takes 3-5 minutes, depending on your mixer and cream temperature.
- Fold in Whipped Cream: Gently fold about one-third of the whipped cream into the peanut butter mixture to lighten it. Then, add the remaining whipped cream and fold until just combined and no streaks of white cream remain. Be very careful not to deflate the whipped cream; use a gentle hand and a rubber spatula, folding from the bottom up. This folding action gives the filling its incredibly light, airy texture, which is a hallmark of a truly great Giant Reeses Peanut Butter Cup Pie.
Assembling Your Giant Reeses Peanut Butter Cup Pie
- Fill the Crust: Pour the glorious peanut butter filling into the cooled (or chilled) chocolate cookie crust. Use an offset spatula or the back of a spoon to spread the filling evenly, creating a smooth top surface. I like to make sure it reaches all the way to the edges of the crust.
- Initial Chill: Once the filling is evenly spread, cover the pie loosely with plastic wrap. Place it in the refrigerator to chill for at least 2-3 hours, or preferably until firm. This chilling time is absolutely essential for the filling to set properly, making for clean slices later on. Patience is a virtue here; don’t rush this step!
Creating the Velvety Chocolate Ganache Topping
- Heat the Cream: In a small saucepan, gently heat the ½ cup of heavy cream over medium-low heat until it just begins to simmer around the edges. Do not let it boil vigorously.
- Melt the Chocolate: Place the chocolate chips (or chopped chocolate) in a heatproof bowl. Once the cream is hot, immediately pour it over the chocolate. Let it sit undisturbed for 5 minutes. This allows the heat from the cream to begin melting the chocolate without scorching it.
- Whisk to Smooth: After 5 minutes, use a small whisk or a spoon to gently stir the mixture, starting from the center and working your way outwards. Continue stirring until the chocolate is completely melted and the ganache is smooth, glossy, and uniform.
- Add Butter (Optional): If using, stir in the tablespoon of room temperature unsalted butter until it’s fully melted and incorporated. This adds an extra layer of richness and a beautiful, professional-looking sheen to your ganache.
- Cool Slightly: Allow the ganache to cool at room temperature for about 10-15 minutes, stirring occasionally, until it has thickened slightly but is still pourable. You want it to be warm but not hot, as pouring hot ganache directly onto the chilled filling can cause it to melt. It should be the consistency of a warm, thick syrup.
The Grand Finale: Garnish and Chill
- Pour the Ganache: Once the peanut butter filling is firm and the ganache has cooled slightly, carefully pour the ganache over the top of the chilled pie. Gently tilt the pie plate to help the ganache spread evenly to the edges, creating a smooth, enticing layer. You can also use an offset spatula to spread it if needed.
- Arrange the Reese’s: Immediately after pouring the ganache (while it’s still wet), artfully arrange your roughly chopped Reese’s Peanut Butter Cups over the chocolate layer. You can cover the entire surface or create a decorative border. This is your chance to make it visually spectacular! The slight warmth of the ganache will help them adhere.
- Final Chill: Return the pie to the refrigerator for at least another 2-3 hours, or until the ganache is completely set and firm. For the best results, I often make this pie the day before I plan to serve it, allowing it to chill overnight. This extended chilling time ensures that every layer is perfectly set, making for a pie that slices beautifully and holds its shape.
- Serve and Enjoy: When you’re ready to serve your spectacular Giant Reeses Peanut Butter Cup Pie, remove it from the refrigerator about 15-20 minutes before slicing to allow it to soften just slightly, which makes for easier cutting. Use a sharp knife, wiping it clean between each slice, for pristine portions. Each bite offers a harmonious blend of crisp chocolate crust, light and creamy peanut butter filling, rich chocolate ganache, and chunks of beloved Reese’s. It’s truly a showstopper!
Chef’s Tips for Your Best Giant Reeses Peanut Butter Cup Pie:
Storage:
This pie should be stored in the refrigerator, covered loosely with plastic wrap or in an airtight container, for up to 4-5 days. It’s just as delicious on day three as it is on day one, sometimes even better as the flavors meld!
Pre-slicing for Parties:
If you’re serving this pie for a large gathering, I sometimes find it helpful to pre-slice it while it’s still very cold and firm. Then, you can easily remove individual slices as needed without disturbing the rest of the pie. Just remember to warm your knife slightly with hot water and wipe it dry between each cut for the cleanest edges.
Variations:
While the classic Reese’s Peanut Butter Cups are iconic, feel free to experiment with other peanut butter candies. Miniature peanut butter cups, or even other chocolate-peanut butter candy bar pieces, could be a fun addition to the topping. You could also drizzle a bit of melted white chocolate over the top for an extra flourish before adding the Reese’s!
Conclusion:
So, there you have it! We’ve journeyed through the steps of creating what I truly believe is one of the most magnificent desserts you could ever whip up in your own kitchen. This isn’t just another pie; it’s a statement, a celebration, and frankly, a dream come true for anyone who adores that iconic combination of rich chocolate and creamy peanut butter. What makes this recipe an absolute must-try, in my humble opinion, is its uncanny ability to deliver an unparalleled level of decadent satisfaction without demanding an advanced culinary degree. Every single bite is a testament to the harmonious blend of sweet and salty, a texture sensation that transitions from the crisp, buttery crust to the velvety smooth peanut butter filling, all crowned with a luscious layer of chocolate ganache. It’s the kind of dessert that silences a room, then fills it with delighted murmurs of appreciation. You really haven’t lived until you’ve experienced the sheer joy of biting into a slice of this particular masterpiece.
But why stop at simply making it? Let’s talk about elevating the experience! While this incredible pie is certainly a showstopper all on its own, there are so many delightful ways to serve and enjoy it, tailoring it perfectly to your mood or occasion. For an extra touch of indulgence, I absolutely love serving a slice slightly chilled, alongside a generous scoop of vanilla bean ice cream. The cool, creamy ice cream melting into the rich pie creates a symphony of textures and temperatures that is simply divine. Alternatively, a dollop of freshly whipped cream, perhaps infused with a hint of vanilla or even a dash of cocoa powder, can add a beautiful lightness and balance to the richness. For the ultimate chocolate lover, a drizzle of warm chocolate fudge sauce or a sprinkle of finely chopped roasted peanuts can provide an additional layer of crunch and flavor complexity that truly takes it over the top. Don’t forget, a sprinkle of flaky sea salt right before serving can magically enhance all those chocolate and peanut butter notes, making them sing!
Endless Possibilities for Customization
This recipe is also wonderfully versatile, inviting you to put your own creative spin on it. If you’re feeling adventurous, consider swapping out the standard graham cracker crust for an Oreo cookie crust for an even deeper chocolate foundation, or perhaps a Nutter Butter crust to really double down on the peanut butter goodness. The beauty of the filling is that it can also be subtly adjusted; a tiny pinch of espresso powder stirred into the chocolate ganache can deepen its flavor without making it taste like coffee, bringing out the inherent richness of the cocoa. For an extra layer of textural intrigue, you could fold in mini chocolate chips or chopped Reese’s Peanut Butter Cups directly into the peanut butter filling before chilling. Thinking about presentation? Instead of one large pie, you could easily adapt this recipe to create individual tartlets using muffin tins or mini tart pans, perfect for portion control at a party or as delightful personalized treats. Imagine mini versions of this Giant Reeses Peanut Butter Cup Pie at your next gathering – they’d be an instant hit!
Your Culinary Adventure Awaits!
I truly hope this recipe inspires you to dive into your kitchen and create something truly special. There’s immense satisfaction in crafting a dessert that not only tastes incredible but also brings smiles to the faces of everyone who tries it. This isn’t just baking; it’s creating edible joy. So, clear your schedule, gather your ingredients, and prepare to embark on a delicious adventure. Once you’ve pulled this magnificent Giant Reeses Peanut Butter Cup Pie out of your fridge, perfectly set and ready to be devoured, I guarantee you’ll feel a tremendous sense of accomplishment and a profound desire to share your triumph. Please, when you do make it, don’t keep the experience to yourself! I would absolutely love to hear about your culinary journey, see your photos, and learn about any clever twists or serving suggestions you come up with. Share your masterpieces, your triumphs, and even your funny kitchen anecdotes. Happy baking, my friends, and prepare for some serious dessert adoration!
Giant Reeses Peanut Butter Cup Pie: The Ultimate Dessert!
Giant Reeses Peanut Butter Cup Pie is not just a dessert; it’s a dream come true for anyone who cherishes the iconic chocolate and peanut butter pairing. Imagine an indulgent, creamy peanut butter filling nestled in a rich chocolate crust, crowned with an abundance of chopped Reese’s Peanut Butter Cups. This magnificent creation elevates a beloved candy into a show-stopping dessert that promises to captivate every palate.
Ingredients
-
1 ½ cups crushed graham crackers or chocolate sandwich cookies (e.g., Oreos)
-
½ cup (113 grams) unsalted butter, melted
-
8 ounces (226 grams) full-fat cream cheese, softened
-
1 ½ cups (380 grams) creamy peanut butter
-
1 ½ cups (180 grams) powdered sugar, sifted
-
1 teaspoon pure vanilla extract
-
1 ¾ cups (420 ml) cold heavy cream
-
1 cup (170 grams) semi-sweet chocolate chips
-
½ cup (120 ml) heavy cream
-
1 tablespoon unsalted butter, room temperature (optional)
-
1 ½ cups (18-24 miniature or 8-10 regular-sized) Reese’s Peanut Butter Cups, chopped
Instructions
-
Step 1
For the crust: Crush 1 ½ cups graham crackers or chocolate sandwich cookies into fine crumbs. Combine with ½ cup melted unsalted butter until moistened. -
Step 2
Press crumbs firmly into a 9-inch pie plate. Bake at 350°F (175°C) for 8-10 minutes, then cool completely on a wire rack. (Or chill crust in freezer for 30 minutes for a no-bake option). -
Step 3
For the filling: In a large bowl, beat 8 oz softened cream cheese on medium speed until light and smooth (2-3 minutes). Scrape sides. -
Step 4
Add 1 ½ cups creamy peanut butter and 1 tsp vanilla extract; beat until well combined and smooth. -
Step 5
Gradually add 1 ½ cups sifted powdered sugar, beating on low then medium speed until fully incorporated and smooth. -
Step 6
In a separate, cold bowl, whip 1 ¾ cups cold heavy cream until stiff peaks form (3-5 minutes). -
Step 7
Gently fold the whipped cream into the peanut butter mixture until just combined and no white streaks remain. Do not overmix. -
Step 8
Pour the filling into the cooled crust and spread evenly. Cover loosely with plastic wrap and chill in the refrigerator for at least 2-3 hours, or until firm. -
Step 9
For the ganache: Heat ½ cup heavy cream in a small saucepan until it just begins to simmer. Place 1 cup semi-sweet chocolate chips in a heatproof bowl. -
Step 10
Pour hot cream over chocolate; let sit undisturbed for 5 minutes. Whisk gently until the chocolate is completely melted and the ganache is smooth and glossy. -
Step 11
Stir in 1 tbsp room temperature unsalted butter (if using) until incorporated. Let ganache cool at room temperature for 10-15 minutes, stirring occasionally, until slightly thickened but still pourable. -
Step 12
Pour cooled ganache over the chilled pie, spreading evenly to the edges. Immediately arrange 1 ½ cups chopped Reese’s Peanut Butter Cups over the chocolate layer. -
Step 13
Return the pie to the refrigerator for at least another 2-3 hours, or preferably overnight, until the ganache is completely set and firm. -
Step 14
Remove pie from refrigerator 15-20 minutes before serving for easier slicing. Use a sharp, clean knife for pristine portions. Store leftover pie in the refrigerator for up to 4-5 days.
Important Information
Nutrition Facts (Per Serving)
It is important to consider this information as approximate and not to use it as definitive health advice.
Allergy Information
Please check ingredients for potential allergens and consult a health professional if in doubt.