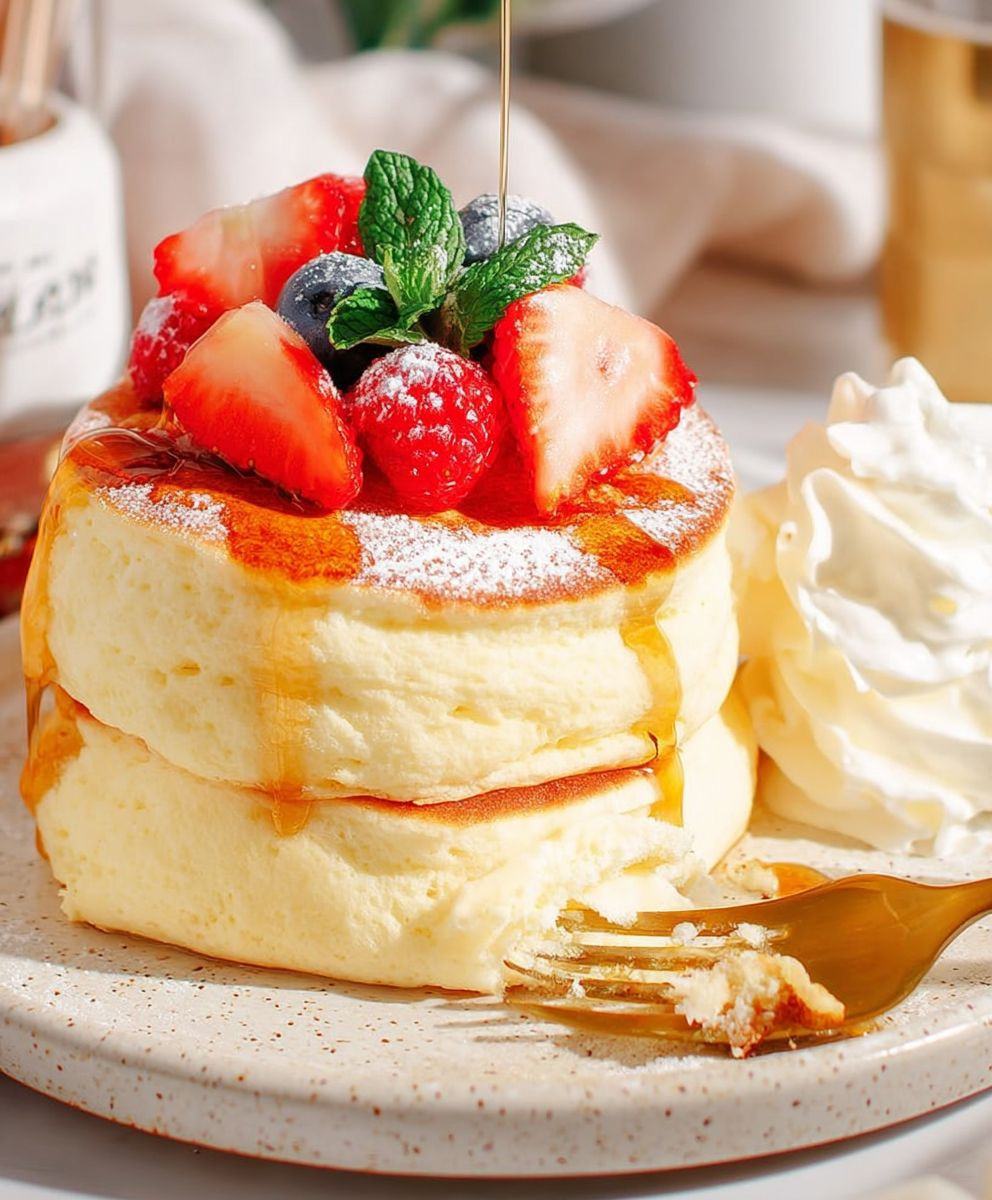
Fluffy Japanese Souffle Pancakes: Prepare to embark on a culinary adventure that will redefine your breakfast expectations! Imagine sinking your fork into a cloud of ethereal sweetness, a pancake so light and airy it practically melts in your mouth. These aren’t your average pancakes; they’re a delightful Japanese creation that has taken the world by storm, and for good reason.
The history of souffle pancakes in Japan is relatively recent, but their popularity exploded thanks to cafes dedicated to perfecting this delicate art. They draw inspiration from classic French soufflés, incorporating whisked egg whites to achieve their signature height and airy texture. These pancakes are more than just a breakfast item; they’re an experience, a moment of pure indulgence.
What makes fluffy Japanese souffle pancakes so irresistible? It’s a combination of factors. The taste is subtly sweet, allowing the toppings to truly shine. The texture is unlike anything you’ve ever experienced – a delicate balance of creamy and airy. And while they might seem intimidating to make, with a little patience and this recipe, you’ll be whipping up these delightful treats in no time. Get ready to impress your friends and family with these show-stopping pancakes that are as fun to make as they are to eat!

Ingredients:
- For the Batter:
- 2 large eggs, separated
- 2 tablespoons granulated sugar, divided (1 tbsp for yolks, 1 tbsp for whites)
- 1 tablespoon milk
- 1/2 teaspoon vanilla extract
- 3 tablespoons all-purpose flour, sifted
- 1/4 teaspoon baking powder
- Pinch of salt
- For Cooking:
- 1 tablespoon vegetable oil, plus more for greasing
- 2 tablespoons water
- For Serving (Optional):
- Powdered sugar
- Maple syrup
- Fresh berries (strawberries, blueberries, raspberries)
- Whipped cream
Preparing the Egg Yolks
Okay, let’s get started! First, we’re going to focus on the egg yolks. This is where we build the base of our pancake batter, so pay close attention.
- Separate the Eggs: Carefully separate the egg yolks from the egg whites. Make sure absolutely no yolk gets into the whites. Even a tiny bit of yolk can prevent the whites from whipping up properly. I usually crack the egg in half over a bowl, letting the white drip out, and then gently transfer the yolk back and forth between the shell halves until all the white is gone. Place the yolks in a medium-sized bowl and the whites in a separate, clean, and dry bowl.
- Whisk the Yolks with Sugar: Add 1 tablespoon of granulated sugar to the egg yolks. Using a whisk (a hand whisk is perfectly fine!), whisk the yolks and sugar together until the mixture becomes pale yellow and slightly thickened. This usually takes about 2-3 minutes. You’ll notice the color lighten and the mixture will become a bit ribbon-like when you lift the whisk.
- Add Milk and Vanilla: Pour in the milk and vanilla extract. Gently whisk to combine. Make sure everything is well incorporated, but don’t overmix at this stage. We want to keep the mixture light and airy.
- Sift in the Dry Ingredients: In a separate small bowl, whisk together the sifted all-purpose flour, baking powder, and salt. Sifting is crucial here! It helps to remove any lumps in the flour and ensures that the dry ingredients are evenly distributed throughout the batter. This will result in a lighter and fluffier pancake. Now, gradually add the dry ingredients to the egg yolk mixture, whisking gently until just combined. Be careful not to overmix! Overmixing will develop the gluten in the flour, leading to tough pancakes. A few small lumps are okay at this point.
Whipping the Egg Whites
Now for the magic! The key to those sky-high soufflé pancakes is perfectly whipped egg whites. This step requires a little patience and attention to detail.
- Prepare the Bowl and Whisk: Make sure the bowl and whisk you’re using for the egg whites are completely clean and dry. Any trace of grease or moisture can prevent the whites from whipping up properly. I like to wipe the bowl and whisk with a little lemon juice or vinegar to ensure they’re squeaky clean.
- Start Whipping: Using an electric mixer (either a stand mixer or a hand mixer), begin whipping the egg whites on medium speed. You’ll start to see small bubbles forming.
- Gradually Add Sugar: Once the egg whites become foamy (this usually takes about a minute or two), gradually add the remaining 1 tablespoon of granulated sugar. Add it in a slow and steady stream while continuing to whip.
- Whip to Stiff Peaks: Continue whipping the egg whites until they form stiff, glossy peaks. This means that when you lift the whisk, the peaks of the egg whites stand straight up and don’t droop. Be careful not to overwhip! Overwhipped egg whites will look dry and curdled. If you’re unsure, stop the mixer and check the consistency frequently.
Combining the Batter
This is where we gently fold the whipped egg whites into the yolk mixture. This step is crucial for maintaining the airiness of the batter.
- Fold in the Egg Whites: Take about one-third of the whipped egg whites and gently fold them into the egg yolk mixture. This first addition helps to lighten the yolk mixture and make it easier to incorporate the remaining egg whites. Use a rubber spatula and gently cut down through the center of the mixture, then scrape along the bottom of the bowl and fold the mixture over the top. Rotate the bowl slightly and repeat until the egg whites are mostly incorporated.
- Gently Fold in the Remaining Egg Whites: Add the remaining whipped egg whites to the mixture and continue to gently fold until just combined. Be very careful not to overmix! You want to keep as much air in the batter as possible. It’s okay if there are a few streaks of egg white remaining.
Cooking the Soufflé Pancakes
Now for the fun part! Cooking these pancakes requires a little bit of technique, but with a little practice, you’ll be making perfect soufflé pancakes in no time.
- Prepare the Pan: Heat a large non-stick skillet or griddle over low heat. Lightly grease the pan with vegetable oil. You can use a paper towel to spread the oil evenly and remove any excess.
- Create the Pancake Stacks: Using a large spoon or ice cream scoop, carefully drop dollops of batter onto the hot skillet. I usually make stacks of two or three dollops per pancake, placing one dollop on top of the other to create height. Leave some space between each pancake to allow them to expand.
- Add Water and Cover: Pour about 2 tablespoons of water into the skillet around the pancakes. Immediately cover the skillet with a lid. The steam created by the water will help the pancakes cook evenly and rise beautifully.
- Cook on Low Heat: Cook the pancakes for about 3-4 minutes per side, or until they are golden brown and cooked through. The cooking time will vary depending on the heat of your skillet, so keep an eye on them. You can gently peek under the lid to check their progress. If the bottoms are browning too quickly, reduce the heat slightly.
- Flip Carefully: Gently flip the pancakes using a wide spatula. Be careful not to deflate them! Add another 2 tablespoons of water to the skillet, cover with the lid, and cook for another 3-4 minutes, or until the other side is golden brown and the pancakes are cooked through.
- Check for Doneness: To check if the pancakes are cooked through, you can gently insert a toothpick into the center of one of the pancakes. If the toothpick comes out clean, the pancakes are done. If not, cook for another minute or two.
Serving Your Fluffy Creations
Finally, it’s time to enjoy your hard work! These soufflé pancakes are best served immediately, while they’re still warm and fluffy.
- Plate the Pancakes: Carefully transfer the pancakes to a plate.
- Garnish and Serve: Dust the pancakes with powdered sugar, drizzle with maple syrup, and top with fresh berries and whipped cream, if desired. Get creative and add your favorite toppings!
- Enjoy Immediately: These pancakes are best enjoyed right away, as they will start to deflate slightly as they cool. So grab a fork and dig in!
Tips for Success:
- Use room temperature eggs: Room temperature eggs whip up better and create a more stable meringue.
- Don’t overmix the batter: Overmixing will develop the gluten in the flour, resulting in tough pancakes.
- Cook on low heat: Cooking the pancakes on low heat ensures that they cook evenly and don’t burn.
- Use a non-stick skillet: A non-stick skillet will prevent the pancakes from sticking and make them easier to flip.
- Be patient: These pancakes take a little bit of time and effort to make, but the results are well worth it!
Variations:
- Chocolate Chip Pancakes: Add 1/4 cup of chocolate chips to the batter before cooking.
- Blueberry Pancakes: Add 1/2 cup of blueberries to the batter before cooking.
- Matcha Pancakes: Add 1 teaspoon of matcha powder to the dry ingredients.
- Lemon Pancakes: Add 1 teaspoon of lemon zest to the egg yolk mixture.
Conclusion:
Okay, friends, let’s recap why these Fluffy Japanese Souffle Pancakes are about to become your new weekend obsession. We’re talking cloud-like texture, a subtly sweet flavor that’s incredibly satisfying, and a presentation that’s guaranteed to impress. Seriously, who wouldn’t want to wake up to a stack of these beauties? This isn’t just breakfast; it’s an experience!
I know, I know, the slightly longer cooking time might seem intimidating, but trust me, the payoff is HUGE. The light and airy texture you achieve with this method is simply unmatched by regular pancakes. Plus, the process itself is kind of fun and therapeutic. Think of it as a little culinary meditation before you start your day. And the best part? You probably already have most of the ingredients in your pantry!
But the real magic lies in the versatility. While I’ve given you my go-to recipe, feel free to get creative with your toppings and variations. A classic drizzle of maple syrup is always a winner, of course. But why stop there? Fresh berries, a dollop of whipped cream, a sprinkle of powdered sugar, or even a scoop of vanilla ice cream are all fantastic choices.
For a more decadent treat, try drizzling with chocolate sauce or Nutella. If you’re feeling adventurous, you could even add a sprinkle of chopped nuts or a dusting of cocoa powder. And for a truly special occasion, consider topping your Fluffy Japanese Souffle Pancakes with a homemade fruit compote. Think berries simmered with a touch of sugar and lemon juice – divine!
Want to take things in a savory direction? Consider topping them with a fried egg, some crispy bacon, and a drizzle of sriracha mayo. It might sound a little unconventional, but trust me, the sweet and savory combination is surprisingly delicious. You could even add some chopped chives or green onions for a pop of freshness.
Another fun variation is to infuse the batter with different flavors. A teaspoon of vanilla extract is a classic addition, but you could also try almond extract, lemon zest, or even a pinch of cinnamon. For a chocolatey twist, add a tablespoon of cocoa powder to the dry ingredients. The possibilities are endless!
Serving wise, these pancakes are best enjoyed immediately after cooking. They tend to deflate slightly as they cool, so don’t wait too long to dig in. I like to serve them with a side of fresh fruit and a cup of hot coffee or tea. It’s the perfect way to start a relaxing weekend morning.
So, what are you waiting for? Grab your whisk, preheat your pan, and get ready to experience pancake perfection. I promise, once you try these Fluffy Japanese Souffle Pancakes, you’ll never go back to regular pancakes again. They are truly in a league of their own.
And now for the most important part: I want to hear about your experience! Did you try the recipe? Did you make any fun variations? What were your favorite toppings? Share your photos and stories in the comments below. I can’t wait to see what you create! Happy cooking!
Fluffy Japanese Souffle Pancakes: The Ultimate Guide to Light & Airy Perfection
Light and airy Japanese Soufflé Pancakes that are incredibly fluffy and tall. These pancakes are made with whipped egg whites for an unforgettable texture.
Ingredients
- 2 large eggs, separated
- 2 tablespoons granulated sugar, divided (1 tbsp for yolks, 1 tbsp for whites)
- 1 tablespoon milk
- 1/2 teaspoon vanilla extract
- 3 tablespoons all-purpose flour, sifted
- 1/4 teaspoon baking powder
- Pinch of salt
- 1 tablespoon vegetable oil, plus more for greasing
- 2 tablespoons water
- Powdered sugar
- Maple syrup
- Fresh berries (strawberries, blueberries, raspberries)
- Whipped cream
Instructions
- Separate the Eggs: Carefully separate the egg yolks from the egg whites. Ensure no yolk gets into the whites. Place the yolks in a medium-sized bowl and the whites in a separate, clean, and dry bowl.
- Whisk the Yolks with Sugar: Add 1 tablespoon of granulated sugar to the egg yolks. Whisk until the mixture becomes pale yellow and slightly thickened (2-3 minutes).
- Add Milk and Vanilla: Pour in the milk and vanilla extract. Gently whisk to combine.
- Sift in the Dry Ingredients: In a separate small bowl, whisk together the sifted all-purpose flour, baking powder, and salt. Gradually add the dry ingredients to the egg yolk mixture, whisking gently until just combined. Be careful not to overmix! A few small lumps are okay at this point.
- Prepare the Bowl and Whisk: Make sure the bowl and whisk you’re using for the egg whites are completely clean and dry.
- Start Whipping: Using an electric mixer (either a stand mixer or a hand mixer), begin whipping the egg whites on medium speed. You’ll start to see small bubbles forming.
- Gradually Add Sugar: Once the egg whites become foamy (this usually takes about a minute or two), gradually add the remaining 1 tablespoon of granulated sugar. Add it in a slow and steady stream while continuing to whip.
- Whip to Stiff Peaks: Continue whipping the egg whites until they form stiff, glossy peaks. This means that when you lift the whisk, the peaks of the egg whites stand straight up and don’t droop. Be careful not to overwhip! Overwhipped egg whites will look dry and curdled. If you’re unsure, stop the mixer and check the consistency frequently.
- Fold in the Egg Whites: Take about one-third of the whipped egg whites and gently fold them into the egg yolk mixture. This first addition helps to lighten the yolk mixture and make it easier to incorporate the remaining egg whites. Use a rubber spatula and gently cut down through the center of the mixture, then scrape along the bottom of the bowl and fold the mixture over the top. Rotate the bowl slightly and repeat until the egg whites are mostly incorporated.
- Gently Fold in the Remaining Egg Whites: Add the remaining whipped egg whites to the mixture and continue to gently fold until just combined. Be very careful not to overmix! You want to keep as much air in the batter as possible. It’s okay if there are a few streaks of egg white remaining.
- Prepare the Pan: Heat a large non-stick skillet or griddle over low heat. Lightly grease the pan with vegetable oil. You can use a paper towel to spread the oil evenly and remove any excess.
- Create the Pancake Stacks: Using a large spoon or ice cream scoop, carefully drop dollops of batter onto the hot skillet. I usually make stacks of two or three dollops per pancake, placing one dollop on top of the other to create height. Leave some space between each pancake to allow them to expand.
- Add Water and Cover: Pour about 2 tablespoons of water into the skillet around the pancakes. Immediately cover the skillet with a lid. The steam created by the water will help the pancakes cook evenly and rise beautifully.
- Cook on Low Heat: Cook the pancakes for about 3-4 minutes per side, or until they are golden brown and cooked through. The cooking time will vary depending on the heat of your skillet, so keep an eye on them. You can gently peek under the lid to check their progress. If the bottoms are browning too quickly, reduce the heat slightly.
- Flip Carefully: Gently flip the pancakes using a wide spatula. Be careful not to deflate them! Add another 2 tablespoons of water to the skillet, cover with the lid, and cook for another 3-4 minutes, or until the other side is golden brown and the pancakes are cooked through.
- Check for Doneness: To check if the pancakes are cooked through, you can gently insert a toothpick into the center of one of the pancakes. If the toothpick comes out clean, the pancakes are done. If not, cook for another minute or two.
- Plate the Pancakes: Carefully transfer the pancakes to a plate.
- Garnish and Serve: Dust the pancakes with powdered sugar, drizzle with maple syrup, and top with fresh berries and whipped cream, if desired. Get creative and add your favorite toppings!
- Enjoy Immediately: These pancakes are best enjoyed right away, as they will start to deflate slightly as they cool. So grab a fork and dig in!
Notes
- Use room temperature eggs for better whipping.
- Don’t overmix the batter to avoid tough pancakes.
- Cook on low heat to ensure even cooking and prevent burning.
- Use a non-stick skillet for easy flipping.
- Be patient; these pancakes require time and effort.
- Serve immediately for the best texture.