Christmas Tree Cake Macarons Recipe Holiday Dessert – prepare to transform your holiday baking with a touch of nostalgia and gourmet elegance! Remember those iconic Little Debbie Christmas Tree Cakes, a beloved staple of festive cheer since the 1980s? That simple, delightful vanilla cake, adorned with green frosting, a red swirl, and festive sprinkles, holds a special place in so many hearts. Now, imagine capturing all that delightful holiday magic within the delicate, crisp shells of a perfectly baked macaron.
I know, it sounds like a dream! This isn’t just any treat; it’s a delightful homage to a cherished tradition, elevated to a sophisticated level that will truly impress your guests. People adore this dish because it marries the familiar, comforting flavors of a classic holiday snack—sweet vanilla, creamy filling, and a hint of festive flair—with the sophisticated texture of a French macaron: a crisp outer shell, a chewy almond interior, and a luscious buttercream filling. It’s the ultimate conversation starter and a guaranteed showstopper on any dessert table, offering both whimsy and refined taste.
This unique Christmas Tree Cake Macarons Recipe Holiday Dessert brings together the best of both worlds, offering a creation that is as delicious to eat as it is beautiful to behold. Get ready to embark on a truly joyful baking adventure!

Ingredients:
For the Macaron Shells:
- 100 grams almond flour: It is absolutely crucial to use super-fine almond flour for these delicate shells. I always take the extra step to sift it thoroughly, sometimes even twice, to ensure there are no coarse bits or lumps that could disrupt the smooth texture of our Christmas Tree Cake Macarons.
- 100 grams powdered sugar: Also known as confectioners’ sugar. Just like the almond flour, sifting this is non-negotiable. Lumps in the powdered sugar can lead to a less refined shell surface, and we’re aiming for that perfect, pristine look for our holiday dessert.
- 80 grams egg whites: This usually amounts to about 2-3 large egg whites. For the best results, I prefer to use “aged” egg whites, meaning I separate them a day or two in advance and store them covered in the refrigerator. Then, I make sure to bring them back to a true room temperature before whipping. Weighing is incredibly important here, as even a slight variation can affect the meringue’s stability.
- 100 grams granulated sugar: This is the sugar we’ll use to create our Italian meringue. It contributes to the macaron’s structure, stability, and that beautiful, glossy finish.
- Pinch of cream of tartar: (Optional, but I find it immensely helpful!) This acidic ingredient helps stabilize the egg whites, making your meringue stronger and less prone to collapsing, which is a big plus for macaron success.
- Green gel food coloring: To achieve that iconic Christmas tree hue! Gel colors are far superior to liquid colors because they provide vibrant saturation without adding excess moisture to your delicate macaron batter. A little goes a long way, so start small.
For the Christmas Tree Cake Buttercream Filling:
- 1 cup (226g) unsalted butter: Softened to true room temperature. This is perhaps the most important detail for a silky-smooth, lump-free buttercream. If it’s too cold, it won’t cream properly; if it’s too warm, your buttercream might separate.
- 3-4 cups (360-480g) powdered sugar: Again, sifting is key here! I usually start with 3 cups and then add more gradually, a tablespoon at a time, until I achieve my desired consistency and sweetness for the perfect Christmas Tree Cake Macarons filling.
- 2 teaspoons pure vanilla extract: I believe in using the best quality vanilla extract you can find. It truly makes a difference in the overall flavor profile and contributes significantly to that classic Christmas Tree Cake taste we’re aiming for.
- 2-4 tablespoons heavy cream or whole milk: This is what helps adjust the consistency of your buttercream. I always start with 2 tablespoons and add more slowly, mixing thoroughly after each addition, until the buttercream is light, fluffy, and perfectly pipeable.
- Pinch of salt: A small amount of salt is essential to balance out the sweetness of the buttercream, enhancing all the other flavors without making it taste salty.
- Green gel food coloring: If you wish for your filling to also be a festive green, matching or slightly contrasting with the shells. I personally love a pale green filling to tie everything together.
- Christmas-themed sprinkles: This is the fun part that truly brings the “Christmas Tree Cake” concept to life! I love a mix of red, green, and white nonpareils, jimmies, or even small star sprinkles for that festive touch.
Equipment You’ll Need:
- Kitchen scale (a non-negotiable for macarons – precision is everything!)
- Electric mixer (a stand mixer with a whisk attachment is ideal for consistent results)
- Fine-mesh sieve (for sifting dry ingredients)
- Piping bag with a large round tip (Wilton 1A or Ateco 808 for shells, a star tip like Wilton 1M for filling if desired)
- Baking sheets (heavy-gauge ones are best for even heat distribution)
- Silicone baking mats (macaron-specific ones with pre-printed circles are incredibly helpful, or good quality parchment paper)
- Rubber spatula (for macaronage)
Now that we have all our festive ingredients meticulously prepared, let’s embark on the delightful journey of creating these gorgeous Christmas Tree Cake Macarons!
Preparing the Macaron Shells
-
Prepare Your Workspace and Dry Ingredients:
Before I begin any serious baking, I always make sure my workspace is clean and organized. For macarons, this meticulousness is even more critical. I start by lining two large, heavy-gauge baking sheets with high-quality silicone baking mats. If you’re using parchment paper, I highly recommend either drawing or printing out a macaron template (approximately 1.5 inches in diameter, spaced about 1 inch apart) and placing it underneath the parchment. This template acts as your guide for piping consistently sized shells, which is absolutely vital for pairing them later. I also get my piping bag ready by fitting it with a large round tip (like an Ateco 808 or Wilton 1A) and setting it aside, perhaps standing upright in a tall glass for easy filling later.
Next, I focus on our dry ingredients. In a medium-sized bowl, I carefully weigh out 100 grams of super-fine almond flour and 100 grams of powdered sugar using my kitchen scale. Precision truly matters in macaron making, so avoid guessing or using volumetric measurements. Once weighed, I combine these two ingredients and sift them together through a fine-mesh sieve at least twice. I can’t stress this enough – sifting removes any lumps from the powdered sugar and ensures the almond flour is as fine as possible, which directly contributes to achieving that coveted smooth, unblemished macaron shell surface. Any leftover coarser bits in the sieve are discarded. This perfectly prepared dry mixture is set aside for later.
-
Whip Up the Green Meringue:
This is where the magic of the meringue truly unfolds! I ensure the bowl of my stand mixer (and the whisk attachment) is impeccably clean and completely dry – even a tiny speck of grease or water can prevent your egg whites from whipping properly. Into this bowl, I carefully measure and add 80 grams of room temperature egg whites. If you’ve aged your egg whites, bringing them to room temperature can take about 30 minutes to an hour. I start whipping the egg whites on medium-low speed until they become frothy and foamy, similar to bath bubbles. At this stage, I add a small pinch of cream of tartar. This optional but highly recommended ingredient helps to stabilize the meringue, giving it more strength and resilience.
With the mixer still running on medium-low, I begin to gradually add the 100 grams of granulated sugar. This is a slow and steady process; I add the sugar one tablespoon at a time, allowing each addition to fully dissolve into the egg whites before adding the next. This ensures that the sugar is properly incorporated, contributing to a stable and glossy meringue. Once all the sugar has been added, I increase the mixer speed to medium-high. I continue to whip the meringue until it reaches what’s known as “stiff peaks.” You’ll know it’s ready when the meringue is incredibly thick, glossy, and forms a firm, upright peak that holds its shape perfectly when you lift the whisk attachment. It should resemble melted marshmallow and be beautifully shiny. Now, it’s time to add our festive color! I incorporate a small amount of green gel food coloring, starting with just a tiny drop, and mix until the color is evenly distributed and I achieve a lovely, vibrant Christmas tree green. Be careful not to overmix at this stage, as it can cause the meringue to become dry and brittle.
-
The Macaronage – The Art of Folding:
This particular step, “macaronage,” is often considered the most critical and can be the trickiest for beginners. It’s all about achieving the perfect consistency for our macaron batter. I gently add about half of our previously sifted almond flour and powdered sugar mixture into the beautifully green meringue. Using a wide rubber spatula, I begin the folding process. The technique I employ involves scraping around the sides of the bowl, then cutting through the center, lifting from the bottom of the bowl, and folding the mixture over itself. I rotate the bowl with my free hand as I go, ensuring even incorporation.
Once the first half of the dry ingredients is mostly incorporated, I add the remaining dry mixture and continue the folding process. The goal here is to reach the elusive “lava” or “ribbon” stage. This means that when you lift your spatula, the macaron batter should flow off in a thick, continuous ribbon that slowly but steadily melts back into the rest of the batter within approximately 10 to 20 seconds. It should be fluid enough to pipe smoothly but not so runny that it spreads uncontrollably once piped. An under-mixed batter will be too stiff, resulting in shells that lack the characteristic “feet” and may be lumpy. Conversely, an over-mixed batter will be too liquid, leading to flat, cracked, or hollow macarons that spread excessively. This stage requires a keen eye and often a bit of practice to master, so pay close attention to the batter’s flow. I frequently scrape down the sides and bottom of the bowl to ensure everything is evenly incorporated.
-
Piping the Shells for Your Christmas Tree Cake Macarons:
With our perfectly macaronaged batter ready, it’s time to pipe! To make this step as mess-free as possible, I typically stand my prepared piping bag, tip-down, into a tall glass or pitcher and fold the top edges of the bag over the rim. This creates a wide opening, making it easy to spoon the delicate green macaron batter into the bag without waste. Once the bag is filled, I twist the top to secure the batter and remove any air pockets.
Now for the actual piping! I hold the piping bag strictly perpendicular (straight up and down) to the baking mat, about half an inch above the surface. I apply firm, consistent pressure to pipe even circles of batter onto my templates, aiming for approximately 1.5 inches in diameter. The trick is to apply pressure evenly, then, once the circle is formed, quickly flick your wrist upwards to stop the flow of batter cleanly. Don’t fret if tiny “noses” or peaks form on top; we’ll address those in the next step. I continue piping until all the batter is used, remembering to leave adequate space between each macaron to allow for spreading and foot development. Consistency in size is not just for aesthetics; it also ensures even baking and easy pairing later.
-
Tapping and Resting (The “Foot” Development):
This is a crucial step for achieving those iconic ruffled “feet” on your macarons and preventing unsightly cracks! Once all the green shells are piped onto the baking sheets, I firmly tap each baking sheet against the counter or a sturdy surface about 5-10 times. This vigorous tapping helps to release any trapped air bubbles within the macaron batter, which, if not released, can cause cracks during baking. After tapping, I also visually inspect each shell and use a clean toothpick to gently pop any remaining visible air bubbles on the surface. This ensures a smooth, beautiful top on our Christmas Tree Cake Macarons.
After the tapping and bubble-popping, it’s time for the shells to “rest” or “dry.” I leave the baking sheets uncovered on the counter in a dry area of my kitchen for anywhere from 30 minutes to 2 hours. The exact resting time is highly dependent on the humidity levels in your environment. You’ll know they are sufficiently rested and ready to bake when they develop a slight, dry skin on top. To test, I gently touch a macaron shell with my finger; if it feels dry to the touch and the batter doesn’t stick to my finger, they are ready. This skin is vital because it prevents the macaron from cracking in the oven and forces the rising air to escape from the bottom, creating those desirable ruffled feet. If your kitchen is particularly humid, this drying process might take longer, so patience is a virtue here!
-
Baking Your Christmas Tree Cake Macaron Shells:
While my beautiful green macaron shells are patiently resting, I preheat my oven to 300°F (150°C). It’s important to note that oven temperatures can vary significantly, so knowing your oven’s quirks is a huge advantage for macaron success. Some bakers might find success at slightly lower (285°F) or higher (325°F) temperatures; 300°F generally works best for my oven. Once the oven is fully preheated and the shells have developed their dry skin, I place one baking sheet at a time into the middle rack of the oven.
I bake the shells for approximately 12-16 minutes. It is absolutely critical that you do not open the oven door during the first 10 minutes of baking! Opening the door too early can cause a sudden drop in temperature, leading to cracked, deflated, or lopsided macarons. Around the 6-8 minute mark, you should observe the “feet” magically starting to form at the bottom of the shells – this is always an exciting moment! After about 12 minutes, I gently try to wiggle one of the shells on the silicone mat. If it moves easily or slides, it needs a few more minutes. If it feels firm and doesn’t budge from the mat, it’s likely done. Sometimes, I rotate the baking sheet halfway through baking to ensure even cooking and consistent color. The tops of the shells should be firm, not sticky, and the feet should be fully developed. Once baked to perfection, I carefully remove the baking sheets from the oven and immediately slide the silicone mats (or parchment paper) off onto a wire rack to allow the shells to cool completely. Attempting to remove warm macarons from the mat is a recipe for disaster, as they are very fragile and prone to breaking when hot.
Crafting the Christmas Tree Cake Buttercream Filling
While our gorgeous green macaron shells are cooling down, let’s turn our attention to preparing the irresistibly delicious filling that will truly make these taste like festive Christmas Tree Cake Macarons!
-
Prepare the Butter for a Fluffy Base:
In the bowl of my stand mixer fitted with the paddle attachment (a hand mixer in a large bowl works well too), I place 1 cup of unsalted butter that has been softened to true room temperature. This is a crucial detail for achieving a smooth, lump-free buttercream. The butter should be soft enough that you can easily indent it with your finger, but not melted or greasy. I beat the butter on medium speed for about 2-3 minutes until it transforms into a wonderfully light, fluffy, and noticeably pale yellow consistency. This initial creaming process is vital as it incorporates air, which makes our buttercream incredibly light and airy.
-
Incorporate Powdered Sugar and Vanilla Flavor:
Next, I reduce the mixer speed to low. I then gradually add the sifted powdered sugar, one cup at a time. Sifting the powdered sugar is absolutely non-negotiable here; it prevents any pesky lumps from forming in your otherwise smooth buttercream. After each cup of sugar is incorporated, I make sure to pause and scrape down the sides and bottom of the bowl with my rubber spatula to ensure everything is thoroughly mixed. Once I’ve added about 3 cups of powdered sugar, I introduce the 2 teaspoons of pure vanilla extract. This is where that signature Christmas Tree Cake flavor really starts to shine through! I also add a tiny pinch of salt to balance the sweetness, enhancing all the other flavors.
-
Achieve the Perfect Christmas Tree Cake Consistency:
Now, I slowly begin to add the heavy cream or whole milk, starting with 2 tablespoons. After adding the cream, I increase the mixer speed back to medium-high and continue to beat the mixture for another 3-5 minutes. This prolonged beating helps to whip air into the buttercream, making it wonderfully light and fluffy, much like the filling in the iconic snack cake. I’m looking for a buttercream that is smooth, creamy, and holds its shape beautifully for piping. If the buttercream feels too stiff, I add more heavy cream, one tablespoon at a time, until I reach my desired, pipeable consistency. If it turns out a little too thin, a tablespoon or two of additional sifted powdered sugar can help to thicken it. For a truly festive touch for our Christmas Tree Cake Macarons, I then add a small amount of green gel food coloring to the buttercream and mix until the color is uniformly distributed, creating a lovely, pale green filling that evokes the holiday spirit.
-
Prepare for Piping the Filling:
Once the buttercream has reached its ideal consistency and color, I carefully transfer it into a piping bag. For the filling, I often like to use a star tip, such as a Wilton 1M, to create a pretty swirl that adds a touch of elegance to the macaron. Alternatively, a simple round tip works perfectly well for a cleaner, more classic look. I set the filled piping bag aside until our beautiful macaron shells are completely cool, ensuring everything is ready for assembly.
Assembling and Decorating Your Christmas Tree Cake Macarons
The moment has finally arrived – bringing all these festive components together to create our breathtaking and delicious Christmas Tree Cake Macarons!
-
Pairing the Macaron Shells:
Before any filling begins, I make absolutely certain that my macaron shells are completely, utterly cool. This is a crucial step; attempting to fill warm shells will cause them to sweat, potentially ruining their delicate texture and making them soggy. Once cool, I gently peel each shell off the silicone mats. Then, I embark on the task of pairing them up. I lay all the shells out and meticulously match them into pairs of similar size and shape. This careful pairing ensures that each finished macaron looks uniform, professional, and is a joy to behold. I always try to find the closest possible matches for a perfect presentation.
-
Filling the Festive Macarons:
Now for the delicious part! I take one of my matched green macaron shells and place it flat side up. With my piping bag filled with our glorious green Christmas Tree Cake buttercream, I pipe a generous dollop onto the center of the flat side of the shell. You have creative freedom here – you can pipe a simple mound, a graceful swirl, or even a neat ring around the edge, leaving the very center hollow if you desire. Don’t be shy with the filling; a good amount of buttercream is part of the luxurious macaron experience! Once the buttercream is piped, I gently take the second matched shell and place it on top, flat side down, pressing very lightly until the buttercream spreads just to the edges of the shells. It’s important to be gentle here to avoid cracking your beautiful, delicate shells.
-
Decorating for the Iconic Christmas Tree Cake Look:
This is the fun and distinctive step that transforms these into true Christmas Tree Cake Macarons! While the buttercream is still soft and before it has a chance to set, I immediately roll the edges of the filled macaron in our festive Christmas-themed sprinkles. Alternatively, you can carefully sprinkle them directly over the top and sides of the macaron if you prefer. This step not only gives them an incredibly festive and appealing visual flair but also adds a delightful textural crunch that perfectly mimics the original, beloved snack cake. If I’m feeling extra ambitious and want to go above and beyond, I might melt a tiny bit of white chocolate and drizzle it decoratively over the top of the macaron, then finish with a delicate star sprinkle, just like the star atop a Christmas tree. This extra detail truly elevates our holiday dessert to a next-level charming creation.
-
Maturing Your Christmas Tree Cake Macarons:
While it’s incredibly tempting to devour these glorious creations right away, I wholeheartedly recommend a period of “maturing.” After assembling and decorating all your macarons, place them in an airtight container and store them in the refrigerator for at least 12-24 hours. During this maturing time, the moisture from the delicious buttercream filling will slowly migrate into the delicate macaron shells, causing them to soften ever so slightly. This process results in that perfect, slightly chewy, and melt-in-your-mouth texture that macaron connoisseurs adore. This step truly transforms them from simply good to absolutely incredible! After maturing, remember to bring them back to room temperature for about 15-20 minutes before serving for the absolute best flavor and texture experience.
And there you have it! A spectacular batch of homemade Christmas Tree Cake Macarons, meticulously crafted and bursting with holiday cheer. These are truly perfect for sharing with loved ones, gifting in festive boxes, or simply enjoying as a delightful holiday dessert with a warm cup of tea or coffee during the joyous Christmas season. Happy baking, and enjoy every exquisite bite!
Conclusion:
And there you have it, fellow bakers! We’ve journeyed through the delightful process of creating something truly magical and utterly unforgettable. If you’ve been searching for that quintessential holiday treat that not only tastes divine but also captivates with its charm, then look no further. This isn’t just another dessert; it’s an experience, a miniature edible masterpiece that brings the spirit of the season right to your taste buds and your table. I genuinely believe this recipe is a true game-changer for your festive celebrations, offering a homemade touch that store-bought treats simply can’t match.
What makes this particular creation a non-negotiable addition to your holiday baking repertoire? Firstly, the sheer joy of seeing those perfectly crisp yet chewy macaron shells, adorned with festive sprinkles, emerge from your oven is unparalleled. Then comes the glorious moment of biting into the delicate outer shell, giving way to that rich, creamy filling—a symphony of textures and flavors that dances on your palate. It’s the perfect balance of sweetness, the subtle almond flavor of the shells, and the indulgent filling that truly elevates these treats. They possess an almost ethereal quality, light yet satisfying, making them an ideal indulgence without being overly heavy.
This recipe truly delivers on all fronts: visual appeal, incredible taste, and the immense satisfaction of creating something so professional-looking right in your own kitchen. It’s an opportunity to impress your friends and family with your culinary prowess, all while embracing the warmth and generosity of the holiday season. Imagine the gasps of delight when these beauties are presented! They’re not just desserts; they’re conversation starters, tiny parcels of happiness that embody the festive spirit.
Now, let’s talk about enjoying and perhaps even personalizing these delightful creations. While they are undoubtedly magnificent served as is, perhaps alongside a steaming mug of hot cocoa or a festive spiced tea, there are countless ways to make them even more special. Consider arranging them on a tiered dessert stand for a truly show-stopping display at your holiday gathering. They make absolutely wonderful edible gifts, carefully packaged in clear boxes tied with a festive ribbon – a handmade present that speaks volumes about your care and effort. Trust me, anyone receiving a box of these will feel incredibly cherished.
Creative Variations to Explore:
Don’t be afraid to experiment a little! While the classic rendition is always a winner, you could try different fillings. A peppermint buttercream would introduce a refreshing zing, or a rich chocolate ganache could add an extra layer of decadence. For a fruity twist, a dollop of raspberry jam could be swirled into the buttercream, offering a lovely contrast. You could even play with the colors of your shells – a pastel green or a delicate pink could be lovely, perhaps with different sprinkle motifs to match various festive themes beyond the classic. For those who love a bit of sparkle, edible glitter dusted over the finished macarons before the filling sets completely can add an extra touch of magic. Think about alternating the sprinkle colors or shapes too; mini stars or snowflakes could be delightful alternatives to traditional rounds.
I wholeheartedly encourage you to roll up your sleeves and give this recipe a try this holiday season. It might seem a little daunting at first, especially if you’re new to macaron making, but I promise the reward is absolutely worth every minute of effort. There’s a profound sense of accomplishment that comes with perfecting these delicate treats. Don’t stress over perfection on your first attempt; the beauty is in the process and the delicious outcome! Each macaron you create is a testament to your passion for baking.
Once you’ve successfully crafted your batch, please don’t keep it a secret! I’d love to see your beautiful creations and hear about your baking journey. Share your photos and experiences on social media, tag me, and let me know how they turned out. Did you try a unique variation? What was the most delightful part of making them? Your feedback and shared joy truly inspire me and our entire baking community.
So, go forth and bake with glee! Unleash your inner pastry chef and delight your loved ones with this truly exceptional Christmas Tree Cake Macarons Recipe Holiday Dessert. It’s more than just a sweet treat; it’s a moment of shared joy, a splash of festive cheer, and a delicious tradition waiting to be born in your home. Happy baking, and happy holidays!
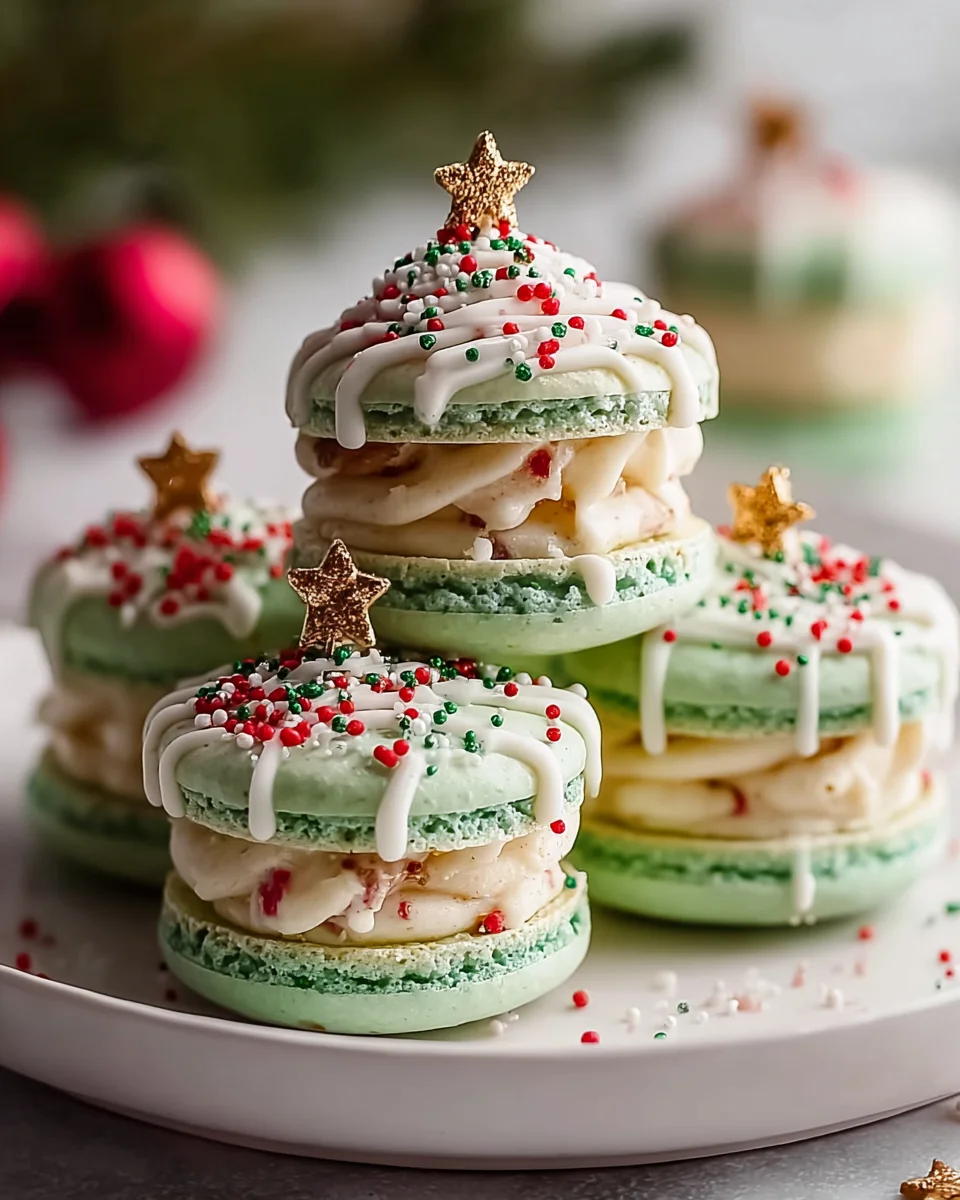
Festive Christmas Tree Cake Macarons: Perfect Holiday Sweet
Prepare a delightful holiday dessert with these Christmas Tree Cake Macarons, capturing the nostalgic flavors of the beloved festive snack in sophisticated French macaron form. Featuring sweet vanilla shells, creamy buttercream with real cake crumbles, and festive sprinkles, these are a true showstopper.
Ingredients
Instructions
Important Information
Nutrition Facts (Per Serving)
It is important to consider this information as approximate and not to use it as definitive health advice.
Allergy Information
Please check ingredients for potential allergens and consult a health professional if in doubt.