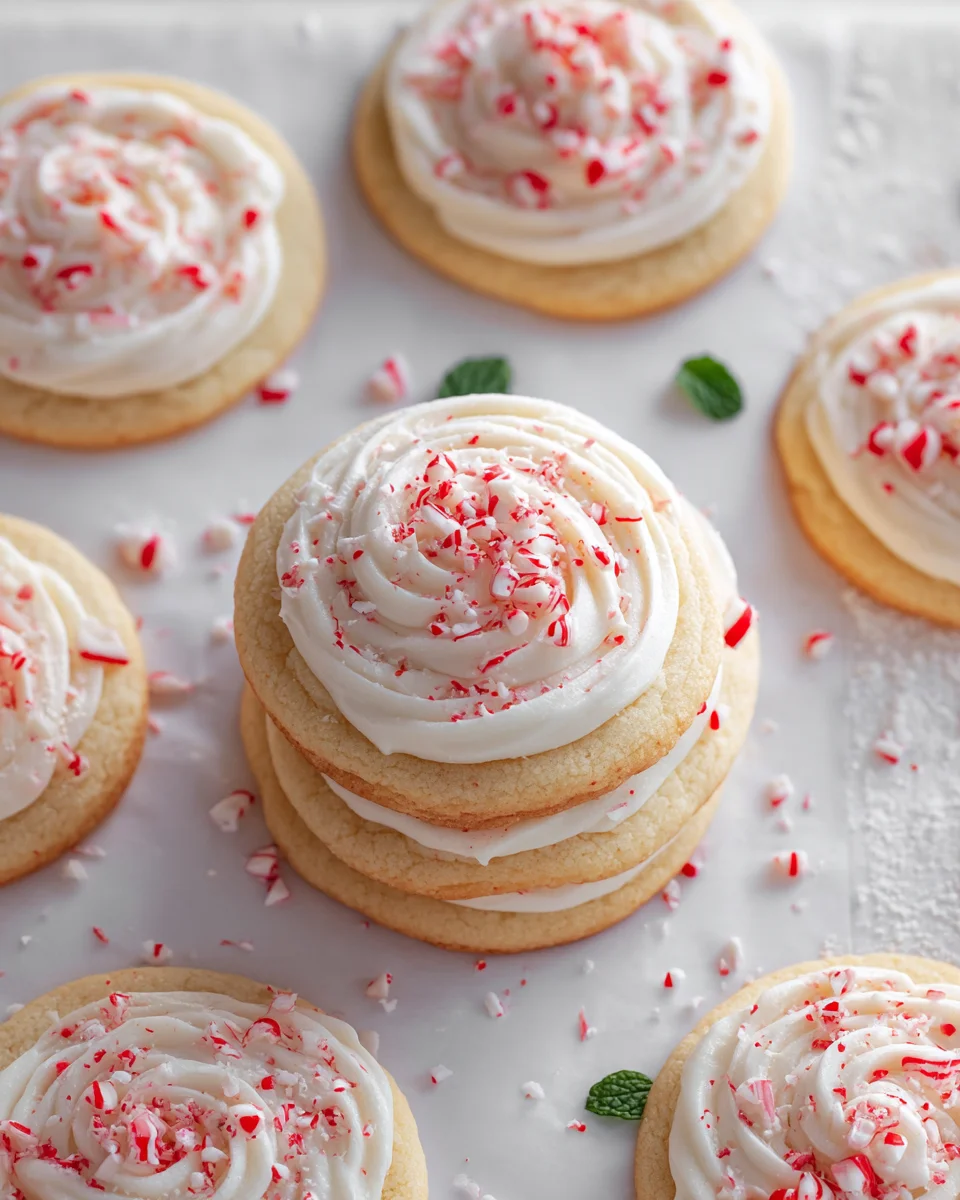
Easy Christmas Peppermint Sugar Cookies
Oh, the holidays! There’s just something magical about this time of year, and what better way to celebrate than with a batch of freshly baked cookies? Today, I’m so excited to share my recipe for Easy Christmas Peppermint Sugar Cookies! This isn’t just any sugar cookie recipe; it’s specifically crafted to bring that joyous, festive cheer right into your kitchen with minimal fuss.
What makes these cookies so special, you ask? Well, for starters, the “easy” in the name isn’t just for show! I’ve streamlined the process so you can get from mixing bowl to delicious cookie in no time, making them perfect for busy holiday schedules or spontaneous baking urges. But the real magic comes from the delightful peppermint twist on a classic sugar cookie. Imagine that wonderfully tender, buttery sugar cookie base, now infused with the cool, refreshing burst of peppermint – it’s a match made in Christmas heaven! We’ll be decking them out with a simple glaze and a sprinkling of crushed candy canes, making them as beautiful to look at as they are to eat.
I know you’re going to absolutely love these because they capture the very essence of Christmas in every bite. They’re perfect for cookie exchanges, gifting to neighbors, leaving out for Santa, or simply enjoying with a warm mug of hot cocoa by the fireplace. They’re incredibly festive, wonderfully easy, and undeniably delicious. Get ready to fill your home with the most incredible holiday aroma and spread some serious cheer with these delightful peppermint gems!

Ingredient Notes
Creating these delightful Easy Christmas Peppermint Sugar Cookies starts with understanding the stars of the show – our ingredients! Each one plays a crucial role in achieving that perfect balance of crisp edges, soft centers, and festive peppermint flavor. Here’s a quick rundown of what you’ll need and a few ideas for substitutions, just in case.
Unsalted Butter: This is the foundation of our cookies, providing richness and tenderness. I always recommend using unsalted butter so you can control the salt level yourself. Make sure it’s softened to room temperature – not melted – for easy creaming with the sugar. If you need a dairy-free alternative, a good quality plant-based butter substitute (look for stick form) can work wonders, though the texture might be slightly different. Avoid margarine with a high water content, as it can affect the spread of the cookies.
Granulated Sugar: Our primary sweetener, granulated sugar helps create that signature crisp edge and aids in browning. While you could technically reduce the sugar slightly, I find the amount specified creates the ideal sweetness without being cloying, especially with the peppermint. For a slightly softer cookie, you could experiment with a small amount of powdered sugar, but granulated is best for the classic sugar cookie texture.
Large Egg: The egg acts as a binder, lending structure and richness to the dough. It also contributes to the chewy texture we love. If you’re looking for a vegan alternative, a “flax egg” (1 tablespoon ground flaxseed meal mixed with 3 tablespoons water, allowed to sit for 5 minutes until gel-like) can often be used as a substitute for one egg in cookie recipes. Just be aware that it might alter the final texture slightly.
Vanilla Extract: A classic for a reason! Vanilla enhances all the other flavors in the cookie. Use a good quality pure vanilla extract for the best results. While not strictly necessary with the strong peppermint, it provides a lovely background note. If you’re out, a touch of almond extract can be an interesting twist, but peppermint is the star here.
Peppermint Extract: This is where the Christmas magic happens! Pure peppermint extract is essential for that unmistakable festive flavor. Make sure you’re using peppermint, not spearmint. I always start with the recommended amount and then taste a tiny bit of the raw dough (before adding egg, just a pinch!) to see if I want to add a tiny bit more, as extract strengths can vary. Look for non-alcoholic versions if you prefer to avoid alcohol-based extracts, though most standard baking extracts use alcohol as a carrier.
All-Purpose Flour: The backbone of our cookies. Make sure to measure it correctly – either by weight (my preferred method!) or by spooning it into your measuring cup and leveling it off, rather than scooping directly from the bag, which can compact the flour and lead to dry, crumbly cookies. For a gluten-free option, a good 1:1 gluten-free baking blend that contains xanthan gum usually works well in sugar cookie recipes.
Baking Powder: Just a touch of baking powder gives our cookies a slight lift, ensuring they’re not too dense. It helps create that tender crumb. Don’t confuse it with baking soda; they react differently!
Salt: A pinch of salt is vital for balancing the sweetness and enhancing all the flavors. Don’t skip it!
Red Food Coloring (Optional): For that extra festive touch! I like to add a few drops of gel food coloring to create a beautiful swirl or a light pink hue. Gel food coloring provides more vibrant color without adding excess liquid to your dough. You can easily omit it if you prefer plain white cookies or green for another festive look!
Crushed Candy Canes: The perfect garnish and an extra burst of peppermint crunch! I prefer to crush them right before decorating so they don’t absorb too much moisture from the air. You can use mini candy canes or regular-sized ones. If you can’t find candy canes, any peppermint hard candy will work, or even peppermint baking chips.
Step-by-Step Instructions
Let’s get baking! These Easy Christmas Peppermint Sugar Cookies come together quite simply, but a few key steps will ensure they turn out perfectly every time. Follow along with me:
Step 1: Cream Wet Ingredients
In a large mixing bowl, either with a stand mixer fitted with the paddle attachment or using a hand mixer, cream together your softened unsalted butter and granulated sugar. You want to beat this mixture until it’s light and fluffy, about 2-3 minutes. This process incorporates air, which contributes to the cookies’ texture.
Step 2: Add Egg and Extracts
Scrape down the sides of the bowl. Then, crack in your large egg, add the vanilla extract, and most importantly, the peppermint extract. Beat again until everything is just combined. Be careful not to overmix at this stage; we just want it homogeneous. If you’re adding red food coloring for a swirled or lightly colored dough, now is the time to add a few drops and mix until you reach your desired hue.
Step 3: Combine Dry Ingredients
In a separate medium bowl, whisk together your all-purpose flour, baking powder, and salt. Whisking ensures these dry ingredients are evenly distributed, preventing pockets of leavening agent in your cookies.
Step 4: Gradually Add Dry to Wet
With the mixer on low speed, gradually add the dry ingredient mixture to the wet ingredients, a third at a time. Mix only until just combined and a soft dough forms. It’s crucial not to overmix the dough once the flour is added, as this can develop the gluten too much, leading to tough cookies. As soon as you see no more streaks of flour, stop the mixer.
Step 5: Chill the Dough (Crucial!)
Divide the dough into two equal portions. Gently flatten each portion into a disk, wrap tightly in plastic wrap, and refrigerate for at least 1 hour, or up to 2 days. Chilling the dough helps firm up the butter, which prevents the cookies from spreading too much during baking, ensuring they hold their shape beautifully. It also makes the dough much easier to handle when rolling.
Step 6: Preheat and Prepare Baking Sheets
Once your dough is sufficiently chilled, preheat your oven to 375°F (190°C). Line two baking sheets with parchment paper or silicone baking mats. This prevents sticking and makes cleanup a breeze.
Step 7: Roll and Cut Cookies
On a lightly floured surface, unwrap one disk of chilled dough. Roll it out to about ¼-inch thickness. Using your favorite Christmas-themed cookie cutters (stars, trees, snowflakes, candy canes!), cut out your shapes. Carefully transfer the cut-out cookies to your prepared baking sheets, leaving about 1-2 inches between each cookie. Re-roll any dough scraps, being careful not to overwork the dough, until all dough is used. If the dough gets too warm and sticky, pop it back in the fridge for 10-15 minutes.
Step 8: Bake the Cookies
Bake for 8-10 minutes, or until the edges are lightly golden and the centers are just set. Do not overbake! For perfectly soft sugar cookies, you want them to look barely done in the middle. The baking time will vary depending on the size and thickness of your cookies, so keep a close eye on them.
Step 9: Cool and Decorate
Once baked, let the cookies cool on the baking sheets for 5 minutes before carefully transferring them to a wire rack to cool completely. Once fully cooled, they are ready for decorating! I love to make a simple peppermint glaze (powdered sugar, a touch of milk, and a drop of peppermint extract) and then sprinkle generously with crushed candy canes. Get creative and have fun!
Tips & Suggestions
Making these Easy Christmas Peppermint Sugar Cookies is a joy, and with a few extra pointers, you can elevate your baking experience and ensure fantastic results every time. Here are my favorite tips and suggestions:
- Don’t Overmix the Dough: This is probably the most crucial tip for any sugar cookie. Once you add the flour, mix only until just combined. Overmixing develops the gluten, leading to tough, dense cookies instead of the tender, melt-in-your-mouth texture we’re aiming for.
- Chill Your Dough Thoroughly: I cannot stress this enough! Chilled dough is much easier to work with; it rolls out beautifully without sticking and, most importantly, prevents your cookies from spreading too much in the oven. This ensures your festive shapes stay crisp and defined. If your kitchen is warm, you might even pop your cut-out cookies back into the fridge for 5-10 minutes before baking.
- Roll Dough to Even Thickness: For consistent baking and texture, try to roll your dough to an even ¼-inch thickness. This prevents some cookies from burning while others are underbaked. A rolling pin with thickness guides can be a real game-changer here!
- Use Parchment Paper: Always line your baking sheets with parchment paper or silicone baking mats. Not only does it prevent sticking, but it also promotes even baking and makes cleanup a breeze.
- Don’t Overbake: Sugar cookies are best when they are just set. Look for lightly golden edges and centers that still appear slightly soft. They will continue to firm up as they cool on the baking sheet. Overbaking leads to dry, crumbly cookies.
- For Vibrant Red Color: If you want truly vibrant red or pink cookies, I highly recommend using gel food coloring. It delivers intense color without adding excess liquid to your dough, which can alter its consistency. Add it gradually until you achieve your desired shade.
- Crushing Candy Canes: The easiest way to crush candy canes without a mess is to place them in a zip-top bag, seal it, and then gently tap them with a rolling pin or the bottom of a heavy pan. Don’t pulverize them too finely; a mix of coarse and fine pieces adds great texture. Crush them just before decorating for the best look and crunch, as they can absorb moisture from the air and get sticky.
- Peppermint Glaze: A simple glaze of powdered sugar, a few drops of milk (or water), and a touch of peppermint extract makes a fantastic, easy frosting. Adjust the liquid to your desired consistency – thick for piping, thin for drizzling.
- Get Creative with Cutters: This is the perfect recipe to break out all your favorite Christmas cookie cutters! From classic stars and trees to reindeer and gingerbread men, the possibilities are endless.
- Gift Giving: These cookies make wonderful homemade gifts! Once cooled and decorated, layer them in festive tins or boxes with parchment paper in between layers to prevent sticking and breakage. They’re a truly personal and delicious holiday treat.
Storage
Proper storage is key to keeping your Easy Christmas Peppermint Sugar Cookies fresh, flavorful, and perfectly crunchy (or soft, depending on your preference!). Here’s how I recommend storing them to ensure they last through the holiday season:
Unbaked Dough:
- Refrigerator: The unbaked cookie dough can be stored tightly wrapped in plastic wrap in the refrigerator for up to 2-3 days. This is great for making ahead! Just allow it to warm up slightly on the counter for about 10-15 minutes before rolling if it’s too firm.
- Freezer: For longer storage, wrap the dough disks in plastic wrap, then place them in an airtight freezer-safe bag or container. It will keep well in the freezer for up to 3 months. When you’re ready to bake, transfer the dough to the refrigerator overnight to thaw, then proceed with rolling and baking as usual.
Baked Cookies (Undecorated):
- Room Temperature: Once completely cooled, store undecorated peppermint sugar cookies in an airtight container at room temperature for up to 5-7 days. To maintain their texture, you can place a slice of bread in the container; the cookies will absorb moisture from the bread, keeping them softer.
- Freezer: Fully baked and completely cooled undecorated cookies freeze wonderfully. Place them in a single layer on a baking sheet and freeze until solid (this prevents them from sticking together). Then, transfer them to a freezer-safe airtight container or bag, separating layers with parchment paper. They will keep for up to 3 months. Thaw at room temperature before decorating.
Baked Cookies (Decorated with Glaze and Crushed Candy Canes):
- Room Temperature: Cookies decorated with a simple glaze and crushed candy canes are best stored in an airtight container at room temperature. They will typically stay fresh for 3-5 days.
- A Note on Candy Canes: Crushed candy canes, especially in humid environments, can start to melt and get sticky after a day or two when exposed to air or moisture from the glaze. To minimize this, you can store decorated cookies with candy canes in an airtight container, and ideally, only decorate with candy canes just before serving or gifting if you want them to be perfectly crisp. If you are making them several days in advance, you might consider omitting the candy canes from the top and just adding peppermint extract to the glaze for flavor, or decorating them closer to when they will be enjoyed.
- Avoid Refrigeration for Decorated Cookies: I generally advise against refrigerating decorated sugar cookies, as the moisture in the fridge can cause glazes to become sticky and dull, and candy canes to dissolve. Room temperature is usually best for decorated sugar cookies.
No matter how you store them, always ensure your cookies are completely cool before packaging them to prevent condensation, which can lead to soggy cookies or a melted glaze.
Final Thoughts
And there you have it! I truly believe these Easy Christmas Peppermint Sugar Cookies are an absolute must-try for your holiday baking this year. What I adore about this recipe is how it perfectly blends the timeless comfort of a classic sugar cookie with that invigorating burst of peppermint, all while keeping things wonderfully simple. You don’t need to be a seasoned baker to create these festive treats, which means more time for enjoying the magic of the season with loved ones. They’re not just cookies; they’re little edible expressions of Christmas joy, guaranteed to bring smiles and fill your home with the most delightful aroma. Go ahead and bake a batch of these Easy Christmas Peppermint Sugar Cookies – I promise, they’ll become a beloved part of your holiday tradition!
Easy Christmas Peppermint Sugar Cookies: Festive & Delicious

Celebrate the holidays with these delightful Easy Christmas Peppermint Sugar Cookies! Infused with a refreshing peppermint twist, they are perfect for cookie exchanges and festive gatherings.
- Prep Time: 30 mins
- Cook Time: 10 mins
- Total Time: 40 minutes
- Yield: 24 cookies 1x
- Category: Dessert
- Method: Baking
- Cuisine: American
Ingredients
- 1 cup Unsalted Butter, softened
- 1 cup Granulated Sugar
- 1 Large Egg
- 1 teaspoon Vanilla Extract
- 1 teaspoon Peppermint Extract
- 2 ½ cups All-Purpose Flour
- 1 teaspoon Baking Powder
- ½ teaspoon Salt
- Red Food Coloring (Optional)
- Crushed Candy Canes, for garnish
Instructions
- In a large mixing bowl, cream together your softened unsalted butter and granulated sugar until light and fluffy, about 2-3 minutes.
- Scrape down the sides of the bowl, then add the large egg, vanilla extract, and peppermint extract. Beat until just combined.
- In a separate medium bowl, whisk together the all-purpose flour, baking powder, and salt.
- With the mixer on low speed, gradually add the dry ingredient mixture to the wet ingredients, mixing only until just combined.
- Divide the dough into two equal portions, flatten each into a disk, wrap in plastic wrap, and refrigerate for at least 1 hour.
- Preheat your oven to 375°F (190°C) and line two baking sheets with parchment paper.
- On a lightly floured surface, roll out one disk of chilled dough to about ¼-inch thickness and cut out shapes with cookie cutters. Transfer to the prepared baking sheets.
- Bake for 8-10 minutes, or until the edges are lightly golden and the centers are just set.
- Let the cookies cool on the baking sheets for 5 minutes, then transfer to a wire rack to cool completely. Decorate with a peppermint glaze and sprinkle with crushed candy canes.
Nutrition
- Serving Size: 1 cookie
- Calories: 120
- Sugar: 10 g
- Sodium: 50 mg
- Fat: 6 g
- Saturated Fat: 4 g
- Unsaturated Fat: 2 g
- Trans Fat: 0 g
- Carbohydrates: 15 g
- Fiber: 0 g
- Protein: 1 g
- Cholesterol: 20 mg
Keywords: Don't overmix the dough after adding flour, and ensure to chill the dough thoroughly to prevent spreading. Use gel food coloring for vibrant colors and crush candy canes just before decorating for the best texture.