As a child, summer afternoons at my grandmother’s house always felt like pure magic. I remember sitting on her porch, the sun streaming down, while she introduced me to her latest culinary creation: mint chocolate chip cake pops. The smell of fresh mint mingled with rich chocolate wafted through the air, tempting my taste buds and sparking my curiosity. With every bite, the creamy cake and the playful crunch of chocolate chips danced on my palate, and I knew I had stumbled upon something truly special.
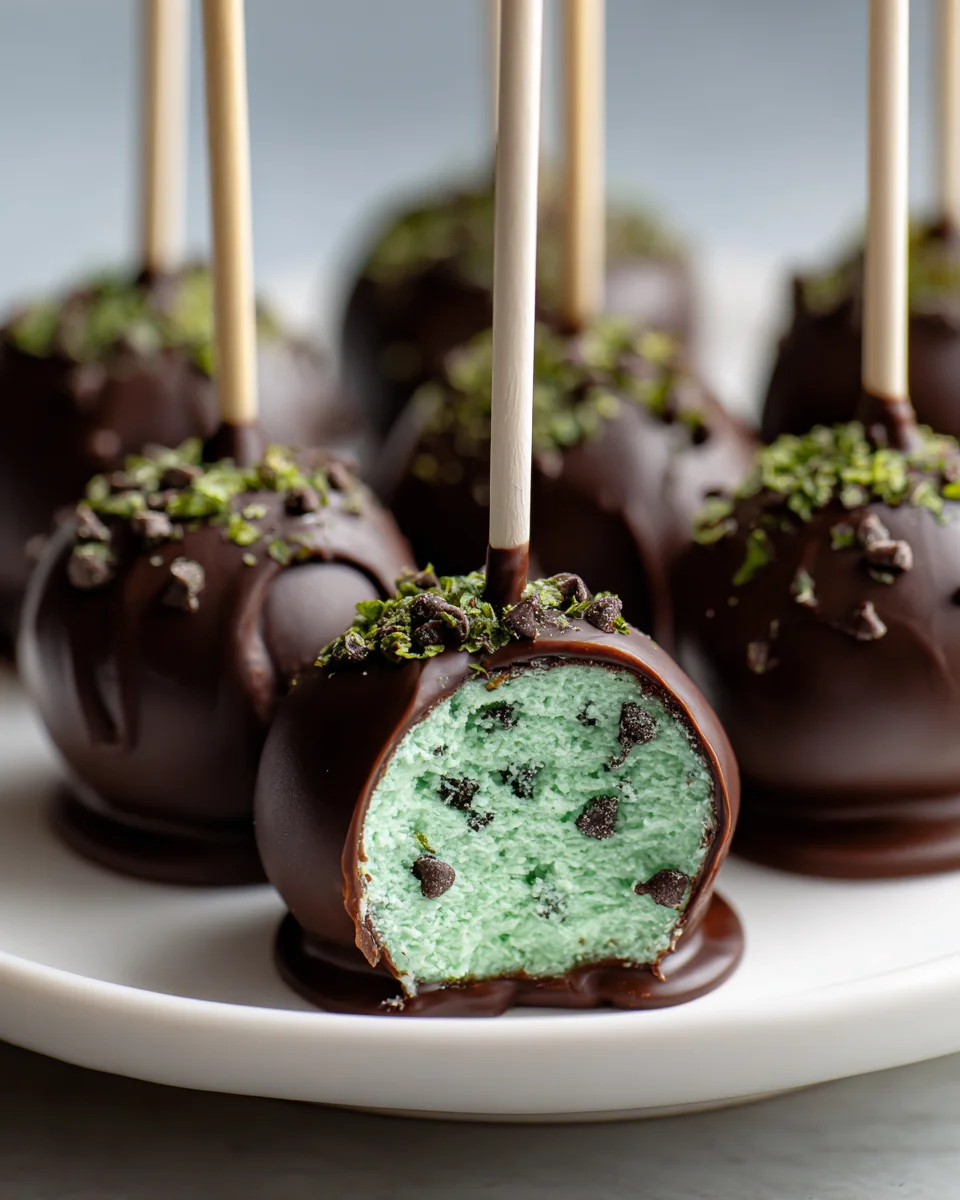
Fast forward to today, and I still think about those delightful treats. My version of mint chocolate chip cake pops captures that same nostalgic joy, but with a twist. Each pop is lovingly crafted with a moist mint-infused cake that’s rolled into perfect little spheres, then dipped in a rich chocolate coating. As you take a bite, the refreshing mint flavor bursts forth, harmonizing beautifully with the smooth, velvety chocolate. I’ve added a hint of vanilla to elevate the flavor and a sprinkle of crushed chocolate chips for that extra crunch.
These cake pops are not just a dessert; they’re a celebration of memories, a way to bring a piece of my childhood into the present. Whether for a party or a cozy afternoon treat, they are sure to brighten anyone’s day. So, let me show you exactly how to make them!

Why You’ll Love This Recipe
- These Mint Chocolate Chip Cake Pops are a delightful combination of rich chocolate cake and refreshing mint flavor, creating a unique and satisfying dessert.
- They can be made in under an hour, and with minimal equipment, you’ll only have a mixing bowl and a baking tray to clean!
- The cake pops have a moist, tender crumb that perfectly complements the creamy frosting, making each bite a flavor explosion.
- Budget-friendly ingredients ensure you can whip up these treats without breaking the bank, making them perfect for parties or just a sweet indulgence at home.
- The festive green color of the frosting and the decorative chocolate chips make these cake pops visually appealing, perfect for any celebration!
Ingredients
- For the Cake:
- 1 ½ cups all-purpose flour
- 1 cup granulated sugar
- ½ cup unsweetened cocoa powder
- 1 ½ teaspoons baking powder
- ½ teaspoon baking soda
- ½ teaspoon salt
- ½ cup unsalted butter, softened
- 2 large eggs
- 1 teaspoon pure vanilla extract
- ½ teaspoon peppermint extract
- 1 cup buttermilk
- For the Frosting:
- 1 cup unsweetened butter, softened
- 4 cups powdered sugar
- ¼ cup heavy cream
- 1 teaspoon pure vanilla extract
- ½ teaspoon peppermint extract
- ½ cup mini chocolate chips
- Green food coloring (optional, for color)
- For the Coating:
- 12 oz. dark chocolate or chocolate candy coating (such as Merckens or Wilton)
- 2 tablespoons coconut oil (optional, for thinning chocolate)
- Extra mini chocolate chips (for decoration)
- For Assembly:
- 12 to 15 lollipop sticks
- Styrofoam block or cake pop stand for drying
Now let’s dive into some key ingredients. The all-purpose flour is the backbone of the cake, providing structure and stability. For a gluten-free option, you can substitute it with a 1:1 gluten-free flour blend. The unsweetened cocoa powder adds that essential chocolatey flavor; I always recommend using high-quality cocoa for the best taste. Buttermilk is crucial for moisture and a tender crumb, and if you don’t have it on hand, you can easily make a substitute by mixing milk with a tablespoon of vinegar and letting it sit for about 5 minutes. The mini chocolate chips in the frosting not only add flavor but also a delightful texture contrast, so using semi-sweet for that balance of sweetness can elevate the overall taste.
Step-by-Step Instructions
- Preheat your oven to 350°F (175°C). Grease a 9×13 inch baking pan with cooking spray or line it with parchment paper to prevent sticking.
- In a large bowl, whisk together the flour, sugar, cocoa powder, baking powder, baking soda, and salt until well combined. This will ensure your dry ingredients are evenly distributed.
- In a separate bowl, beat the softened butter with an electric mixer on medium speed for about 2 minutes until creamy. This step is essential for incorporating air into the butter, which will help your cake rise.
- Add the eggs, vanilla extract, and peppermint extract to the butter mixture. Beat on medium speed for another 2 minutes until the mixture is smooth and light in color.
- Gradually mix in half of the dry ingredients into the butter mixture, followed by the buttermilk. Alternate adding the remaining dry ingredients and buttermilk, mixing until just combined. Avoid over-mixing at this stage — stop as soon as you no longer see dry flour.
- Pour the batter into the prepared baking pan and spread it evenly. Bake for 25-30 minutes, or until a toothpick inserted into the center comes out clean. The top should be set and slightly springy to the touch.
- Once baked, remove the cake from the oven and let it cool in the pan for about 10 minutes before transferring it to a wire rack to cool completely.
- While the cake cools, prepare the frosting. In a large bowl, beat the softened butter until creamy. Gradually add the powdered sugar, mixing on low speed until combined.
- Pour in the heavy cream, vanilla extract, and peppermint extract. Beat on medium-high speed for about 3-4 minutes until the frosting is light and fluffy. Mix in the mini chocolate chips and green food coloring, if using.
- Once the cake is completely cooled, crumble it into a large bowl. Add half of the frosting to the crumbled cake and mix until fully incorporated. You want the mixture to hold together but not be overly wet. If necessary, add more frosting a tablespoon at a time.
- Using your hands, form the mixture into 1-inch balls and place them on a parchment-lined baking sheet. Once all the balls are formed, chill them in the refrigerator for about 30 minutes until firm.
- While the cake balls chill, melt the chocolate or candy coating in a microwave-safe bowl in 30-second intervals, stirring in between, until fully melted and smooth. If you’re using coconut oil for thinning, add it in at this stage.
- Remove the cake balls from the fridge. Dip the tip of each lollipop stick into the melted chocolate, then insert it into the center of a cake ball. This helps keep the stick in place.
- Dunk each cake pop into the melted chocolate, ensuring it’s fully coated. Tap the stick gently against the bowl to remove excess chocolate.
- Sprinkle extra mini chocolate chips on top for decoration while the chocolate is still wet. Place the coated pops upright in a styrofoam block or cake pop stand to set. Allow the chocolate to harden completely before serving.
Pro Tips for the Best Mint Chocolate Chip Cake Pops
- One common mistake is not letting the cake cool completely before crumbling; if it’s warm, it can lead to a gooey mixture that’s hard to shape. Be patient!
- For the best results, use a food scale to measure your flour and sugar. Too much can lead to a dense cake, while too little may not hold together.
- When melting the chocolate for coating, ensure your bowl is completely dry. Even a drop of water can cause the chocolate to seize up, ruining the smooth texture.
- Experiment with different chocolate types for coating. White chocolate with a hint of mint extract offers a fun twist to the traditional dark chocolate coating.
- Don’t skip the chilling step for the cake balls; it’s crucial for achieving a firm structure that will hold up well on the sticks.
Variations & Serving Ideas
For a twist on the original recipe, consider these variations:
1. Pistachio Mint Cake Pops: Replace half of the cocoa powder with crushed pistachios for a unique nutty flavor.
2. Vegan Chocolate Mint Cake Pops: Substitute eggs with flaxseed meal and use coconut cream for the frosting to create a vegan-friendly treat.
3. Holiday Themed Pops: Add red and white sprinkles for a festive touch around Christmas or Valentine’s Day.
4. Mint Chocolate Chip Ice Cream Cake Pops: Mix crumbled mint chocolate chip ice cream with the cake for a refreshing summer treat.
When serving, these cake pops pair beautifully with a cup of hot cocoa, as the warmth balances the refreshing mint. They also make a fantastic addition to a dessert platter alongside fruit skewers, providing a fresh contrast. For parties, consider serving them with a chilled glass of milk or mint-infused lemonade for a refreshing twist!
Storage, Make-Ahead & Reheating
Your Mint Chocolate Chip Cake Pops can be stored in the refrigerator for up to one week in an airtight container. They also freeze well; just place them in a single layer on a baking sheet until frozen, then transfer to a zip-top bag for up to three months. For the best flavor, allow them to thaw in the fridge overnight before serving. Interestingly, they tend to taste even better the next day as the flavors meld together, creating a richer mint chocolate experience!
Frequently Asked Questions
Can I make Mint Chocolate Chip Cake Pops ahead of time?
Yes — in fact, they taste even better the next day! You can prepare the cake and frosting in advance, and assemble the pops the day you plan to serve them.
What can I use instead of buttermilk?
If you don’t have buttermilk on hand, you can create a substitute by mixing 1 cup of milk with 1 tablespoon of white vinegar or lemon juice, letting it sit for 5-10 minutes before using.
How do I prevent my
Final Thoughts
Mint Chocolate Chip Cake Pops are a delightful blend of flavors that truly elevate any occasion. The refreshing mint combined with rich chocolate creates a satisfying treat that’s fun to eat and share. Each bite delivers a burst of nostalgia, reminiscent of the classic mint chocolate chip ice cream we all love.
This is the kind of recipe I come back to again and again, especially when I want to impress friends at gatherings or simply indulge in a sweet moment at home. The process of creating these cake pops is not only enjoyable but also allows for creativity with decorations.
I encourage you to give this recipe a try! Experiment with different toppings or flavors, and don’t forget to share your results. I’d love to see how you put your own twist on these delightful treats!
Delicious Mint Chocolate Chip Cake Pops Recipe to Delight!

These Mint Chocolate Chip Cake Pops are a delightful combination of rich chocolate cake and refreshing mint flavor. Perfect for parties or cozy afternoons, they bring a piece of childhood nostalgia to every bite.
- Prep Time: 30 mins
- Cook Time: 30 mins
- Total Time: 1 hour
- Yield: 12 to 15 cake pops 1x
- Category: Dessert
- Method: Baking
- Cuisine: American
Ingredients
- 1 ½ cups all-purpose flour
- 1 cup granulated sugar
- ½ cup unsweetened cocoa powder
- 1 ½ teaspoons baking powder
- ½ teaspoon baking soda
- ½ teaspoon salt
- ½ cup unsalted butter, softened
- 2 large eggs
- 1 teaspoon pure vanilla extract
- ½ teaspoon peppermint extract
- 1 cup buttermilk
- 1 cup unsweetened butter, softened
- 4 cups powdered sugar
- ¼ cup heavy cream
- 1 teaspoon pure vanilla extract
- ½ teaspoon peppermint extract
- ½ cup mini chocolate chips
- Green food coloring (optional, for color)
- 12 oz. dark chocolate or chocolate candy coating (such as Merckens or Wilton)
- 2 tablespoons coconut oil (optional, for thinning chocolate)
- Extra mini chocolate chips (for decoration)
- 12 to 15 lollipop sticks
- Styrofoam block or cake pop stand for drying
Instructions
- Preheat your oven to 350°F (175°C). Grease a 9×13 inch baking pan with cooking spray or line it with parchment paper to prevent sticking.
- In a large bowl, whisk together the flour, sugar, cocoa powder, baking powder, baking soda, and salt until well combined.
- In a separate bowl, beat the softened butter with an electric mixer on medium speed for about 2 minutes until creamy.
- Add the eggs, vanilla extract, and peppermint extract to the butter mixture. Beat on medium speed for another 2 minutes until the mixture is smooth and light in color.
- Gradually mix in half of the dry ingredients into the butter mixture, followed by the buttermilk. Alternate adding the remaining dry ingredients and buttermilk, mixing until just combined.
- Pour the batter into the prepared baking pan and spread it evenly. Bake for 25-30 minutes, or until a toothpick inserted into the center comes out clean.
- Once baked, remove the cake from the oven and let it cool in the pan for about 10 minutes before transferring it to a wire rack to cool completely.
- While the cake cools, prepare the frosting. In a large bowl, beat the softened butter until creamy. Gradually add the powdered sugar, mixing on low speed until combined.
- Pour in the heavy cream, vanilla extract, and peppermint extract. Beat on medium-high speed for about 3-4 minutes until the frosting is light and fluffy. Mix in the mini chocolate chips and green food coloring, if using.
- Once the cake is completely cooled, crumble it into a large bowl. Add half of the frosting to the crumbled cake and mix until fully incorporated.
- Using your hands, form the mixture into 1-inch balls and place them on a parchment-lined baking sheet. Chill them in the refrigerator for about 30 minutes until firm.
- While the cake balls chill, melt the chocolate or candy coating in a microwave-safe bowl in 30-second intervals, stirring in between, until fully melted and smooth.
- Remove the cake balls from the fridge. Dip the tip of each lollipop stick into the melted chocolate, then insert it into the center of a cake ball.
- Dunk each cake pop into the melted chocolate, ensuring it’s fully coated. Tap the stick gently against the bowl to remove excess chocolate.
- Sprinkle extra mini chocolate chips on top for decoration while the chocolate is still wet. Place the coated pops upright in a styrofoam block or cake pop stand to set.
Nutrition
- Serving Size: 1 cake pop
- Calories: 150
- Sugar: 12 g
- Sodium: 50 mg
- Fat: 7 g
- Saturated Fat: 4 g
- Unsaturated Fat: 2 g
- Trans Fat: 0 g
- Carbohydrates: 20 g
- Fiber: 1 g
- Protein: 2 g
- Cholesterol: 30 mg
Keywords: Ensure the cake cools completely before crumbling to avoid a gooey mixture. Use a food scale for accurate measurements, and ensure your bowl is dry when melting chocolate.