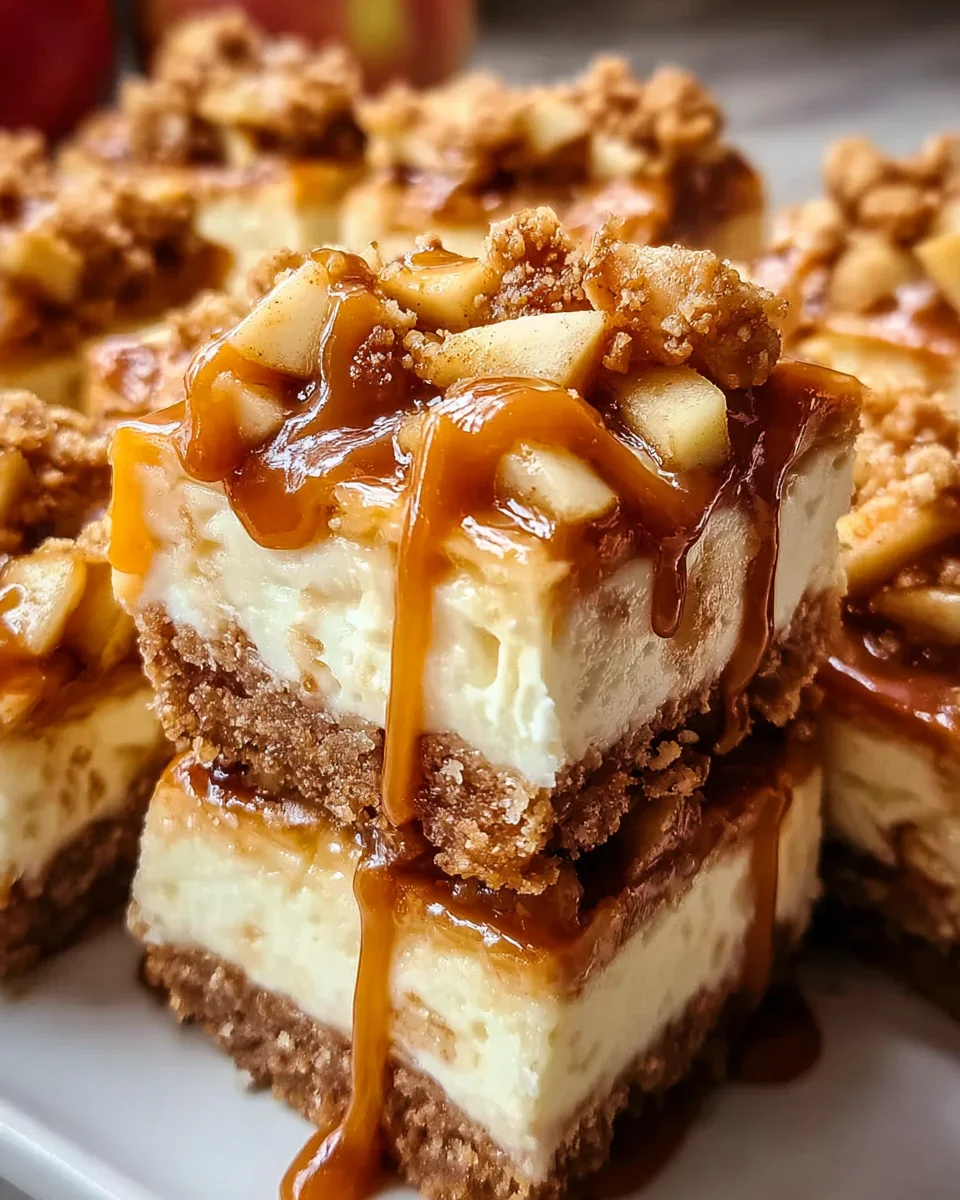
Caramel Apple Cheesecake Bars are an autumnal dream come true, encapsulating the very essence of fall in one irresistible bite. As an avid baker, I’ve always found immense joy in recipes that perfectly blend classic comfort with a touch of elegance, and these bars truly hit the mark. While cheesecake boasts a rich history dating back to ancient Greece, a dessert cherished by many cultures for centuries, and caramel apples evoke nostalgic memories of harvest festivals and trick-or-treating, our recipe brings these two beloved traditions together in a spectacularly harmonious way.
People adore this dish not only for its comforting familiarity but for the incredible symphony of textures and flavors it delivers. Imagine the creamy, tangy cheesecake base perfectly complementing the tender, spiced apples, all topped with gooey, rich caramel and a hint of crunchy pecans on a buttery graham cracker crust.
It’s this delightful interplay of sweet, tart, smooth, and crisp that makes each bite utterly transcendent.
These Caramel Apple Cheesecake Bars are incredibly convenient for sharing at gatherings or simply indulging in a moment of pure bliss, offering that quintessential taste of fall in a wonderfully accessible format.

Ingredients:
- For the Shortbread Crust:
- 2 cups (240g) all-purpose flour
- ½ cup (100g) granulated sugar
- ½ teaspoon fine sea salt
- 1 cup (226g) unsalted butter, very cold and cut into ½-inch cubes
- For the Cheesecake Filling:
- 24 ounces (about 3 blocks or 680g) cream cheese, full-fat, softened at room temperature
- 1 cup (200g) granulated sugar
- 2 large eggs, at room temperature
- ½ cup (120g) full-fat sour cream, at room temperature
- 1 ½ teaspoons pure vanilla extract
- 1 tablespoon fresh lemon juice (optional, but highly recommended for brightness)
- For the Caramel Apple Topping:
- 3 large (about 1.5 lbs or 680g) firm apples (such as Honeycrisp, Fuji, Granny Smith, or Gala), peeled, cored, and diced into ½-inch pieces
- 2 tablespoons unsalted butter
- ¼ cup (50g) packed light brown sugar
- 1 teaspoon ground cinnamon
- ¼ teaspoon ground nutmeg (optional, but adds warmth)
- Pinch of fine sea salt
- 1 tablespoon fresh lemon juice
- For the Caramel Drizzle & Garnish:
- ½ cup (120ml) store-bought high-quality caramel sauce, or homemade caramel
- Flaky sea salt, for sprinkling (optional)
Preparing the Shortbread Crust: The Foundation of Deliciousness
- Prepare Your Pan and Oven: First things first, my friends! Let’s preheat our oven to a cozy 350°F (175°C). Then, you’ll want to line a 9×13-inch baking pan with parchment paper, making sure to leave an overhang on the sides. This little trick is going to be your best friend when it comes to lifting those beautiful “Caramel Apple Cheesecake Bars” out of the pan with ease later on. Trust me, you’ll thank yourself!
- Combine Dry Ingredients: In a large mixing bowl, whisk together the all-purpose flour, granulated sugar, and fine sea salt until they are thoroughly combined. It’s important to distribute that salt evenly, as it helps to balance the sweetness of the crust and really makes the butter shine.
-
Incorporate the Cold Butter: Now for the magic! Add your very cold, cubed unsalted butter to the dry ingredients. You have a few options here:
- Using a Pastry Blender: If you have one, a pastry blender is fantastic for cutting the butter into the flour mixture. Work it in until the mixture resembles coarse crumbs, with some pea-sized pieces of butter remaining. This texture is key for a tender, flaky crust.
- Using Your Fingertips: If you’re a hands-on baker like me, you can use your fingertips to rub the butter into the flour mixture. Work quickly, as the warmth from your hands can melt the butter. Again, aim for those coarse, sandy crumbs with small butter pieces.
- Using a Food Processor: For a super quick method, you can pulse the dry ingredients and cold butter in a food processor until it forms coarse crumbs. Be careful not to over-process; we want texture, not a paste!
Why cold butter? Using cold butter is absolutely crucial for a shortbread crust. As the butter melts in the oven, it creates pockets of steam, which results in a tender, crumbly, and incredibly delicious texture. If the butter is too warm, it will blend too readily with the flour, leading to a tough, dense crust. This step truly defines the quality of your base.
- Press into the Pan: Once your butter and flour mixture is perfectly crumbly, pour it into your prepared 9×13-inch baking pan. Use the bottom of a flat glass or your clean hands to press the mixture firmly and evenly into the bottom of the pan. Make sure it’s compact and reaches all the way to the edges. A well-pressed crust won’t crumble apart when you cut the bars later.
- Par-Bake the Crust: Pop that pan into your preheated oven and bake for 15-18 minutes, or until the crust is lightly golden brown around the edges. This process, known as “par-baking,” is essential. It ensures that your crust is fully cooked and crisp, preventing it from becoming soggy once the creamy cheesecake filling is added. Nobody wants a soggy bottom, right? Once par-baked, remove the pan from the oven and let it cool slightly on a wire rack while we prepare the next layer.
Crafting the Creamy Cheesecake Filling: The Heart of the Bars
- Soften Your Cream Cheese: For the silkiest, smoothest cheesecake filling, it is absolutely paramount that your cream cheese is at room temperature. I usually take it out of the fridge at least an hour or two before I plan to bake. If you’re in a pinch, you can unwrap it and microwave it for 10-15 seconds per block, but be careful not to melt it! Room temperature cream cheese is non-negotiable for a lump-free filling.
- Beat Cream Cheese and Sugar: In the bowl of a stand mixer fitted with the paddle attachment (or using a large bowl and a hand mixer), beat the softened cream cheese on medium speed for about 2-3 minutes. You want it to be incredibly smooth and light. Then, gradually add the granulated sugar and continue beating for another 2-3 minutes, scraping down the sides of the bowl frequently. The mixture should be airy, fluffy, and all the sugar crystals should be dissolved, making for an incredibly smooth texture. This initial creaming helps to incorporate air, which contributes to the light texture of the finished cheesecake.
- Add Eggs, One at a Time: Reduce the mixer speed to low. Add the eggs one at a time, mixing just until each egg is incorporated. It’s really important not to overmix at this stage once the eggs are added. Overmixing can incorporate too much air, which can cause the cheesecake to puff up too much during baking and then crack as it cools. Gentle mixing is key here for a smooth, crack-free finish.
- Stir in Sour Cream, Vanilla, and Lemon Juice: Finally, gently fold in the room temperature sour cream, pure vanilla extract, and the optional (but highly recommended!) fresh lemon juice. Mix on low speed just until everything is combined and the filling is uniform. The sour cream adds a wonderful tang that perfectly complements the sweetness of the cheesecake and also contributes to its incredibly creamy texture. The lemon juice brightens the flavors and helps cut through the richness.
Sautéing the Sweet Caramel Apple Topping: A Burst of Fall Flavor
- Prepare Your Apples: Let’s get those apples ready! Peel, core, and dice your chosen apples into ½-inch pieces. I find that a mix of sweet and tart apples (like Honeycrisp and Granny Smith) gives the best flavor dimension. Consistency in dicing size is important here, my friends, as it ensures they cook evenly. No one wants crunchy bits mixed with mushy ones!
- Sauté the Apples: In a large skillet or frying pan, melt the unsalted butter over medium heat. Once the butter is shimmering, add your diced apples. Sauté them for about 5-7 minutes, stirring occasionally, until they start to soften slightly but still retain some of their shape and a bit of a bite. We don’t want apple sauce just yet!
- Flavor the Apples: Add the packed light brown sugar, ground cinnamon, optional ground nutmeg, and a pinch of fine sea salt to the skillet. Stir well to coat all the apple pieces. Continue to cook for another 3-5 minutes, allowing the sugar to melt and create a beautiful, glossy sauce that coats the apples. The cinnamon and nutmeg will fill your kitchen with the most amazing autumn aromas.
- Finish with Lemon Juice: Stir in the fresh lemon juice. This not only adds a lovely brightness that cuts through the sweetness but also helps to prevent the apples from turning brown. Remove the skillet from the heat and let the apple topping cool for a few minutes while we move on to assembly. We want it to be slightly warm, not piping hot, when it goes onto the cheesecake filling.
Assembling and Baking Your Caramel Apple Cheesecake Bars: The Grand Finale
- Pour the Cheesecake Filling: Carefully pour your wonderfully smooth cheesecake filling over the par-baked and slightly cooled shortbread crust in the pan. Gently spread the filling evenly using an offset spatula or the back of a spoon, making sure it reaches all the way to the edges. Don’t worry if it looks a little full; it will settle as it bakes.
- Arrange the Apple Topping: Now for the artistic part! Spoon your cooled caramel apple topping evenly over the cheesecake filling. You can arrange the apple pieces in a neat pattern, or simply spoon them on randomly for a more rustic look. Make sure to get some of that lovely caramel sauce from the skillet onto the topping as well; it adds extra flavor and moisture.
- Bake to Perfection: Gently place your pan back into the preheated 350°F (175°C) oven. Bake for approximately 45-55 minutes. How do you know when it’s done? The edges of the cheesecake will appear set, but the very center will still have a slight jiggle to it when you gently shake the pan. This slight jiggle is exactly what you want! It means the cheesecake is perfectly cooked and will firm up beautifully as it cools. Overbaking a cheesecake is the primary cause of cracks, so keep an eye on it!
- Cool Completely (This is Crucial!): Once baked, remove the pan from the oven and place it on a wire rack. Let the Caramel Apple Cheesecake Bars cool at room temperature for at least 2-3 hours. This slow cooling process is incredibly important for preventing cracks and ensuring a creamy texture.
- Chill for Firmness: After cooling at room temperature, transfer the pan to the refrigerator and chill for a minimum of 4 hours, or even better, overnight. This chilling time allows the cheesecake to fully set, making it firm enough to slice cleanly and ensuring its rich, creamy texture is at its absolute best. Patience is a virtue, especially when it comes to cheesecake!
The Final Flourish: Drizzle and Serve!
- The Caramel Drizzle: Once your Caramel Apple Cheesecake Bars are thoroughly chilled, it’s time for the crowning glory! If your caramel sauce is too thick, you can gently warm it in the microwave for 15-30 seconds or in a small saucepan over low heat until it’s a pourable consistency. Using a spoon or a squeeze bottle, artfully drizzle the caramel sauce all over the top of the chilled bars. Feel free to be generous here – more caramel is always a good idea in my book!
- Add a Pinch of Salt (Optional but Recommended): For an extra layer of flavor that truly elevates these bars, sprinkle a little flaky sea salt over the caramel drizzle. The salt provides a wonderful contrast, highlighting the sweetness of the caramel and apples while adding a sophisticated touch. It’s that little something extra that makes these bars truly irresistible.
- Slice and Serve: Now for the moment you’ve been waiting for! Using the parchment paper overhangs, carefully lift the entire cheesecake bar creation out of the pan and transfer it to a cutting board. Using a sharp knife, run under hot water and wiped clean between each cut, slice the cheesecake into 18-24 bars, depending on your desired serving size. I love serving these bars slightly chilled, but they’re also fantastic closer to room temperature after sitting out for just 15-20 minutes. Store any leftover “Caramel Apple Cheesecake Bars” in an airtight container in the refrigerator for up to 3-4 days. Each bite is a perfect symphony of buttery shortbread, creamy cheesecake, tender spiced apples, and luscious caramel. Enjoy the fruits of your labor!
Conclusion:
So there you have it, my friends! We’ve journeyed through every delightful step of creating what I truly believe will become a cherished staple in your baking repertoire, especially as the seasons shift and we crave those comforting, familiar flavors. What makes these incredible
Caramel Apple Cheesecake Bars
an absolute must-try isn’t just their stunning visual appeal, but the harmonious symphony of textures and tastes that dance on your palate with every single bite. Imagine that perfect, buttery crunch from the golden graham cracker crust, a foundation robust enough to support the layers of indulgence that follow. This crust isn’t just a base; it’s an integral part of the experience, offering a delightful counterpoint to the creaminess.Nestled atop that perfect crust is a rich, luscious, and incredibly smooth cheesecake layer. This cheesecake isn’t overly sweet; it’s a perfectly balanced canvas, allowing the true stars of the show to shine brightly without being overwhelmed. Then comes the magic: the tender, slightly tart apple chunks, softened to perfection and infused with a hint of warm spice, mingling beautifully with generous swirls of rich, buttery caramel that cascade throughout the bars. It’s a masterful blend of sweet, tart, and creamy, creating a dessert that feels both sophisticated enough for a special gathering and wonderfully comforting for a quiet evening at home. You’re not just baking a dessert; you’re crafting edible happiness, a guaranteed crowd-pleaser that embodies the very essence of homemade goodness and makes every moment feel a little more special. These bars truly encapsulate everything wonderful about a classic flavor combination, reimagined in a convenient and absolutely irresistible format.
Now, how to best enjoy these little slices of heaven? While they are absolutely divine served chilled, straight from the fridge, don’t hesitate to experiment! For an extra cozy experience, try warming a bar ever so slightly in the microwave – just enough to soften the caramel and truly release the intoxicating aromas of the baked apples and spices. A small scoop of premium vanilla bean ice cream melting gently over the warm bar is pure bliss, adding another layer of creamy indulgence that’s hard to beat. If you’re feeling particularly fancy, a dollop of freshly whipped cream, perhaps infused with a hint of cinnamon, maple, or even a touch of bourbon for the adults, would be a delightful accompaniment.
Looking to put your own unique spin on them? Consider sprinkling a handful of toasted pecans or walnuts over the caramel layer before baking for an added nutty crunch and textural complexity. You could also experiment with different types of apples – Granny Smiths offer a delightful tartness that cuts through the sweetness beautifully, while Honeycrisps or Braeburns bring a sweeter, crisper bite. For a bolder caramel flavor, a tiny pinch of flaky sea salt can be sprinkled on top just after baking, transforming them into a salted caramel dream. And if you’re a true spice lover, a tiny extra dash of nutmeg, allspice, or even a pinch of cardamom in the apple mixture can elevate the autumnal notes even further, making them uniquely yours. The possibilities are truly endless, allowing you to tailor this fantastic recipe to your unique taste and preferences.
So, I implore you, don’t just admire these pages; roll up your sleeves and give these fantastic bars a try! I promise you, the effort involved is minimal compared to the incredible rewards you’ll reap. There’s something uniquely satisfying about pulling a tray of these golden beauties from your oven, the aroma filling your kitchen with an irresistible scent of apples, caramel, and warm spices. This isn’t just a recipe; it’s an invitation to create, to share, and to savor. I truly believe this recipe will become a treasured go-to in your collection, bringing smiles to everyone who tries them. Once you’ve baked them, I would absolutely love to hear about your experience! Did you try a variation? What was your favorite part of the process or the taste? Please feel free to share your thoughts, your photos, and your baking triumphs. Your feedback inspires me, and I can’t wait to celebrate your baking successes with you. Go forth and bake; your taste buds (and your loved ones!) will most certainly thank you!
Caramel Apple Cheesecake Bars
These delightful bars combine a buttery graham cracker crust with a creamy cheesecake filling and tender, spiced caramel apples. Perfect for gatherings or a comforting treat, they offer a wonderful symphony of textures and flavors in every bite.
Ingredients
Instructions
Important Information
Nutrition Facts (Per Serving)
It is important to consider this information as approximate and not to use it as definitive health advice.
Allergy Information
Please check ingredients for potential allergens and consult a health professional if in doubt.