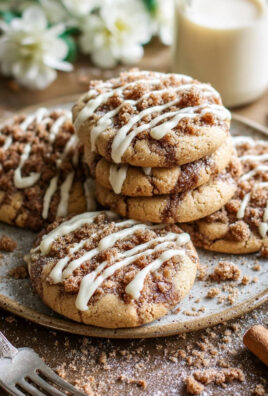
Cookie Butter Cheesecake Cups are an absolute dream come true for dessert enthusiasts seeking a uniquely delightful treat that perfectly marries comfort with sophistication. I am so thrilled to share this recipe with you, as I’ve found these individual cups to be nothing short of a revelation, bringing smiles to every single person who tastes them. Imagine the irresistible, caramelized spice of beloved cookie butter, typically made from crushed Belgian speculoos biscuits, swirled through a rich, velvety smooth cheesecake filling, all nestled in convenient, single-serving portions.
The magic of cookie butter itself stems from a rich European heritage, transforming humble spiced biscuits into a creamy spread that has captivated palates worldwide. When combined with the timeless appeal of a classic cheesecake, the result is an extraordinary fusion that offers a symphony of textures and flavors. People adore this dish not only for its unique taste profile – a perfect balance of sweet, spiced, and tangy – but also for its incredibly creamy texture and the sheer convenience of having perfectly portioned desserts ready to enjoy.
Why You’ll Fall in Love with These Cups
I genuinely believe you will fall in love with making these delightful Cookie Butter Cheesecake Cups. They offer a fantastic way to impress guests without endless hours in the kitchen, making them ideal for gatherings, potlucks, or simply as a special treat for yourself. The ease of preparation, combined with the utterly satisfying taste, ensures they will become a cherished addition to your recipe collection. Get ready to experience dessert bliss!

Ingredients:
My goodness, you’re in for a treat with these incredible Cookie Butter Cheesecake Cups! Here’s everything you’ll need to create them, broken down for clarity. I always say, a good recipe starts with a well-organized ingredient list!
-
For the Graham Cracker Crust:
- 1 ½ cups (about 180g) Graham Cracker Crumbs: I find that about 12-14 full graham cracker sheets will yield this amount once crushed. You can buy pre-crushed crumbs, but crushing your own gives you a lovely fresh aroma and texture.
- ¼ cup (50g) Granulated Sugar: Just enough to add a touch of sweetness and help the crust bind beautifully.
- ½ cup (113g) Unsalted Butter, melted: Make sure it’s unsalted so we can control the salt content precisely. Melting it properly is key to coating those crumbs evenly.
- Pinch of Salt (optional): I always add just a tiny pinch; it really helps to enhance the flavor of the crust and balance the sweetness.
-
For the Cookie Butter Cheesecake Filling:
- 2 (8-ounce) packages (452g total) Full-Fat Cream Cheese, softened: This is absolutely non-negotiable! Use full-fat for the creamiest, most luxurious cheesecake texture. Make sure it’s at room temperature – it makes a world of difference for a smooth, lump-free filling.
- ¾ cup (210g) Cookie Butter (like Biscoff or Lotus Speculoos Spread), softened: Also at room temperature! This is our star flavor, so choose a good quality spread. Softening it ensures it incorporates seamlessly into the cream cheese.
- ¾ cup (150g) Granulated Sugar: For that perfect level of sweetness that complements the cookie butter without overpowering it.
- 2 Large Eggs, at room temperature: Room temperature eggs incorporate better and help prevent overmixing. They also contribute to the cheesecake’s structure and richness.
- ¼ cup (60g) Sour Cream or Greek Yogurt (full-fat), at room temperature: This adds a lovely tang and an incredibly tender texture to the cheesecake. Don’t skip it!
- 1 teaspoon Pure Vanilla Extract: A good quality vanilla extract always elevates any dessert. It harmonizes beautifully with the cookie butter.
- Pinch of Salt: Again, just a tiny bit to balance and enhance all those wonderful flavors.
-
For the Cookie Butter Topping and Garnish (Optional but Highly Recommended!):
- ¼ cup (70g) Cookie Butter: Softened, for drizzling or spreading on top of the cooled cheesecake cups. This extra layer really emphasizes the cookie butter theme!
- Whipped Cream: Freshly whipped cream or a dollop of your favorite ready-made variety for a final flourish.
- Crushed Biscoff Cookies: A sprinkle of crushed cookies adds texture and a beautiful visual appeal.
Preparing the Graham Cracker Crust
The foundation of any great cheesecake, even a mini one like these delightful Cookie Butter Cheesecake Cups, is a fantastic crust! This simple crust provides the perfect counterpoint to the creamy filling.
- Preheat and Prepare: First things first, let’s get our oven ready. Preheat your oven to 350°F (175°C). Then, line a standard 12-cup muffin tin with paper liners. I find that using paper liners makes these cheesecake cups incredibly easy to remove and serve, plus they look so charming! You can also lightly grease the muffin tin if you prefer not to use liners, but trust me, the liners are a lifesaver here.
- Crush Those Crackers: If you’re using whole graham crackers, now’s the time to crush them into fine crumbs. You can do this by placing them in a large zip-top bag and crushing them with a rolling pin – it’s actually quite therapeutic! Alternatively, a food processor makes quick work of it, ensuring uniform crumbs. Transfer your 1 ½ cups of graham cracker crumbs to a medium-sized mixing bowl.
- Combine Dry Ingredients: Add the ¼ cup of granulated sugar and the optional pinch of salt to the graham cracker crumbs. Give everything a good stir with a spoon or whisk until these dry ingredients are thoroughly combined. This ensures an even distribution of sweetness and seasoning throughout the crust.
- Incorporate the Butter: Pour the ½ cup of melted unsalted butter over the graham cracker mixture. Using a fork or your hands (which I often do, it’s quite satisfying!), mix everything together until the crumbs are evenly moistened. The mixture should resemble wet sand and hold together when you press it between your fingers. This is a key indicator that your crust will be perfectly binded. If it feels too dry, you might need another tablespoon of melted butter, but usually, ½ cup is just right.
- Press into Cups: Divide the graham cracker mixture evenly among the 12 prepared muffin cups. I usually use a tablespoon to scoop the mixture, aiming for about 1 ½ to 2 tablespoons per cup. Once the crumbs are in, use the back of a spoon, a small shot glass, or even your fingertips to firmly press the mixture down into the bottom of each liner. You want a compact, even layer – this will ensure a sturdy crust that doesn’t crumble when you bite into your finished Cookie Butter Cheesecake Cup.
- A Quick Bake: Place the muffin tin into your preheated oven and bake for 5-7 minutes. This short bake time helps to set the crust, making it extra firm and fragrant. Trust me, it makes a huge difference compared to a no-bake crust. Once baked, remove the tin from the oven and let the crusts cool completely on a wire rack while you prepare the filling. Cooling them helps them firm up even more.
Crafting the Luscious Cookie Butter Cheesecake Filling
This is where the magic truly happens! We’re going to create a velvety smooth, incredibly flavorful cookie butter cheesecake filling that will make these Cookie Butter Cheesecake Cups utterly irresistible. Patience and room temperature ingredients are your best friends here.
- Cream Cheese and Cookie Butter Prep: Ensure your 2 (8-ounce) packages of full-fat cream cheese and ¾ cup of cookie butter are at room temperature. I can’t stress this enough! If they’re cold, you’ll end up with lumps, and nobody wants a lumpy cheesecake. You can leave them out on the counter for at least an hour, or for a quicker method, microwave the cream cheese (removed from packaging) in 15-second intervals until slightly softened, and the cookie butter in 10-second intervals, stirring in between.
- Beat the Cream Cheese: In a large mixing bowl, using an electric mixer (either a stand mixer with the paddle attachment or a handheld mixer), beat the softened cream cheese on medium speed for about 2-3 minutes. You want it to be super smooth and creamy, with no lumps whatsoever. Scrape down the sides and bottom of the bowl frequently to ensure even beating. This initial step is crucial for a perfectly smooth cheesecake.
- Introduce the Cookie Butter: Add the softened ¾ cup of cookie butter to the cream cheese. Continue beating on medium speed for another 1-2 minutes until the cookie butter is fully incorporated and the mixture is uniform in color and consistency. Scrape the bowl once more. Oh, the aroma alone at this stage is heavenly!
- Sweeten and Flavor: Now, add the ¾ cup of granulated sugar, the 1 teaspoon of pure vanilla extract, and the tiny pinch of salt to the cream cheese and cookie butter mixture. Beat on low speed until just combined. Then, increase the speed to medium and beat for another minute, making sure the sugar is dissolved and the mixture is light and fluffy. Overmixing at this stage can incorporate too much air, which can lead to cracks later.
- Incorporate Eggs, One by One: Reduce the mixer speed to low. Add the 2 large eggs, one at a time. Beat each egg just until it is incorporated into the mixture before adding the next. It’s paramount not to overmix the eggs! Overmixing after adding the eggs can develop too much gluten, leading to a tough cheesecake or cracks. As soon as the yolk disappears, stop the mixer.
- Fold in Sour Cream: Finally, add the ¼ cup of room temperature sour cream (or Greek yogurt). Mix on the lowest speed just until it’s barely combined. Alternatively, you can gently fold it in by hand with a spatula. We want to maintain that delicate, creamy texture. Scrape down the sides of the bowl one last time to ensure everything is perfectly blended. At this point, your cheesecake batter should be incredibly smooth, thick, and have a beautiful, uniform beige color.
Baking and Chilling Your Cookie Butter Cheesecake Cups
Baking miniature cheesecakes requires a gentle hand, and chilling is where they truly transform into those perfectly set, delightful Cookie Butter Cheesecake Cups you’re dreaming of.
- Prepare for Baking: Reduce your oven temperature to 325°F (160°C). We’re going for a gentler bake now. Carefully spoon or pour the cheesecake filling evenly into the cooled graham cracker crusts in your muffin tin. I like to fill them almost to the top, leaving just a little bit of room for expansion. Typically, each cup will hold about 3-4 tablespoons of filling.
- The Gentle Bake: Place the muffin tin into your preheated 325°F (160°C) oven. Bake for 18-22 minutes. The exact baking time can vary depending on your oven, so keep an eye on them. You’ll know they’re done when the edges are set and slightly puffed, but the very centers still have a slight jiggle to them when you gently shake the pan. Do not overbake! Overbaked cheesecakes are dry and prone to cracking. We want them to be moist and creamy.
- Cooling Down Slowly: Once baked, turn off the oven, but leave the muffin tin inside with the oven door slightly ajar (you can prop it open with a wooden spoon). Let the cheesecake cups cool in the oven for about 15-20 minutes. This slow cooling process helps prevent cracking and allows the cheesecake to set gently.
- Room Temperature Rest: After the oven cool-down, remove the muffin tin from the oven and transfer it to a wire rack. Let the cheesecake cups cool completely at room temperature for at least 1-2 hours. They will continue to firm up as they cool. You might notice them sinking ever so slightly in the middle – that’s perfectly normal!
- The Essential Chill: Once fully cooled to room temperature, carefully transfer the muffin tin to the refrigerator. Chill the Cookie Butter Cheesecake Cups for a minimum of 4 hours, but preferably overnight. This chilling period is absolutely crucial! It allows the cheesecake to set completely, develop its full flavor, and achieve that signature dense yet creamy texture. Trying to serve them before they are thoroughly chilled will result in a less satisfying, softer consistency.
Adding the Delectable Cookie Butter Topping and Finishing Touches
Once your Cookie Butter Cheesecake Cups are perfectly chilled, it’s time for the final flourish! This step adds an extra layer of flavor and makes them look incredibly inviting.
- Prepare the Topping: If your additional ¼ cup of cookie butter for the topping is a bit stiff, gently warm it in the microwave for 10-15 seconds, or until it’s soft and drizzly but not hot. You can also place the jar in a bowl of warm water for a few minutes. We want it to be easy to spread or drizzle.
- Top Each Cheesecake Cup: Once the cheesecake cups are thoroughly chilled and ready to serve, carefully remove them from the muffin tin (the liners make this a breeze!). Spoon a small amount of the softened cookie butter onto the top of each cheesecake cup. You can spread it gently with the back of a spoon to create an even layer, or simply drizzle it artfully across the top for a more rustic look. The choice is yours, but either way, that extra hit of cookie butter flavor is phenomenal!
- Garnish and Serve: For an extra special touch, add a dollop of freshly whipped cream or a ready-made whipped topping to each cup. Then, sprinkle some crushed Biscoff cookies over the whipped cream. This not only adds a beautiful textural contrast but also reinforces that wonderful cookie butter theme.
- Enjoy Your Masterpiece: Serve your magnificent Cookie Butter Cheesecake Cups immediately, or keep them refrigerated until you’re ready to enjoy them. They are best enjoyed within 3-4 days when stored in an airtight container in the refrigerator. Each bite is a delightful symphony of creamy cheesecake, crunchy crust, and the warm, spiced notes of cookie butter. You’ve truly created something special!

Conclusion:
Well, my friends, we’ve reached the sweet finale of our culinary journey, and I genuinely hope you’re feeling as inspired as I am to get into the kitchen and whip up something truly magical. This recipe, dear readers, is more than just another dessert; it’s an experience waiting to happen. If you’ve been searching for that perfect treat that strikes an impeccable balance between indulgence and simplicity, then look no further. I truly believe this recipe is an absolute game-changer for anyone who loves rich, creamy desserts but might not have hours to spend in the kitchen perfecting a full-sized cheesecake.
Why This Recipe is an Absolute Must-Try!
Why is this a must-try, you ask? Let me count the ways! First off, the sheer convenience of individual portions means no messy slicing, perfect for entertaining or portion control (if you can manage to stop at just one!). But beyond practicality, it’s the flavor profile that truly elevates these treats. Imagine the velvety smooth, tangy creaminess of a perfectly set cheesecake, infused with that unmistakable, warmly spiced, caramel-like goodness of cookie butter. It’s a symphony of textures and tastes, from the crisp, buttery crust providing a delightful contrast to the luscious filling, all culminating in a moment of pure bliss with every single bite. These aren’t just any mini cheesecakes; they are a sophisticated yet playful twist that promises to delight even the most discerning palates. And let’s be honest, who can resist the charm of their own personal dessert? These delightful Cookie Butter Cheesecake Cups are designed to impress with minimal effort, offering all the luxuriousness of a classic cheesecake without the fuss.
Endless Possibilities for Serving and Customization
One of the things I adore most about these delightful treats is their incredible versatility. While they are utterly perfect just as they are, there are so many ways to customize them to make them uniquely yours. For an extra touch of elegance, consider a delicate dollop of freshly whipped cream on top, perhaps dusted with a tiny sprinkle of cinnamon or a few extra cookie crumbs for added texture and visual appeal. A drizzle of melted white chocolate or a caramel sauce can also add another layer of decadence that is simply irresistible. If you’re feeling a bit adventurous, try folding some finely chopped toasted pecans or walnuts into the crust mixture for a nutty twist that complements the spiced notes of the cookie butter beautifully. For a touch of freshness and vibrant color, a few ripe raspberries or blueberries perched on top can offer a beautiful contrast and a hint of tartness to cut through the richness, making them perfect for warmer weather. These little cups are fantastic for any occasion – from a casual weeknight treat to an impressive dessert for a dinner party, a potluck, or even a thoughtful homemade gift for a friend. They travel exceptionally well and are always a crowd-pleaser, ensuring you’ll be asked for the recipe every single time you bring them.
Your Turn: Bake, Share, and Inspire!
My biggest hope is that you don’t just read about this recipe, but that you truly embrace the joy of making it. It’s a fantastic project for a lazy afternoon, a sweet escape from the everyday, and a guaranteed mood-lifter. Don’t be shy; dive in and experience the magic for yourself! I promise you won’t regret taking the time to create these little wonders. They offer a rewarding baking experience that culminates in a truly spectacular dessert. And once you’ve had the chance to savor your very own batch, I would absolutely love to hear about your experience. Did you add any unique toppings? Did you share them, or were they all for you (no judgment here, we’ve all been there!)? Please come back and share your thoughts, your photos, and any creative variations you came up with in the comments below. Your feedback and culinary adventures inspire me, and our community thrives on shared deliciousness. Happy baking, and may your kitchen be filled with the wonderful aroma of something truly special and utterly unforgettable!
Cookie Butter Cheesecake Cups
Cookie Butter Cheesecake Cups are an absolute dream come true for dessert enthusiasts seeking a uniquely delightful treat. Imagine the irresistible, caramelized spice of beloved cookie butter, typically made from crushed Belgian speculoos biscuits, swirled through a rich, velvety smooth cheesecake filling, all nestled in convenient, single-serving portions. These no-bake cups offer a perfect balance of sweet, spiced, and tangy flavors with an incredibly creamy texture, ideal for impressing guests without endless hours in the kitchen.
Ingredients
Instructions
Important Information
Nutrition Facts (Per Serving)
It is important to consider this information as approximate and not to use it as definitive health advice.
Allergy Information
Please check ingredients for potential allergens and consult a health professional if in doubt.