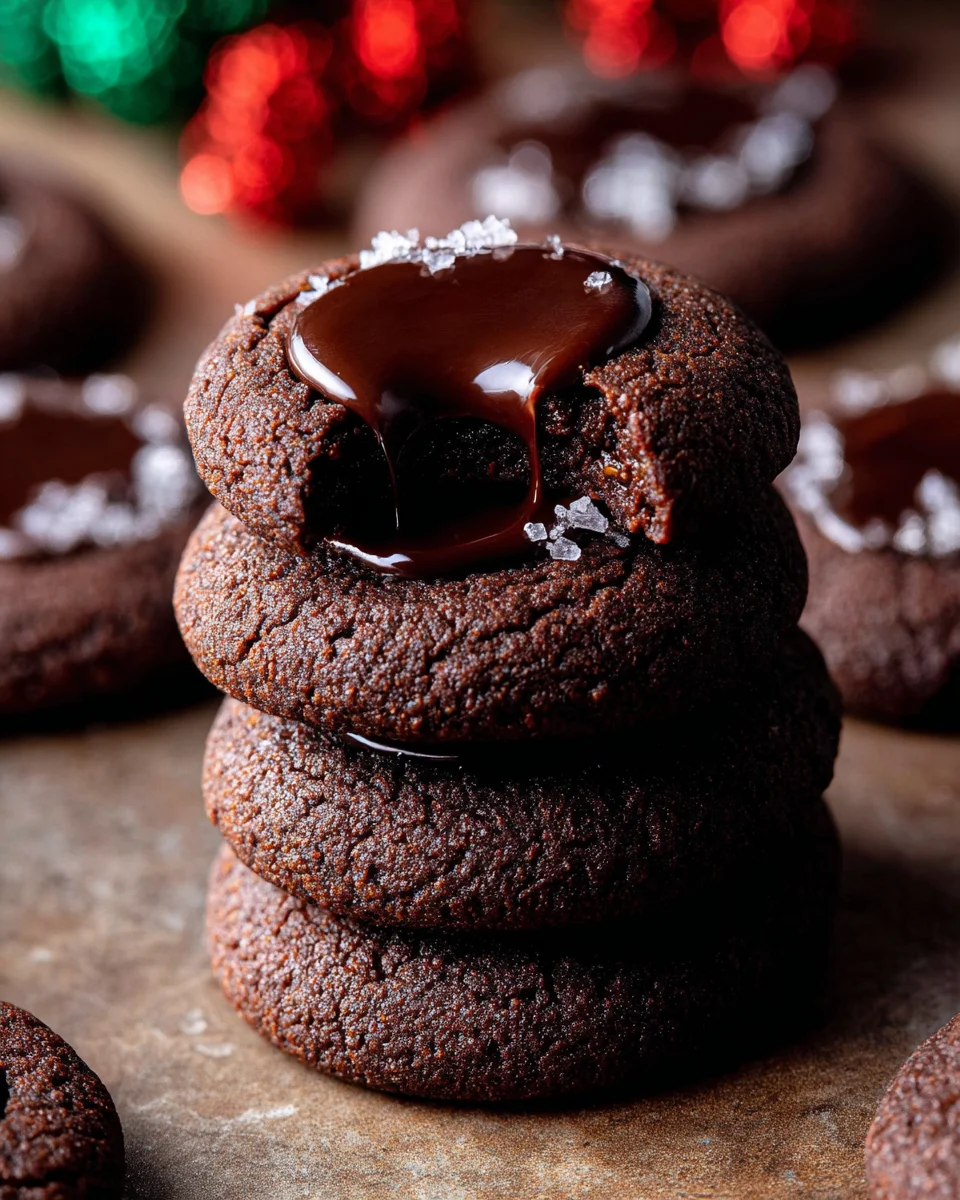
Chocolate Thumbprint Cookies are more than just a sweet treat; they are a delightful invitation to pure indulgence. Imagine sinking your teeth into a wonderfully tender, rich chocolate cookie, perfectly balanced with a surprise burst of creamy, melt-in-your-mouth filling in its center. It’s this irresistible combination that makes them a true showstopper on any dessert table and a cherished part of countless baking traditions.
While the classic thumbprint cookie often traces its roots to Scandinavian traditions, frequently featuring vibrant jam centers, our chocolate rendition takes this beloved concept to an exciting new level. I’ve found that the addition of deep cocoa powder transforms the humble thumbprint into something truly extraordinary, appealing to chocolate lovers everywhere. People adore these cookies not only for their intense flavor – the perfect marriage of a soft, chewy chocolate base with a luscious filling – but also for their charming visual appeal. Each cookie, with its neat indentation holding a glistening dollop of deliciousness, is a miniature work of art.
Why are these Chocolate Thumbprint Cookies so universally loved? Beyond their stunning taste and delightful texture, they evoke a sense of warmth and homemade comfort. They are the perfect embodiment of a special occasion cookie that’s also wonderfully accessible for everyday cravings. Their versatility means you can fill them with anything from rich caramel to smooth ganache or even more chocolate, allowing for endless customization. Get ready to create a batch of these truly unforgettable treats!

Ingredients:
- For the Chocolate Thumbprint Cookie Dough:
- 1 cup (2 sticks or 226g) unsalted butter, softened to room temperature
- ¾ cup (150g) granulated sugar
- 1 large egg yolk
- 1 teaspoon pure vanilla extract
- 2 cups (240g) all-purpose flour
- ¼ cup (25g) unsweetened cocoa powder (I prefer Dutch-processed for a richer color and flavor)
- ¼ teaspoon salt
- For the Chocolate Ganache Filling:
- ½ cup (120ml) heavy cream (also known as heavy whipping cream)
- 4 ounces (113g) good quality semi-sweet or dark chocolate, finely chopped (chocolate chips can work, but a bar chopped finely melts more smoothly)
- 1 tablespoon (14g) unsalted butter, cut into small pieces (optional, for extra gloss and richness)
- Pinch of salt (optional, to enhance chocolate flavor)
- For Decoration (Optional):
- Flaky sea salt, for sprinkling
- Powdered sugar, for dusting
- Mini chocolate chips or sprinkles
Making the Chocolate Thumbprint Cookie Dough
Creating the perfect base for our Chocolate Thumbprint Cookies is all about precise mixing and understanding your ingredients. This dough comes together beautifully, resulting in a tender, slightly crumbly cookie that perfectly complements the rich chocolate filling. Let’s get started!
- Prepare Your Workspace and Ingredients: First things first, preheat your oven to 350°F (175°C). Line two large baking sheets with parchment paper or silicone baking mats. This step is crucial for preventing sticking and ensuring even baking. I always find that having everything ready before I start makes the baking process so much more enjoyable and stress-free. Make sure your butter is truly at room temperature – it should be soft enough to make an indentation with your finger without melting, but not greasy. This ensures it creams properly with the sugar.
- Cream Butter and Sugar: In the bowl of a stand mixer fitted with the paddle attachment, or with a large bowl and a handheld electric mixer, cream together the softened unsalted butter and granulated sugar. Beat on medium speed for about 3-5 minutes. You’re looking for a light, fluffy, and pale-yellow mixture. This process incorporates air into the butter, which contributes to the tenderness of the final cookie. Scrape down the sides of the bowl often with a rubber spatula to ensure everything is evenly combined. Don’t rush this step; it’s fundamental to the cookie’s texture.
- Add Wet Ingredients: Once your butter and sugar are beautifully creamed, add the egg yolk and vanilla extract. Beat on medium speed for another 1-2 minutes, until they are fully incorporated and the mixture looks smooth and cohesive. The egg yolk adds richness and helps bind the dough, while vanilla is, of course, essential for that classic comforting cookie flavor.
- Combine Dry Ingredients: In a separate medium bowl, whisk together the all-purpose flour, cocoa powder, and salt. Whisking ensures these dry ingredients are evenly distributed, especially the cocoa powder, so you don’t end up with pockets of unmixed flour in your dough. I highly recommend using Dutch-processed cocoa powder for these cookies; it gives them a darker, richer chocolate flavor and a more striking appearance compared to natural cocoa powder.
- Gradually Add Dry to Wet Ingredients: With the mixer on low speed, gradually add the dry ingredient mixture to the wet ingredients, mixing just until combined. It’s very important not to overmix the dough at this stage. Overmixing can develop the gluten in the flour too much, leading to tough, chewy cookies instead of the melt-in-your-mouth tenderness we’re aiming for. Stop mixing as soon as no streaks of flour are visible. The dough will be soft but shouldn’t be sticky.
- Chill the Dough (Optional, but Recommended): While not strictly necessary if your dough feels firm, I often find that chilling the dough for 20-30 minutes in the refrigerator makes it much easier to handle and helps prevent the cookies from spreading too much during baking. If your kitchen is warm or your butter was very soft, this step is highly recommended to ensure your Chocolate Thumbprint Cookies hold their shape beautifully.
Forming and Baking the Chocolate Thumbprint Cookies
Now comes the fun part – shaping our delightful Chocolate Thumbprint Cookies! This stage is all about gentle handling and creating the perfect little well for our decadent ganache. Let’s get these beauties ready for the oven!
- Portion the Dough: Take small portions of the dough, about 1 tablespoon each. I like to use a small cookie scoop for consistency, which ensures all my cookies are roughly the same size and bake evenly.
- Roll into Balls: Roll each portion of dough between your palms to form a smooth ball. Aim for balls that are approximately 1-inch in diameter. As you roll, the warmth of your hands will slightly soften the dough, making it pliable. Place the rolled dough balls about 1-2 inches apart on your prepared baking sheets. This spacing allows for a little expansion during baking and ensures air circulates properly around each cookie.
-
Create the Indentation: This is where the “thumbprint” comes in! You have a few options here:
- The Classic Thumb: Gently press your thumb into the center of each dough ball, creating a shallow indentation. Be careful not to press all the way through to the bottom.
- Round Teaspoon or Measuring Spoon: For a more uniform and neat indentation, I often use the back of a ½ teaspoon or a small measuring spoon. Dip the spoon in a little flour if the dough is sticking, then gently press and twist it into the center of each cookie. This creates a beautifully defined well.
- Handle of a Wooden Spoon: Another great tool is the rounded end of a wooden spoon handle. It creates a slightly wider and deeper well, perfect for holding more ganache!
Important Tip: If the edges of your cookies crack a bit when you press, don’t worry! Simply gently push the dough back together around the edges to reshape them. We want nice, intact walls to hold our ganache filling.
- Bake the Cookies: Transfer the baking sheets to your preheated oven. Bake for 10-12 minutes. The exact baking time will depend on your oven and the size of your cookies. You’ll know they’re done when the edges are set and appear slightly firm, but the centers still look a little soft. These are Chocolate Thumbprint Cookies, and like many chocolate cookies, it can be tricky to tell when they’re done by color alone. Err on the side of slightly underbaking rather than overbaking, as they will continue to set as they cool, and this helps keep them wonderfully tender.
- Cooling Process: Once baked, remove the baking sheets from the oven. Let the cookies cool on the baking sheets for about 5 minutes before carefully transferring them to a wire rack to cool completely. They will be quite delicate when warm, so handle them with care. Cooling completely on a wire rack is crucial before filling, as residual heat could melt our beautiful ganache.
Preparing the Chocolate Ganache Filling
The star of our Chocolate Thumbprint Cookies, beyond the cookie itself, is undoubtedly the rich, luscious chocolate ganache filling. This velvety smooth center elevates these cookies from simple to simply irresistible. Don’t be intimidated; making ganache is surprisingly easy and incredibly rewarding!
- Chop the Chocolate: While your cookies are cooling, finely chop your good quality semi-sweet or dark chocolate. The finer the chop, the more quickly and smoothly the chocolate will melt. I can’t stress enough the importance of good quality chocolate here; it truly makes all the difference in the flavor and texture of your ganache. Chocolate chips often contain stabilizers that can make ganache a bit grainy, so a chopped bar is always my preferred choice. Place the chopped chocolate in a heatproof bowl. If using, add the optional tablespoon of butter and a pinch of salt to the bowl with the chocolate.
- Heat the Heavy Cream: In a small saucepan, heat the heavy cream over medium heat until it just begins to simmer and small bubbles appear around the edges. Do not let it boil vigorously! Boiling can cause the cream to separate or scorch, which we absolutely want to avoid for our delicate ganache. Keep a close eye on it.
- Pour Cream Over Chocolate: Immediately remove the hot cream from the heat and pour it directly over the chopped chocolate (and butter/salt, if using) in the heatproof bowl. Let it sit undisturbed for 5 minutes. This allows the hot cream to gently melt the chocolate, ensuring a smooth, lump-free ganache.
- Stir to Emulsify: After 5 minutes, begin stirring the mixture gently from the center outwards with a whisk or rubber spatula. Continue stirring slowly and steadily until the chocolate is completely melted and the mixture is smooth, glossy, and beautifully emulsified. It will transform into a rich, dark, and luxurious chocolate sauce. If you find any stubborn lumps, you can gently heat the bowl over a double boiler or microwave for a few seconds, but be very careful not to overheat. The ganache should be perfectly pourable but thick enough to hold its shape once set.
- Cool the Ganache: Allow the ganache to cool slightly at room temperature for about 15-20 minutes, or until it has thickened enough to hold its shape when piped or spooned into the cookie indentations. If it’s too warm, it will simply run out of the wells. If you want to speed up the process, you can refrigerate it, but be sure to stir it every 5-10 minutes to prevent it from setting too hard around the edges. We’re looking for a thick but still fluid consistency, similar to a soft pudding.
Assembling and Finishing Your Chocolate Thumbprint Cookies
We’re almost there! The final steps bring all our hard work together into these utterly irresistible Chocolate Thumbprint Cookies. Get ready to enjoy the fruits of your labor!
- Fill the Cookies: Once the cookies are completely cool and the ganache has reached the desired consistency (thickened but still easily spoonable or pipeable), it’s time to fill them. You can use a small spoon, a piping bag with a small round tip, or even a ziplock bag with a corner snipped off to carefully fill each indentation with the chocolate ganache. Fill them generously, but make sure not to overfill so it doesn’t spill over the edges. Each cookie should have a beautiful, glistening pool of chocolate.
-
Optional Decorations: This is where you can add your personal touch!
- Flaky Sea Salt: For a sophisticated touch that beautifully contrasts the sweetness of the chocolate, sprinkle a tiny pinch of flaky sea salt over the wet ganache in each cookie. The salt enhances the chocolate flavor in the most delightful way.
- Powdered Sugar: A light dusting of powdered sugar over the entire cookie can add an elegant finish, especially if you want a classic look.
- Other Toppings: Mini chocolate chips, edible glitter, or finely chopped nuts can also be sprinkled on top of the ganache while it’s still wet.
- Set the Ganache: Allow the filled Chocolate Thumbprint Cookies to sit at room temperature for at least 1-2 hours, or until the ganache has fully set. If you’re in a hurry, you can carefully place them in the refrigerator for about 30 minutes to speed up the setting process. Once set, the ganache will be firm enough that it won’t smudge when handled, but still delightfully soft and fudgy when you bite into it.
Storage and Enjoyment Tips for Your Chocolate Thumbprint Cookies
These Chocolate Thumbprint Cookies are best enjoyed within a few days of baking. Store them in an airtight container at room temperature for up to 3-4 days. If your kitchen is particularly warm, or if you prefer a firmer ganache, you can store them in the refrigerator, but let them come to room temperature for about 15-20 minutes before serving for the best texture and flavor. The cookie base will soften slightly over time, but the flavor will remain fantastic. These also make wonderful gifts for friends and family, so consider doubling the recipe!
Common Troubleshooting for Chocolate Thumbprint Cookies:
- Cookies Spreading Too Much: This often happens if your butter was too warm, or if you didn’t chill the dough. Ensure butter is just softened, not melted, and consider a quick chill for the dough balls before baking.
- Cracked Edges on Thumbprints: If the dough is too cold, it can crack. Let it sit at room temperature for a few minutes if it’s straight from the fridge. Gentle pressure and reshaping any cracks will fix this.
- Ganache Too Thin: If your ganache is too runny after cooling, it might need more time to thicken, or perhaps a tiny bit more chocolate was needed. Try refrigerating it for a bit longer, stirring frequently.
- Ganache Too Thick/Hard: If the ganache becomes too firm to work with, gently warm it in a double boiler or microwave for short bursts (5-10 seconds), stirring until it reaches the desired consistency. Adding a teaspoon of hot cream can also help loosen it.
I genuinely hope you enjoy baking and devouring these exquisite Chocolate Thumbprint Cookies as much as I do. They are truly a delightful treat for any occasion, offering a perfect balance of tender cookie and rich, fudgy chocolate ganache. Happy baking, my friends!
Conclusion:
And there you have it, my friends! We’ve journeyed through the creation of what I truly believe are some of the most comforting and utterly delightful cookies you’ll ever bake. This recipe for
Chocolate Thumbprint Cookies
isn’t just another cookie recipe; it’s an invitation to experience pure, unadulterated joy in every single bite. I can’t stress enough why these gems are an absolute must-try. They strike the perfect balance between a tender, buttery cookie base that practically melts in your mouth and a rich, decadent chocolate ganache filling that provides that satisfying cocoa burst. The textural contrast is simply divine – the slight crisp of the edge, the soft chewiness of the cookie, and the smooth, creamy chocolate center all come together in a symphony of flavors that will leave you reaching for another, and another!
What I particularly adore about these cookies is their incredible versatility and undeniable charm. They look homemade in the best possible way – rustic, inviting, and clearly made with love. The aroma that fills your kitchen as they bake is a treat in itself, a warm and welcoming scent that promises something wonderful. These aren’t just for special occasions, though they certainly elevate any dessert table; they’re perfect for a cozy afternoon treat with a cup of tea, a thoughtful homemade gift for a neighbor, or simply as a well-deserved indulgence after a long day. The effort-to-reward ratio here is off the charts! You’ll be amazed at how simple they are to bring to life, yielding a batch of cookies that look and taste like they came straight from a gourmet bakery.
Now, let’s talk about how to truly make these your own and elevate the experience even further. While these
Chocolate Thumbprint Cookies
are utterly fantastic on their own, serving them can be an art form. Imagine presenting them on a charming platter alongside a steaming mug of hot cocoa, perhaps with a dollop of whipped cream and a sprinkle of cinnamon – pure bliss on a chilly evening. For a more sophisticated offering, pair them with a robust espresso or a delicate herbal tea. They also make a fantastic addition to any holiday cookie assortment, providing that crucial chocolatey element everyone craves. Think about arranging them artfully with some fresh berries or a sprinkle of powdered sugar for an extra touch of elegance. For the little ones (or the young at heart!), a tall glass of cold milk is the quintessential accompaniment, bringing back nostalgic memories of childhood.
But don’t stop there! One of the great joys of baking is experimenting and adding your personal twist. These thumbprint cookies are ripe for variation. While the classic dark chocolate ganache is truly superb, consider filling the thumbprints with a luscious white chocolate ganache for a striking visual contrast and a different flavor profile. Or, for the true chocolate lover, perhaps a molten caramel center, or even a raspberry jam for a classic thumbprint with a twist before topping with chocolate. You could also experiment with different extracts in the cookie dough – a hint of almond, peppermint, or orange can transform the entire experience. Don’t be shy about adding a sprinkle of sea salt flakes over the chocolate filling immediately after they’re baked for a sophisticated sweet-and-salty kick, or some festive sprinkles for a more playful touch. Even rolling the dough balls in finely chopped nuts before pressing the thumbprint can add another layer of texture and flavor. The possibilities are truly endless, limited only by your imagination!
So, what are you waiting for? I wholeheartedly encourage you to roll up your sleeves, gather your ingredients, and give these incredible cookies a try. I promise you, the moment you bite into one of your freshly baked creations, you’ll understand exactly what I mean. There’s something profoundly satisfying about baking something so delicious from scratch, and these cookies are designed to deliver that feeling of accomplishment and pure culinary delight. Go ahead, make a batch, and let your kitchen fill with that irresistible aroma! Once you’ve experienced the magic, please, please share your creations with me! I absolutely adore seeing your baking triumphs, hearing about your serving suggestions, and learning about any creative variations you came up with. Your insights and photos inspire me and our entire baking community. Happy baking, my friends, and get ready to fall in love with your new favorite cookie!
Chocolate Thumbprint Cookies
Chocolate Thumbprint Cookies are a delightful invitation to pure indulgence. These tender, rich chocolate cookies feature a surprise burst of creamy, melt-in-your-mouth chocolate ganache in their center, making them a true showstopper on any dessert table and a cherished part of countless baking traditions.
Ingredients
Instructions
Important Information
Nutrition Facts (Per Serving)
It is important to consider this information as approximate and not to use it as definitive health advice.
Allergy Information
Please check ingredients for potential allergens and consult a health professional if in doubt.