Chicken katsu curry, a symphony of crispy, golden-brown cutlets swimming in a rich, savory curry sauce, is a dish that transcends borders and tantalizes taste buds. Have you ever craved a meal that’s both comforting and exciting, familiar yet subtly exotic? Then look no further! This Japanese-inspired delight is about to become your new weeknight staple.
While the “katsu” element – the breaded and fried cutlet – has its roots in European cuisine introduced to Japan during the Meiji era, the curry itself is a fascinating adaptation of Indian curry brought over by the British. Over time, the Japanese have masterfully transformed it into something uniquely their own, a milder, sweeter, and thicker curry that perfectly complements the crispy chicken.
What makes chicken katsu curry so universally loved? It’s the delightful contrast of textures – the satisfying crunch of the katsu against the smooth, velvety curry. It’s the harmonious blend of flavors – the savory chicken, the aromatic curry spices, and the subtle sweetness that lingers on your palate. Plus, it’s incredibly versatile! Serve it with fluffy white rice, noodles, or even as a topping for fries. And the best part? It’s surprisingly easy to make at home. So, let’s embark on a culinary adventure and create this irresistible dish together!

Ingredients:
- For the Chicken Katsu:
- 4 boneless, skinless chicken breasts (about 6-8 ounces each)
- 1 cup all-purpose flour
- 2 large eggs, beaten
- 2 cups panko breadcrumbs
- 1 teaspoon salt
- 1/2 teaspoon black pepper
- 1/2 teaspoon garlic powder
- Vegetable oil, for frying
- For the Curry Sauce:
- 2 tablespoons vegetable oil
- 1 large onion, chopped
- 2 cloves garlic, minced
- 1 inch ginger, grated
- 1 large carrot, peeled and chopped
- 2 medium potatoes, peeled and cubed
- 4 cups chicken broth
- 2 tablespoons soy sauce
- 1 tablespoon Worcestershire sauce
- 1 teaspoon honey or sugar
- 2-3 tablespoons curry powder (adjust to taste)
- 1 bay leaf
- 1 apple, peeled, cored, and grated (optional, but adds sweetness and depth)
- 2 tablespoons cornstarch (mixed with 2 tablespoons cold water to create a slurry)
- Salt and pepper to taste
- For Serving:
- Cooked white rice (Japanese short-grain rice is ideal)
- Optional garnishes: sliced green onions, pickled ginger (beni shoga), fukujinzuke (Japanese pickled vegetables)
Preparing the Chicken Katsu:
Alright, let’s get started with the star of the show – the crispy, golden chicken katsu! This part is all about the breading, so pay attention to the details for the best results.
- Prepare the Chicken Breasts: First, we need to make sure the chicken breasts are an even thickness. Place each chicken breast between two sheets of plastic wrap. Using a meat mallet or rolling pin, pound the chicken to about 1/2-inch thickness. This helps them cook evenly and become nice and tender. Season both sides of each chicken breast with salt, pepper, and garlic powder.
- Set up the Breading Station: Now, set up your breading station. You’ll need three shallow dishes. In the first dish, place the all-purpose flour. In the second dish, whisk the eggs. In the third dish, place the panko breadcrumbs. Make sure you have enough panko to fully coat all the chicken.
- Bread the Chicken: Take one chicken breast and dredge it in the flour, making sure to coat it completely. Shake off any excess flour. Next, dip the floured chicken into the beaten eggs, ensuring it’s fully coated. Finally, dredge the chicken in the panko breadcrumbs, pressing the breadcrumbs gently to adhere. You want a nice, thick coating of panko for that perfect crispy texture. Repeat this process with the remaining chicken breasts.
- Rest the Breaded Chicken: Place the breaded chicken breasts on a plate or baking sheet and let them rest for about 10-15 minutes. This helps the breading adhere better during frying.
Frying the Chicken Katsu:
Time to get that golden-brown perfection! Frying can seem intimidating, but with a little care, you’ll have perfectly cooked katsu in no time.
- Heat the Oil: Pour about 1/2 inch of vegetable oil into a large skillet or frying pan. Heat the oil over medium-high heat until it reaches about 350°F (175°C). You can use a thermometer to check the temperature, or test it by dropping a few panko breadcrumbs into the oil – they should sizzle gently and turn golden brown in a few seconds.
- Fry the Chicken: Carefully place the breaded chicken breasts into the hot oil, being careful not to overcrowd the pan. Fry for about 3-4 minutes per side, or until the chicken is cooked through and the breading is golden brown and crispy. The internal temperature of the chicken should reach 165°F (74°C).
- Drain the Chicken: Remove the fried chicken from the pan and place it on a wire rack lined with paper towels to drain excess oil. This helps keep the katsu crispy.
- Slice the Katsu: Once the chicken has cooled slightly, slice each breast into 1-inch thick strips. This makes it easier to eat and also looks great when served.
Making the Curry Sauce:
Now for the heart of the dish – the flavorful curry sauce! This is where you can really customize the flavors to your liking. Don’t be afraid to experiment with different curry powders and spices.
- Sauté the Aromatics: Heat the vegetable oil in a large pot or Dutch oven over medium heat. Add the chopped onion and cook until softened and translucent, about 5-7 minutes. Add the minced garlic and grated ginger and cook for another minute until fragrant. Be careful not to burn the garlic.
- Add the Vegetables: Add the chopped carrot and cubed potatoes to the pot. Cook for about 5 minutes, stirring occasionally, until the vegetables are slightly softened.
- Add the Liquids and Seasonings: Pour in the chicken broth, soy sauce, Worcestershire sauce, and honey (or sugar). Stir in the curry powder and add the bay leaf. If you’re using it, add the grated apple at this stage. Bring the mixture to a boil, then reduce the heat to low, cover, and simmer for about 20-25 minutes, or until the vegetables are tender.
- Thicken the Curry: In a small bowl, whisk together the cornstarch and cold water to create a slurry. Slowly pour the cornstarch slurry into the simmering curry, stirring constantly, until the sauce thickens to your desired consistency. This usually takes just a minute or two.
- Season to Taste: Remove the bay leaf. Taste the curry and season with salt and pepper as needed. You can also add more curry powder if you want a stronger curry flavor. If the curry is too thick, add a little more chicken broth to thin it out. If it’s too thin, simmer it for a few more minutes to reduce it.
- Blend for a Smooth Sauce (Optional): For a smoother curry sauce, you can use an immersion blender to blend the sauce directly in the pot. Alternatively, you can carefully transfer the sauce to a regular blender and blend until smooth. Be careful when blending hot liquids!
Assembling and Serving:
The final step – putting it all together and enjoying your delicious Chicken Katsu Curry!
- Prepare the Rice: Cook the white rice according to package directions. Japanese short-grain rice is ideal for this dish, as it’s sticky and holds its shape well.
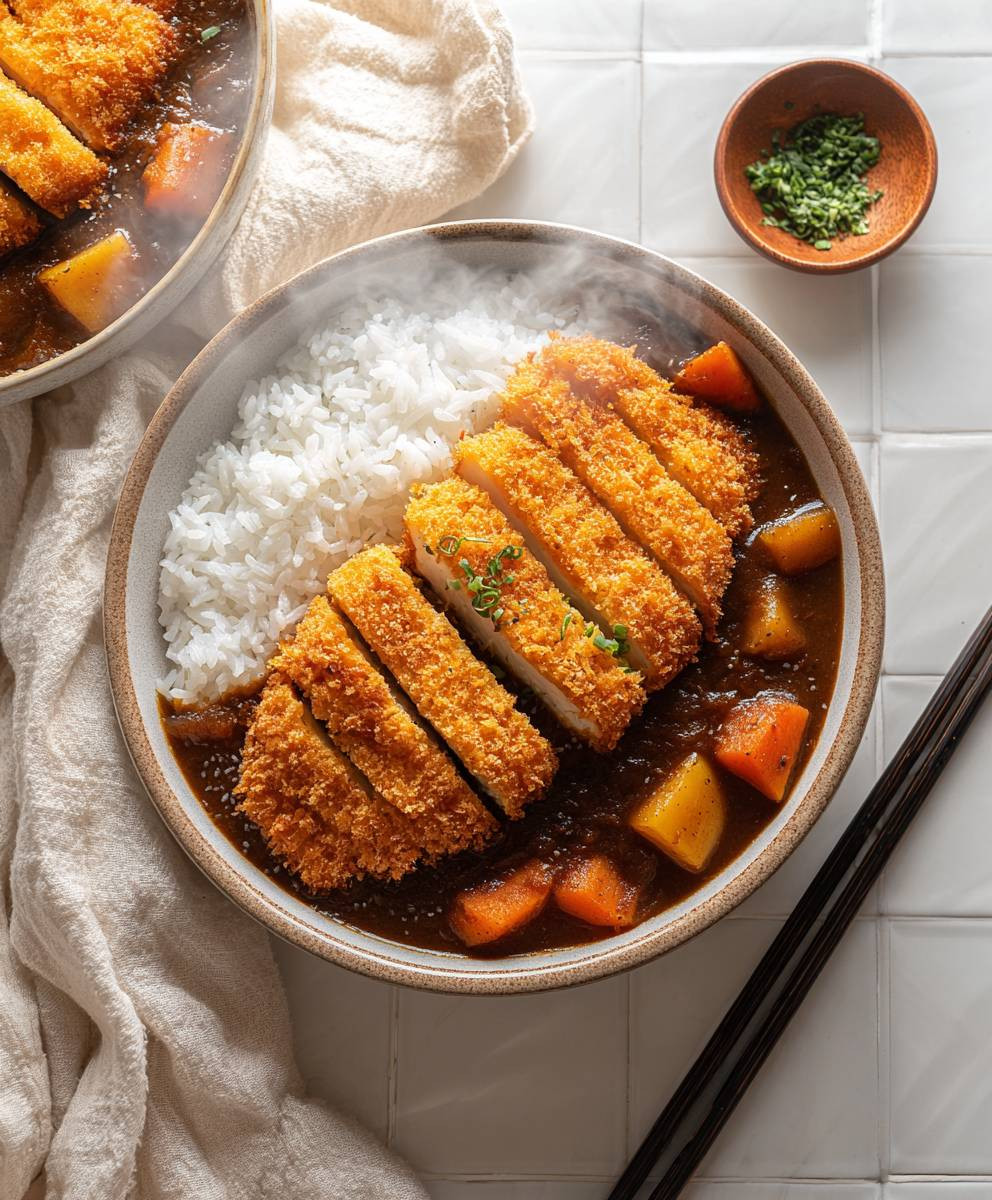
- Plate the Dish: Spoon a generous serving of cooked rice onto a plate or bowl. Arrange the sliced chicken katsu on top of the rice.
- Ladle the Curry: Ladle the curry sauce over the chicken katsu and rice. Make sure to get plenty of sauce on everything!
- Garnish (Optional): Garnish with sliced green onions, pickled ginger (beni shoga), and/or fukujinzuke (Japanese pickled vegetables) for added flavor and visual appeal.
- Serve and Enjoy! Serve immediately and enjoy your homemade Chicken Katsu Curry! It’s best enjoyed hot and fresh.
Conclusion:
So there you have it! This Chicken Katsu Curry recipe isn’t just another meal; it’s a flavor explosion waiting to happen. I truly believe this will become a staple in your kitchen, and here’s why: the crispy, golden-brown chicken katsu paired with the rich, savory, and slightly sweet curry sauce is a match made in culinary heaven. It’s comforting, satisfying, and surprisingly easy to make, even on a busy weeknight. Forget takeout; this homemade version is fresher, tastier, and you know exactly what’s going into it!
But the best part? It’s incredibly versatile! While I’ve shared my go-to method, feel free to experiment and make it your own.
Serving Suggestions and Variations:
* Rice is your best friend: Serve it over a bed of fluffy, steamed Japanese rice. Short-grain rice is ideal for soaking up all that delicious curry sauce.
* Veggie Power: Add extra vegetables to the curry! Carrots, potatoes, onions, and bell peppers are classic choices, but don’t be afraid to get creative. Broccoli, cauliflower, or even zucchini would work beautifully. Just adjust the cooking time accordingly.
* Spice it up (or down): If you like a little heat, add a pinch of cayenne pepper or a dash of chili flakes to the curry sauce. For a milder flavor, omit the chili altogether. You can also control the spice level by using different types of curry roux.
* Katsu Sandwich: Transform your leftover chicken katsu into a delicious sandwich! Slather some tonkatsu sauce on a toasted bun, add the katsu, and top with shredded cabbage for a satisfying lunch.
* Egg-cellent Addition: Top your curry with a fried egg for extra richness and protein. The runny yolk adds a lovely creaminess to the dish.
* Pickled Perfection: Serve with a side of Japanese pickles (tsukemono) for a refreshing contrast to the rich curry.
* Coconut Curry Twist: For a creamier and slightly sweeter curry, add a can of coconut milk to the sauce. This also adds a lovely tropical flavor.
* Breadcrumbs: Panko breadcrumbs are the key to that perfect crispy katsu, but if you don’t have any on hand, you can use regular breadcrumbs. Just make sure to toast them lightly in a pan before using them to add some extra crunch.
* Make it Vegetarian: Swap the chicken for tofu or eggplant for a delicious vegetarian version. Coat the tofu or eggplant in the same breading mixture and fry until golden brown.
I’m confident that once you try this Chicken Katsu Curry, you’ll be hooked. It’s a guaranteed crowd-pleaser, perfect for family dinners, casual gatherings, or even a special occasion. The combination of textures and flavors is simply irresistible.
So, what are you waiting for? Gather your ingredients, put on your apron, and get cooking! I can’t wait to hear about your experience. Don’t forget to share your photos and comments below. Let me know what variations you tried and how you made the recipe your own. Happy cooking, and enjoy your delicious homemade Chicken Katsu Curry! I hope you love it as much as I do!
Chicken Katsu Curry: The Ultimate Guide to Making It at Home
Crispy, golden chicken katsu served with flavorful homemade Japanese curry sauce over fluffy white rice. A comforting and delicious meal!
Ingredients
- 4 boneless, skinless chicken breasts (about 6-8 ounces each)
- 1 cup all-purpose flour
- 2 large eggs, beaten
- 2 cups panko breadcrumbs
- 1 teaspoon salt
- 1/2 teaspoon black pepper
- 1/2 teaspoon garlic powder
- Vegetable oil, for frying
- 2 tablespoons vegetable oil
- 1 large onion, chopped
- 2 cloves garlic, minced
- 1 inch ginger, grated
- 1 large carrot, peeled and chopped
- 2 medium potatoes, peeled and cubed
- 4 cups chicken broth
- 2 tablespoons soy sauce
- 1 tablespoon Worcestershire sauce
- 1 teaspoon honey or sugar
- 2-3 tablespoons curry powder (adjust to taste)
- 1 bay leaf
- 1 apple, peeled, cored, and grated (optional, but adds sweetness and depth)
- 2 tablespoons cornstarch (mixed with 2 tablespoons cold water to create a slurry)
- Salt and pepper to taste
- Cooked white rice (Japanese short-grain rice is ideal)
- Optional garnishes: sliced green onions, pickled ginger (beni shoga), fukujinzuke (Japanese pickled vegetables)
Instructions
- Place each chicken breast between two sheets of plastic wrap. Using a meat mallet or rolling pin, pound the chicken to about 1/2-inch thickness. Season both sides of each chicken breast with salt, pepper, and garlic powder.
- Set up three shallow dishes. In the first dish, place the all-purpose flour. In the second dish, whisk the eggs. In the third dish, place the panko breadcrumbs.
- Dredge each chicken breast in flour, then dip in beaten eggs, and finally coat thoroughly with panko breadcrumbs, pressing gently to adhere.
- Place the breaded chicken breasts on a plate or baking sheet and let them rest for about 10-15 minutes.
- Pour about 1/2 inch of vegetable oil into a large skillet or frying pan. Heat the oil over medium-high heat until it reaches about 350°F (175°C).
- Carefully place the breaded chicken breasts into the hot oil, being careful not to overcrowd the pan. Fry for about 3-4 minutes per side, or until the chicken is cooked through and the breading is golden brown and crispy. The internal temperature of the chicken should reach 165°F (74°C).
- Remove the fried chicken from the pan and place it on a wire rack lined with paper towels to drain excess oil.
- Once the chicken has cooled slightly, slice each breast into 1-inch thick strips.
- Heat the vegetable oil in a large pot or Dutch oven over medium heat. Add the chopped onion and cook until softened and translucent, about 5-7 minutes. Add the minced garlic and grated ginger and cook for another minute until fragrant.
- Add the chopped carrot and cubed potatoes to the pot. Cook for about 5 minutes, stirring occasionally, until the vegetables are slightly softened.
- Pour in the chicken broth, soy sauce, Worcestershire sauce, and honey (or sugar). Stir in the curry powder and add the bay leaf. If you’re using it, add the grated apple at this stage. Bring the mixture to a boil, then reduce the heat to low, cover, and simmer for about 20-25 minutes, or until the vegetables are tender.
- In a small bowl, whisk together the cornstarch and cold water to create a slurry. Slowly pour the cornstarch slurry into the simmering curry, stirring constantly, until the sauce thickens to your desired consistency. This usually takes just a minute or two.
- Remove the bay leaf. Taste the curry and season with salt and pepper as needed. You can also add more curry powder if you want a stronger curry flavor. If the curry is too thick, add a little more chicken broth to thin it out. If it’s too thin, simmer it for a few more minutes to reduce it.
- For a smoother curry sauce, you can use an immersion blender to blend the sauce directly in the pot. Alternatively, you can carefully transfer the sauce to a regular blender and blend until smooth. Be careful when blending hot liquids!
- Cook the white rice according to package directions. Japanese short-grain rice is ideal for this dish, as it’s sticky and holds its shape well.
- Spoon a generous serving of cooked rice onto a plate or bowl. Arrange the sliced chicken katsu on top of the rice.
- Ladle the curry sauce over the chicken katsu and rice. Make sure to get plenty of sauce on everything!
- Garnish with sliced green onions, pickled ginger (beni shoga), and/or fukujinzuke (Japanese pickled vegetables) for added flavor and visual appeal.
- Serve immediately and enjoy your homemade Chicken Katsu Curry! It’s best enjoyed hot and fresh.
Notes
- Pounding the chicken breasts to an even thickness ensures even cooking and tender results.
- Resting the breaded chicken helps the breading adhere better during frying.
- Use a thermometer to ensure the oil is at the correct temperature for frying.
- Adjust the amount of curry powder to your preferred level of spiciness.
- For a smoother curry sauce, blend with an immersion blender or regular blender (carefully!).
- Japanese short-grain rice is recommended for its sticky texture.