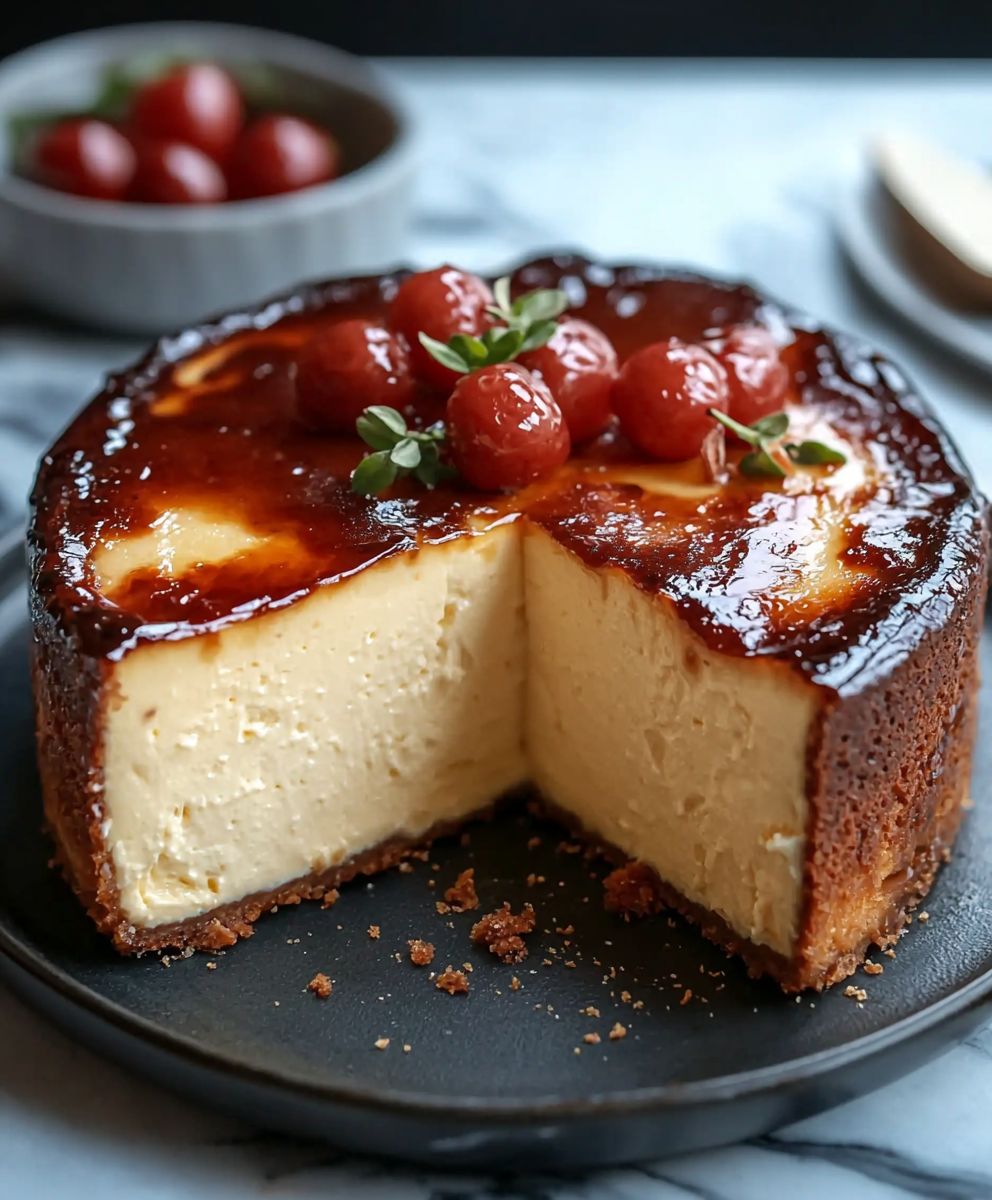
Basque Cheesecake Loaf Pan: Prepare to embark on a culinary adventure that will redefine your understanding of cheesecake! Forget everything you thought you knew about fussy water baths and perfectly smooth surfaces. This recipe embraces imperfection, celebrating the beautifully burnt top and the irresistibly creamy interior that makes Basque cheesecake so unique.
Originating from the Basque region of Spain, this cheesecake is a testament to rustic simplicity. Legend has it that La Viña, a renowned restaurant in San Sebastian, Spain, first created this iconic dessert. Unlike its American counterpart, Basque cheesecake is intentionally baked at a high temperature to achieve its signature dark, almost caramelized exterior. This high-heat baking process creates a delightful contrast between the deeply flavorful crust and the custardy center.
What makes this Basque cheesecake loaf pan recipe so appealing? It’s the sheer ease of preparation combined with the incredible flavor payoff. People adore this dessert for its intensely rich and creamy texture, its subtle sweetness, and the delightful hint of bitterness from the caramelized top. Plus, baking it in a loaf pan makes it incredibly convenient for slicing and serving, perfect for a weeknight treat or a sophisticated addition to your next gathering. Get ready to impress your friends and family with this surprisingly simple yet utterly decadent dessert!

Ingredients:
- Cream Cheese: 900g (32 oz), full-fat, softened to room temperature. This is crucial for the creamy texture! Don’t skimp on the fat content.
- Granulated Sugar: 250g (1 1/4 cups). Adjust slightly to your preference, but remember sugar contributes to the caramelization.
- Large Eggs: 5 large, at room temperature. Room temperature eggs emulsify better, creating a smoother batter.
- Heavy Cream: 480ml (2 cups). Again, full-fat is key! This adds richness and helps with the signature Basque cheesecake texture.
- All-Purpose Flour: 30g (1/4 cup). Just a touch to provide some structure. Don’t overdo it, or you’ll lose the creamy, almost custardy interior.
- Vanilla Extract: 1 teaspoon. Enhances the flavor, but feel free to experiment with other extracts like almond or lemon.
- Pinch of Salt: Just a pinch! Balances the sweetness and brings out the other flavors.
Preparing the Batter:
- Preheat your oven to 400°F (200°C). This high temperature is essential for achieving the dark, caramelized top that is characteristic of Basque cheesecake. Make sure your oven is properly calibrated for best results.
- Prepare your loaf pan. Line a 9×5 inch loaf pan with parchment paper, leaving plenty of overhang on all sides. This is incredibly important! The cheesecake will rise quite a bit during baking, and the overhang will prevent it from sticking to the pan and make it easy to lift out later. Don’t be afraid to crumple the parchment paper a bit; this helps it conform to the shape of the pan and creates those beautiful, rustic edges. I usually use two sheets of parchment, crisscrossing them to ensure complete coverage.
- Beat the cream cheese. In a large bowl (or the bowl of your stand mixer), beat the softened cream cheese with an electric mixer on medium speed until smooth and creamy. This usually takes about 2-3 minutes. Make sure there are no lumps! Lumpy cream cheese will result in a lumpy cheesecake. If you’re using a stand mixer, use the paddle attachment.
- Add the sugar. Gradually add the granulated sugar to the cream cheese, beating on medium speed until well combined. Scrape down the sides of the bowl as needed to ensure everything is evenly incorporated. Don’t overbeat at this stage; you don’t want to introduce too much air into the batter.
- Incorporate the eggs. Add the eggs one at a time, beating well after each addition. Again, scrape down the sides of the bowl as needed. Make sure each egg is fully incorporated before adding the next. This step is crucial for creating a smooth and stable emulsion.
- Add the heavy cream. Gradually pour in the heavy cream, beating on low speed until just combined. Be careful not to overmix! Overmixing can lead to a tough cheesecake.
- Add the flour and vanilla. Sift the flour into the batter and add the vanilla extract and salt. Gently fold everything together with a spatula until just combined. Do not overmix! A few streaks of flour are okay. Overmixing will develop the gluten in the flour, resulting in a denser, less creamy cheesecake.
Baking the Cheesecake:
- Pour the batter into the prepared loaf pan. Pour the batter evenly into the parchment-lined loaf pan. The batter will be quite liquid, which is perfectly normal.
- Bake the cheesecake. Bake in the preheated oven for 50-60 minutes, or until the top is deeply browned and caramelized, and the center is still slightly jiggly. The exact baking time will depend on your oven, so keep a close eye on it. The cheesecake should be very dark brown, almost burnt-looking, on top. This is what gives it its signature flavor. If the top is browning too quickly, you can loosely tent it with aluminum foil.
- Cool the cheesecake. Remove the cheesecake from the oven and let it cool completely in the loaf pan at room temperature. This is important! The cheesecake will continue to cook as it cools. Cooling at room temperature helps prevent cracking.
- Chill the cheesecake. Once the cheesecake has cooled to room temperature, cover it with plastic wrap and refrigerate for at least 4 hours, or preferably overnight. This allows the cheesecake to set completely and develop its full flavor.
Serving and Storing:
- Unmold the cheesecake. To unmold the cheesecake, gently lift it out of the loaf pan using the parchment paper overhang.
- Slice and serve. Slice the cheesecake with a sharp knife and serve chilled. The cheesecake is best served cold, as this allows the flavors to meld together and the texture to be at its best.
- Storage. Store leftover cheesecake in an airtight container in the refrigerator for up to 3-4 days. The cheesecake may become slightly softer over time, but it will still be delicious.
Tips for Success:
- Use full-fat ingredients. This is not the time to skimp on fat! Full-fat cream cheese and heavy cream are essential for achieving the creamy, rich texture that is characteristic of Basque cheesecake.
- Bring ingredients to room temperature. Room temperature ingredients emulsify better, resulting in a smoother batter. This is especially important for the cream cheese and eggs.
- Don’t overmix the batter. Overmixing can lead to a tough cheesecake. Mix the batter until just combined.
- Don’t be afraid to burn it! The dark, caramelized top is what gives Basque cheesecake its signature flavor. Don’t be afraid to let it get very dark brown, almost burnt-looking.
- Chill the cheesecake completely. Chilling the cheesecake allows it to set completely and develop its full flavor.
- Experiment with flavors. While vanilla extract is the classic flavoring, feel free to experiment with other extracts like almond or lemon. You can also add a swirl of caramel or chocolate to the batter.
- Parchment paper is your friend. Don’t skimp on the parchment paper! It’s essential for preventing the cheesecake from sticking to the pan and making it easy to lift out later.
Troubleshooting:
- Cracked Cheesecake: Cracking can be caused by several factors, including overbaking, cooling too quickly, or using ingredients that are too cold. To prevent cracking, make sure to bake the cheesecake at the correct temperature, cool it slowly at room temperature, and use room temperature ingredients.
- Lumpy Cheesecake: Lumpy cheesecake is usually caused by using cream cheese that is not softened enough. Make sure to soften the cream cheese to room temperature before beating it.
- Dense Cheesecake: Dense cheesecake can be caused by overmixing the batter or using too much flour. Be careful not to overmix the batter, and use the correct amount of flour.
- Cheesecake is too soft: This usually means it wasn’t baked long enough or chilled sufficiently. Make sure to bake until the top is deeply browned and the center is still slightly jiggly, and chill for at least 4 hours, or preferably overnight.
Conclusion:
This Basque cheesecake loaf pan recipe is truly a game-changer, and I wholeheartedly believe it deserves a spot in your regular baking rotation. Why? Because it delivers all the intensely caramelized, creamy, and slightly wobbly goodness of a traditional Basque cheesecake, but in a convenient and utterly charming loaf format. Forget fussy water baths and worrying about cracks – this method is surprisingly straightforward and yields consistently stunning results. The deep, rich flavor, coupled with the beautifully rustic appearance, makes it a showstopper that’s perfect for any occasion, from a casual weeknight dessert to an elegant dinner party.
But the best part? It’s incredibly versatile! While I adore it served simply, sliced and enjoyed at room temperature, there are countless ways to elevate your Basque cheesecake loaf pan experience. A dollop of lightly sweetened whipped cream and a scattering of fresh berries (raspberries and blueberries are particularly delightful) add a touch of freshness and visual appeal. For a more decadent treat, drizzle with a homemade salted caramel sauce or a rich chocolate ganache. And if you’re feeling adventurous, try infusing the batter with different flavors. A teaspoon of vanilla extract is a classic choice, but you could also experiment with citrus zest (lemon or orange would be lovely), a pinch of cardamom, or even a splash of your favorite liqueur.
Serving suggestions abound! This Basque cheesecake loaf pan is fantastic as a dessert, of course, but it’s also surprisingly delicious as part of a brunch spread. Imagine serving slices alongside fresh fruit, yogurt, and granola – a truly indulgent start to the day! It also pairs beautifully with a strong cup of coffee or tea, making it the perfect afternoon pick-me-up. And for a truly memorable dessert, try serving it with a scoop of vanilla ice cream or a dollop of mascarpone cheese.
Don’t be intimidated by the “burnt” appearance – that’s precisely what gives this cheesecake its signature flavor and texture. The high baking temperature creates a deeply caramelized crust that contrasts beautifully with the creamy, almost custard-like interior. It’s a textural and flavor sensation that you simply have to experience for yourself.
I truly encourage you to give this recipe a try. It’s a relatively simple bake, but the results are anything but ordinary. I’m confident that you’ll be amazed by the ease and the incredible flavor of this Basque cheesecake loaf pan. It’s a guaranteed crowd-pleaser and a recipe that you’ll be making again and again.
And most importantly, I’d love to hear about your experience! Did you try any variations? What were your favorite toppings? Share your photos and stories in the comments below. Let’s build a community of Basque cheesecake loaf pan enthusiasts and inspire each other with our culinary creations! Happy baking!
Basque Cheesecake Loaf Pan: The Ultimate Guide to Baking Perfection
Rich, decadent Basque cheesecake baked in a loaf pan for easy slicing. Deeply caramelized top with a creamy, custardy interior.
Ingredients
- 900g (32 oz) full-fat cream cheese, softened to room temperature
- 250g (1 1/4 cups) granulated sugar
- 5 large eggs, at room temperature
- 480ml (2 cups) heavy cream
- 30g (1/4 cup) all-purpose flour
- 1 teaspoon vanilla extract
- Pinch of salt
Instructions
- Preheat your oven to 400°F (200°C).
- Line a 9×5 inch loaf pan with parchment paper, leaving plenty of overhang on all sides. Crumple the parchment paper a bit to help it conform to the shape of the pan. Use two sheets of parchment, crisscrossing them to ensure complete coverage.
- In a large bowl (or stand mixer), beat the softened cream cheese with an electric mixer on medium speed until smooth and creamy (2-3 minutes).
- Gradually add the granulated sugar to the cream cheese, beating on medium speed until well combined. Scrape down the sides of the bowl as needed.
- Add the eggs one at a time, beating well after each addition. Scrape down the sides of the bowl as needed.
- Gradually pour in the heavy cream, beating on low speed until just combined.
- Sift the flour into the batter and add the vanilla extract and salt. Gently fold everything together with a spatula until just combined. Do not overmix.
- Pour the batter evenly into the parchment-lined loaf pan.
- Bake in the preheated oven for 50-60 minutes, or until the top is deeply browned and caramelized, and the center is still slightly jiggly. If the top is browning too quickly, loosely tent it with aluminum foil.
- Remove the cheesecake from the oven and let it cool completely in the loaf pan at room temperature.
- Once cooled to room temperature, cover with plastic wrap and refrigerate for at least 4 hours, or preferably overnight.
- Gently lift the cheesecake out of the loaf pan using the parchment paper overhang.
- Slice with a sharp knife and serve chilled.
- Store leftover cheesecake in an airtight container in the refrigerator for up to 3-4 days.
Notes
- Use full-fat ingredients for the best texture and flavor.
- Ensure cream cheese and eggs are at room temperature for a smoother batter.
- Don’t overmix the batter.
- Don’t be afraid to let the top get very dark brown, almost burnt-looking.
- Chill the cheesecake completely before serving.
- Experiment with flavors by adding almond or lemon extract, or a swirl of caramel or chocolate.
- Parchment paper is essential for easy removal.