On rainy afternoons in my grandmother’s kitchen, the air would be thick with the sweet scent of nostalgia. I can still picture her, apron tied snugly around her waist, meticulously layering those delicate pink jelly cakes, each one a little masterpiece. The moment she pulled them from the fridge, the vibrant pink glistened like jewels, their creamy frosting beckoning me closer. I would stand there, entranced, waiting for the first bite, which always promised a burst of flavor that danced on my tongue — a delightful mix of sweetness and a hint of tartness from the jelly.
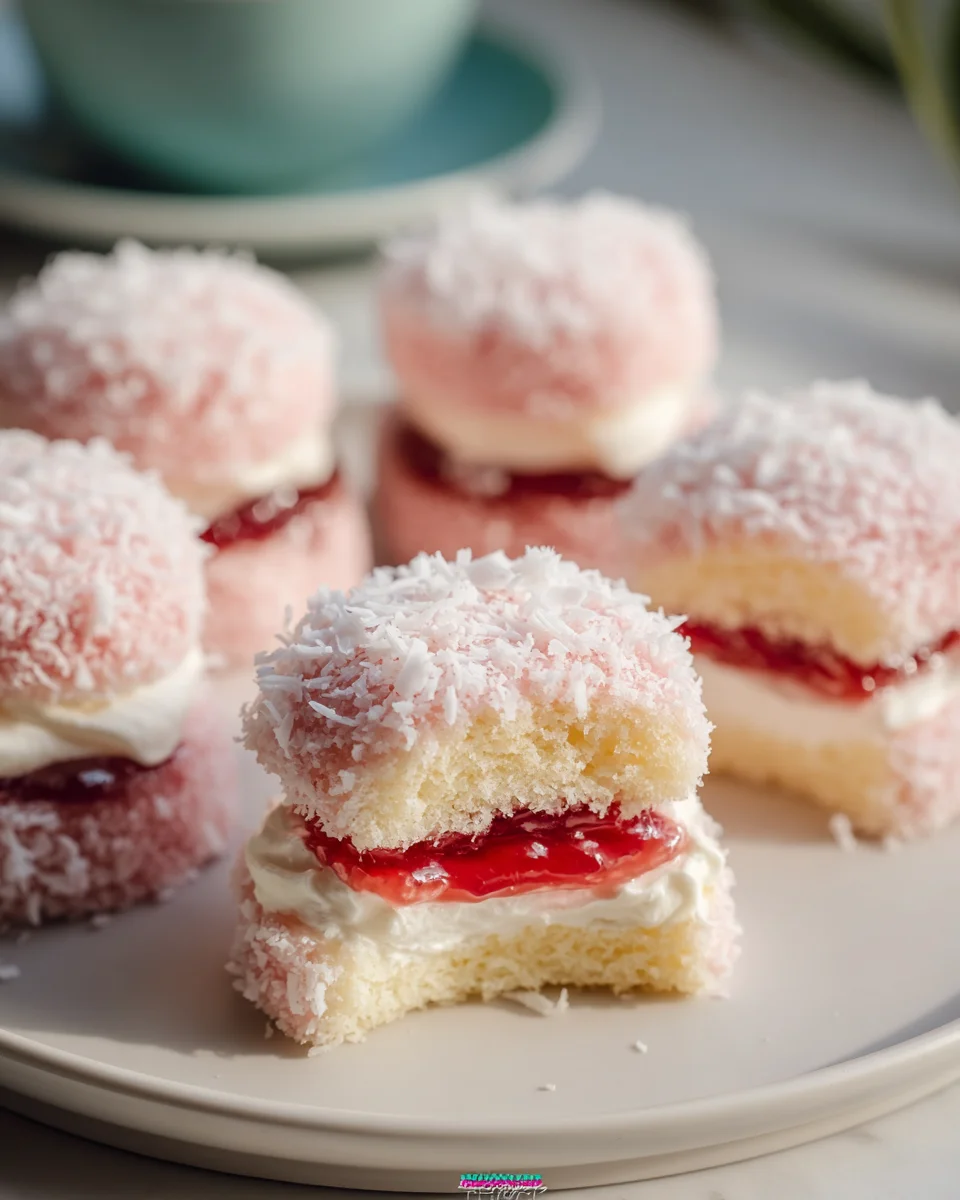
Old Fashioned Pink Jelly Cakes are more than just a treat; they’re a slice of my childhood, a symbol of love and tradition. These charming little cakes are soft, airy, and layered with luscious jelly and fluffy frosting, creating a delightful contrast in every bite. The pale pink hue is not only visually appealing but also evokes a sense of joy and celebration. My version of this classic recipe stands out because I infuse it with a touch of vanilla and a hint of lemon zest, which elevate the flavors and add a refreshing twist.
As I share this recipe with you, I hope to transport you to that cozy kitchen filled with laughter and warmth. Let me show you exactly how to make these delightful Old Fashioned Pink Jelly Cakes that will bring a smile to your face and a sprinkle of sweetness to your day.

Why You’ll Love This Recipe
- These Old Fashioned Pink Jelly Cakes are a delightful combination of fluffy vanilla sponge and sweet strawberry jelly, creating a perfect balance of textures and flavors.
- They’re incredibly easy to make, taking just about 25 minutes of prep time and 18 minutes of baking, making them a feasible choice for both novice and seasoned bakers.
- With a total time of only 1 hour and 45 minutes, you can have these nostalgic treats ready to serve at your next gathering or family event.
- This recipe is budget-friendly, utilizing common pantry staples like flour, sugar, and butter, ensuring you don’t break the bank while creating a show-stopping dessert.
- Each cake is a visual treat, covered in vibrant pink jelly and fluffy coconut, making them a hit for both kids and adults alike — perfect for birthdays, picnics, or afternoon teas!
Ingredients
- 80g butter, softened
- 1/2 cup (110g) caster sugar
- 1 tsp vanilla extract
- 1 egg
- 2/3 cup (160g) milk
- 1 cup (130g) self-raising flour, sifted
- 85g packet strawberry jelly crystals
- 1 cup (240g) boiling water
- 1 cup (240g) cold water
- 3 1/2 cups (280g) desiccated coconut
- 1 cup (240g) whipped cream
Let’s break down some of the key ingredients. The butter is essential for creating that tender, moist cake texture. When creamed with sugar, it helps incorporate air, leading to a light sponge. Always use unsalted butter for better control over the cake’s sweetness. If you’re in a pinch, you can substitute with margarine.
The strawberry jelly crystals not only add flavor but also contribute to the vibrant pink hue that makes these cakes so visually appealing. For a twist, you could use raspberry or even orange jelly crystals, but keep in mind that this will change the flavor profile. Lastly, the whipped cream provides a rich, creamy filling that contrasts beautifully with the sweetness of the jelly. You can opt for store-bought or homemade whipped cream, depending on your preference.
Step-by-Step Instructions
- Preheat your oven to 175°C (fan-forced). Lightly grease two 12-hole patty-pan tins to ensure the cakes don’t stick. This is crucial; if you skip this step, you might end up with cakes that are hard to remove.
- In a large mixing bowl, cream together the softened butter, caster sugar, and vanilla extract until the mixture is pale and fluffy, which should take about 3-5 minutes. This step is vital for incorporating air into your batter, ensuring a light texture.
- Beat in the egg until fully incorporated. You’ll know it’s right when the mixture appears smooth and uniform. Be careful not to overbeat, as this can make your cakes dense.
- Gently fold in the milk and sifted self-raising flour alternately, starting with half of the milk, then half of the flour, and repeat. This method helps maintain the airiness of the batter. Avoid over-mixing; stop as soon as you no longer see dry flour.
- Spoon the batter evenly into the prepared patty-pan holes, filling each just below the top. This helps the cakes rise without overflowing. You should see a nice smooth top when they’re filled correctly.
- Bake in the preheated oven for 15-18 minutes, or until the edges turn a light golden color and a skewer inserted into the center comes out clean. Keep an eye on them, as overbaking can lead to dry cakes!
- Once baked, cool the cakes in the tin for 5 minutes, then transfer them to a wire rack to cool completely. This step is important to avoid sogginess.
- While the cakes cool, prepare the jelly by dissolving the jelly crystals in 1 cup of boiling water. Stir until completely dissolved, then mix in 1 cup of cold water. Refrigerate until partially set, about 1-2 hours. This consistency is crucial for dipping; if it’s too runny, it won’t coat the cakes well.
- When the jelly is ready, use a slotted spoon to dip each cake into the jelly, ensuring it’s fully coated. After dipping, roll the cakes in desiccated coconut to get an even covering. This step adds texture and enhances the flavor.
- Spoon whipped cream onto one half of each cake and sandwich them together with another half. This creates a delightful surprise when you bite into them! Make sure not to overfill to avoid spilling.
- Chill the assembled cakes in the fridge for at least 30 minutes to set the jelly before serving. This final chill allows the jelly to firm up and makes for a better presentation.
Pro Tips for the Best Old Fashioned Pink Jelly Cakes
- One common mistake is overmixing the batter, which leads to denser cakes. Remember, once you add the flour, mix just until combined to retain that light texture.
- Invest in quality self-raising flour as it can make a significant difference in the rise and texture of your cakes. If you can’t find it, you can make your own by mixing plain flour with baking powder (1 cup plain flour + 1 ½ tsp baking powder).
- For a more intense coconut flavor, toast the desiccated coconut lightly before rolling the cakes in it. This adds depth and a lovely crunch.
- Use a slotted spoon to dip the cakes in jelly to avoid excess dripping. Let them sit upright for a few seconds after dipping to allow any excess jelly to drip off.
- When making the whipped cream, ensure your bowl and beaters are chilled beforehand. This helps the cream whip faster and achieve a better consistency.
Variations & Serving Ideas
Want to switch things up? Here are a few creative variations: try using lime jelly instead of strawberry for a zesty twist or coconut cream instead of regular whipped cream for an extra coconut kick. You can also make mini versions using a mini muffin pan for bite-sized treats! For a seasonal touch, consider adding fresh berries inside the sandwich for added flavor and texture.
For serving ideas, these jelly cakes pair wonderfully with tea or coffee, making them a perfect afternoon snack. They also go well with vanilla ice cream, creating a delightful contrast in temperature and texture. Lastly, consider serving them alongside a fruit salad; the freshness of the fruit complements the sweetness of the cakes beautifully!
Storage, Make-Ahead & Reheating
You can store leftover Old Fashioned Pink Jelly Cakes in the refrigerator for up to 3 days. They actually taste better the next day as the flavors meld together nicely. If you want to freeze them, wrap each cake in plastic wrap and place them in an airtight container. They can be frozen for up to 2 months. To reheat, simply allow them to thaw in the fridge overnight and enjoy them cold or at room temperature, as they are best served chilled.
Frequently Asked Questions
Can I make Old Fashioned Pink Jelly Cakes ahead of time?
Yes — in fact, they taste even better the next day! Make them the day before your event, and store them in the fridge to allow the flavors to develop fully.
What can I substitute for the desiccated coconut?
If you’re not a fan of coconut, you can use finely crushed graham crackers or almonds for a different texture and flavor. Just ensure they’re finely ground to coat the cakes properly.
How do I ensure my cakes don’t stick to the pan?
Lightly greasing the pans is essential. You can also use parchment paper to line the bottom of each hole for extra insurance against sticking. This will help you easily lift the cakes out after baking.
Can I use a different flavor of jelly?
Absolutely! While strawberry is traditional, feel free to experiment with other flavors like raspberry, orange, or even grape. Just remember that different flavors will change the overall taste of the cakes.
Is it possible to make these cakes gluten-free?
Yes, you can substitute self-raising flour with a gluten-free flour blend that includes a leavening agent. Make sure to check the ratios on the package for the best results.
Final Thoughts
Old Fashioned Pink Jelly Cakes are a delightful combination of soft, moist cake and luscious jelly that transport you to a simpler time with every bite. The unique flavor profile and vibrant color make them not just a treat for the taste buds but also a feast for the eyes.
This is the kind of recipe I come back to again and again, especially when I want to create something nostalgic for family gatherings or to brighten a rainy day. It’s a wonderful way to bring a touch of sweetness and joy to any occasion. I encourage you to try making these charming cakes yourself, and don’t hesitate to share your results or add your own twist to the recipe. Your creativity could inspire others to enjoy this classic treat!
Delicious Old Fashioned Pink Jelly Cakes Recipe to Try Today!

These Old Fashioned Pink Jelly Cakes are a delightful combination of fluffy vanilla sponge and sweet strawberry jelly, creating a perfect balance of textures and flavors. They are not only easy to make but also a nostalgic treat that brings joy to any gathering.
- Prep Time: 25 mins
- Cook Time: 18 mins
- Total Time: 43 minutes
- Yield: 12 servings 1x
- Category: Dessert
- Method: Baking
- Cuisine: American
Ingredients
- 80g butter, softened
- 1/2 cup (110g) caster sugar
- 1 tsp vanilla extract
- 1 egg
- 2/3 cup (160g) milk
- 1 cup (130g) self-raising flour, sifted
- 85g packet strawberry jelly crystals
- 1 cup (240g) boiling water
- 1 cup (240g) cold water
- 3 1/2 cups (280g) desiccated coconut
- 1 cup (240g) whipped cream
Instructions
- Preheat your oven to 175°C (fan-forced). Lightly grease two 12-hole patty-pan tins to ensure the cakes don’t stick.
- In a large mixing bowl, cream together the softened butter, caster sugar, and vanilla extract until the mixture is pale and fluffy, which should take about 3-5 minutes.
- Beat in the egg until fully incorporated.
- Gently fold in the milk and sifted self-raising flour alternately, starting with half of the milk, then half of the flour, and repeat.
- Spoon the batter evenly into the prepared patty-pan holes, filling each just below the top.
- Bake in the preheated oven for 15-18 minutes, or until the edges turn a light golden color and a skewer inserted into the center comes out clean.
- Once baked, cool the cakes in the tin for 5 minutes, then transfer them to a wire rack to cool completely.
- While the cakes cool, prepare the jelly by dissolving the jelly crystals in 1 cup of boiling water. Stir until completely dissolved, then mix in 1 cup of cold water. Refrigerate until partially set, about 1-2 hours.
- When the jelly is ready, use a slotted spoon to dip each cake into the jelly, ensuring it's fully coated. After dipping, roll the cakes in desiccated coconut.
- Spoon whipped cream onto one half of each cake and sandwich them together with another half.
- Chill the assembled cakes in the fridge for at least 30 minutes to set the jelly before serving.
Nutrition
- Serving Size: 1 cake
- Calories: 200
- Sugar: 15 g
- Sodium: 50 mg
- Fat: 10 g
- Saturated Fat: 6 g
- Unsaturated Fat: 4 g
- Trans Fat: 0 g
- Carbohydrates: 25 g
- Fiber: 2 g
- Protein: 3 g
- Cholesterol: 30 mg
Keywords: One common mistake is overmixing the batter, which leads to denser cakes. For a more intense coconut flavor, toast the desiccated coconut lightly before rolling the cakes in it.