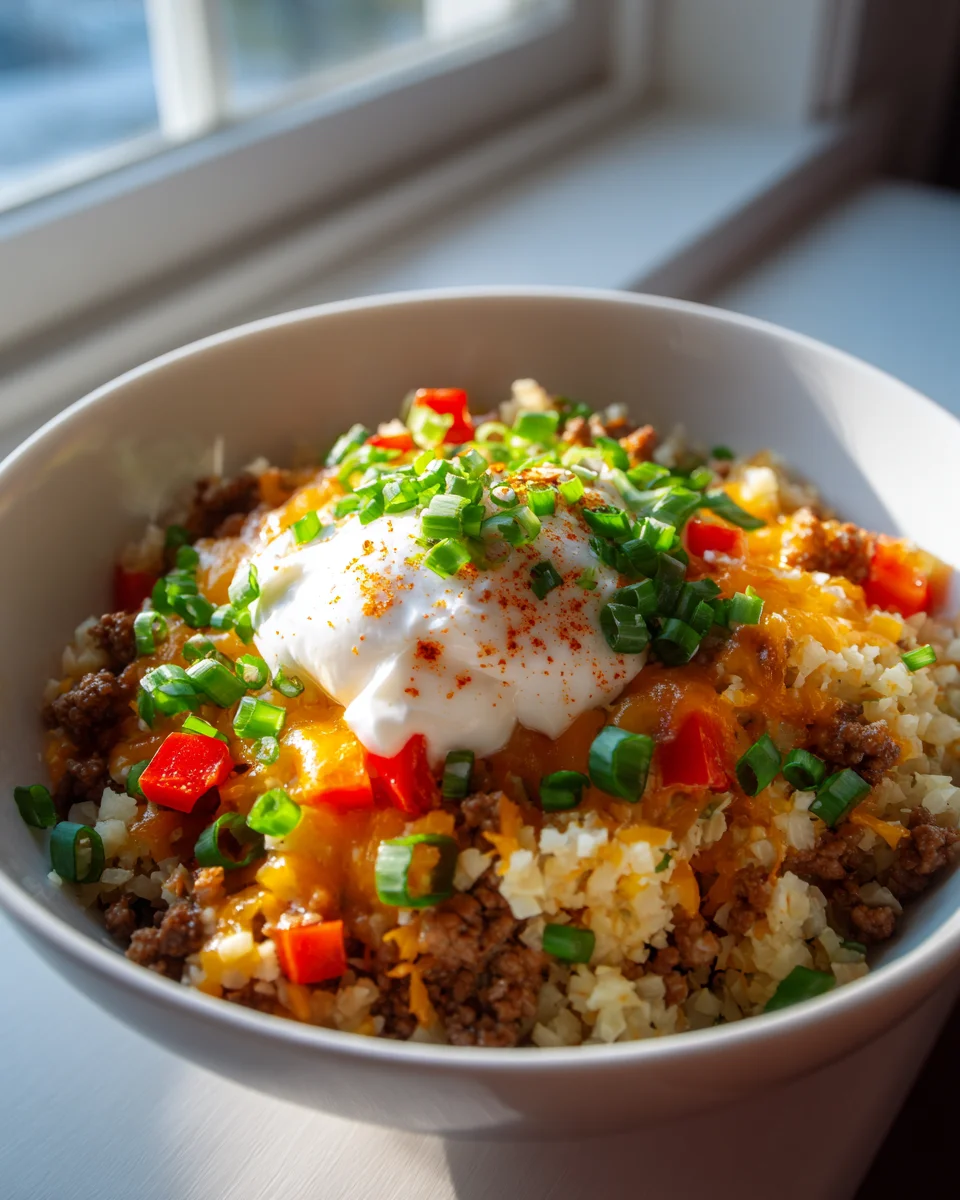
Keto Cheeseburger Cauliflower Rice Bowl
Oh my goodness, get ready to have your taste buds sing! I’m so excited to share my absolute favorite way to enjoy all the classic, comforting flavors of a juicy cheeseburger without any of the carb guilt. This Keto Cheeseburger Cauliflower Rice Bowl isn’t just another keto recipe; it’s a game-changer that truly satisfies those burger cravings in the most delicious, wholesome, and incredibly easy way possible. You’re going to adore how simple it is to whip up and how perfectly it hits that nostalgic comfort food sweet spot.
Imagine perfectly seasoned ground beef, rich and savory, nestled atop a fluffy bed of cauliflower rice that soaks up all that amazing flavor. Then, we take it up a notch with glorious melted cheese, crisp pickles, fresh tomatoes, and whatever other burger toppings your heart desires, all combined into one hearty, flavor-packed bowl. It’s everything you love about a classic cheeseburger, deconstructed and transformed into a vibrant, low-carb meal that feels incredibly indulgent yet keeps you perfectly on track. Trust me, this is going to become a regular in your meal rotation!

Ingredient Notes
Creating a delicious Keto Cheeseburger Cauliflower Rice Bowl starts with selecting the right ingredients. I find that a keen eye on quality and keto-friendliness truly makes all the difference in achieving that classic, comforting cheeseburger taste without the carbs.
The Core: Ground Beef and Cauliflower Rice
- Ground Beef: I always recommend using a good quality ground beef, preferably 80/20 lean-to-fat ratio. This gives you plenty of flavor and keeps the dish juicy. For me, beef is essential for that authentic cheeseburger experience. While you could technically use ground turkey or chicken, the rich, savory taste of beef is what truly elevates this bowl.
- Cauliflower Rice: This is the hero of our keto base! You can buy pre-riced cauliflower in the fresh or frozen section, or rice it yourself in a food processor. I personally love making my own from a fresh head; it often yields a better texture. Don’t be afraid to season your cauliflower rice well as you cook it – a little salt, pepper, garlic powder, and perhaps a knob of butter or a splash of heavy cream can make it incredibly satisfying. If you’re not a fan of cauliflower, finely chopped steamed broccoli or even a bed of crisp lettuce could serve as an alternative base, though they won’t mimic rice as closely.
The Cheesy Goodness and Flavor Foundation
- Cheese: What’s a cheeseburger without cheese? I love using sharp cheddar for its robust flavor, but a blend of cheddar and Monterey Jack works wonderfully for melty goodness. American cheese slices, torn into pieces, also melt beautifully and give that classic diner-style cheeseburger feel. Don’t hesitate to experiment with smoked gouda or pepper jack for an extra kick!
- Onions and Garlic: These aromatic powerhouses are non-negotiable for me. They build the foundation of flavor for our beef mixture, adding depth and sweetness when sautéed properly.
- Sugar-Free Ketchup and Mustard: Essential for capturing that quintessential cheeseburger flavor without the hidden sugars. I always keep a good quality sugar-free ketchup and a tangy Dijon or classic yellow mustard on hand. Read labels carefully to ensure they are truly keto-friendly.
- Dill Pickles: Chopped dill pickles are a must for that tangy crunch that cuts through the richness of the beef and cheese. Ensure they are sugar-free; most dill pickles are, but it’s always good to double-check.
Optional Add-ins and Toppings for Perfection
- Bacon: Crispy bacon bits are a fantastic addition, lending a smoky, salty crunch that complements the cheeseburger flavors perfectly. I often cook up a batch of bacon and crumble it over the bowls.
- Mayonnaise: For that creamy “special sauce” touch. I use a good quality avocado oil mayonnaise for a healthy fat boost.
- Fresh Veggies: Shredded lettuce, diced tomatoes, or sliced green onions add freshness, color, and texture. Don’t skip them if you enjoy a classic burger loaded with fresh toppings.
- Seasonings: Beyond salt and pepper, I always reach for garlic powder, onion powder, a pinch of smoked paprika, and sometimes a dash of Worcestershire sauce (checking for sugar content, or using a keto-friendly alternative like coconut aminos). These elevate the overall savory profile.
Step-by-Step Instructions
Let’s get cooking! This Keto Cheeseburger Cauliflower Rice Bowl comes together quite easily, making it perfect for a weeknight meal. I like to prep my ingredients ahead of time to make the process even smoother.
- Prep Your Veggies & Cheese: First, I chop my onion and mince my garlic. I also get my cheese ready by shredding it or tearing slices into smaller pieces. If I’m using any fresh toppings like lettuce or tomatoes, I chop those up and set them aside.
- Cook the Cauliflower Rice: In a large skillet, I heat a tablespoon of olive or avocado oil over medium heat. I add the cauliflower rice and sauté it for about 5-7 minutes, stirring occasionally, until it’s tender-crisp. I season it generously with salt, black pepper, and a sprinkle of garlic powder. Sometimes, for extra richness, I’ll stir in a tablespoon of butter or cream cheese until melted. Once cooked, I transfer it to a bowl and set it aside, keeping the skillet handy for the beef.
- Brown the Ground Beef: Using the same skillet, I add my ground beef (if there’s enough fat from the cauliflower rice, I might not add more oil). I break up the beef with a spoon and cook it over medium-high heat until it’s fully browned and no pink remains. This usually takes about 6-8 minutes.
- Drain and Season the Beef: Once the beef is cooked, I carefully drain off any excess fat. This prevents the bowl from being greasy. Then, I return the beef to the skillet and season it with salt, black pepper, onion powder, and smoked paprika. I give it a good stir to ensure the beef is evenly coated.
- Build the Flavor Base: Now, I add the chopped onion to the beef in the skillet and cook for about 3-4 minutes until it softens and becomes translucent. Then, I stir in the minced garlic and cook for another minute until fragrant, being careful not to burn it.
- Stir in Sauces and Finish Beef: I stir in the sugar-free ketchup and mustard, ensuring the beef is well coated. If I’m using a dash of Worcestershire or coconut aminos for extra umami, I’d add it here. I let it simmer for a couple of minutes to allow the flavors to meld.
- Melt the Cheese: I reduce the heat to low and sprinkle the shredded or torn cheese over the beef mixture. I cover the skillet with a lid for about 1-2 minutes, or until the cheese is beautifully melted and gooey. Alternatively, I sometimes just stir the cheese directly into the hot beef mixture until it’s fully incorporated and creamy.
- Assemble the Bowls: To serve, I divide the seasoned cauliflower rice among individual bowls. Then, I generously spoon the cheesy ground beef mixture over the cauliflower rice.
- Garnish and Serve: Finally, I top each bowl with my favorite cheeseburger fixings: chopped dill pickles, shredded lettuce, diced tomatoes, crispy bacon bits, and a drizzle of my homemade “special sauce” (a mix of keto mayo, sugar-free ketchup, a touch of mustard, and a splash of pickle juice). Enjoy immediately!
Tips & Suggestions
I’ve found a few tricks over time that really enhance this Keto Cheeseburger Cauliflower Rice Bowl, making it not just a meal, but a genuinely satisfying experience. Here are some of my favorite tips:
- The “Special Sauce” is a Game Changer: Honestly, don’t skip this step! I whisk together about 1/2 cup keto-friendly mayonnaise, 2 tablespoons sugar-free ketchup, 1 tablespoon Dijon mustard, a teaspoon of sugar-free pickle relish (or finely chopped dill pickle), and a splash of pickle juice. A tiny pinch of erythritol can balance the tang if you like. This sauce truly brings all those classic cheeseburger flavors together.
- Amp Up the Cauliflower Rice: While cooking the cauliflower rice, don’t just stop at salt and pepper. I sometimes add a tablespoon of cream cheese or a splash of heavy cream at the end to make it extra rich and creamy, almost like a loaded mashed potato texture. A little onion powder or dried chives also works wonders for boosting its flavor.
- Add Smokiness: For an even deeper, more authentic burger flavor, I often add a teaspoon of smoked paprika to the ground beef mixture along with the other seasonings. If you have liquid smoke, a tiny drop can also achieve this, but use sparingly!
- Extra Richness in the Beef: To make the cheeseburger mixture extra decadent, stir in 1-2 tablespoons of cream cheese or a splash of heavy cream right before adding the shredded cheese. It makes the mixture incredibly creamy and binds the cheese even better.
- Make it Spicy: If you love a little heat, consider adding a pinch of red pepper flakes to the beef mixture, or top your bowl with sliced fresh or pickled jalapeños.
- Meal Prep Friendly: This recipe is fantastic for meal prep! I usually cook the cauliflower rice and the cheesy beef mixture separately. I store them in airtight containers in the fridge. When I’m ready to eat, I just reheat and assemble with fresh toppings. This keeps the textures optimal.
- Customizable Toppings: Encourage everyone to build their own bowl! Beyond the standard pickles and lettuce, consider avocado slices, a dollop of sour cream, sliced black olives, or even a sprinkle of toasted sesame seeds for a bun-like crunch.
- Crispy Onions (Keto-Friendly): For a gourmet touch, you can make crispy fried onions using thinly sliced onions coated in a little almond flour and pan-fried until golden. These add amazing texture and flavor if you have the time!
Storage
One of the best things about this Keto Cheeseburger Cauliflower Rice Bowl is how well it stores, making it an excellent candidate for meal prep during a busy week. I always make a bit extra so I have delicious, keto-friendly lunches or dinners ready to go.
Refrigeration
- Cooked Components: The cooked cheesy ground beef mixture and the cooked cauliflower rice can be stored separately or together in airtight containers in the refrigerator. I find that they remain fresh and delicious for 3-4 days.
- Fresh Toppings: I always recommend storing any fresh toppings like shredded lettuce, diced tomatoes, or chopped pickles separately. These are best added just before serving, as they can become soggy or lose their crispness when stored with the hot components. Your homemade “special sauce” can also be stored in a separate small container in the fridge for up to a week.
Freezing
- Ground Beef Mixture: The cooked cheesy ground beef mixture freezes wonderfully. I let it cool completely, then transfer it to a freezer-safe bag or airtight container. It can be frozen for up to 2-3 months. When you’re ready to use it, thaw it overnight in the refrigerator.
- Cauliflower Rice: Cooked cauliflower rice can also be frozen, though I’ve found its texture can become a little softer or more watery upon thawing and reheating. If you freeze it, ensure it’s cooled completely and stored in an airtight freezer-safe container for up to 1 month. You might want to give it a quick sauté or roast after thawing to help evaporate any excess moisture.
- Assembled Bowls: I don’t recommend freezing fully assembled bowls, as the cauliflower rice and fresh toppings won’t hold up well. It’s best to freeze the components separately and combine them fresh.
Reheating
- From Refrigerator:
- Microwave: This is the quickest method. Place the desired amount of the cheesy beef and cauliflower rice (if stored together) into a microwave-safe bowl. Heat on high for 1-2 minutes, stirring halfway through, until heated through.
- Stovetop: For a slightly better texture, especially for the cauliflower rice, I often reheat the mixture in a skillet over medium heat, stirring occasionally, until hot. You might need to add a splash of water or broth to prevent sticking if it seems dry.
- From Freezer:
- Thaw the frozen ground beef mixture and/or cauliflower rice in the refrigerator overnight. Then, reheat using either the microwave or stovetop method as described above.
- Always add fresh toppings after reheating for the best taste and texture!
Final Thoughts
I am absolutely thrilled to share with you my go-to recipe for the Keto Cheeseburger Cauliflower Rice Bowl. This dish is truly a revelation, capturing all the beloved, savory flavors of a classic cheeseburger – the juicy beef, the melted cheese, the tang of pickles, and the freshness of crisp veggies – all nestled on a bed of fluffy cauliflower rice. It’s an ingenious way to enjoy comfort food without any of the carb guilt, proving that healthy eating can be incredibly satisfying and bursting with flavor.
What makes the Keto Cheeseburger Cauliflower Rice Bowl a must-try in my kitchen is not just its incredible taste, but also its sheer simplicity and speed. It’s a lifesaver on busy weeknights, coming together quickly and leaving you feeling nourished and completely content. This recipe is a testament to how creative low-carb cooking can be, offering a delightful twist on a familiar favorite that’s both vibrant and hearty.
So, if you’re searching for a delicious, keto-friendly meal that genuinely excites your taste buds and keeps you on track, I wholeheartedly urge you to give this Keto Cheeseburger Cauliflower Rice Bowl a try. I promise, it’s a delightful experience that you’ll want to revisit again and again!
Keto Cheeseburger Cauliflower Rice Bowl: Easy Low Carb Meal

This Keto Cheeseburger Cauliflower Rice Bowl is a deliciously satisfying way to enjoy the classic flavors of a cheeseburger without the carbs. It’s a quick and easy meal that will leave you feeling nourished and guilt-free.
- Prep Time: 15 mins
- Cook Time: 30 mins
- Total Time: 45 minutes
- Yield: 4 servings 1x
- Category: Dinner
- Method: Stovetop
- Cuisine: American
Ingredients
- 1 lb Ground Beef (80/20 lean-to-fat ratio)
- 1 head Cauliflower (or pre-riced cauliflower)
- 1 cup Sharp Cheddar Cheese (shredded)
- 1/2 cup Monterey Jack Cheese (optional, shredded)
- 2 slices American Cheese (torn into pieces, optional)
- 1 medium Onion (chopped)
- 2 cloves Garlic (minced)
- 1/4 cup Sugar-Free Ketchup
- 2 tablespoons Dijon Mustard (or classic yellow mustard)
- 1/2 cup Dill Pickles (chopped)
- 1 tablespoon Olive Oil (or avocado oil)
- Salt (to taste)
- Black Pepper (to taste)
- 1 teaspoon Garlic Powder
- 1 teaspoon Onion Powder
- 1 teaspoon Smoked Paprika
- 1–2 tablespoons Worcestershire Sauce (or coconut aminos, optional)
- 1–2 tablespoons Butter (optional)
- 1–2 tablespoons Cream Cheese (optional)
- Crispy Bacon (for topping, optional)
- Avocado Oil Mayonnaise (for special sauce, optional)
- Shredded Lettuce (for topping, optional)
- Diced Tomatoes (for topping, optional)
- Sliced Green Onions (for topping, optional)
- Red Pepper Flakes (for heat, optional)
Instructions
- Prep Your Veggies & Cheese: Chop the onion and mince the garlic. Shred the cheese or tear slices into smaller pieces. Chop any fresh toppings like lettuce or tomatoes and set aside.
- Cook the Cauliflower Rice: Heat a tablespoon of olive or avocado oil in a large skillet over medium heat. Add the cauliflower rice and sauté for about 5-7 minutes until tender-crisp. Season with salt, black pepper, and garlic powder. Stir in butter or cream cheese if desired. Transfer to a bowl and set aside.
- Brown the Ground Beef: In the same skillet, add the ground beef and cook over medium-high heat until fully browned, about 6-8 minutes.
- Drain and Season the Beef: Drain excess fat from the beef and return it to the skillet. Season with salt, black pepper, onion powder, and smoked paprika. Stir well.
- Build the Flavor Base: Add the chopped onion to the beef and cook for 3-4 minutes until softened. Stir in minced garlic and cook for another minute until fragrant.
- Stir in Sauces and Finish Beef: Add sugar-free ketchup and mustard to the beef, stirring to coat. Let it simmer for a couple of minutes.
- Melt the Cheese: Reduce heat to low, sprinkle cheese over the beef mixture, and cover the skillet for 1-2 minutes until melted.
- Assemble the Bowls: Divide the seasoned cauliflower rice among bowls and spoon the cheesy ground beef mixture on top.
- Garnish and Serve: Top each bowl with chopped dill pickles, shredded lettuce, diced tomatoes, crispy bacon bits, and a drizzle of homemade 'special sauce'. Enjoy immediately!
Nutrition
- Serving Size: 1 bowl
- Calories: 450
- Sugar: 2 g
- Sodium: 800 mg
- Fat: 30 g
- Saturated Fat: 15 g
- Unsaturated Fat: 10 g
- Trans Fat: 0 g
- Carbohydrates: 10 g
- Fiber: 4 g
- Protein: 35 g
- Cholesterol: 100 mg
Keywords: For a richer flavor, consider adding cream cheese to the beef mixture. Customize toppings to your liking for a personalized bowl.