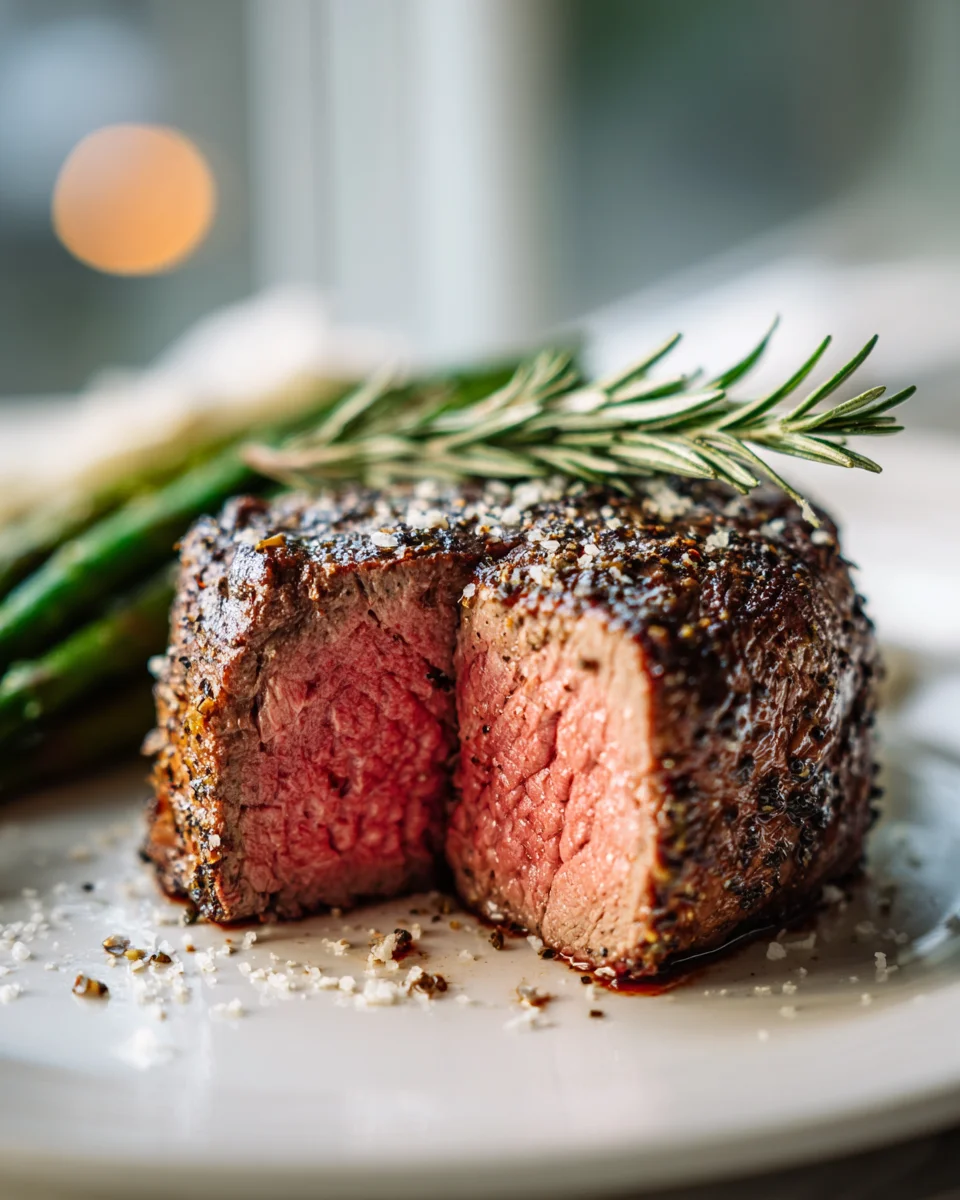
Juicy Beef Tenderloin (simple Rub + Perfect Temperature)
Juicy Beef Tenderloin (simple Rub + Perfect Temperature) – now, doesn’t that just sound like pure culinary bliss? I know what you might be thinking: beef tenderloin is often reserved for fancy restaurants or the most experienced home cooks. But I’m here to tell you that achieving a truly show-stopping, perfectly cooked beef tenderloin at home is not only possible, it’s incredibly straightforward with this recipe! What makes this particular take so special? It all comes down to two glorious things: a ridiculously simple rub that enhances the beef’s natural, rich flavors without overpowering them, and a foolproof technique for hitting that “perfect temperature” every single time.
You are absolutely going to love this recipe because it completely demystifies cooking such a premium cut. No more guesswork, no more fear of overcooking a beautiful piece of beef. We’re talking about a succulent, melt-in-your-mouth experience that delivers restaurant-quality results right in your own kitchen. My goal is to equip you with the confidence to transform a gorgeous beef tenderloin into an unforgettable meal. We’ll simply season the beef, then guide it to that ideal doneness, ensuring every slice is incredibly tender and bursting with juicy flavor. Get ready to impress your family and friends (and yourself!) with a dish that looks sophisticated but is surprisingly easy to master. This is beef tenderloin perfection, simplified for you!

Ingredient Notes
Creating a truly juicy beef tenderloin with a simple rub and perfect temperature starts with understanding your ingredients. While the dish itself is elegant, the components for success are wonderfully straightforward. Here’s what you’ll need to make this culinary masterpiece a reality in your kitchen.
Beef Tenderloin
- Quality Matters: I always recommend getting the best quality beef tenderloin you can find. Look for a piece that has a good, even color and minimal sinew. You might find it as a whole roast or pre-trimmed into a “chateaubriand” cut or center-cut portion. For a special occasion, I love a good Angus or Prime grade.
- Size: A 2-3 pound roast is usually perfect for 4-6 people, but adjust based on your guest count.
- Why Tenderloin? It’s called “tenderloin” for a reason! This cut comes from a muscle that isn’t heavily used, making it incredibly tender and lean. Its natural tenderness means it doesn’t require complex marinades, allowing our simple rub to shine.
The Simple Rub
This rub is all about enhancing the beef’s natural flavor without overpowering it. It’s a classic combination that creates a beautiful crust and deep seasoning.
- Coarse Salt: I swear by coarse sea salt or Kosher salt for this. The larger crystals adhere well to the meat, draw out a bit of moisture from the surface to aid in searing, and provide that perfect salty crust. Fine table salt can make the meat too salty if you’re not careful.
- Freshly Ground Black Pepper: There’s no substitute for freshly ground pepper. Its pungent aroma and vibrant flavor are a must. Pre-ground pepper just doesn’t compare.
- Garlic Powder: This provides a wonderful savory depth without the risk of fresh garlic burning during searing.
- Onion Powder: Similar to garlic powder, onion powder adds another layer of savory deliciousness that complements beef beautifully.
- Optional (but still simple) additions: Sometimes I’ll add a touch of smoked paprika for a hint of color and mild sweetness, or a tiny pinch of dried thyme if I’m feeling fancy. But honestly, the core four are fantastic on their own.
Cooking Oil
- High Smoke Point: You’ll need an oil that can withstand high heat for searing without burning. My go-to choices are avocado oil, grapeseed oil, or a good vegetable oil. Olive oil has a lower smoke point and isn’t ideal for the initial high-heat sear.
Optional Finishing Touches
- Unsalted Butter: A pat or two of butter at the end of the cooking process can add incredible richness and a golden sheen, especially if you’re basting briefly on the stovetop.
- Fresh Herbs: A sprig of fresh rosemary or thyme added to the pan during the final roasting or even just as a garnish can infuse beautiful aromatic notes.
That’s it! With these carefully chosen ingredients, we’re setting ourselves up for success to achieve that juicy, perfectly cooked beef tenderloin.
Step-by-Step Instructions
Getting that perfectly juicy beef tenderloin is all about technique, and I’m going to walk you through my tried-and-true method. Pay close attention to temperature and timing – these are your best friends here!
Step 1: Bring to Room Temperature & Prepare the Beef
- Unwrap and Rest: About 1 to 1.5 hours before you plan to cook, remove your beef tenderloin from its packaging and place it on a wire rack set over a baking sheet. This allows air to circulate and brings the meat closer to room temperature, which is crucial for even cooking.
- Pat Dry, REALLY Dry: Using paper towels, pat the entire surface of the tenderloin as dry as possible. Any moisture on the surface will hinder the searing process, preventing that beautiful crust we’re aiming for.
Step 2: Apply the Simple Rub
- Light Oil Coat: Drizzle about 1 tablespoon of your high-smoke point oil over the tenderloin and rub it all over the surface. This helps the rub adhere and contributes to a good sear.
- Season Generously: In a small bowl, combine your coarse salt, freshly ground black pepper, garlic powder, and onion powder. Sprinkle this simple rub generously over all sides of the beef tenderloin, patting it gently to ensure it sticks. Don’t be shy – the tenderloin can handle a good amount of seasoning!
Step 3: Preheat & Sear
- Preheat Oven: While your pan is heating, preheat your oven to 400°F (200°C).
- Heat the Pan: Place a heavy-bottomed, oven-safe skillet (cast iron is my absolute favorite for this) over high heat on your stovetop. Add 1-2 tablespoons of high-smoke point oil to the hot pan. You want the oil to be shimmering, just before it starts to smoke.
- Sear for a Crust: Carefully place the tenderloin in the hot pan. Sear undisturbed for 2-3 minutes per side, turning with tongs, until a deep golden-brown crust forms all around. Don’t forget to sear the ends too! This searing locks in flavor and creates that appealing exterior.
Step 4: Roast to Perfect Temperature
- Insert Thermometer: Once seared, remove the pan from the stovetop. Insert an oven-safe meat thermometer into the thickest part of the tenderloin, making sure it doesn’t touch any bone (though tenderloin is boneless) or the bottom of the pan.
- Transfer to Oven: Carefully transfer the skillet with the tenderloin to your preheated 400°F (200°C) oven.
- Roast and Monitor: Roast for about 15-25 minutes, or until the internal temperature reaches your desired doneness. This is where your thermometer is indispensable!
- Rare: Pull at 120-125°F (49-52°C)
- Medium-Rare: Pull at 125-130°F (52-54°C) – My personal favorite for tenderloin!
- Medium: Pull at 130-135°F (54-57°C)
Remember, the temperature will rise another 5-10 degrees during resting (carryover cooking), so always pull the meat out of the oven before it reaches its final desired temperature.
Step 5: Rest and Slice
- The Crucial Rest: This is arguably the most important step for juiciness! Once the tenderloin reaches your target temperature, immediately remove it from the oven and transfer it to a clean cutting board. Tent it loosely with foil. Let it rest for a minimum of 10-15 minutes, or even up to 20 minutes for a larger roast. This allows the juices to redistribute throughout the meat, resulting in an incredibly juicy tenderloin. If you cut it too early, all those delicious juices will just run out onto your board.
- Slice Against the Grain: After resting, remove the foil. Using a sharp knife, slice the tenderloin against the grain into ½ to ¾-inch thick medallions.
- Serve: Arrange your beautiful slices on a platter and serve immediately. Enjoy your perfectly cooked, juicy beef tenderloin!
Tips & Suggestions
I’ve made beef tenderloin countless times, and over the years, I’ve picked up some key tips that really make a difference. These little insights will help ensure your tenderloin is not just good, but absolutely spectacular and perfectly juicy every single time.
- Don’t Skip Bringing to Room Temperature: This isn’t just a suggestion; it’s a critical step. When your beef is at room temperature before cooking, it cooks more evenly from edge to center. If you start with cold meat, the outside can overcook and dry out before the inside reaches your desired doneness. Plan for at least an hour out of the fridge.
- Pat, Pat, Pat Dry: I can’t emphasize this enough! A super dry surface is essential for achieving a deep, beautiful sear and a flavorful crust. Moisture on the surface will steam the meat instead of searing it, leading to a pale, less flavorful exterior.
- Invest in a Good Meat Thermometer: This is your secret weapon for “perfect temperature.” An instant-read digital thermometer is invaluable. Forget the guesswork; precise temperature control is the only way to consistently achieve your desired doneness, ensuring a juicy result without overcooking. Insert it into the thickest part, avoiding bone or fat.
- Understand Carryover Cooking: Remember that your tenderloin will continue to cook even after you take it out of the oven. This is called carryover cooking. The internal temperature will rise by another 5-10°F (3-6°C) as it rests. Always pull your beef out when it’s 5-10 degrees below your target final temperature to account for this.
- The Importance of Resting: After cooking, it’s tempting to slice into that gorgeous roast immediately. Resist! Resting allows the muscle fibers to relax and reabsorb the juices that have migrated to the center during cooking. Cutting it too soon will cause all those precious juices to run out onto your cutting board, leaving you with dry meat. Loosely tent with foil to keep it warm without steaming.
- Searing for Flavor and Texture: Get your pan smoking hot before adding the beef. A good, even sear creates a crust that’s packed with flavor and adds wonderful texture. Don’t crowd the pan, and don’t move the meat too soon – let that crust develop!
- Slicing Against the Grain: Once rested, always slice your beef tenderloin against the grain. The “grain” refers to the direction of the muscle fibers. Slicing against them shortens these fibers, making each bite incredibly tender and easier to chew.
- Don’t Be Afraid to Adjust: Every oven is different, and every cut of beef might vary slightly in shape or fat content. Use my cooking times as a guide, but always rely on your meat thermometer for accuracy. You might need a few minutes more or less.
- Serving Suggestions: A beautiful beef tenderloin doesn’t need much. I love serving it with simple roasted vegetables (like asparagus, green beans, or potatoes), creamy mashed potatoes, or a simple pan sauce made from the drippings. A fresh green salad provides a nice contrast.
Following these tips will elevate your beef tenderloin from good to extraordinary, ensuring that every slice is perfectly juicy and flavorful.
Storage
Once you’ve cooked and enjoyed your juicy beef tenderloin, you might find yourself with some delicious leftovers (lucky you!). Proper storage is key to keeping it fresh and tasty for future meals.
Refrigeration
- Cool Completely: Before storing, it’s really important to let the cooked beef tenderloin cool down to room temperature. This typically takes about 30-60 minutes, but never leave it out for more than two hours to prevent bacterial growth.
- Airtight Container: Transfer the cooled beef tenderloin slices (or the remaining roast) to an airtight container. This protects it from absorbing odors from other foods in your refrigerator and keeps it from drying out.
- Shelf Life: Stored correctly in the refrigerator, cooked beef tenderloin will remain fresh and safe to eat for 3-4 days.
Freezing
- Prep for Freezing: If you plan to store it for longer, freezing is an excellent option. Ensure the beef is completely cool. You can freeze it as a whole piece or in individual slices. For best results, I often wrap individual slices tightly in plastic wrap, then again in aluminum foil, or place them in a freezer-safe bag or container, removing as much air as possible.
- Freezer Life: Properly frozen beef tenderloin can last for 2-3 months. Beyond that, it’s still safe to eat, but the quality, texture, and flavor might start to diminish.
- Thawing: When you’re ready to enjoy it again, transfer the frozen beef to the refrigerator to thaw slowly overnight. Avoid thawing at room temperature for food safety reasons.
Reheating Leftovers
Reheating beef tenderloin can be tricky because you want to warm it through without drying it out or overcooking it. My goal is always to preserve that tenderness and juiciness.
- Oven Method (Recommended): This is my preferred method for reheating beef tenderloin. Preheat your oven to a low temperature, around 250-300°F (120-150°C). Place the slices in an oven-safe dish with a splash of beef broth or water to create a little steam. Cover the dish tightly with foil. Reheat for 15-25 minutes, or until warmed through, checking occasionally to ensure it doesn’t dry out.
- Stovetop Method: For a few slices, you can gently reheat them in a non-stick skillet over low to medium-low heat with a tiny bit of beef broth or water, covered, until warm. This method requires more vigilance to prevent drying.
- Microwave (Use with Caution): While possible, I generally avoid using the microwave for reheating beef tenderloin. It tends to heat unevenly and can quickly make the meat tough and dry. If you must use it, reheat in short bursts (30 seconds) on a lower power setting, flipping the meat, and checking frequently.
By following these storage and reheating tips, you can extend the deliciousness of your juicy beef tenderloin and enjoy it for multiple meals!
Final Thoughts
And just like that, you’ve unlocked the secret to truly spectacular beef tenderloin! I truly believe that once you try this method, you’ll never look back. The beauty of the Juicy Beef Tenderloin (simple Rub + Perfect Temperature) recipe lies in its elegant simplicity and the utterly delicious results it consistently delivers. You don’t need a complex ingredient list or fancy techniques to achieve a melt-in-your-mouth experience; just a thoughtful rub and precise temperature control are your best friends here.
I’m so confident that this approach will become your go-to for special occasions, or even just a luxurious weeknight treat. It transforms a beautiful cut of beef into something truly memorable, proving that sometimes, the simplest path leads to the most extraordinary flavors. So go ahead, impress your guests, treat yourself, and savor every tender, juicy bite. You absolutely deserve this culinary success!
Make Juicy Beef Tenderloin: Simple Rub, Perfect Temp Every Time

This Juicy Beef Tenderloin recipe features a simple rub that enhances the beef’s natural flavors and a foolproof technique for achieving perfect doneness every time. Impress your family and friends with this restaurant-quality dish made right in your kitchen!
- Prep Time: 1 hour 30 mins
- Cook Time: 25 mins
- Total Time: 1 hour 55 minutes
- Yield: 4-6 servings 1x
- Category: Dinner
- Method: Roasting
- Cuisine: American
Ingredients
- 2–3 pound beef tenderloin
- Coarse sea salt or Kosher salt
- Freshly ground black pepper
- Garlic powder
- Onion powder
- Optional: smoked paprika
- Optional: dried thyme
- High smoke point oil (avocado oil, grapeseed oil, or vegetable oil)
- Unsalted butter (optional)
- Fresh herbs (rosemary or thyme, optional)
Instructions
- Step 1: Bring to Room Temperature & Prepare the Beef
- Unwrap and rest the beef tenderloin on a wire rack set over a baking sheet for 1 to 1.5 hours.
- Pat the entire surface of the tenderloin dry with paper towels.
- Step 2: Apply the Simple Rub
- Drizzle about 1 tablespoon of high-smoke point oil over the tenderloin and rub it all over the surface.
- In a small bowl, combine coarse salt, freshly ground black pepper, garlic powder, and onion powder. Sprinkle this rub generously over all sides of the beef tenderloin, patting it gently to ensure it sticks.
- Step 3: Preheat & Sear
- Preheat your oven to 400°F (200°C).
- Heat a heavy-bottomed, oven-safe skillet over high heat and add 1-2 tablespoons of high-smoke point oil.
- Sear the tenderloin undisturbed for 2-3 minutes per side until a deep golden-brown crust forms.
- Step 4: Roast to Perfect Temperature
- Insert an oven-safe meat thermometer into the thickest part of the tenderloin.
- Transfer the skillet with the tenderloin to the preheated oven.
- Roast for about 15-25 minutes, monitoring the internal temperature until it reaches your desired doneness.
- Step 5: Rest and Slice
- Once the tenderloin reaches your target temperature, remove it from the oven and tent it loosely with foil. Let it rest for 10-20 minutes.
- After resting, slice the tenderloin against the grain into ½ to ¾-inch thick medallions and serve immediately.
Nutrition
- Serving Size: 1 slice
- Calories: 250
- Sugar: 0 g
- Sodium: 600 mg
- Fat: 15 g
- Saturated Fat: 6 g
- Unsaturated Fat: 8 g
- Trans Fat: 0 g
- Carbohydrates: 0 g
- Fiber: 0 g
- Protein: 25 g
- Cholesterol: 80 mg
Keywords: Ensure the beef is at room temperature before cooking for even cooking. A dry surface is essential for a good sear. Use a meat thermometer for precise temperature control.