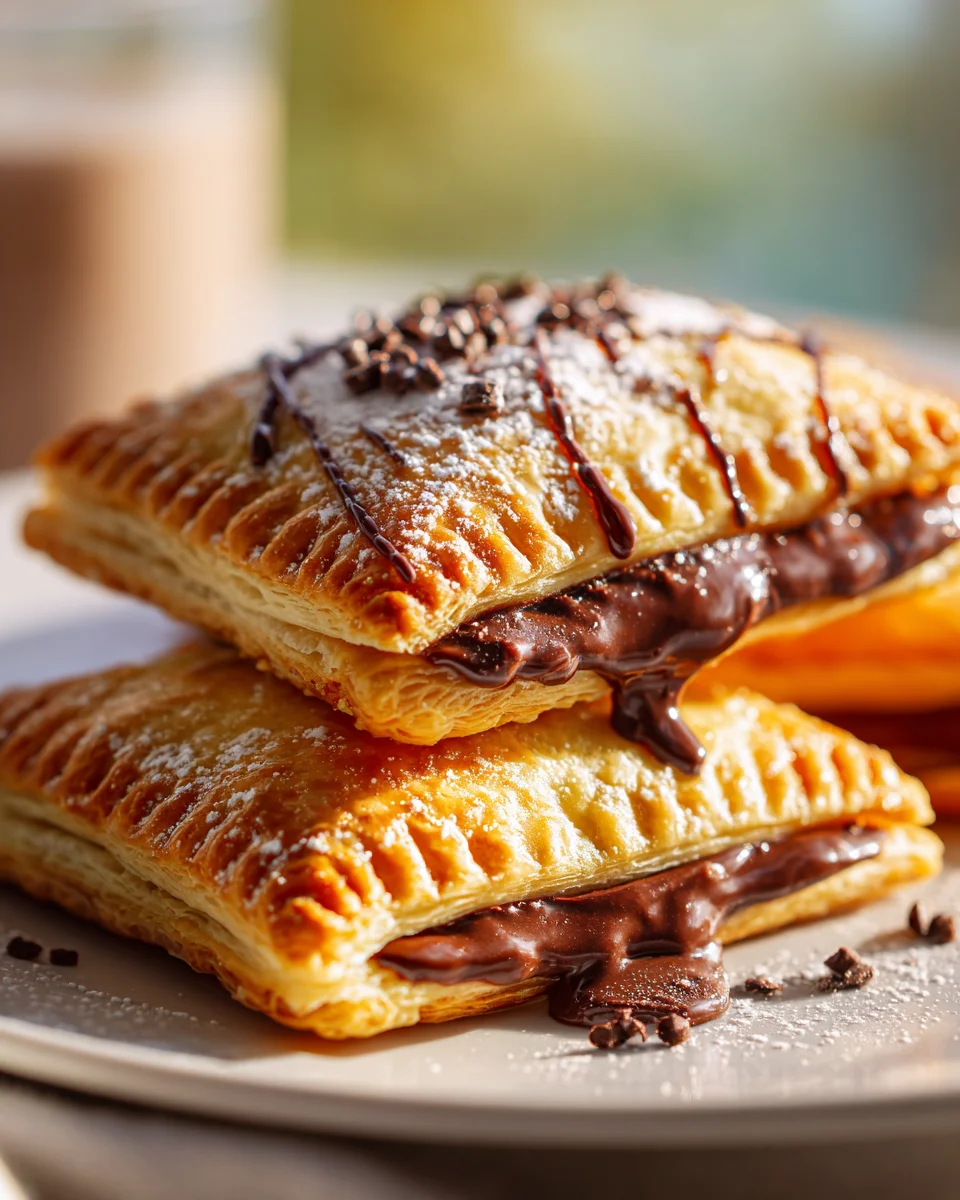
Chocolate Fudge Pop Tarts
Oh my goodness, get ready to experience a level of breakfast (or anytime!) indulgence you didn’t even know was possible. I’m talking about homemade Chocolate Fudge Pop Tarts, and trust me when I say, these are a game-changer. Forget everything you thought you knew about those foil-wrapped pastries from your childhood; we’re elevating the classic to a gourmet delight that’s packed with flavor and pure joy.
What makes these Chocolate Fudge Pop Tarts so incredibly special? Well, for starters, it’s the sheer luxury of a perfectly flaky, golden-brown pastry that crumbles delicately with every bite. But the real magic, the absolute star of the show, is the filling: a rich, gooey, molten chocolate fudge that melts in your mouth. This isn’t just a chocolate spread; it’s a luscious, intensely chocolatey experience that will have you closing your eyes in pure bliss. We’re taking that nostalgic favorite and giving it a serious upgrade with fresh ingredients and a whole lot of love.
You, my friend, are going to absolutely adore making (and devouring!) these. Why? Because they’re the ultimate comfort food, perfect for a cozy morning, an afternoon pick-me-up, or even a decadent dessert. Imagine pulling a tray of these warm, glistening beauties out of the oven, each one promising a delightful explosion of chocolatey goodness. They’re surprisingly fun to create, and the payoff is a treat that not only tastes miles better than anything store-bought but also brings that wonderful feeling of homemade goodness to your table. Get ready to impress your taste buds and everyone lucky enough to share them with you!

Ingredient Notes
Crafting delicious homemade Chocolate Fudge Pop Tarts starts with choosing the right ingredients. Here’s a breakdown of what you’ll need and a few ideas for substitutions to make them your own!
For the Pastry
- Refrigerated Pie Crusts: My go-to for these Pop Tarts is pre-made refrigerated pie crusts. They’re a huge time-saver and provide that perfect flaky, tender base we all love. You’ll need two rolls for about 8-10 Pop Tarts.
- Substitution: If you’re feeling ambitious, you can absolutely make your own pie crust from scratch! A classic shortcrust pastry recipe works beautifully here. For a gluten-free option, use your favorite store-bought or homemade gluten-free pie crust.
For the Chocolate Fudge Filling
This is where the magic happens! We’re aiming for a rich, dense, and gooey fudge that sets just enough to stay in place but melts beautifully when warmed.
- Unsweetened Cocoa Powder: This is essential for a deep, authentic chocolate flavor in our fudge. I prefer Dutch-processed for its darker color and smoother taste, but natural cocoa works too.
- Granulated Sugar: To sweeten our fudge to perfection.
- Milk: Whole milk works best for richness, but 2% or even a non-dairy alternative like almond or soy milk can be used.
- Butter: Unsalted butter adds richness and helps with the fudge’s texture.
- Vanilla Extract: A splash of good quality vanilla extract enhances all the chocolatey goodness.
- A Pinch of Salt: Don’t skip this! It balances the sweetness and really makes the chocolate flavor pop.
- Substitution: For an even richer filling, you could melt in a few ounces of good quality semi-sweet or dark chocolate along with the cocoa powder. If you want a slightly chewy fudge, a tiny amount of corn syrup or honey can be added, though it’s not strictly necessary.
For the Egg Wash
- Egg: Just one large egg, whisked with a tablespoon of water, is perfect for sealing the edges and giving the pastry a beautiful golden sheen.
For the Chocolate Glaze
- Powdered Sugar (Confectioners’ Sugar): This forms the base of our smooth, pourable glaze.
- Unsweetened Cocoa Powder: Again, for that lovely chocolate color and flavor in the glaze.
- Milk (or Cream): A tablespoon or two is all it takes to thin the glaze to the right consistency. Heavy cream will give a richer glaze, but milk is perfectly fine.
- Vanilla Extract: Another little flavor boost.
- Optional Sprinkles: Who doesn’t love sprinkles on a Pop Tart? Chocolate or rainbow sprinkles add a fun touch.
- Substitution: For a dairy-free glaze, simply use a non-dairy milk alternative. You could also omit the cocoa powder from the glaze for a classic vanilla glaze, but honestly, more chocolate is always better for a Chocolate Fudge Pop Tart!
Step-by-Step Instructions
Let’s get baking! Here’s how I make my irresistible Chocolate Fudge Pop Tarts, step by delicious step.
- Prepare the Fudge Filling: In a small saucepan, whisk together the unsweetened cocoa powder, granulated sugar, milk, butter, and a pinch of salt over medium heat. Bring the mixture to a gentle boil, stirring constantly to prevent scorching. Reduce the heat to low and simmer for about 3-5 minutes, continuing to stir, until the mixture thickens slightly to a pudding-like consistency. Remove from heat and stir in the vanilla extract. Transfer the fudge to a shallow bowl or plate and let it cool completely. I often pop it into the refrigerator for 20-30 minutes to speed up the cooling and firm it up; this makes it much easier to work with inside the pastry.
- Preheat Oven and Prep Baking Sheets: Preheat your oven to 375°F (190°C). Line two large baking sheets with parchment paper or silicone baking mats.
- Roll and Cut the Pastry: Unroll one of the refrigerated pie crusts onto a lightly floured surface. Gently roll it out slightly to smooth any creases and make it a bit larger. Using a sharp knife or a pastry wheel, cut the crust into equal rectangles, approximately 3×4 inches in size. You should get about 4-5 rectangles per crust. Repeat with the second pie crust. You’ll need two rectangles for each Pop Tart, so aim for an even number.
- Assemble the Pop Tarts: In a small bowl, whisk the egg with 1 tablespoon of water to create an egg wash. Place half of your pastry rectangles on one of the prepared baking sheets. Spoon about 1-2 tablespoons of the cooled chocolate fudge filling onto the center of each pastry rectangle, leaving at least a ½-inch border all around the edges. Be careful not to overfill, as this can lead to leakage during baking.
- Seal the Pop Tarts: Lightly brush the edges of the pastry rectangles with the egg wash. Carefully place a second pastry rectangle over each filled one, aligning the edges. Using a fork, press firmly all around the edges to seal the Pop Tarts completely. This crimping also creates that classic Pop Tart look. Use a fork or skewer to gently prick the top of each Pop Tart a few times; this allows steam to escape and prevents puffing.
- Bake Them Golden: Transfer the baking sheets to the preheated oven. Bake for 15-20 minutes, or until the pastry is golden brown and cooked through. Keep an eye on them, as oven temperatures can vary.
- Cool Before Glazing: Once baked, remove the Pop Tarts from the oven and carefully transfer them to a wire rack to cool completely. This step is crucial; if you glaze them while hot, the glaze will melt right off!
- Make the Chocolate Glaze: While the Pop Tarts are cooling, prepare the glaze. In a small bowl, whisk together the powdered sugar, cocoa powder, vanilla extract, and 1 tablespoon of milk or cream. Add more milk/cream, ½ teaspoon at a time, until you reach a smooth, pourable consistency. It should be thick enough to cling to the Pop Tart but thin enough to spread.
- Glaze and Decorate: Once the Pop Tarts are completely cool, spoon or spread the chocolate glaze over the top of each one. If desired, immediately sprinkle with your favorite sprinkles before the glaze sets. Let the glaze set for about 10-15 minutes before serving.
Tips & Suggestions
Making homemade Chocolate Fudge Pop Tarts is a fun and rewarding experience! Here are a few tips and suggestions I’ve picked up along the way to ensure yours turn out perfectly every time.
- Don’t Overfill: This is probably the most important tip! It’s tempting to load up on that delicious fudge, but overfilling will cause the Pop Tarts to burst open and leak filling during baking. Stick to 1-2 tablespoons per pastry.
- Chill Your Fudge: As mentioned in the steps, cooling the fudge filling completely, even chilling it in the fridge, makes it much firmer and easier to handle. This prevents it from spreading too much when you’re assembling the Pop Tarts.
- Seal Those Edges Well: Really press down with that fork! A good, firm crimp around the edges is vital to prevent the fudge from escaping. The egg wash acts as a glue, but the mechanical seal from the fork is your best defense.
- Prick for Perfection: Don’t forget to prick the tops of your Pop Tarts with a fork. This allows steam to vent, preventing the pastry from puffing up unevenly and ensuring a flat top for glazing.
- Customize Your Fudge: While this recipe focuses on classic chocolate fudge, feel free to get creative! A tiny pinch of espresso powder added to the fudge can deepen the chocolate flavor beautifully. For a touch of texture, you could fold in a tablespoon of finely chopped nuts (like pecans or walnuts) into the cooled fudge.
- Glaze Consistency is Key: When making the glaze, add the milk gradually. You want it thick enough to stay on top but thin enough to spread easily. If it’s too thick, it won’t spread; too thin, and it will run off the sides.
- Patience with Cooling: I know it’s hard to wait, but allowing the Pop Tarts to cool completely before glazing is essential. If they’re warm, the glaze will simply melt into a puddle.
- Batch Baking: These Pop Tarts are perfect for making ahead! You can prepare the fudge filling a day or two in advance and store it in the refrigerator. You can also assemble the unbaked Pop Tarts, place them on a parchment-lined baking sheet, and freeze them until firm. Then transfer them to a freezer-safe bag. When ready to bake, place them on a prepared baking sheet and bake from frozen, adding a few extra minutes to the baking time.
Storage
Once you’ve made a batch of these glorious Chocolate Fudge Pop Tarts, you’ll want to make sure you store them properly to enjoy every last bite!
- Room Temperature: Once the glaze has fully set, your Pop Tarts can be stored in an airtight container at room temperature for up to 2-3 days. This is my preferred method for enjoying them fresh.
- Refrigeration: If your kitchen is particularly warm, or if you prefer a slightly firmer texture, you can store them in an airtight container in the refrigerator for up to 5 days. Just note that the pastry might lose a little bit of its crispness when chilled.
- Freezing Baked Pop Tarts: These Pop Tarts freeze wonderfully! Once completely cooled and the glaze has fully set, arrange them in a single layer on a baking sheet and freeze until solid (about 1-2 hours). Once frozen, transfer them to a freezer-safe bag or container. They can be stored in the freezer for up to 1 month.
- Reheating: To reheat, simply pop a Pop Tart into a toaster oven or conventional oven preheated to 350°F (175°C) for 5-10 minutes, or until warmed through. If frozen, you might need to add a few extra minutes. Avoid microwaving if you want to retain any crispness in the pastry.
Final Thoughts
So, we’ve come to the end of our chocolatey journey, and what a delicious destination it is! Making your own Chocolate Fudge Pop Tarts is truly an experience that elevates a nostalgic favorite to an entirely new level. I genuinely believe this recipe is a must-try for anyone who adores the rich, deep flavor of chocolate and the comforting warmth of a homemade treat.
Forget everything you thought you knew about toaster pastries; these aren’t just any Pop Tarts. The homemade crust, combined with that irresistibly gooey, decadent chocolate fudge filling, transforms them into something truly special. Biting into a warm, freshly made Chocolate Fudge Pop Tart is pure bliss – a perfect harmony of flaky pastry and intense chocolate indulgence. I can assure you, the satisfaction of creating these delightful squares of happiness yourself is immense. Get ready to fall in love with your new favorite breakfast, snack, or even dessert!
Homemade Chocolate Fudge Pop Tarts: Easy & Delicious!

Indulge in the ultimate breakfast treat with these homemade Chocolate Fudge Pop Tarts, featuring a flaky pastry and rich chocolate filling. Perfect for any time of day, these gourmet delights will impress your taste buds and elevate your snack game.
- Prep Time: 30 mins
- Cook Time: 20 mins
- Total Time: 50 minutes
- Yield: 8-10 Pop Tarts 1x
- Category: Breakfast
- Method: Baking
- Cuisine: American
Ingredients
- 2 rolls Refrigerated Pie Crusts
- 1/2 cup Unsweetened Cocoa Powder
- 1/2 cup Granulated Sugar
- 1/2 cup Milk
- 1/4 cup Butter
- 1 teaspoon Vanilla Extract
- A Pinch of Salt
- 1 large Egg
- 1 cup Powdered Sugar (Confectioners' Sugar)
- 1/4 cup Unsweetened Cocoa Powder
- 1–2 tablespoons Milk (or Cream)
- 1 teaspoon Vanilla Extract
- Optional Sprinkles
Instructions
- Prepare the Fudge Filling: In a small saucepan, whisk together the unsweetened cocoa powder, granulated sugar, milk, butter, and a pinch of salt over medium heat. Bring the mixture to a gentle boil, stirring constantly to prevent scorching. Reduce the heat to low and simmer for about 3-5 minutes, continuing to stir, until the mixture thickens slightly to a pudding-like consistency. Remove from heat and stir in the vanilla extract. Transfer the fudge to a shallow bowl or plate and let it cool completely.
- Preheat Oven and Prep Baking Sheets: Preheat your oven to 375°F (190°C). Line two large baking sheets with parchment paper or silicone baking mats.
- Roll and Cut the Pastry: Unroll one of the refrigerated pie crusts onto a lightly floured surface. Gently roll it out slightly to smooth any creases and make it a bit larger. Using a sharp knife or a pastry wheel, cut the crust into equal rectangles, approximately 3×4 inches in size. You should get about 4-5 rectangles per crust. Repeat with the second pie crust.
- Assemble the Pop Tarts: In a small bowl, whisk the egg with 1 tablespoon of water to create an egg wash. Place half of your pastry rectangles on one of the prepared baking sheets. Spoon about 1-2 tablespoons of the cooled chocolate fudge filling onto the center of each pastry rectangle, leaving at least a ½-inch border all around the edges.
- Seal the Pop Tarts: Lightly brush the edges of the pastry rectangles with the egg wash. Carefully place a second pastry rectangle over each filled one, aligning the edges. Using a fork, press firmly all around the edges to seal the Pop Tarts completely. Use a fork or skewer to gently prick the top of each Pop Tart a few times.
- Bake Them Golden: Transfer the baking sheets to the preheated oven. Bake for 15-20 minutes, or until the pastry is golden brown and cooked through.
- Cool Before Glazing: Once baked, remove the Pop Tarts from the oven and carefully transfer them to a wire rack to cool completely.
- Make the Chocolate Glaze: While the Pop Tarts are cooling, prepare the glaze. In a small bowl, whisk together the powdered sugar, cocoa powder, vanilla extract, and 1 tablespoon of milk or cream. Add more milk/cream, ½ teaspoon at a time, until you reach a smooth, pourable consistency.
- Glaze and Decorate: Once the Pop Tarts are completely cool, spoon or spread the chocolate glaze over the top of each one. If desired, immediately sprinkle with your favorite sprinkles before the glaze sets.
Nutrition
- Serving Size: 1 Pop Tart
- Calories: 250
- Sugar: 20 g
- Sodium: 150 mg
- Fat: 10 g
- Saturated Fat: 5 g
- Unsaturated Fat: 3 g
- Trans Fat: 0 g
- Carbohydrates: 35 g
- Fiber: 1 g
- Protein: 3 g
- Cholesterol: 30 mg
Keywords: Don't overfill the Pop Tarts to prevent leakage. Chill the fudge filling for easier handling. Ensure to seal the edges well and prick the tops for steam to escape. Customize your fudge with espresso powder or nuts for added flavor.