Grinch Mini Cheesecakes
Oh, how I love the holidays, and nothing says “I’m ready for some festive mischief” quite like these incredible Grinch Mini Cheesecakes! I mean, who could resist a dessert that captures the spirit of everyone’s favorite green grumpy guy whose heart grew three sizes that day? These aren’t just any cheesecakes; they’re individual bites of pure holiday joy, specifically designed to bring a smile to even the most Grinch-like among us.
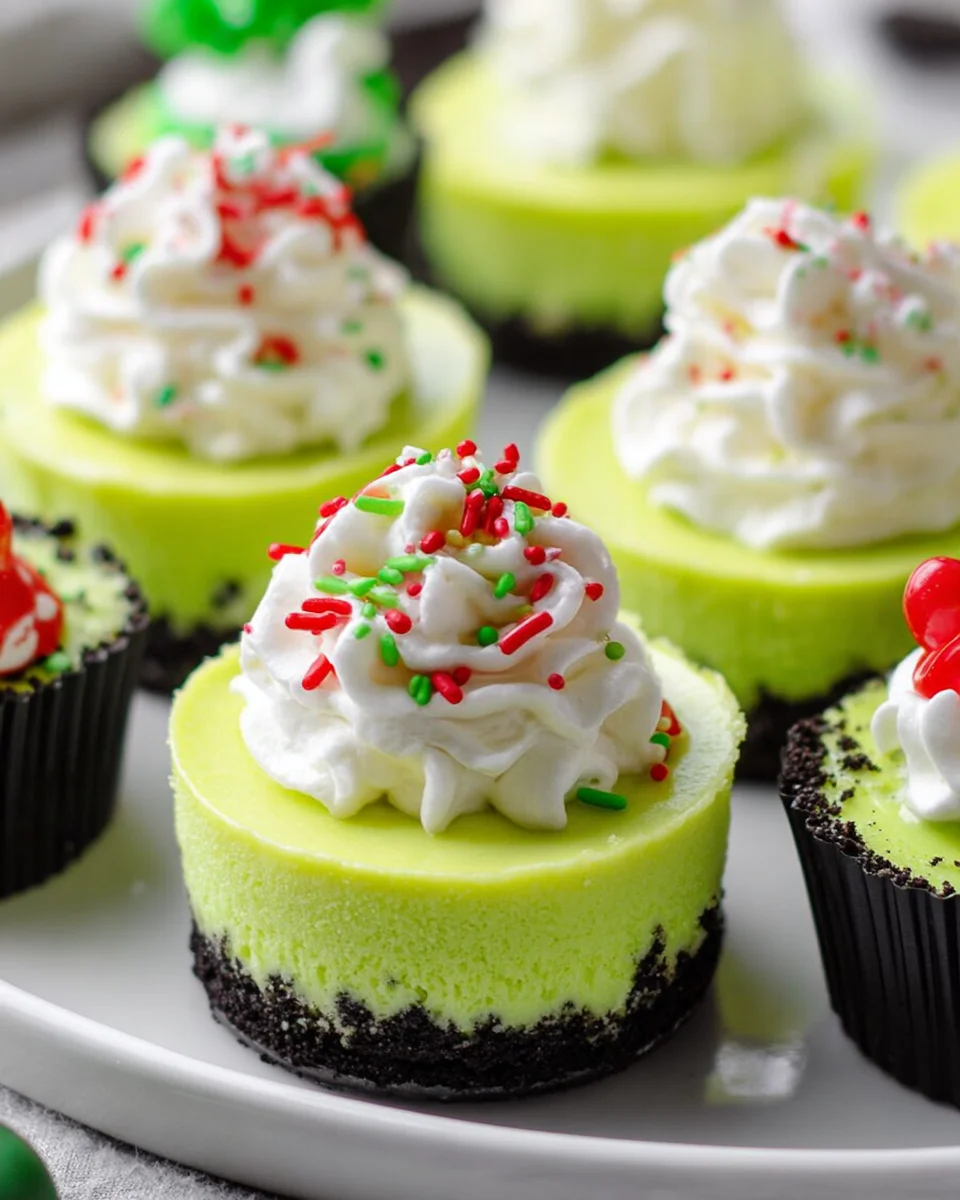
What makes these mini cheesecakes truly special is their whimsical charm and irresistible flavor. We’re talking vibrant green, perfectly creamy cheesecake nestled in cute individual servings, each topped with a tiny, iconic red heart — just like the Grinch himself! I guarantee you and your guests will absolutely adore the playful look and the rich, velvety texture. They’re the ultimate crowd-pleaser for any holiday gathering, office party, or even just a cozy night in, promising a delicious treat that’s as fun to look at as it is to eat.
Get ready to whip up a batch of these delightful treats that are surprisingly easy to make and absolutely packed with festive cheer. Each bite delivers that classic cheesecake tang and sweetness, all wrapped up in a visually stunning, holiday-themed package. Trust me, these Grinch Mini Cheesecakes are about to become your new favorite holiday tradition!

Ingredient Notes
Crafting these Grinch Mini Cheesecakes is such a joy, and getting the right ingredients sets you up for success. I’ll walk you through what you’ll need and some helpful swaps!
Crust Ingredients
- Graham Cracker Crumbs: These are the classic base for cheesecakes, providing that perfectly sweet and slightly spiced foundation. I prefer the pre-crushed kind for convenience, but you can definitely crush your own graham crackers in a food processor for a fresher taste.
- Melted Butter: Unsalted butter is my go-to here. It binds the crumbs together beautifully and adds richness. If you only have salted, that’s fine too, just omit any extra salt you might be tempted to add.
- Green Food Coloring (Optional): For an extra festive touch, I sometimes add a drop or two of green gel food coloring to the crust mixture. It’s not essential for flavor but really amps up the Grinchy vibe right from the bottom!
- Substitutions for Crust: You can easily swap graham crackers for crushed vanilla wafers or even chocolate cookie crumbs (like Oreos, just make sure to remove the cream filling). If you’re avoiding dairy, a plant-based butter alternative works wonderfully in the same quantity.
Cheesecake Filling Ingredients
- Full-Fat Cream Cheese: This is the star! For the creamiest, most luxurious texture, full-fat cream cheese (softened to room temperature) is non-negotiable in my kitchen. It ensures your mini cheesecakes are rich and smooth, just as they should be.
- Granulated Sugar: Provides the perfect balance of sweetness to counter the tanginess of the cream cheese.
- Large Eggs: Eggs are crucial for binding the filling and giving it structure. Make sure they’re at room temperature for easier incorporation into the batter, which helps prevent overmixing.
- Vanilla Extract: A good quality vanilla extract elevates all the flavors in the cheesecake. I use pure vanilla extract, but imitation works too.
- Green Gel Food Coloring: This is where the magic happens for our Grinch Mini Cheesecakes! Gel food coloring is superior for achieving that vibrant, Grinch-green hue without thinning out your batter like liquid colors might. Add it gradually until you reach your desired level of Grinchiness.
- Flavor Boost (Optional): To add an extra festive twist, I sometimes include a tiny splash of peppermint extract (think a subtle candy cane hint) or a little lime zest for a brighter, more whimsical flavor. Just a little goes a long way!
- Substitutions for Filling: While full-fat cream cheese is best, you can use reduced-fat cream cheese, but be aware the texture might be slightly less rich. For sugar, you could experiment with a granulated sugar substitute, adjusting to taste. For eggs, certain commercial egg replacers can work, though the texture might be slightly different.
Topping & Decoration
- Whipped Cream or Cool Whip: A dollop of fluffy whipped cream on top is the perfect cloud-like finish. You can make your own or use a store-bought version for convenience.
- Red Heart Sprinkles or Candy Hearts: This is the iconic “Grinch’s heart” element! A tiny red heart sprinkle, a small red candy heart, or even a tiny piece of a red fruit roll-up cut into a heart shape will do the trick. It’s essential for that unmistakable Grinch charm!
Step-by-Step Instructions
Let’s get baking! Don’t be intimidated by cheesecakes; mini versions are surprisingly forgiving and incredibly fun to make. I’ll guide you through each step to create your delightful Grinch Mini Cheesecakes.
1. Prepare Your Baking Station
- Preheat your oven to 325°F (160°C).
- Line a 12-cup mini muffin tin with paper liners. I find paper liners are best for mini cheesecakes as they make removal so much easier and cleanup a breeze. If you don’t have mini muffin tins, a standard muffin tin with regular liners works too, just expect slightly larger cheesecakes and adjust baking time by a few minutes.
2. Craft the Grinchy Crust
- In a medium bowl, combine 1 ½ cups of graham cracker crumbs with ¼ cup of melted butter. If you’re adding green food coloring to the crust, now is the time to mix in 1-2 drops until you achieve a light green hue.
- Distribute the crumb mixture evenly among the 12 lined muffin cups. I use a tablespoon measure to get roughly the same amount in each.
- Using the back of a spoon or your fingertips, press the crumbs firmly into the bottom of each liner. This creates a sturdy base.
- Bake the crusts for 5-7 minutes. This short bake helps set the crust and prevents it from getting soggy later. Remove from the oven and let them cool slightly while you prepare the filling.
3. Mix the Vibrant Green Filling
- In a large mixing bowl, using an electric mixer (handheld or stand mixer), beat 2 packages (8 oz each) of softened full-fat cream cheese on medium speed until it’s completely smooth and free of lumps. This is critical for a silky-smooth cheesecake.
- Gradually add ¾ cup of granulated sugar to the cream cheese, beating until just combined and smooth. Scrape down the sides of the bowl as needed to ensure everything is well incorporated.
- Beat in 2 large eggs, one at a time, mixing on low speed until just combined after each addition. Be careful not to overmix once the eggs are in, as this can incorporate too much air and lead to cracks.
- Stir in 1 teaspoon of vanilla extract.
- Now for the fun part: add your green gel food coloring! Start with a few drops and mix until you achieve that perfect vibrant Grinch green. You can always add more a drop at a time until you’re happy with the shade. If you’re using peppermint extract or lime zest, add about ¼ teaspoon now.
4. Fill and Bake
- Carefully spoon or pour the green cheesecake filling over the par-baked crusts in your muffin tin. Fill each liner about ¾ full.
- Bake for 18-22 minutes, or until the edges are set and the centers have just a slight wobble when you gently shake the pan. Overbaking can lead to cracks, so keep an eye on them!
5. Cool and Chill
- Once baked, remove the muffin tin from the oven and let the mini cheesecakes cool completely on a wire rack at room temperature. This slow cooling helps prevent cracks.
- Once cooled, transfer the muffin tin to the refrigerator and chill the cheesecakes for at least 3-4 hours, or ideally overnight. Chilling is essential for the cheesecake to fully set and achieve its creamy texture.
6. Decorate Your Grinchy Masterpieces
- Once thoroughly chilled, carefully remove the Grinch Mini Cheesecakes from their liners.
- Top each cheesecake with a generous dollop of whipped cream or Cool Whip.
- Finally, place a single red heart sprinkle or candy heart right in the center of the whipped cream to represent the Grinch’s tiny heart.
- Serve and enjoy your adorable and delicious Grinch Mini Cheesecakes!
Tips & Suggestions
I’ve made my share of cheesecakes, and I’ve picked up a few tricks along the way. Here are my best tips for making your Grinch Mini Cheesecakes absolutely perfect!
- Room Temperature Ingredients are Key: This is probably my most important tip for any cheesecake! Ensure your cream cheese and eggs are at true room temperature. This makes for a smoother batter that’s less prone to lumps and reduces the risk of overmixing. I usually take them out about an hour before I plan to bake.
- Achieving the Perfect Green: Use gel food coloring for the most vibrant and concentrated green without affecting the consistency of your batter. Add it gradually, mixing after each addition, until you get that signature Grinch shade. A little really does go a long way!
- Don’t Overmix: Once you add the eggs, mix only until just combined. Overmixing incorporates too much air into the batter, which can cause your cheesecakes to puff up excessively in the oven and then fall, leading to cracks. Gentle mixing is the way to go.
- Preventing Cracks: Beyond not overmixing, two other factors help prevent cracks. First, don’t overbake! A slight wobble in the center is actually a good thing; they’ll continue to set as they cool. Second, allow them to cool slowly. Rapid temperature changes are a common culprit for cheesecake cracks, so let them cool completely on the counter before moving them to the fridge.
- For the Grinch Heart: Get creative with your red heart! Beyond sprinkles, you can pipe a small heart with red icing, use a tiny piece of red licorice cut into a heart shape, or even press a small fresh raspberry into the whipped cream. It’s the detail that brings the whole theme together.
- Serving Temperature: These mini cheesecakes are best served thoroughly chilled. The cold enhances their texture and firmness, making them easier to handle and more refreshing to eat.
- Make Ahead Magic: These are fantastic for making ahead! You can bake them a day or two in advance (without the whipped cream topping), chill them, and then just add the festive decorations right before serving. It saves so much stress during holiday prep!
Storage
Once you’ve made these delightful Grinch Mini Cheesecakes, you’ll want to make sure they stay fresh and delicious. Here’s how I store mine to keep them perfect!
- In the Refrigerator: Your Grinch Mini Cheesecakes are best stored in an airtight container in the refrigerator. This keeps them moist and prevents them from absorbing any unwanted odors from other foods in the fridge. I find they taste best within 3-5 days of baking. For optimal freshness and texture, I recommend enjoying them within 2-3 days, especially if they have the whipped cream topping.
- If Topped with Whipped Cream: If you’ve already added the whipped cream topping, the cheesecakes are best consumed within a day or two. Whipped cream can start to weep or deflate over time, which might affect the appearance and texture. If you’re making them in advance, I highly recommend storing the plain, chilled cheesecakes and adding the whipped cream and heart just before serving.
- Freezing for Later: Yes, you can freeze these mini cheesecakes! This is a fantastic option if you’ve made a big batch or want to save some for a later treat.
- Preparation for Freezing: Make sure the cheesecakes are completely cooled and thoroughly chilled (preferably overnight) before freezing. Do NOT add the whipped cream topping if you plan to freeze them.
- Wrapping: Carefully remove each mini cheesecake from its liner. Individually wrap each cheesecake tightly in plastic wrap, ensuring it’s sealed well to prevent freezer burn.
- Container: Place the individually wrapped cheesecakes into a freezer-safe airtight container or a heavy-duty freezer bag. This provides an extra layer of protection.
- Freezing Duration: They can be stored in the freezer for up to 1-2 months.
- Thawing: To enjoy, transfer the frozen mini cheesecakes to the refrigerator and let them thaw overnight. Once thawed, you can then add your fresh whipped cream and red heart decoration before serving. They’ll taste almost as good as freshly made!
- Preventing Drying Out: Always keep your cheesecakes covered, whether in the fridge or freezer. Exposure to air is the quickest way for them to dry out and lose their lovely creamy texture.
Final Thoughts
And there you have it! I truly believe these Grinch Mini Cheesecakes are more than just a dessert; they’re a little bite of pure holiday magic. There’s something so wonderfully satisfying about their vibrant green hue and the playful nod to everyone’s favorite green grumpy guy that just brings a smile to my face. The creamy, tangy cheesecake filling perfectly balances the sweet crust, creating an irresistible individual treat that’s impossible to resist.
Whether you’re looking to add a whimsical touch to your holiday spread, searching for the perfect festive dessert for a party, or simply want to bake something incredibly fun and delicious, these Grinch Mini Cheesecakes are an absolute winner. I promise, whipping up a batch will not only fill your kitchen with a joyful spirit but also delight everyone who takes a bite. Get ready to watch hearts grow three sizes!
Festive Grinch Mini Cheesecakes – Easy Holiday Dessert!

These Grinch Mini Cheesecakes are individual bites of pure holiday joy, capturing the spirit of everyone’s favorite green grumpy guy. With their vibrant green color and creamy texture, they’re the ultimate crowd-pleaser for any festive gathering.
- Prep Time: 30 mins
- Cook Time: 30 mins
- Total Time: 1 hour
- Yield: 12 servings 1x
- Category: Dessert
- Method: Baking
- Cuisine: American
Ingredients
- 1 ½ cups graham cracker crumbs
- ¼ cup melted unsalted butter
- Green food coloring (optional)
- 2 packages (8 oz each) full-fat cream cheese, softened to room temperature
- ¾ cup granulated sugar
- 2 large eggs, at room temperature
- 1 teaspoon vanilla extract
- Green gel food coloring
- ¼ teaspoon peppermint extract or lime zest (optional)
- Whipped cream or Cool Whip, for topping
- Red heart sprinkles or candy hearts, for decoration
Instructions
- Preheat your oven to 325°F (160°C). Line a 12-cup mini muffin tin with paper liners.
- In a medium bowl, combine graham cracker crumbs with melted butter. If using, mix in green food coloring until you achieve a light green hue.
- Distribute the crumb mixture evenly among the 12 lined muffin cups. Press the crumbs firmly into the bottom of each liner.
- Bake the crusts for 5-7 minutes, then remove from the oven and let them cool slightly.
- In a large mixing bowl, beat the softened cream cheese on medium speed until smooth. Gradually add granulated sugar, beating until just combined.
- Beat in the eggs one at a time on low speed until just combined. Stir in vanilla extract.
- Add green gel food coloring until you achieve the desired vibrant shade. If using, add peppermint extract or lime zest.
- Spoon or pour the cheesecake filling over the par-baked crusts, filling each liner about ¾ full.
- Bake for 18-22 minutes, until the edges are set and the centers have a slight wobble.
- Let the mini cheesecakes cool completely on a wire rack at room temperature, then chill in the refrigerator for at least 3-4 hours or overnight.
- Once chilled, remove the cheesecakes from their liners. Top each with whipped cream and a red heart sprinkle or candy heart.
Nutrition
- Serving Size: 1 mini cheesecake
- Calories: 200
- Sugar: 15 g
- Sodium: 150 mg
- Fat: 12 g
- Saturated Fat: 7 g
- Unsaturated Fat: 3 g
- Trans Fat: 0 g
- Carbohydrates: 20 g
- Fiber: 1 g
- Protein: 3 g
- Cholesterol: 50 mg
Keywords: Ensure your cream cheese and eggs are at room temperature for a smoother batter. Use gel food coloring for the most vibrant green without affecting the batter's consistency. Don't overmix after adding the eggs to prevent cracks.