Grinch Mini Cheesecakes
Oh boy, have I got a treat for you that’s sure to make your heart grow three sizes this holiday season! We’re diving headfirst into the whimsical world of Grinch Mini Cheesecakes. These aren’t just any ordinary desserts; they’re a burst of festive fun, perfectly capturing the mischievous charm of everyone’s favorite green grumpy guy, complete with his iconic little heart.
What makes these mini cheesecakes so special, you ask? Well, beyond their absolutely adorable appearance, it’s their delightful combination of creamy, tangy cheesecake filling, vibrant green color, and that sweet little red heart on top that truly sets them apart. They’re individually portioned, making them incredibly easy to serve at parties, potlucks, or even just as a delightful holiday treat for yourself without any fuss or slicing. I promise you’ll love making these because they’re surprisingly simple to put together, yet they look incredibly impressive, guaranteed to bring a smile to anyone’s face.
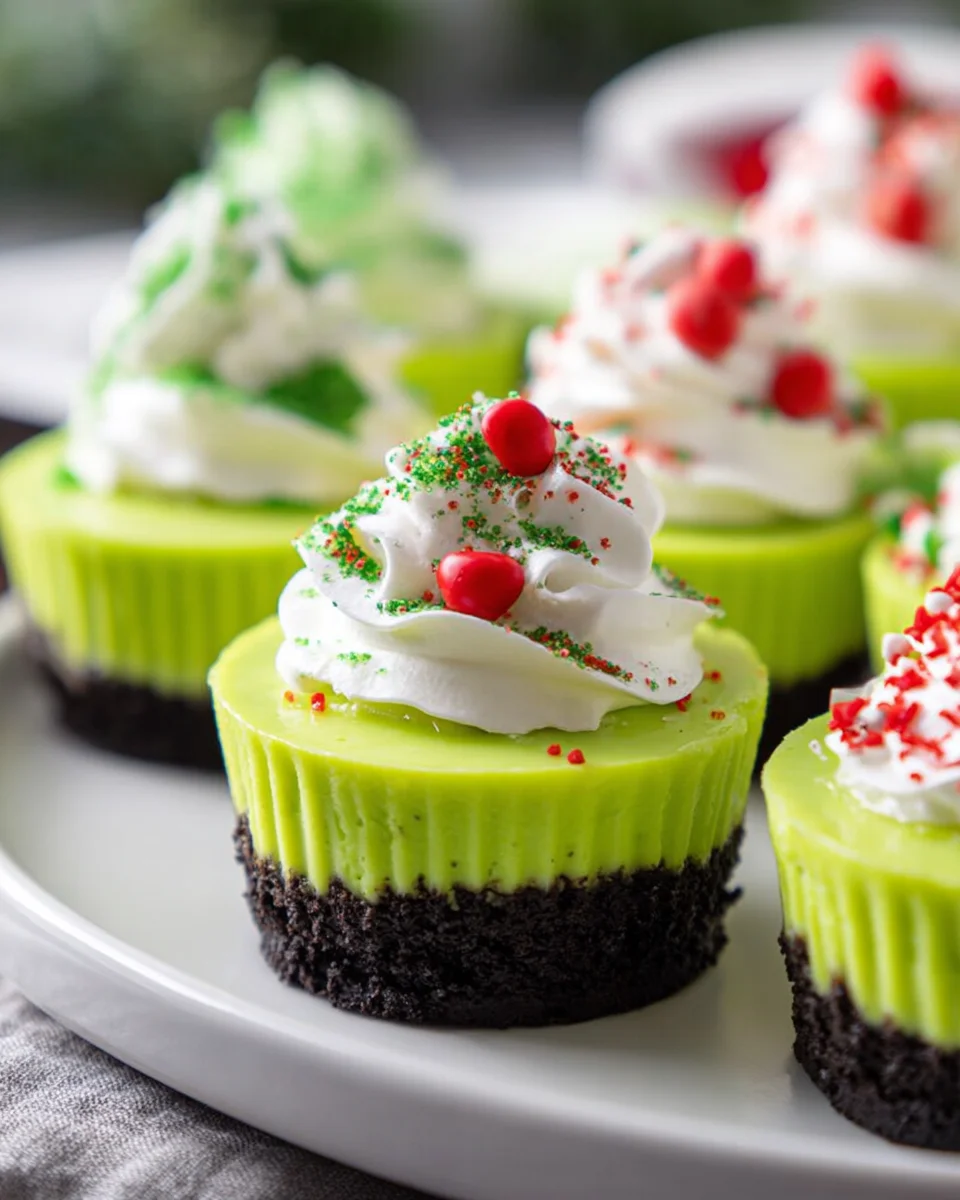
So, what exactly are we creating? Picture this: a rich, buttery graham cracker crust forms the perfect base for a smooth, velvety, bright green cheesecake filling. Each luscious bite delivers that classic cheesecake bliss, all wrapped up in a charming, bite-sized package. To top it all off, we’ll crown each one with a tiny, sweet red candy heart, symbolizing the Grinch’s transformation. These Grinch Mini Cheesecakes are more than just a dessert; they’re a delicious, joyful nod to a beloved holiday story, and I can’t wait for you to try them!

Ingredient Notes
Welcome, fellow bakers, to the delightful world of Grinch Mini Cheesecakes! These festive little treats are not only adorable but incredibly delicious. To ensure your batch turns out perfectly, let’s chat about the key ingredients and some helpful notes.
Cream Cheese: The Star of the Show
- What I Use: Full-fat block cream cheese is absolutely essential for these Grinch Mini Cheesecakes. Trust me, it makes all the difference in achieving that rich, creamy, and decadent texture we all crave in a cheesecake. Make sure it’s softened to room temperature – I usually take it out of the fridge an hour or two before I plan to start baking. This prevents lumps and ensures a super smooth batter.
- Substitutions/Tips: Avoid using cream cheese spreads from a tub, as they have more water content and won’t set up properly. If you only have cold cream cheese, you can carefully soften it in the microwave in 15-second intervals, but be careful not to melt it.
Sweeteners and Flavorings
- Granulated Sugar: This provides the perfect level of sweetness without overpowering the tangy cream cheese. It also helps with the cheesecake’s structure.
- Vanilla Extract: A good quality vanilla extract enhances all the other flavors. I always opt for pure vanilla extract over imitation for the best taste.
Eggs: For Structure and Smoothness
- What I Use: Large eggs, also at room temperature. Eggs act as a binder and give our mini cheesecakes their classic smooth texture and help them set up beautifully.
- Tips: Room temperature eggs incorporate more easily into the batter, preventing overmixing which can lead to cracks.
The Grinchy Green Color
- Green Food Coloring: This is where the magic happens! I highly recommend using a gel food coloring for the most vibrant and concentrated green hue. Liquid food coloring can thin out your batter and often requires more drops to achieve a strong color, potentially altering the consistency.
- Tips: Start with a few drops, mix, and then add more gradually until you reach your desired Grinch-approved green.
The Crust
- Graham Cracker Crumbs: A classic choice for cheesecake! You can buy pre-crushed crumbs or crush your own graham crackers in a food processor.
- Melted Butter: I use unsalted butter, melted, to bind the crumbs together. This creates a sturdy and flavorful base for our mini cheesecakes.
- Substitutions: Feel free to experiment with other cookie crumbs! Vanilla wafers, shortbread cookies, or even chocolate cookies could be fun variations, though they’ll change the overall flavor profile.
The Iconic Red Heart
- Red Heart Sprinkles or Candies: For that final, unmistakable Grinch touch! You can find small red heart sprinkles in most baking aisles, or sometimes small red candy hearts are available, especially around the holidays.
Step-by-Step Instructions
Alright, let’s get our aprons on and bake some festive Grinch Mini Cheesecakes! Follow these steps carefully, and you’ll have a batch of adorable, delicious treats ready to steal (or warm) hearts.
Step 1: Get Prepped and Crust Ready
- Preheat Your Oven: My first step is always to preheat my oven to 325°F (160°C). This ensures the oven is at the correct temperature when your cheesecakes are ready to go in.
- Prepare Your Muffin Tin: Line a 12-cup standard muffin tin with paper liners. This makes it super easy to remove the mini cheesecakes once they’re baked and cooled.
- Make the Crust: In a small bowl, combine the graham cracker crumbs, granulated sugar, and melted butter. Mix until the crumbs are evenly moistened.
- Press the Crust: Divide the crumb mixture evenly among the 12 muffin cups. Using the back of a spoon or your fingertips, firmly press the crumbs down into an even layer at the bottom of each liner. Set aside.
Step 2: Craft the Creamy Grinch Filling
- Beat the Cream Cheese: In a large mixing bowl (or the bowl of a stand mixer with the paddle attachment), beat the softened cream cheese on medium speed for about 2-3 minutes until it’s completely smooth and creamy. Make sure there are no lumps!
- Add Sugar: Gradually add the granulated sugar to the cream cheese, beating on low speed until just combined. Don’t overmix at this stage.
- Incorporate Eggs and Vanilla: Add the eggs one at a time, mixing on low speed only until each egg is just incorporated. Scrape down the sides of the bowl as needed. Stir in the vanilla extract. The key here is to avoid incorporating too much air, which can lead to cracks.
- Color It Grinchy Green: Now for the fun part! Add a few drops of green gel food coloring to the cheesecake batter. Mix on low speed until the color is evenly distributed and you’ve achieved your desired Grinch green. You can always add a little more if you want a deeper hue.
Step 3: Bake to Perfection
- Fill the Liners: Carefully spoon the green cheesecake batter into each prepared muffin liner, filling them about two-thirds full. I find using a small cookie scoop works wonderfully for this.
- Bake: Transfer the muffin tin to your preheated oven. Bake for 18-22 minutes, or until the edges of the cheesecakes are set and the centers have a slight jiggle. They will continue to set as they cool.
- Cool Gradually: Once baked, turn off the oven and prop the oven door open slightly. Let the mini cheesecakes cool inside the oven for about 15-20 minutes. This gradual cooling helps prevent cracking.
- Cool Completely: Remove the muffin tin from the oven and transfer it to a wire rack. Let the cheesecakes cool completely in the muffin tin at room temperature.
Step 4: Chill and Decorate
- Chill Time: Once cooled to room temperature, transfer the muffin tin to the refrigerator and chill for at least 4 hours, or preferably overnight. This chilling time is crucial for the cheesecakes to firm up and develop their full flavor and perfect texture.
- Decorate (Optional but Recommended!): When ready to serve, carefully remove the paper liners. Top each Grinch Mini Cheesecake with a dollop of whipped cream (homemade or store-bought) and place one small red heart sprinkle or candy heart in the center.
- Serve and Enjoy! Arrange them on a platter and watch them disappear!
Tips & Suggestions
To make sure your Grinch Mini Cheesecakes are absolutely perfect and to add a little extra flair, here are some of my favorite tips and suggestions:
- Room Temperature Ingredients are Key: I can’t stress this enough! Ensure your cream cheese and eggs are at room temperature. This helps them combine smoothly, creating a lump-free batter and preventing overmixing, which can lead to cracks in your cheesecakes.
- Don’t Overmix the Batter: Once you add the eggs, mix only until just combined. Overmixing incorporates too much air into the batter, which can cause the cheesecakes to puff up excessively in the oven and then sink or crack as they cool.
- Achieve Vibrant Green: For that perfect Grinchy hue, use gel food coloring. It’s much more concentrated than liquid food coloring, so you’ll need less, and it won’t thin out your batter. Start with a few drops and add more until you reach your desired shade.
- Prevent Cracks: The gradual cooling method I outlined (leaving them in the turned-off oven with the door ajar) is excellent for minimizing cracks. While mini cheesecakes are less prone to cracking than full-sized ones, this step helps ensure a smooth top.
- Perfect Portioning: For evenly sized cheesecakes, I like to use a cookie scoop or an ice cream scoop to transfer the batter into the muffin liners. This keeps things neat and consistent.
- Crust Variations: While graham crackers are classic, feel free to experiment with other cookie crumbs for your crust. Vanilla wafers, shortbread cookies, or even gingersnaps could add an interesting twist to your Grinch Mini Cheesecakes.
- Topping Creativity: Beyond the simple whipped cream and red heart, you could drizzle a little red candy melt, add some green sprinkles around the whipped cream, or even pipe a small swirl of red frosting in the shape of a heart.
- Make Ahead: These Grinch Mini Cheesecakes are fantastic for making ahead of time. They actually taste even better after a full night in the fridge, allowing the flavors to meld beautifully. Decorate them just before serving for the freshest look.
- Serving Suggestions: They are perfect on their own, but if you’re feeling extra festive, arrange them on a tiered dessert stand. They make a wonderful addition to any holiday party spread or a fun treat for a movie night watching “The Grinch”!
Storage
Proper storage is essential to keep your Grinch Mini Cheesecakes fresh and delicious. Here’s how I store mine:
- Refrigeration: Because they are dairy-based, these mini cheesecakes must be stored in the refrigerator. After chilling and once decorated (if using whipped cream, this is best done just before serving), place them in an airtight container. They will stay fresh and delicious in the refrigerator for up to 3-4 days. I often line the container with parchment paper and place a piece of parchment between layers if I stack them, to prevent sticking and protect the toppings.
- Freezing for Longer Storage: These mini cheesecakes freeze beautifully! If you want to make them further in advance or have leftovers, here’s what I do:
- Before Decorating: It’s best to freeze them before adding the whipped cream and red heart sprinkles.
- Flash Freeze: Place the cooled (and un-decorated) mini cheesecakes on a baking sheet and pop them in the freezer for about 1-2 hours, or until they are solid. This prevents them from sticking together.
- Wrap Securely: Once frozen solid, transfer the cheesecakes to a freezer-safe airtight container or a heavy-duty freezer bag. You can stack them with parchment paper between layers.
- Freezer Duration: They will keep well in the freezer for up to 1 month.
- Thawing Frozen Cheesecakes: When you’re ready to enjoy them, simply transfer the frozen cheesecakes from the freezer to the refrigerator and let them thaw for several hours or overnight. Once thawed, you can add your whipped cream and red heart decorations and serve.
- Avoid Room Temperature Storage: Never leave Grinch Mini Cheesecakes out at room temperature for extended periods, especially if they have whipped cream, as this can lead to spoilage and food safety issues.
Final Thoughts
And there you have it – my delightful recipe for
Grinch Mini Cheesecakes
! I truly believe these little green wonders are more than just a dessert; they’re a vibrant, festive hug in miniature form. What makes these
Grinch Mini Cheesecakes
an absolute must-try is their irresistible combination of creamy, tangy sweetness, perfectly portioned for individual enjoyment. They’re incredibly fun to make, a treat for the eyes with their signature Grinchy green and cheerful red heart, and guaranteed to bring smiles to any gathering. They effortlessly capture the playful spirit of the holidays, making them the perfect centerpiece for your dessert table or a charming surprise for someone special. I promise, once you experience the joy of these
Grinch Mini Cheesecakes
, they’ll become a beloved tradition in your holiday repertoire!
Grinch Mini Cheesecakes: Festive, Easy Holiday Dessert!

These Grinch Mini Cheesecakes are a delightful combination of creamy cheesecake filling and a buttery graham cracker crust, topped with a sweet red heart. Perfect for holiday gatherings, they are both adorable and delicious!
- Prep Time: 30 mins
- Cook Time: 22 mins
- Total Time: 52 minutes
- Yield: 12 servings
- Category: Dessert
- Method: Baking
- Cuisine: American
Ingredients
- Full-fat block cream cheese, softened
- Granulated sugar
- Large eggs, at room temperature
- Vanilla extract
- Green gel food coloring
- Graham cracker crumbs
- Melted unsalted butter
- Red heart sprinkles or candies
Instructions
- Preheat your oven to 325°F (160°C).
- Line a 12-cup standard muffin tin with paper liners.
- In a small bowl, combine the graham cracker crumbs, granulated sugar, and melted butter. Mix until the crumbs are evenly moistened.
- Divide the crumb mixture evenly among the 12 muffin cups and firmly press the crumbs down into an even layer at the bottom of each liner. Set aside.
- In a large mixing bowl, beat the softened cream cheese on medium speed for about 2-3 minutes until completely smooth and creamy.
- Gradually add the granulated sugar to the cream cheese, beating on low speed until just combined.
- Add the eggs one at a time, mixing on low speed only until each egg is just incorporated. Stir in the vanilla extract.
- Add a few drops of green gel food coloring to the cheesecake batter and mix on low speed until the color is evenly distributed.
- Carefully spoon the green cheesecake batter into each prepared muffin liner, filling them about two-thirds full.
- Transfer the muffin tin to your preheated oven and bake for 18-22 minutes, or until the edges of the cheesecakes are set and the centers have a slight jiggle.
- Once baked, turn off the oven and prop the oven door open slightly. Let the mini cheesecakes cool inside the oven for about 15-20 minutes.
- Remove the muffin tin from the oven and transfer it to a wire rack. Let the cheesecakes cool completely in the muffin tin at room temperature.
- Once cooled to room temperature, transfer the muffin tin to the refrigerator and chill for at least 4 hours, or preferably overnight.
- When ready to serve, carefully remove the paper liners. Top each Grinch Mini Cheesecake with a dollop of whipped cream and place one small red heart sprinkle or candy heart in the center.
- Arrange them on a platter and serve.
Nutrition
- Serving Size: 1 mini cheesecake
- Calories: 150
- Sugar: 10 g
- Sodium: 150 mg
- Fat: 9 g
- Saturated Fat: 5 g
- Unsaturated Fat: 4 g
- Trans Fat: 0 g
- Carbohydrates: 15 g
- Fiber: 0 g
- Protein: 2 g
- Cholesterol: 40 mg
Keywords: Ensure your cream cheese and eggs are at room temperature for a smooth batter. Avoid overmixing to prevent cracks in the cheesecakes. Use gel food coloring for a vibrant green hue.