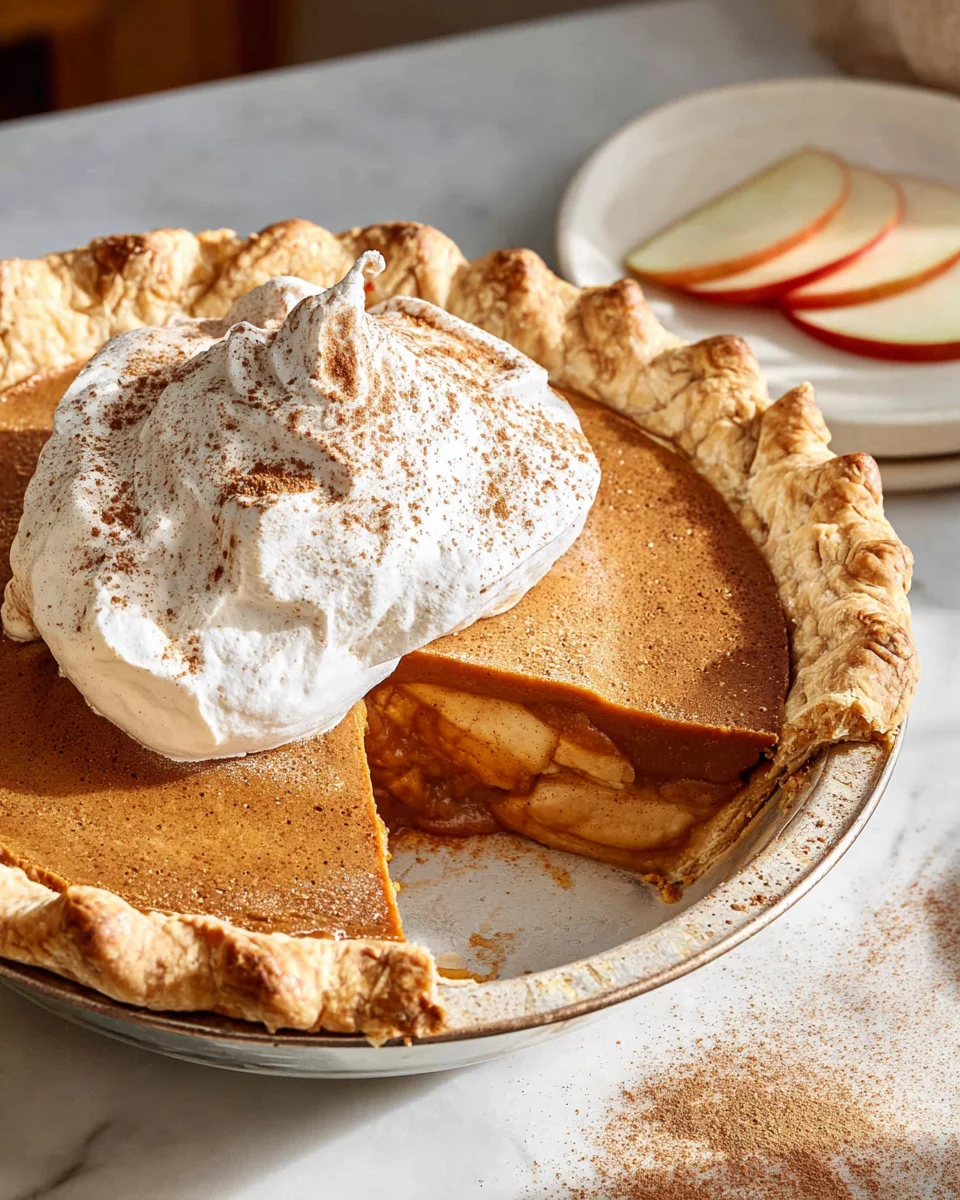
Apple Butter Pie With Cinnamon Whipped Cream is more than just a dessert; it’s a slice of autumn comfort, a warm hug on a plate that I believe promises to enchant your senses from the very first bite. Imagine with me a golden, flaky crust cradling a rich, spiced apple butter filling, all crowned with a cloud of light, fragrant cinnamon whipped cream. This isn’t just any pie; it’s a celebration of heritage and homemade goodness, inviting you to rediscover the simple joys of seasonal baking, and truly, it’s one of my favorite ways to celebrate fall.
Historically, apple butter has been a staple of harvest seasons, particularly in regions like the Pennsylvania Dutch country and Appalachia, where long, slow cooking over an open fire transformed abundant apple hauls into a spreadable, preserves-like delight. This tradition of preserving the season’s bounty speaks to a timeless wisdom, and bringing that concentrated apple essence into a pie elevates a humble spread into a truly magnificent centerpiece. It’s a taste of history, lovingly reimagined for your modern table, and a tradition I am thrilled to share with you.
People absolutely adore this dish because it strikes a perfect balance between nostalgic charm and sophisticated flavor, and frankly, I understand why! The deep, caramelized apple notes of the apple butter provide a unique depth that differs from a traditional apple pie, while the creamy texture of the filling is utterly divine. Paired with our light and airy cinnamon whipped cream, each forkful of this Apple Butter Pie With Cinnamon Whipped Cream delivers a symphony of sweet, spicy, and buttery notes, creating an unforgettable experience that will have everyone asking for another slice. It’s a dish that evokes warmth, comfort, and the undeniable magic of fall, making it a perfect addition to any gathering.

Ingredients:
For the Flaky Pie Crust (one 9-inch crust):
- 1 ¼ cups (150g) all-purpose flour, plus more for dusting
- ½ teaspoon granulated sugar
- ¼ teaspoon fine sea salt
- 8 tablespoons (113g) unsalted butter, very cold and cut into ½-inch cubes
- 4-6 tablespoons ice water, divided
For the Apple Butter Pie Filling:
- 1 ½ cups (360g) good quality apple butter (homemade or store-bought, make sure it’s thick and flavorful)
- ½ cup (100g) granulated sugar (adjust based on the sweetness of your apple butter)
- ¼ cup (30g) all-purpose flour or 2 tablespoons cornstarch (for thickening)
- 2 large eggs
- ½ cup (120ml) whole milk or heavy cream
- 1 teaspoon pure vanilla extract
- ½ teaspoon ground cinnamon
- ¼ teaspoon ground nutmeg
- ⅛ teaspoon ground cloves (optional, but adds wonderful depth!)
- 1 tablespoon fresh lemon juice (to brighten the flavors)
For the Cinnamon Whipped Cream:
- 1 ½ cups (360ml) cold heavy cream (at least 36% milk fat)
- ¼ cup (30g) powdered sugar (confectioners’ sugar), sifted
- 1 teaspoon ground cinnamon
- ½ teaspoon pure vanilla extract
Optional Garnish:
- Extra sprinkle of ground cinnamon or a tiny grating of fresh nutmeg
Instructions:
Preparing Your Flaky Pie Crust:
Making your own pie crust might seem a bit daunting at first, but trust me, the reward of a truly flaky, buttery crust for your Apple Butter Pie With Cinnamon Whipped Cream is absolutely worth it! If you’re short on time, a good quality store-bought crust will work, but for the ultimate experience, let’s dive into making one from scratch.
- Combine Dry Ingredients: In a large mixing bowl, whisk together the 1 ¼ cups all-purpose flour, ½ teaspoon granulated sugar, and ¼ teaspoon fine sea salt. This ensures all the dry components are evenly distributed before we introduce the star: the butter.
- Cut in the Cold Butter: Add the 8 tablespoons of very cold, cubed unsalted butter to your dry mixture. The key to a flaky crust is cold butter! You want to work quickly here to prevent the butter from melting. Using a pastry blender, two forks, or even your fingertips (just try to use the pads of your fingers, not your warm palms), cut the butter into the flour until the mixture resembles coarse meal with some pea-sized pieces of butter remaining. These little pockets of butter are what create those beautiful, flaky layers as the pie bakes. Alternatively, you can pulse the ingredients a few times in a food processor until this stage is reached.
- Add Ice Water Gradually: Start by drizzling 4 tablespoons of ice water over the flour and butter mixture. Use a fork to gently mix, bringing the dough together. Don’t overmix! You’re looking for the dough to just come together. If it’s still too dry and crumbly, add the remaining ice water, one tablespoon at a time, mixing until the dough forms a shaggy ball. The amount of water needed can vary based on humidity and flour type, so go by feel. The dough should be cohesive but not sticky.
- Form and Chill the Dough: Turn the dough out onto a lightly floured surface. Gently knead it just a few times, enough to bring it into a smooth disc. Avoid overworking the dough, as this can develop the gluten too much, leading to a tough crust. Flatten the disc slightly, wrap it tightly in plastic wrap, and refrigerate for at least 30 minutes, or up to 2 days. Chilling the dough is crucial; it allows the gluten to relax (making it easier to roll) and re-solidifies the butter, which is essential for flakiness.
- Roll Out the Dough: Once your dough is nicely chilled, remove it from the refrigerator and let it sit at room temperature for about 5-10 minutes to make it slightly more pliable. Lightly flour your work surface and your rolling pin. Roll the dough into a 12-inch circle, about ⅛-inch thick, rotating it often and adding a little more flour as needed to prevent sticking.
- Transfer to Pie Plate: Carefully transfer the rolled-out dough into a 9-inch pie plate. You can do this by gently rolling the dough onto your rolling pin and then unrolling it over the pie plate, or by carefully folding it in quarters and unfolding it into the plate. Trim the edges, leaving about a ½-inch overhang.
- Crimp the Edges: Fold the overhang under itself, creating a thicker edge. Crimp the edges decoratively using your fingers or a fork. This not only looks pretty but also helps to hold the pie’s shape.
- Chill Again (Pre-Bake Prep): Place the pie crust-lined plate back into the refrigerator for at least 15-20 minutes while you prepare the filling. This final chill helps prevent the crust from shrinking too much during baking and helps set those beautiful crimped edges.
Crafting Your Luscious Apple Butter Pie Filling:
This is where the magic of the Apple Butter Pie With Cinnamon Whipped Cream truly comes alive! The filling is wonderfully rich, subtly spiced, and incredibly smooth.
- Whisk Eggs: In a medium-sized bowl, lightly whisk the 2 large eggs until they are smooth and slightly frothy. This ensures they incorporate easily into the rest of the ingredients.
- Combine Main Filling Ingredients: In a large bowl, combine the 1 ½ cups of apple butter, ½ cup granulated sugar (remember to taste your apple butter first – if it’s already very sweet, you might reduce the sugar slightly), ¼ cup all-purpose flour (or 2 tablespoons cornstarch for a gluten-free option or slightly clearer filling), ½ teaspoon ground cinnamon, ¼ teaspoon ground nutmeg, and ⅛ teaspoon ground cloves (if using). Stir well until everything is thoroughly combined and there are no lumps of flour or spice.
- Temper the Eggs: This is a crucial step to prevent scrambling the eggs! While whisking constantly, slowly drizzle a small amount (about ½ cup) of the apple butter mixture into the whisked eggs. This gradually raises the temperature of the eggs without cooking them. Then, pour the egg mixture back into the main apple butter mixture, whisking continuously until fully incorporated.
- Add Liquids and Flavorings: Stir in the ½ cup whole milk or heavy cream, 1 teaspoon pure vanilla extract, and 1 tablespoon fresh lemon juice. The lemon juice is a secret weapon here; it brightens all the rich, warm flavors and prevents the pie from tasting overly heavy. Mix until the filling is completely smooth and uniform in color and consistency.
- Pour into Crust: Remove your chilled pie crust from the refrigerator. Carefully pour the prepared apple butter filling into the pie crust, spreading it evenly with a spatula if needed.
Baking Your Apple Butter Pie:
Now comes the anticipation! Baking this beautiful Apple Butter Pie to perfection requires a little patience and attention to detail. You want a set filling with a golden-brown crust.
- Preheat Oven and Prepare: Preheat your oven to 425°F (220°C). Place an empty baking sheet on the bottom rack of your oven while it preheats. This will help conduct heat directly to the bottom of the pie, ensuring a perfectly baked crust and preventing a soggy bottom.
- Initial High-Heat Bake: Carefully place the pie plate onto the hot baking sheet in the preheated oven. Bake at 425°F (220°C) for 15 minutes. This initial high heat helps to set the crust and begin the baking process quickly.
- Reduce Heat and Continue Baking: After 15 minutes, reduce the oven temperature to 350°F (175°C) without opening the oven door. Continue baking for an additional 40-50 minutes.
- Monitor and Prevent Over-Browning: Keep an eye on the crust edges. If they start to brown too quickly, loosely cover them with aluminum foil or use a pie shield. The pie is done when the edges of the crust are golden brown, and the filling is mostly set but still has a slight jiggle in the very center when gently shaken. An inserted knife or toothpick into the center (about an inch from the edge) should come out mostly clean.
- Cool Completely: This is arguably the hardest part: waiting! Once baked, carefully remove the pie from the oven and transfer it to a wire rack. Allow the pie to cool completely at room temperature for at least 3-4 hours, or even longer, until it is fully set. If you try to slice it too soon, the filling will not have had enough time to firm up, resulting in a runny mess. Patience is a virtue here, especially for achieving that perfect slice of Apple Butter Pie.
Whipping Up Your Cinnamon Whipped Cream:
No Apple Butter Pie is complete without its perfect companion: a light, airy, and delicately spiced Cinnamon Whipped Cream. It’s the crowning glory of this dessert!
- Chill Equipment: For the best results, place your mixing bowl (preferably a metal one) and whisk attachments (if using an electric mixer) in the refrigerator or freezer for 10-15 minutes before you start. Cold equipment helps the cream whip up faster and hold its volume better.
- Whip the Cream: Pour the 1 ½ cups of very cold heavy cream into the chilled bowl. Using an electric mixer on medium-high speed, begin to whip the cream.
- Add Flavorings: As the cream starts to thicken and form soft peaks (this usually takes about 2-3 minutes), gradually add the ¼ cup sifted powdered sugar, 1 teaspoon ground cinnamon, and ½ teaspoon pure vanilla extract. Sifting the powdered sugar prevents lumps.
- Continue Whipping: Increase the mixer speed to high and continue whipping until the cream reaches your desired consistency. For soft, billowy cream, stop at medium peaks. For a firmer topping that holds its shape well, whip until stiff peaks form. Be careful not to over-whip, or you’ll end up with butter! Over-whipped cream will look curdled and grainy.
- Serve Immediately or Chill: Your fresh Cinnamon Whipped Cream is best served immediately. If you need to make it ahead, cover it and refrigerate for up to 2-3 hours. Give it a gentle whisk just before serving if it has softened slightly.
Serving Your Masterpiece:
It’s finally time to enjoy your homemade Apple Butter Pie With Cinnamon Whipped Cream!
- Slice and Serve: Once the pie is completely cool and set, slice it into generous wedges. Top each slice with a dollop (or a generous swirl!) of your freshly made Cinnamon Whipped Cream.
- Optional Garnish: For an extra touch of elegance and flavor, you can lightly dust the whipped cream with a tiny sprinkle of ground cinnamon or a fresh grating of nutmeg.
- Enjoy! This pie is absolutely delightful served at room temperature or slightly chilled. The warmth of the apple butter filling combined with the cool, spiced whipped cream is truly a match made in heaven.
- Storage: Store any leftover Apple Butter Pie, covered, in the refrigerator for up to 3-4 days. It actually tastes even better the next day as the flavors meld together! If you have leftover whipped cream, store it separately in an airtight container in the fridge for up to 2 days; it might lose some of its stiffness but will still be delicious.
Conclusion:
Well, my friends, we’ve reached the end of our delightful journey with this recipe, and I sincerely hope you’re feeling inspired to roll up your sleeves and get baking! I truly believe that this isn’t just another dessert; it’s an experience, a warm embrace in pie form, especially when you gather around with loved ones. It embodies everything wonderful about homemade treats – the comforting aroma filling your kitchen, the anticipation as it bakes, and that first glorious bite.
Why You Absolutely Must Try This Recipe
This particular pie stands out from the crowd, making it a genuine must-try for anyone who appreciates a dessert that tells a story. It’s the perfect blend of rustic charm and refined flavor, taking the humble apple and elevating it to new heights. The deep, caramelized notes of apple butter create a uniquely rich and smooth filling that is a world away from your standard apple pie. It’s less overtly sweet, allowing the complex fruitiness and spice to shine through beautifully. When you factor in the ethereal cloud of Cinnamon Whipped Cream on top, you’re not just getting a dessert; you’re getting a symphony of textures and tastes. The creamy, spicy topping provides a stunning contrast to the pie’s velvety interior and crisp crust, creating a truly harmonious bite every single time. It’s a dessert that feels both familiar and excitingly new all at once. Trust me, this isn’t just a pie; it’s an heirloom in the making, destined to become a staple in your autumn and winter baking repertoire.
Serving Suggestions & Delightful Variations
Now, let’s talk about how to make this culinary masterpiece even more versatile. While a slice of your homemade
Apple Butter Pie With Cinnamon Whipped Cream
is absolutely perfect on its own, especially with a steaming mug of coffee or a comforting cup of spiced tea, there are so many ways to enjoy and adapt it. For a truly decadent dessert, consider serving it slightly warm with a scoop of vanilla bean ice cream melting gently over the top, adding another layer of creamy indulgence. It also makes an incredible showstopper for holiday gatherings, Sunday brunches, or even a sophisticated afternoon treat. Imagine serving small slices as part of a dessert buffet – it’s impressive without being overly complicated.
If you’re feeling adventurous, don’t shy away from playing with variations. For the crust, you could try a brown butter crust for an extra layer of nutty depth, or even a shortbread crust for a more cookie-like texture. If you’re catering to dietary restrictions, a gluten-free pie crust works wonderfully too. Inside the filling, consider adding a handful of toasted pecans or walnuts for an additional crunch, or perhaps a touch of grated fresh ginger for an extra zing. And that Cinnamon Whipped Cream? Oh, the possibilities! You could infuse it with a hint of maple syrup for a fall-inspired twist, or a tiny splash of bourbon for an adult-only treat. A drizzle of homemade caramel sauce over the whipped cream would also be nothing short of divine. Don’t be afraid to experiment; baking is, after all, an act of creativity!
Your Turn to Bake and Share!
My biggest hope is that you’ll take this recipe and make it your own. There’s an immense joy in creating something delicious from scratch, especially when you know it’s going to bring smiles to faces. I genuinely encourage you to dive into your kitchen, gather your ingredients, and experience the magic of baking this Apple Butter Pie With Cinnamon Whipped Cream. Don’t worry about perfection; focus on the process, the aromas, and the satisfaction of a job well done. Once you’ve baked it and shared it (or devoured it all yourself!), I would absolutely love to hear about your experience. Did you make any fun variations? What did your friends and family think? Please, share your photos and stories with me. Your baking triumphs inspire us all, and I can’t wait to see what wonderful creations you come up with. Happy baking!
Apple Butter Pie with Cinnamon Whipped Cream
A comforting autumn dessert featuring a rich, spiced apple butter filling in a flaky crust, crowned with light, fragrant cinnamon whipped cream. This recipe is a celebration of heritage and homemade goodness, perfect for seasonal baking.
Ingredients
Instructions
Important Information
Nutrition Facts (Per Serving)
It is important to consider this information as approximate and not to use it as definitive health advice.
Allergy Information
Please check ingredients for potential allergens and consult a health professional if in doubt.