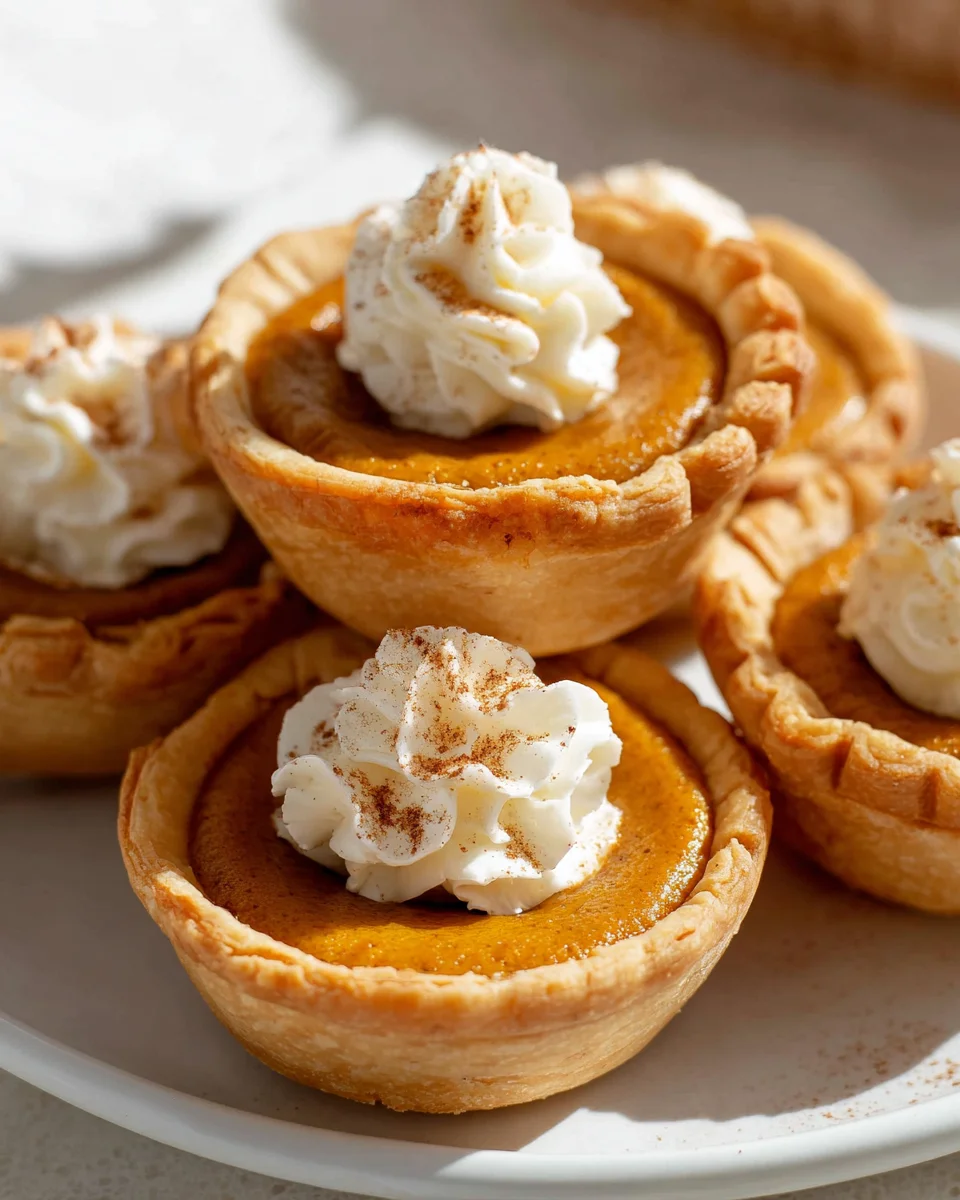
Mini Pumpkin Pies are truly miniature marvels, individual servings of autumn’s finest flavors encased in a buttery, flaky crust. I’ve always found something irresistibly charming about these personal-sized delights. Gone are the days of wrestling with a full-sized pie; instead, each guest can enjoy their very own perfect portion, making serving an absolute breeze for any fall gathering or holiday table.
This classic dessert has graced tables for centuries, particularly during the festive fall season, symbolizing warmth and harvest celebrations. While the grand pumpkin pie has a storied history rooted deeply in American Thanksgiving traditions, the advent of these delightful Mini Pumpkin Pies offers a convenient and elegant solution for modern entertaining.
They are beloved not only for their perfectly spiced, creamy pumpkin filling and crisp crust, but also for their undeniable cuteness and the simple joy of having an entire pie just for yourself.
They are the ideal treat for gatherings, ensuring everyone gets a flawless, delicious slice without any fuss, embodying both tradition and effortless elegance.

Ingredients:
-
For the Flaky Pie Crusts:
- 2 ½ cups (300g) all-purpose flour, plus more for dusting
- 1 teaspoon salt
- 1 tablespoon granulated sugar
- 1 cup (226g) unsalted butter, very cold and cut into ½-inch cubes
- ½ cup (120ml) ice water, plus 1-2 tablespoons more if needed
-
For the Creamy Pumpkin Filling:
- 1 (15-ounce) can (approximately 425g) pure pumpkin puree (not pumpkin pie filling)
- ¾ cup (150g) granulated sugar
- ¼ cup (50g) packed light brown sugar
- 1 teaspoon ground cinnamon
- ½ teaspoon ground ginger
- ¼ teaspoon ground nutmeg
- ⅛ teaspoon ground cloves
- ½ teaspoon salt
- 2 large eggs, lightly beaten
- 1 cup (240ml) heavy cream or evaporated milk
-
For Garnish (Optional):
- Sweetened whipped cream
- A sprinkle of ground cinnamon or nutmeg
- Miniature cinnamon sticks
Making the Flaky Pie Crusts
- Prepare Your Cold Butter and Dry Ingredients: Begin by ensuring your unsalted butter is as cold as possible. I often pop mine into the freezer for about 15-20 minutes before I start, just to make sure it’s super chilled. Cut the butter into ½-inch cubes. In a large mixing bowl, or the bowl of a food processor, combine the 2 ½ cups of all-purpose flour, 1 teaspoon of salt, and 1 tablespoon of granulated sugar. Give these dry ingredients a quick whisk or pulse to ensure they are well combined. The sugar adds a touch of sweetness and helps with browning, while the salt balances the flavors.
-
Incorporate the Butter into the Flour Mixture:
Using a Food Processor: If you’re using a food processor, add the cold butter cubes to the flour mixture. Pulse about 10-12 times in short bursts until the butter is broken down into pea-sized pieces and some smaller, crumbly bits. Be careful not to over-process, as you want distinct pieces of butter remaining – these pockets of butter are what create that beautiful flakiness in your Mini Pumpkin Pies crust.
Using a Pastry Blender or Your Hands: If you don’t have a food processor, a pastry blender works wonderfully. Cut the butter into the flour mixture until it resembles coarse meal with some larger pea-sized pieces of butter still visible. Alternatively, you can use your fingertips, quickly rubbing the butter into the flour. The key is to work quickly to prevent the butter from melting too much from the warmth of your hands. Cold butter equals flaky crust!
- Gradually Add Ice Water: Slowly drizzle in ½ cup of ice water, one tablespoon at a time, pulsing in the food processor or stirring with a fork/spatula after each addition. The dough should just barely come together when pinched between your fingers. If it still looks too dry and crumbly, add another tablespoon or two of ice water, but do so sparingly. You want to add just enough water to hydrate the flour and bring the dough together, but not so much that it becomes sticky or tough. Over-mixing or over-hydrating can lead to a tough crust, and we are aiming for tender, flaky Mini Pumpkin Pies.
- Form and Chill the Dough: Turn the dough out onto a lightly floured surface. Gently gather it into a cohesive ball, then flatten it into two equal discs. Wrap each disc tightly in plastic wrap. Refrigerate the dough for at least 30 minutes, or up to 2 days. Chilling the dough is a crucial step; it allows the gluten to relax, making the dough easier to roll out, and it solidifies the butter, which is essential for a truly flaky crust. This resting period greatly improves the texture of your Mini Pumpkin Pies crust.
- Roll Out and Cut the Dough: When you’re ready to proceed, take one disc of dough out of the refrigerator (leave the other chilled until needed). On a lightly floured surface, roll out the dough to about ⅛-inch thickness. For Mini Pumpkin Pies, you’ll need to cut out circles that are larger than the openings of your muffin tin cavities. A 3.5 to 4-inch round cutter is usually ideal, depending on the size of your muffin tin. A standard 12-cup muffin tin is perfect for this recipe. You should be able to get about 12-18 circles from each disc of dough, depending on how tightly you re-roll your scraps.
- Press into Muffin Tins: Carefully lift each dough circle and gently press it into the cups of an ungreased standard 12-cup muffin tin. Make sure the dough fits snugly against the bottom and sides of each cavity. You can use your fingers or a small tart tamper to gently press the dough into place, ensuring there are no air bubbles. Trim any excess dough that hangs over the edge, leaving a slight overhang if you desire a rustic look, or pressing it flush with the rim.
- Chill the Crusts Again: Once all your crusts are nestled in their muffin tin cups, place the entire muffin tin back into the refrigerator to chill for another 15-20 minutes. This helps the crusts hold their shape during baking and prevents them from shrinking too much – nobody wants shrunken Mini Pumpkin Pies! This second chilling step is important for maintaining the structural integrity of your mini pie shells.
Crafting the Velvety Pumpkin Filling
- Preheat Your Oven: While the crusts are chilling, preheat your oven to 400°F (200°C). This ensures the oven is at the correct temperature when you’re ready to bake, contributing to even cooking of your Mini Pumpkin Pies.
- Whisk Together the Dry Filling Ingredients: In a medium bowl, combine the ¾ cup granulated sugar, ¼ cup packed light brown sugar, 1 teaspoon ground cinnamon, ½ teaspoon ground ginger, ¼ teaspoon ground nutmeg, ⅛ teaspoon ground cloves, and ½ teaspoon salt. Whisk these dry ingredients together thoroughly. The spices are the heart and soul of any pumpkin pie, providing that warm, comforting flavor we all love. Using a combination of sugars adds depth and richness to the filling for your Mini Pumpkin Pies.
- Prepare the Wet Filling Ingredients: In a separate large bowl, empty the 15-ounce can of pure pumpkin puree. Remember, make sure it’s pure pumpkin puree, not pumpkin pie filling, which already has spices and sugar added. Add the 2 lightly beaten large eggs and the 1 cup of heavy cream or evaporated milk to the pumpkin puree. Whisk these wet ingredients until they are smooth and well combined.
- Combine Wet and Dry, Ensuring Smoothness: Pour the whisked dry spice and sugar mixture into the wet pumpkin mixture. Stir or whisk gently until everything is fully incorporated and the filling is completely smooth. It’s important not to over-mix here; just stir until there are no streaks of dry ingredients visible. The consistency should be thick and creamy. Give it a taste – does it need a pinch more cinnamon? This is your chance to adjust to your personal preference for your Mini Pumpkin Pies.
Assembling and Baking Your Irresistible Mini Pumpkin Pies
- Fill the Chilled Crusts: Carefully retrieve the chilled muffin tin with the crusts from the refrigerator. Give the pumpkin filling a final stir, then very carefully pour or ladle the pumpkin filling into each chilled pie crust, filling them about ¾ full. You want to leave a little room for the filling to puff up slightly as it bakes. Avoid overfilling, as this can cause spillage and make your Mini Pumpkin Pies messy.
-
Bake the Mini Pumpkin Pies: Place the muffin tin on the center rack of your preheated 400°F (200°C) oven. Bake for an initial 15 minutes at this higher temperature. This hot start helps set the crust and filling quickly.
After 15 minutes, reduce the oven temperature to 350°F (175°C) without opening the oven door if possible, to avoid a sudden temperature drop. Continue to bake for another 20-25 minutes, or until the edges of the filling are set but the very center still has a slight jiggle to it when gently shaken. The total baking time for your Mini Pumpkin Pies will be approximately 35-40 minutes.
- Check for Doneness: The best way to check if your Mini Pumpkin Pies are done is to insert a thin knife or a wooden skewer into the center of one of the pies, about an inch from the edge. If it comes out clean, your pies are likely done. Another good indicator is the slight jiggle in the center; the residual heat will continue to cook the pies as they cool, ensuring a perfectly set filling. Overbaking can lead to a cracked or dry filling, so err on the side of a slight jiggle. The crusts should be golden brown and inviting.
- Cool the Pies Properly: Once baked, carefully remove the muffin tin from the oven. Let the Mini Pumpkin Pies cool in the muffin tin on a wire rack for at least 20-30 minutes. This initial cooling period allows the pies to firm up and makes them much easier to remove without breaking. Resist the urge to immediately transfer them; patience here will result in beautiful, intact Mini Pumpkin Pies.
Serving and Storing Your Delightful Mini Pumpkin Pies
- Carefully Remove from Tins: After the initial cooling period, use a small offset spatula or the tip of a thin knife to gently loosen the edges of each Mini Pumpkin Pie from its muffin tin cavity. Carefully lift and transfer the pies to a wire rack to cool completely at room temperature. This might take another 1-2 hours. Complete cooling is essential before serving, as the filling continues to set and flavors meld beautifully. Warm Mini Pumpkin Pies are delicious, but fully cooled ones will have the perfect texture.
- Garnish and Serve: Once your Mini Pumpkin Pies are completely cool, they are ready to be served! For an extra touch of indulgence, top each pie with a dollop of sweetened whipped cream. You can also sprinkle a tiny pinch of ground cinnamon or nutmeg over the whipped cream, or even tuck a mini cinnamon stick into the topping for a professional and festive presentation. These individual Mini Pumpkin Pies are perfect for gatherings, holidays, or just a delightful treat for yourself.
- Store Leftovers: Any leftover Mini Pumpkin Pies should be stored in an airtight container in the refrigerator. They will stay fresh and delicious for 3-4 days. While they are best enjoyed fresh, the flavors can sometimes deepen a little after a day in the fridge. Allow them to come closer to room temperature for about 15-20 minutes before serving again, or enjoy them chilled – both ways are absolutely wonderful!
Conclusion:
Well, there you have it, my friends! We’ve journeyed through the simple magic of creating a truly special dessert, and I genuinely hope you’re feeling inspired to roll up your sleeves and get baking. This isn’t just another recipe; it’s an invitation to experience pure, unadulterated autumn comfort in the most delightful individual portions. I truly believe this recipe is an absolute must-try for so many reasons. First off, the sheer convenience is unparalleled. Forget the fuss and potential disaster of slicing a full-sized pie; these perfectly portioned treats mean everyone gets their own pristine, beautiful dessert without any argument or mess. Each bite delivers that classic, creamy, warmly spiced pumpkin filling we all adore, nestled in a flaky, golden crust, ensuring a consistently perfect experience from start to finish. There’s something inherently comforting and utterly satisfying about holding your own little pie, knowing it was made with love and attention.
But beyond convenience, the flavor profile here is simply outstanding. The spices are balanced just right, hitting all those nostalgic notes of cinnamon, nutmeg, ginger, and cloves, while the pumpkin base remains wonderfully smooth and rich. It’s a dessert that speaks of cozy evenings, joyful gatherings, and the very best of fall. Seriously, if you’re looking to impress without the stress, or simply treat yourself to something truly wonderful, this recipe is your golden ticket. The joy of creating something so delicious and visually appealing, yet so straightforward, is incredibly rewarding.
Now, let’s talk about taking these beauties to the next level, or perhaps making them entirely your own! While absolutely divine on their own, a dollop of freshly whipped cream is always a classic companion. For an extra touch of decadence, consider infusing your whipped cream with a hint of maple syrup or a splash of bourbon. A scoop of good quality vanilla bean ice cream, slowly melting into the warm pumpkin, is another heavenly pairing. If you’re feeling a bit more adventurous, try a drizzle of homemade caramel sauce or a sprinkle of toasted pecans or candied walnuts over the top for added texture and richness.
For those who love to experiment with flavors, think about incorporating a tiny pinch of black pepper or a whisper of cardamom into the pumpkin filling for an unexpected, sophisticated twist. You could even swirl a spoonful of cream cheese softened with a touch of sugar into the filling before baking for a cheesecake-like layer. And don’t stop at the crust – while a traditional pie crust is wonderful, imagine the possibilities with a graham cracker crust or even a crushed gingersnap crust for an extra layer of spice! These Mini Pumpkin Pies are incredibly versatile, making them perfect for any occasion, from a casual family dinner to a festive holiday spread. They can also be prepared ahead of time, which is a lifesaver when entertaining, allowing you to simply pull them from the fridge and bake, or even serve chilled, depending on your preference.
So, please, don’t just read about it – try it! I wholeheartedly encourage you to dive into making these incredible treats. You’ll find the process surprisingly simple and the results incredibly gratifying. There’s a special kind of magic that happens when you bake something homemade, and I promise you, these delightful Mini Pumpkin Pies will bring a smile to everyone’s face. Once you’ve whipped up your batch and perhaps added your own creative flair, I would absolutely love to hear about your experience! Share your photos, your triumphs, your variations, and your feedback in the comments section or wherever you share your culinary adventures. Your insights and creations inspire me, and I can’t wait to see what wonderful things you bake. Happy baking, my friends, and enjoy every single delightful bite!
Bite-Sized Mini Pumpkin Pies: The Ultimate Fall Dessert
Mini Pumpkin Pies are individual servings of autumn’s finest flavors encased in a buttery, flaky crust. These personal-sized delights make serving an absolute breeze for any fall gathering or holiday table.
Ingredients
Instructions
Important Information
Nutrition Facts (Per Serving)
It is important to consider this information as approximate and not to use it as definitive health advice.
Allergy Information
Please check ingredients for potential allergens and consult a health professional if in doubt.