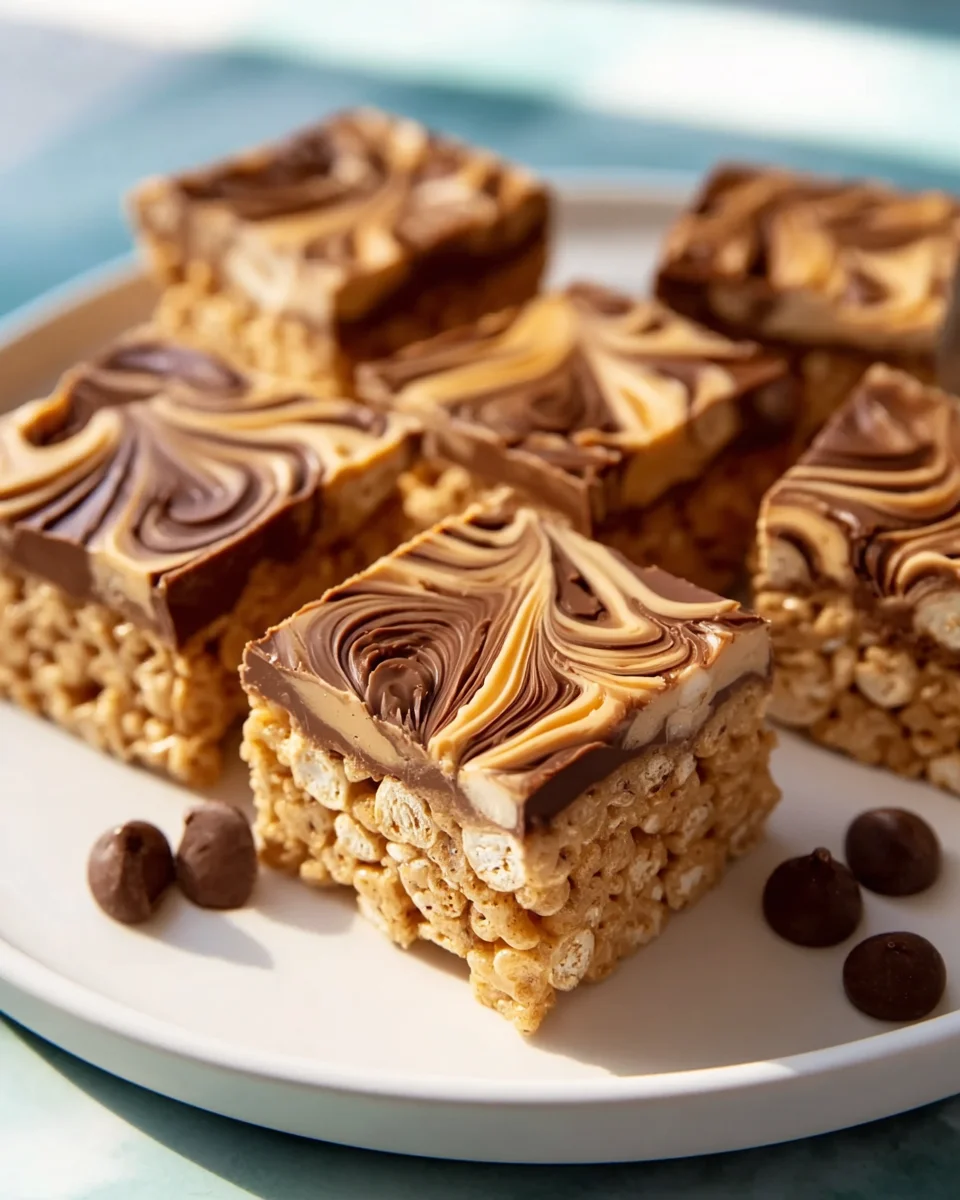
Peanut Butter Rice Krispie Treats are more than just a dessert; they are a delightful journey back to simpler times, a no-bake masterpiece that consistently brings smiles to faces. Imagine that perfect blend of salty and sweet, combined with an irresistible crunch and a satisfying chewiness – all without ever turning on your oven! This iconic treat, a beloved variation of the original Rice Krispie Square developed by Kellogg’s back in the 1930s, gained its peanut butter twist as home cooks innovated, recognizing the magical pairing of creamy peanut butter with the classic marshmallow and cereal base. It’s a testament to how simple ingredients can create extraordinary flavor and evoke such a profound sense of nostalgia.
I find that people absolutely adore these treats for so many reasons. The ease of preparation makes them a go-to for busy parents and spontaneous gatherings, while the unique texture combination of crisp cereal and gooey marshmallow, elevated by the rich, nutty notes of peanut butter, is simply addictive. Who can resist a dessert that’s ready in minutes, requires minimal fuss, and offers such a profound sense of comfort and joy? Whether you’re a long-time fan or new to the magic, preparing these delightful Peanut Butter Rice Krispie Treats is an experience everyone should enjoy.

Ingredients:
- Unsalted Butter: 3 tablespoons. I always recommend unsalted butter so you can control the salt content yourself, though salted butter can work in a pinch if that’s all you have. Good quality butter really makes a difference in the richness of your Peanut Butter Rice Krispie Treats.
- Mini Marshmallows: 1 (10-ounce) bag, approximately 4 cups. Fresh marshmallows are absolutely key here! Older, stale marshmallows don’t melt as smoothly and can result in tougher treats. The mini size melts much more evenly and quickly than large ones, which helps prevent burning.
- Creamy Peanut Butter: 1/2 cup. For the classic smooth Peanut Butter Rice Krispie Treats, creamy is the way to go. If you’re a fan of a bit of texture, you could certainly experiment with crunchy peanut butter, but be aware it will change the mouthfeel. I usually opt for conventional peanut butter here (like Jif or Skippy) because natural peanut butter, with its oil separation, can sometimes make the mixture a bit greasy or harder to emulsify smoothly.
- Rice Krispies Cereal: 6 cups. This is the star of the show, providing that signature crispy, airy texture. Make sure your cereal is fresh and hasn’t gone stale; stale cereal will make your Peanut Butter Rice Krispie Treats taste… well, stale.
- Vanilla Extract (Optional but Recommended): 1 teaspoon. A touch of vanilla extract really elevates the flavor profile, adding a subtle depth that complements both the marshmallow and the peanut butter beautifully. Don’t skip it if you have it!
- Pinch of Salt (Optional): 1/4 teaspoon. A tiny bit of salt balances the sweetness and enhances all the other flavors. Even if you use salted butter, a small pinch can make a noticeable difference in bringing out the nutty notes of the peanut butter.
Gathering and Preparing Your Workspace for Perfect Peanut Butter Rice Krispie Treats
-
Prepare Your Baking Pan: First things first, let’s get our pan ready. You’ll need a 9×13-inch baking pan for this recipe. There are a couple of excellent ways to prepare it to ensure your Peanut Butter Rice Krispie Treats don’t stick and are easy to remove and slice.
- Method 1: Butter and Parchment Paper (My Preferred Method): I highly recommend lining your pan with parchment paper, leaving an overhang on the sides. This creates “handles” that will allow you to easily lift the entire slab of treats out of the pan once they’ve cooled. Before laying down the parchment, I like to lightly butter the bottom of the pan to help the parchment stick. Then, lightly grease the parchment paper itself with a thin layer of butter or non-stick cooking spray. This dual layer of protection is a game-changer for easy removal and cleanup.
- Method 2: Generous Greasing: If you don’t have parchment paper, a thorough greasing of the pan with butter or non-stick cooking spray will suffice. Make sure to get into all the corners and up the sides. While effective, it won’t be as effortless to remove and slice as using parchment.
Having your pan ready to go before you start cooking is crucial because once the marshmallow mixture is ready, things move quickly, and you won’t have time to fuss with pan prep.
- Measure All Your Ingredients (Mise en Place): This might seem like a small step, but it’s incredibly important, especially with a recipe like Peanut Butter Rice Krispie Treats where the cooking process is fairly rapid. Measure out your marshmallows, peanut butter, and Rice Krispies cereal into separate bowls. If you’re using vanilla extract and salt, measure those out too. Having everything pre-measured and within arm’s reach on your counter means you won’t be scrambling for ingredients when you need to add them quickly, which can make all the difference between perfectly gooey treats and a sticky mess.
- Choose the Right Pot and Bowl: For melting the butter and marshmallows, you’ll need a large, heavy-bottomed pot. A heavy bottom helps distribute heat more evenly and prevents scorching. For mixing the cereal, you’ll need an even larger heat-proof bowl. Make sure it’s big enough to comfortably mix 6 cups of cereal with the sticky marshmallow mixture without spilling over. I often use my largest stainless steel mixing bowl for this.
Crafting the Gooey Marshmallow Peanut Butter Base for Your Treats
This is where the magic truly begins! The foundation of truly spectacular Peanut Butter Rice Krispie Treats lies in a perfectly melted and blended marshmallow and peanut butter base.
-
Melt the Butter: Place your large, heavy-bottomed pot over low to medium-low heat on your stovetop. Add the 3 tablespoons of unsalted butter to the pot. Allow the butter to melt slowly and completely.
- Why low heat? It’s critical to melt the butter over low heat. If the heat is too high, the butter can brown or even burn, imparting an undesirable nutty or bitter flavor to your treats. We’re aiming for a clean, rich butter flavor here.
- Stir occasionally: Give the melting butter a gentle swirl or stir with your spatula to encourage even melting. Once it’s fully melted and shimmering, you’re ready for the next step.
This foundational step is critical for the overall richness and mouthfeel of your Peanut Butter Rice Krispie Treats.
-
Add the Marshmallows: Once the butter is completely melted, add the entire 10-ounce bag of mini marshmallows to the pot. Stir them gently but continuously with a heat-resistant spatula or wooden spoon.
- The Melting Process: The marshmallows will slowly begin to soften, clump together, and then gradually melt into a smooth, gooey liquid. Continue stirring until they are fully melted and perfectly smooth, with no lumps remaining. This usually takes about 5-7 minutes.
- Patience is Key: Resist the urge to turn up the heat to speed up the process. High heat can cause the marshmallows to become tough and rubbery, leading to hard Peanut Butter Rice Krispie Treats instead of wonderfully chewy ones. It can also cause them to caramelize too much, which changes the flavor.
- Desired Consistency: You want a uniform, flowing, incredibly sticky, and glossy marshmallow mixture. Once it reaches this stage, immediately remove the pot from the heat. The residual heat in the pot will keep it warm enough for the next step.
-
Stir in the Peanut Butter and Flavorings: With the pot removed from the heat, immediately add the 1/2 cup of creamy peanut butter to the melted marshmallow mixture. This is also the time to add your 1 teaspoon of vanilla extract and the optional 1/4 teaspoon of salt.
- Mix Thoroughly: Stir vigorously until the peanut butter is completely incorporated into the marshmallow mixture. You want a smooth, homogenous blend where there are no streaks of peanut butter and the entire mixture has taken on a beautiful, uniform peanut butter hue. This should take about 1-2 minutes of good stirring.
- The Importance of Off-Heat Mixing: Adding the peanut butter off the heat (or on very low heat, just enough to keep the marshmallow fluid) prevents it from seizing or becoming too oily. It helps maintain that wonderfully creamy texture we’re aiming for in our Peanut Butter Rice Krispie Treats. The combination of sweet marshmallow and savory peanut butter at this stage is absolutely heavenly, and you’ll immediately notice that signature aroma filling your kitchen.
- The Peanut Butter Difference: The peanut butter not only imparts its distinct flavor but also contributes to the chewiness and slightly softer texture of these treats compared to traditional Rice Krispie Treats.
The Rice Krispies Infusion: Bringing Your Peanut Butter Rice Krispie Treats to Life
Now comes the satisfying part where the magic really happens and your mixture transforms into classic Peanut Butter Rice Krispie Treats!
-
Add the Rice Krispies Cereal: Transfer the gooey peanut butter marshmallow mixture from the pot into your extra-large prepared mixing bowl. Then, add the 6 cups of Rice Krispies cereal to the bowl.
- Working Quickly: This is a step where speed and efficiency are beneficial. The marshmallow mixture will start to cool and firm up as soon as it’s exposed to the cereal, making it harder to mix.
- Mixing Technique: Using your heat-resistant spatula (which you can lightly butter for easier handling if it’s getting too sticky), gently fold and stir the cereal into the marshmallow mixture. The goal is to coat every single piece of Rice Krispies cereal evenly with the sticky, sweet, and nutty mixture. Don’t be afraid to get under the cereal and bring the marshmallow from the bottom up.
- Be Gentle, Yet Thorough: While you need to mix thoroughly, try not to crush the cereal. Over-mixing or too much force can break down the delicate structure of the Rice Krispies, resulting in a dense rather than airy treat. We want to preserve that delightful “snap, crackle, pop!”
- Visual Cue: Continue mixing until there are no dry pockets of cereal left, and every crisp looks glossy and sticky, fully enveloped in the peanut butter marshmallow goodness. The entire process of mixing the cereal should take no more than 2-3 minutes. You’ll see your Peanut Butter Rice Krispie Treats really taking shape!
This careful mixing ensures that every bite of your Peanut Butter Rice Krispie Treats delivers the perfect balance of sweetness, nuttiness, and satisfying crunch.
Pressing and Setting Your Delicious Peanut Butter Rice Krispie Treats
You’re almost there! This stage determines the final shape and texture of your treats.
-
Press into the Prepared Pan: Once the cereal is fully coated, immediately transfer the mixture into your prepared 9×13-inch baking pan.
- The Art of Gentle Pressing: This is perhaps the most crucial step for achieving perfect Peanut Butter Rice Krispie Treats. You want to press the mixture into the pan firmly enough to create a cohesive slab, but gently enough to avoid compacting the treats too much. Over-compressing the mixture is a common mistake that leads to hard, dense, and brick-like treats instead of light and airy ones.
- Pressing Tools:
- Buttered Hands: Lightly butter your hands. This prevents the sticky mixture from adhering to your skin and allows you to evenly press down.
- Buttered Spatula or Back of a Spoon: If you prefer not to use your hands, a buttered spatula or the back of a buttered spoon works wonderfully to spread and gently flatten the mixture.
- Parchment Paper Overlay: My favorite trick is to place a piece of parchment paper directly on top of the mixture in the pan, then use your hands or another flat object (like the bottom of another pan) to press down evenly through the parchment. This keeps your hands clean and ensures a wonderfully smooth top surface.
- Achieve Even Thickness: Spread the mixture from corner to corner, ensuring an even thickness throughout the pan. This will result in uniformly sized and textured Peanut Butter Rice Krispie Treats when you slice them. Remember, gentle but firm pressure is the key – no heavy-duty smashing! You should still be able to feel a bit of give and springiness in the treats.
-
Cool and Set: Once you’ve pressed the mixture evenly into the pan, it’s time for patience! Allow the Peanut Butter Rice Krispie Treats to cool completely at room temperature.
- Room Temperature is Best: While it might be tempting to pop them in the refrigerator to speed things up, cooling at room temperature is generally preferred. Refrigerating them can sometimes make them too hard and chewy, losing a bit of that desirable gooeyness.
- Setting Time: This process typically takes about 1 to 2 hours, depending on the temperature and humidity of your kitchen. You’ll know they’re ready when they are firm to the touch, no longer warm, and hold their shape well.
- Resist the Urge to Sample: I know, it’s hard to wait when your kitchen smells incredible, but letting them set properly ensures clean cuts and the best texture!
Allowing your Peanut Butter Rice Krispie Treats to set correctly is essential for perfect slices and a satisfying bite.
Slicing and Serving Your Delicious Peanut Butter Rice Krispie Treats
The moment you’ve been waiting for: enjoying the fruits of your labor!
-
Slice Your Treats: Once your Peanut Butter Rice Krispie Treats are completely cooled and firm, it’s time to slice them.
- Using Parchment Handles: If you lined your pan with parchment paper and left an overhang, simply use the parchment “handles” to lift the entire slab of treats out of the pan and place it onto a cutting board. This makes slicing incredibly easy and mess-free.
- Clean Cuts: For the cleanest cuts, use a large, sharp chef’s knife. You can lightly butter the knife blade or spray it with non-stick spray to prevent sticking, especially after a few cuts.
- Cutting Patterns: You can slice them into traditional squares (e.g., 3×4 cuts for 12 large treats, or 4×5 cuts for 20 smaller treats), rectangles, or even use cookie cutters (lightly buttered) for fun shapes if you’re making them for a party or kids. Just remember that cookie cutters will leave some scraps, which, of course, are perfect for immediate “quality control” sampling!
-
Serve and Enjoy: Now for the best part – digging into your homemade Peanut Butter Rice Krispie Treats! Serve them immediately to appreciate their fresh, crispy, and chewy texture.
- Optional Drizzles: For an extra special touch, you could melt some chocolate chips (milk, semi-sweet, or dark) and drizzle it over the cooled and sliced treats. A sprinkle of sea salt on top of the chocolate drizzle also creates a fantastic sweet and salty combination that pairs incredibly well with peanut butter.
- Serving Suggestions: These treats are perfect for lunchboxes, after-school snacks, potlucks, parties, or simply a sweet indulgence any time of day. The combination of the classic Rice Krispie Treat texture with the rich, nutty flavor of peanut butter is truly irresistible.
-
Storing Your Peanut Butter Rice Krispie Treats: To keep your treats fresh and delicious, proper storage is key.
- Airtight Container: Store any leftover Peanut Butter Rice Krispie Treats in an airtight container at room temperature. Exposure to air is their enemy, as it will cause them to dry out and become hard.
- Layering with Parchment: If you’re stacking them, place a piece of parchment paper or wax paper between layers to prevent them from sticking together.
- Shelf Life: When stored correctly, these treats will remain fresh, chewy, and crispy for about 2-3 days. While they might last a bit longer, their texture starts to degrade after this point. They are definitely best enjoyed within the first 48 hours.
- Reviving Hard Treats (Small Tip): If your treats have become a bit hard, you can sometimes soften them slightly by microwaving a single treat for 5-10 seconds. Be careful not to overheat, or the marshmallow will become liquid again.
Enjoy every single bite of your amazing, homemade Peanut Butter Rice Krispie Treats!
Conclusion:
And there you have it! We’ve journeyed through the simple magic of creating a treat that is undeniably a must-try for anyone with a sweet tooth, a craving for nostalgia, or just a need for a quick, impressive dessert. I truly believe this recipe isn’t just another sweet treat; it’s an experience waiting to happen. What makes it truly exceptional, in my humble opinion, is the perfect marriage of crunchy, chewy, and gloriously sticky textures, all infused with that irresistible, comforting peanut butter flavor we all adore. It’s incredibly easy to make, requires no baking, and comes together in a flash, making it an absolute lifesaver for last-minute gatherings or when you just need a little pick-me-up.
I can’t emphasize enough how much of a crowd-pleaser these squares are. From kids’ birthday parties to adult potlucks, they disappear faster than you can say “more, please!” There’s a wonderful balance of sweetness and savory richness that keeps you reaching for just one more piece. Plus, the sheer joy of transforming a few pantry staples into something so utterly delicious is incredibly satisfying. It’s a testament to the fact that sometimes, the simplest recipes yield the most delightful results. If you’re looking for a dessert that’s guaranteed to bring smiles and satisfy every craving, then you’ve found your new go-to.
Unleash Your Creativity: Serving & Variation Ideas
While these treats are absolutely perfect enjoyed as they are, straight from the pan and cut into delightful squares, there’s a whole world of possibilities for customizing them to your heart’s content. For a classic presentation, simply serve them at room temperature, perhaps with a tall glass of cold milk. But why stop there? One of my favorite ways to elevate them is with a drizzle! A simple melt of dark or milk chocolate over the top creates a beautiful contrast, both visually and in flavor. You could even do a white chocolate drizzle, or a combination of both for a truly artistic swirl.
Thinking about adding more texture? Sprinkle a pinch of flaky sea salt over the warm chocolate drizzle to enhance that incredible sweet-and-salty dynamic. Or, for an extra pop of color and crunch, add some rainbow sprinkles or mini chocolate chips while the chocolate is still wet. If you’re feeling extra indulgent, chop up some of your favorite candy bars – think Snickers, Reese’s cups, or even pretzels for an amazing salty crunch – and mix them into the warm marshmallow-peanut butter mixture before pressing it into the pan. This transforms them into a truly gourmet experience.
Don’t be afraid to experiment with different nut butters too! While peanut butter is king here, almond butter or cashew butter can offer a slightly different, equally delicious flavor profile if you’re looking to switch things up. For those with nut allergies, sunflower seed butter works beautifully as well, ensuring everyone can enjoy a version of this delightful treat. You could also try adding a dash of cinnamon or a tiny splash of vanilla extract (in addition to what’s already in the recipe) to the marshmallow mixture for an extra layer of warmth and flavor. Imagine shaping them into fun forms with cookie cutters for holiday parties, or rolling them into individual balls and dipping them halfway into melted chocolate – talk about impressive!
Your Turn to Experience the Magic!
Now, it’s your turn to experience the sheer delight of making and devouring these incredible treats. Don’t just read about them – grab your ingredients, clear your counter, and get ready for some serious kitchen fun. I promise you, the aroma alone as you mix everything together is worth the minimal effort. These Peanut Butter Rice Krispie Treats are more than just a snack; they’re a little piece of joy, ready to brighten your day or make any occasion feel a bit more special.
I am genuinely excited for you to try this recipe. Once you do, I would absolutely love to hear about your experience! Did you stick to the classic version, or did you venture into some exciting variations? What was your favorite part of making them? Did they bring back any fond memories for you, as they do for me? Please don’t hesitate to share your thoughts, your successes, and even your creative twists in the comments below. Your feedback and ideas truly inspire me and help our community grow. Happy creating, and even happier eating!
No-Bake Peanut Butter Rice Krispie Treats – Quick Recipe!
Peanut Butter Rice Krispie Treats are more than just a dessert; they are a delightful journey back to simpler times, a no-bake masterpiece that consistently brings smiles to faces. Imagine that perfect blend of salty and sweet, combined with an irresistible crunch and a satisfying chewiness – all without ever turning on your oven! This iconic treat, a beloved variation of the original Rice Krispie Square developed by Kellogg’s back in the 1930s, gained its peanut butter twist as home cooks innovated, recognizing the magical pairing of creamy peanut butter with the classic marshmallow and cereal base. It’s a testament to how simple ingredients can create extraordinary flavor and evoke such a profound sense of nostalgia.
Ingredients
Instructions
Important Information
Nutrition Facts (Per Serving)
It is important to consider this information as approximate and not to use it as definitive health advice.
Allergy Information
Please check ingredients for potential allergens and consult a health professional if in doubt.