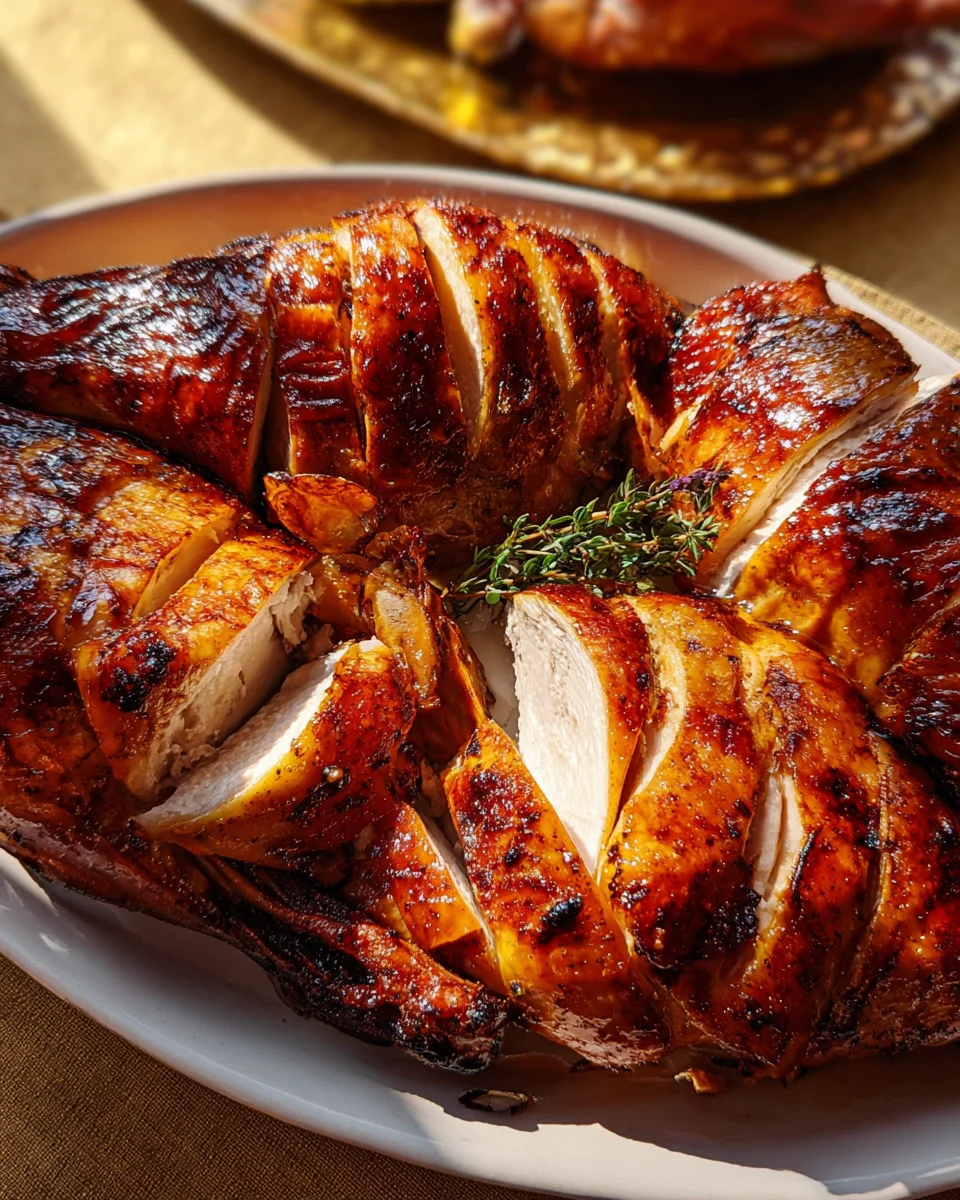
Maple Butter Glazed Turkey Recipe is more than just a dish; it’s a culinary masterpiece that promises to transform your holiday table into a truly unforgettable feast. Imagine the magnificent scene: a glorious, golden-brown turkey, its skin glistening with a rich, caramelized glaze, filling your home with an aroma that instantly signals warmth, festivity, and pure deliciousness. This isn’t just any turkey; it’s a bird imbued with the deep, earthy sweetness of pure maple syrup and the creamy richness of butter, creating an exquisite symphony of flavors that will leave your guests utterly delighted and asking for your secret!
Maple syrup, a truly iconic North American ingredient, carries a rich history, deeply rooted in the traditions of Indigenous peoples and celebrated for centuries as a symbol of natural abundance and culinary artistry. When this beloved sweetener is perfectly combined with savory herbs and tender turkey, it creates a balance that is simply divine. I believe this Maple Butter Glazed Turkey Recipe offers the perfect blend of cherished tradition and gourmet flair, making it an ideal centerpiece for Thanksgiving, Christmas, or any special gathering. People absolutely adore this dish not only for its stunning presentation and festive appeal but especially for the succulent, juicy meat and that irresistibly crispy, sweet-and-savory skin. Get ready to create a showstopper that brings comfort and joy with every single bite!

Ingredients:
Gathering your ingredients is the first exciting step to creating this unforgettable Maple Butter Glazed Turkey Recipe. Quality ingredients make all the difference, so I always recommend using fresh herbs and good-quality maple syrup for the best flavor!
- For the Turkey:
- 1 (12-16 pound) whole turkey, thawed if frozen, neck and giblets removed
- 2 tablespoons olive oil or vegetable oil
- Kosher salt and freshly ground black pepper, to taste
- 1 large yellow onion, quartered
- 2 celery stalks, roughly chopped
- 2 carrots, roughly chopped
- 1 head garlic, cut in half horizontally
- Small bunch fresh thyme
- Small bunch fresh rosemary
- Small bunch fresh sage
- For the Brine (Optional, but highly recommended for a juicy turkey):
- 2 gallons cold water
- 1 cup kosher salt
- 1/2 cup brown sugar, packed
- 1 tablespoon black peppercorns
- 2 bay leaves
- 1 orange, quartered
- 1 cinnamon stick
- 1 tablespoon whole cloves
- For the Maple Butter Glaze:
- 1 cup unsalted butter, melted
- 1/2 cup pure maple syrup (grade B or dark robust is best for flavor)
- 2 tablespoons apple cider vinegar
- 1 tablespoon Dijon mustard
- 1 teaspoon smoked paprika
- 1/2 teaspoon garlic powder
- 1/2 teaspoon onion powder
- 1/4 teaspoon cayenne pepper (optional, for a subtle kick)
- 1/4 cup fresh sage, finely chopped
- 2 tablespoons fresh rosemary, finely chopped
- 2 tablespoons fresh thyme, finely chopped
- Kosher salt and freshly ground black pepper, to taste
- For the Gravy (Using pan drippings):
- Pan drippings from the roasted turkey
- 1/4 cup all-purpose flour (or gluten-free alternative)
- 4-6 cups chicken or turkey broth, warmed
- Salt and freshly ground black pepper, to taste
- A splash of dry white wine or sherry (optional, for extra depth)
- A pat of unsalted butter (optional, for richness and shine)
Phase 1: Preparing the Turkey
This phase is all about getting your turkey ready for its starring role. Taking the time here ensures a succulent, flavorful bird that will impress everyone at your table. My secret for a truly moist turkey is almost always to brine it first!
- Brine the Turkey (Optional, but highly recommended):
If you’ve decided to go the extra mile for an exceptionally moist and flavorful turkey, start here. In a very large stockpot or a clean, food-grade bucket, combine the 2 gallons of cold water, 1 cup kosher salt, 1/2 cup brown sugar, 1 tablespoon black peppercorns, 2 bay leaves, 1 quartered orange, 1 cinnamon stick, and 1 tablespoon whole cloves. Stir well until the salt and sugar are completely dissolved. Carefully submerge the whole turkey into the brine, ensuring it is fully covered. If it floats, you can place a heavy plate on top to keep it submerged. Cover the container and refrigerate for 12-24 hours. Do not brine for longer than 24 hours, as the turkey can become too salty. This brining process will infuse moisture and flavor deep into the meat, yielding a much juicier turkey.
- Rinse and Pat Dry:
After brining (or if you skipped brining), remove the turkey from its packaging. Discard any brining liquid. Thoroughly rinse the turkey, both inside and out, under cold running water. This step is crucial, especially if you brined, to remove any excess salt from the surface. Pat the turkey extremely dry with paper towels. I can’t emphasize this enough! A dry skin is absolutely essential for achieving that beautiful, crispy, golden-brown skin. Moisture on the skin prevents browning and can lead to a steamed rather than roasted finish.
- Prepare the Turkey Cavity:
Remove the neck and giblets from the turkey cavity (they are often found in a small bag inside the neck or body cavity). You can reserve these for making gravy or discard them. Stuff the cavity loosely with the quartered yellow onion, chopped celery, chopped carrots, halved garlic head, and fresh herbs (thyme, rosemary, sage). These aromatics will infuse wonderful flavor into the turkey from the inside out and contribute to delicious pan drippings.
- Season the Turkey:
Once the turkey is thoroughly dry, rub the entire exterior with 2 tablespoons of olive oil. This helps the skin crisp up and encourages even browning. Season generously with kosher salt and freshly ground black pepper. Don’t be shy with the seasoning; a large bird needs a good amount to ensure flavor penetrates. I usually lift the skin over the breast and rub a little salt and pepper directly onto the breast meat as well for extra seasoning, but this is optional.
- Truss the Turkey (Optional, but recommended):
Trussing helps the turkey cook more evenly and creates a neater presentation. Using kitchen twine, tie the legs together. Tuck the wing tips underneath the body. If you’re unsure how to truss, a simple method is to crisscross the legs and tie them securely, then loop the string around the main body to hold the wings snug. This prevents the wing tips from burning and ensures the dark meat cooks at a similar rate to the breast meat, keeping everything juicy.
- Prepare Roasting Pan:
Place the prepared turkey on a V-rack inside a large roasting pan. If you don’t have a V-rack, you can create a bed of chopped vegetables (extra carrots, celery, onion) on the bottom of the pan to elevate the turkey slightly. This allows for better air circulation and prevents the bottom of the turkey from sitting in drippings, which can make the skin soggy.
Phase 2: Crafting the Maple Butter Glaze
The star of our “Maple Butter Glazed Turkey Recipe” is undoubtedly this luxurious glaze. It provides that incredible sweet, savory, and aromatic finish that makes every bite truly special. This glaze isn’t just for flavor; it also helps achieve that stunning golden-brown crust.
- Melt the Butter:
In a small saucepan or microwave-safe bowl, melt 1 cup of unsalted butter. You want it fully liquid, but not browned. I prefer to do this on the stovetop over low heat to ensure it melts gently.
- Combine Glaze Ingredients:
Once the butter is melted, remove it from the heat. Stir in the 1/2 cup of pure maple syrup, 2 tablespoons of apple cider vinegar, 1 tablespoon of Dijon mustard, 1 teaspoon of smoked paprika, 1/2 teaspoon of garlic powder, 1/2 teaspoon of onion powder, and the optional 1/4 teaspoon of cayenne pepper. Whisk thoroughly until all ingredients are well combined and smooth. The mustard and vinegar help to emulsify the butter and maple, creating a stable glaze that won’t separate easily.
- Add Fresh Herbs:
Stir in the finely chopped fresh sage, rosemary, and thyme. The fresh herbs are vital for adding depth and fragrance to the glaze, complementing the richness of the turkey perfectly. Season the glaze with kosher salt and freshly ground black pepper to your taste. I recommend tasting a tiny bit on a spoon (careful, it’s rich!) to ensure the balance of sweet and savory is just right. You want it vibrant and flavorful.
Phase 3: Roasting the Maple Butter Glazed Turkey
Now for the main event! Roasting the turkey is a patient process, but with the right technique and basting schedule, you’ll be rewarded with a perfectly cooked, golden-brown centerpiece. Monitoring internal temperature is key to safety and doneness.
- Preheat Oven and Initial Roast:
Preheat your oven to 425°F (220°C). This initial high heat blast helps to crisp the skin and jumpstart the browning process. Place the roasting pan with the turkey into the preheated oven. Roast for 30 minutes at this high temperature. This quick burst of heat creates a flavorful crust before you lower the temperature for slower cooking.
- Lower Temperature and First Glaze Application:
After 30 minutes, reduce the oven temperature to 325°F (160°C). Remove the turkey from the oven and carefully brush the entire surface with a generous amount of your prepared maple butter glaze. Return the turkey to the oven.
- The Basting Schedule:
Continue roasting the turkey, basting with the maple butter glaze every 30-45 minutes. Each time you baste, ensure you coat the entire surface evenly. If the glaze starts to thicken too much in the bowl, you can gently warm it slightly to make it more spreadable. As the turkey roasts, the glaze will caramelize, forming that beautiful, golden-brown, slightly sticky crust. If at any point the turkey skin starts to brown too quickly, you can loosely tent it with aluminum foil. This prevents burning while allowing the turkey to continue cooking through.
- Monitoring Doneness:
The total roasting time will vary depending on the size of your turkey and your oven. A 12-16 pound turkey typically takes about 3 to 4 hours. The most reliable way to determine doneness is by using a meat thermometer. Insert the thermometer into the thickest part of the thigh, making sure not to touch the bone. The turkey is fully cooked when the internal temperature reaches 165°F (74°C). I also like to check the breast meat, ensuring it also registers 165°F (74°C). When checking the temperature, be mindful of where you insert the probe; inaccurate readings can occur if it’s too close to the surface or hitting bone.
- Rest the Turkey:
Once the turkey reaches the correct internal temperature, carefully remove it from the oven. Transfer the turkey from the roasting pan to a large cutting board or serving platter. Tent it loosely with aluminum foil and let it rest for at least 20-30 minutes before carving. This resting period is absolutely critical! It allows the juices to redistribute throughout the meat, ensuring a supremely tender and moist turkey. If you cut into it too soon, all those delicious juices will run out onto your cutting board, leaving you with dry meat.
Phase 4: Making the Delicious Gravy
No roasted turkey is complete without a rich, flavorful gravy made from the pan drippings. This gravy perfectly complements the sweet and savory notes of our Maple Butter Glazed Turkey Recipe.
- Prepare Pan Drippings:
While the turkey is resting, return the roasting pan to the stovetop (if it’s stovetop safe; otherwise, transfer drippings to a saucepan). Skim off as much excess fat as possible from the pan drippings, leaving behind the flavorful liquid and browned bits (fond) at the bottom. The fat can be reserved for other uses or discarded. If you have any remaining aromatics from the cavity, you can squeeze out their juices into the pan and then discard them as well.
- Create a Roux:
Place the roasting pan (or saucepan) over medium heat. Sprinkle 1/4 cup of all-purpose flour into the drippings. Whisk constantly for 1-2 minutes, allowing the flour to cook and form a roux with the remaining fat and drippings. This step helps eliminate the raw flour taste. The roux should be a light golden color.
- Whisk in Broth:
Gradually whisk in the warmed chicken or turkey broth, starting with 4 cups. Whisk continuously to prevent lumps from forming. Bring the gravy to a simmer, stirring occasionally, until it thickens to your desired consistency. If you want a thinner gravy, add more warmed broth, a little at a time, until you reach your preferred thickness. If you want it thicker, let it simmer a bit longer. A splash of dry white wine or sherry can be added here for extra complexity, if desired.
- Season and Finish:
Taste the gravy and season with salt and freshly ground black pepper as needed. Remember that the pan drippings already contain some seasoning, so taste before adding too much. For an extra touch of richness and shine, whisk in a small pat of unsalted butter just before serving. Strain the gravy through a fine-mesh sieve for an extra-smooth consistency, if desired, to remove any small bits of herbs or vegetables.
Phase 5: Carving and Serving
The final steps! Presenting your beautifully roasted Maple Butter Glazed Turkey and serving it with your homemade gravy is the culmination of all your hard work. Enjoy the cheers!
- Carve the Turkey:
After the turkey has rested adequately, it’s time to carve. Use a sharp carving knife and a carving fork. Start by removing the legs and thighs, then separate the drumsticks from the thighs. Next, slice the breast meat horizontally away from the bone. Arrange the carved turkey pieces on a large platter. Don’t worry if your carving isn’t perfect; the flavor is what truly matters!
- Serve with Gravy:
Serve the glorious Maple Butter Glazed Turkey immediately, accompanied by the hot, savory gravy. I love to drizzle a little extra gravy over the carved pieces on the platter, and then always have a gravy boat available at the table for guests to help themselves. This dish pairs wonderfully with classic Thanksgiving sides like mashed potatoes, green bean casserole, and cranberry sauce. Enjoy your masterpiece!
Conclusion:
As we reach the culmination of our culinary journey, I truly hope you’re as excited as I am about the incredible potential of this dish. This isn’t just another turkey recipe; it’s an experience designed to elevate your dining table, transform your holiday gatherings, or simply make a weeknight meal feel extraordinarily special. What makes this particular offering an absolute must-try? It’s the unparalleled harmony of flavors that defines it. Imagine the rich, savory depth of perfectly roasted turkey, its skin rendered crisp and golden, beautifully complemented by a glaze that sings with the comforting sweetness of maple syrup, balanced by the luxurious silkiness of melted butter. There’s a subtle caramelization that happens as the glaze coats the bird, creating an irresistible sheen and a tender, juicy interior that will have everyone reaching for seconds. This is a recipe that promises not only a feast for the taste buds but also an unforgettable aroma that will fill your home, signaling warmth, comfort, and exceptional cooking.
Elevate Your Meal with Perfect Pairings
Once your magnificent turkey emerges from the oven, glistening and golden, the possibilities for serving are boundless. For a truly classic spread, I wholeheartedly recommend pairing this beautiful bird with creamy
mashed potatoes, perhaps infused with a hint of garlic or chives. Alongside, a vibrant green bean casserole or perfectly roasted Brussels sprouts will add a touch of freshness and texture. Don’t forget a generous dollop of homemade cranberry sauce, its tartness cutting through the richness of the turkey and glaze beautifully. And speaking of richness, the pan drippings from this turkey are pure liquid gold! Don’t let them go to waste; they form the most incredible base for a rich, savory gravy that will complete your meal with an indulgent flourish. For a slightly more adventurous side, consider a wild rice stuffing studded with dried cranberries and pecans, which would echo the sweet and nutty notes of the glaze. If you’re looking to serve this outside of a traditional holiday setting, a simple side salad with a tangy vinaigrette would offer a delightful contrast.
Creative Variations and Lasting Impressions
But the journey with this recipe doesn’t have to end with the first glorious meal. This versatile dish also lends itself wonderfully to creative variations. For a touch of spice, consider adding a pinch of cayenne pepper or a dash of smoked paprika to your maple butter glaze; it introduces a subtle warmth that deepens the flavor profile without overwhelming the delicate maple. A sprig of fresh rosemary or thyme tucked into the cavity or sprinkled over the turkey before glazing will infuse it with an aromatic complexity that is simply divine. And when it comes to leftovers – oh, the magic of leftovers! Slices of this turkey make for the most incredible sandwiches, perhaps layered with a sharp cheddar and a smear of dijon mustard. You could also transform it into a comforting turkey pot pie, a hearty turkey chili, or even a flavorful turkey salad. The point is, this isn’t a one-and-done meal; it keeps on giving, allowing you to enjoy its deliciousness in new and exciting ways.
Your Culinary Adventure Awaits
So, my dear reader, I implore you: don’t let this recipe remain just a tantalizing thought. Take the plunge and make this incredible
Best Maple Butter Glazed Turkey Recipe: Your Holiday Star!
This Maple Butter Glazed Turkey Recipe is a culinary masterpiece, transforming your holiday table with its glorious golden-brown skin glistening with a rich, caramelized glaze. Infused with deep maple sweetness and creamy butter, it creates an exquisite symphony of flavors. Ideal for Thanksgiving, Christmas, or any special gathering, this dish promises succulent, juicy meat and irresistibly crispy, sweet-and-savory skin, delighting guests with every bite.
Ingredients
Instructions
Important Information
Nutrition Facts (Per Serving)
It is important to consider this information as approximate and not to use it as definitive health advice.
Allergy Information
Please check ingredients for potential allergens and consult a health professional if in doubt.