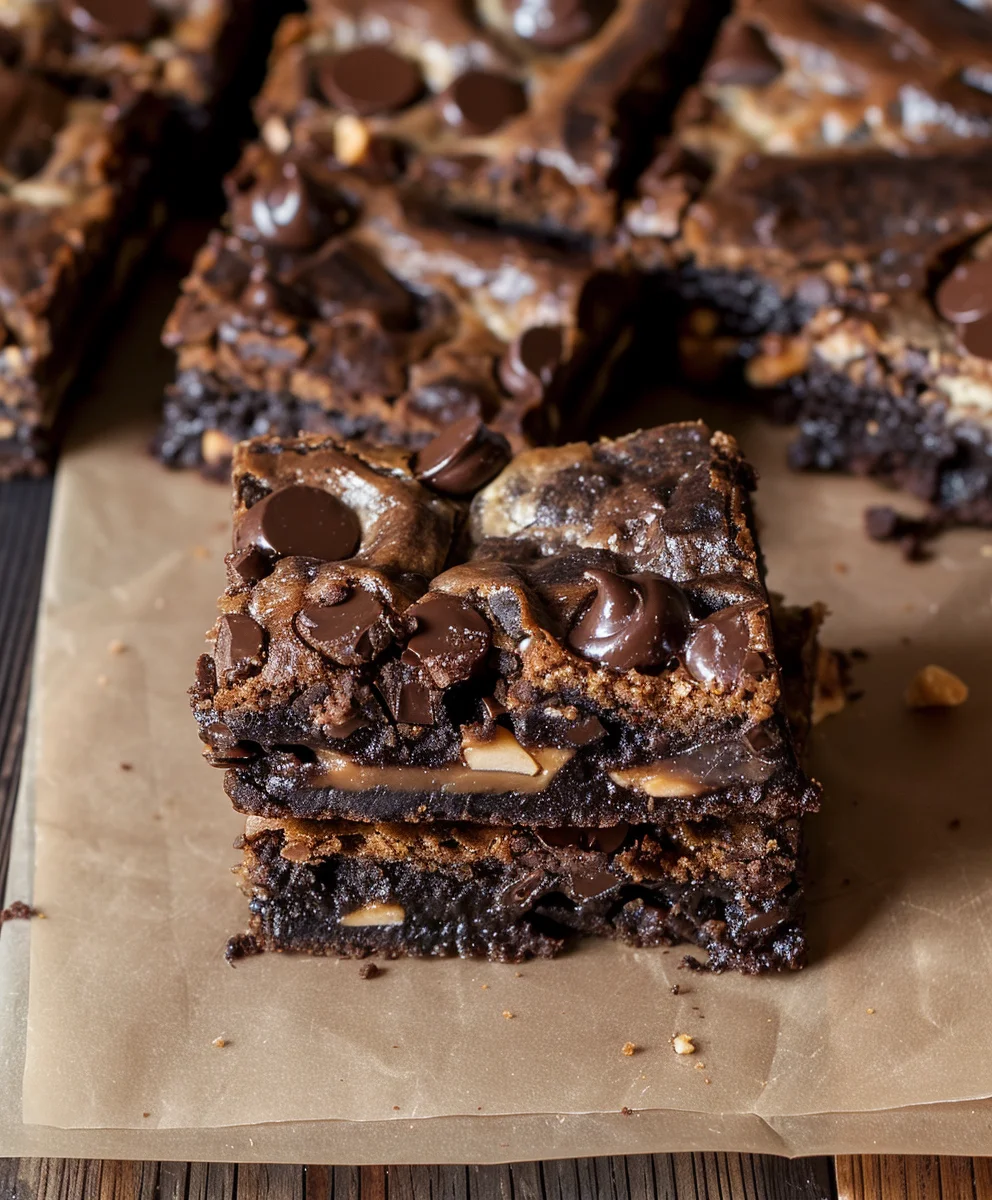
Brownie Bottom Bars are truly a confectionary delight, offering the perfect solution for those who appreciate the rich decadence of a fudgy brownie alongside another delightful treat. I’ve always found it fascinating how some of the most cherished recipes evolve, often born from a simple desire for enhanced indulgence. While the precise historical origin of these layered wonders might not be a single documented event, they undoubtedly emerged from the vibrant tradition of American home baking, where creativity in combining familiar sweets leads to extraordinary results. This innovative spirit led to the creation of bar cookies that offer an unparalleled sensory experience.
What, then, makes these bars so universally adored? For me, it’s the incredible textural harmony – that dense, intensely chocolatey brownie base serving as the perfect foundation, beautifully complemented by a contrasting, often softer or chewier, top layer. It’s more than just a dessert; it’s a celebration of flavor and texture in every bite. The sheer convenience of preparing a pan of these remarkable Brownie Bottom Bars also positions them as an ideal choice for any occasion, from casual family desserts to elegant potlucks, proving that gourmet taste can indeed be effortlessly accessible. Get ready to impress with this irresistible recipe!

Ingredients:
-
For the Fudgy Brownie Layer:
- 1 cup (2 sticks) unsalted butter, softened or melted
- 1 ¾ cups granulated sugar
- 4 large eggs, at room temperature
- 1 teaspoon vanilla extract
- 1 cup all-purpose flour, sifted
- ¾ cup unsweetened cocoa powder, sifted (I love using Dutch-processed for a deeper color and flavor!)
- ½ teaspoon baking powder
- ¼ teaspoon salt
- 1 cup chocolate chips or chunks (milk chocolate, semi-sweet, or dark – your preference!)
-
For the Creamy Cheesecake Filling:
- 2 (8-ounce) packages cream cheese, softened to room temperature
- ½ cup granulated sugar
- 2 large eggs, at room temperature
- 1 teaspoon vanilla extract
-
For the Optional Chocolate Ganache Drizzle:
- ½ cup semi-sweet chocolate chips or finely chopped chocolate
- ¼ cup heavy cream
- 1 tablespoon unsalted butter (optional, for extra shine)
Preparing the Fudgy Brownie Base for Your Brownie Bottom Bars
This is where the magic begins for our incredible Brownie Bottom Bars! A rich, fudgy brownie layer forms the perfect foundation. Don’t rush this step, as a great base makes all the difference.
- Preheat and Prepare Your Pan: First things first, let’s get our oven ready. Preheat your oven to 350°F (175°C). Then, take a 9×13-inch baking pan and line it with parchment paper, leaving an overhang on the sides. This “sling” will make it incredibly easy to lift your finished Brownie Bottom Bars out of the pan later. Lightly grease the exposed sides of the pan or spray the parchment with non-stick cooking spray for extra insurance. Trust me, this little step saves a lot of hassle!
- Melt the Butter and Sugar: In a large, microwave-safe bowl, combine your softened or melted butter and granulated sugar. If your butter isn’t already melted, you can gently melt it in the microwave in 30-second intervals until it’s just liquid. Whisk these two together vigorously until they are well combined and slightly lighter in color. We’re aiming for a smooth, glossy mixture here. This initial mixing helps to create that signature crackly top on the brownies we all adore.
-
Incorporate Wet Ingredients: Now, let’s add the eggs, one at a time, to the butter and sugar mixture. After each egg, whisk well until it’s fully incorporated before adding the next. This ensures a uniform texture and prevents the mixture from separating. Once all the eggs are in, stir in the vanilla extract. Give it another good whisk until everything is beautifully smooth and well emulsified. You’ll notice the mixture becoming a bit thicker and richer in appearance.
Tip for Room Temperature Eggs:
If you forgot to take your eggs out ahead of time, a quick trick is to place them in a bowl of warm (not hot!) water for about 5-10 minutes. Room temperature ingredients blend together much more smoothly, creating a better emulsion and a finer texture in your baked goods.
- Combine Dry Ingredients: In a separate medium bowl, whisk together your sifted all-purpose flour, sifted unsweetened cocoa powder, baking powder, and salt. Sifting the dry ingredients is a really important step that prevents lumps and ensures your brownie base is light and evenly textured. It also helps to aerate the flour, which contributes to a tender crumb. I always recommend not skipping this step, especially for brownies where a smooth texture is key.
- Gently Mix Wet and Dry: Gradually add the dry ingredient mixture to the wet ingredient mixture. Using a rubber spatula, fold them together just until no streaks of flour remain. It’s crucial not to overmix here! Overmixing can develop the gluten in the flour too much, leading to tough brownies. We want tender, fudgy brownies, not tough ones. So, mix until just combined, a few lumps are perfectly fine and will bake out.
- Fold in Chocolate Chips: Gently fold in your chocolate chips or chunks. These add an extra layer of chocolatey goodness and pockets of melted chocolate throughout the brownie base. Spread the brownie batter evenly into your prepared 9×13-inch baking pan. Use your spatula to ensure it reaches all corners.
-
Partial Bake: Bake the brownie layer in your preheated oven for 20-25 minutes. We are only partially baking it at this stage because it will go back into the oven with the cheesecake filling. The edges should be just set, and the center should still be a bit soft and slightly underdone. This prevents the brownie from drying out during the second bake and ensures a wonderfully fudgy texture. Remove the pan from the oven and set it aside to cool slightly while we prepare our decadent cheesecake filling.
Why Partial Baking is Key:
This initial bake for the brownie layer is essential for preventing it from becoming soggy once the creamy cheesecake filling is added. It creates a stable, foundational layer that can support the moisture from the filling without losing its fudgy integrity. Plus, it ensures both layers cook perfectly without one being over or underdone.
Crafting the Velvety Cheesecake Filling for Your Brownie Bottom Bars
The cheesecake layer is what elevates these treats into truly irresistible Brownie Bottom Bars. It’s surprisingly simple to make, but a few key techniques ensure a silky-smooth, perfectly sweet contrast to the rich brownie.
-
Soften Cream Cheese: In a large mixing bowl, using an electric mixer (either hand-held or stand mixer), beat the softened cream cheese on medium speed until it’s completely smooth and creamy. This should take about 2-3 minutes. Make sure there are absolutely no lumps, as this is the foundation of our smooth filling.
Importance of Softened Cream Cheese:
This is probably the most important tip for a lump-free cheesecake filling! If your cream cheese isn’t at room temperature, it won’t mix properly and you’ll end up with frustrating little cream cheese lumps in your filling. Plan ahead and take it out of the fridge at least an hour or two before you start, or use the quick warming trick if you’re short on time.
- Add Sugar: Gradually add the granulated sugar to the cream cheese, beating on medium-low speed until it’s just incorporated. Then, increase the speed to medium and continue beating for another 1-2 minutes, scraping down the sides of the bowl as needed, until the mixture is light and fluffy. The sugar helps to aerate the cream cheese and makes the filling wonderfully smooth.
-
Incorporate Eggs and Vanilla: Reduce the mixer speed to low. Add the eggs, one at a time, mixing only until each egg is just combined. Overmixing the eggs can introduce too much air, which can cause the cheesecake to crack during baking. Once the eggs are in, stir in the vanilla extract. Give it one final gentle mix to ensure everything is evenly distributed.
Avoid Overmixing the Eggs:
I can’t stress this enough – be gentle when adding the eggs! You want to mix just enough to combine them, not to whip them. Excess air can lead to a puffy cheesecake that sinks and cracks as it cools. We’re aiming for dense and creamy, not airy and fragile.
Assembling and Baking Your Irresistible Brownie Bottom Bars
Now comes the exciting part – bringing these two delicious layers together! The assembly is straightforward, but the baking process requires a little patience to ensure your Brownie Bottom Bars are perfectly set.
- Layer the Cheesecake Filling: Carefully pour the creamy cheesecake filling over the partially baked brownie layer in your pan. Use your spatula to gently spread the filling evenly across the entire surface. Take care not to disturb the brownie layer too much underneath.
- Bake the Combined Layers: Return the pan to your preheated 350°F (175°C) oven. Bake for another 30-40 minutes, or until the edges of the cheesecake layer are set, and the center still has a slight jiggle to it when you gently shake the pan. The top might have a very light golden hue around the edges. Remember, a little jiggle in the center is a good thing – it means it will be perfectly creamy once cooled.
- Cool Gradually: This is a critical step for preventing cracks in your cheesecake layer. Once baked, turn off the oven, but leave the pan inside with the oven door propped open a few inches for about 30 minutes. This allows the Brownie Bottom Bars to cool down very slowly and gradually, minimizing the drastic temperature change that often causes cracking. After 30 minutes, remove the pan from the oven and let it cool completely on a wire rack at room temperature. This can take a couple of hours.
-
Chill Thoroughly: Once completely cool to the touch, cover the pan loosely with plastic wrap and transfer it to the refrigerator. Chill for at least 4 hours, or preferably overnight. This chilling time is absolutely essential! It allows the cheesecake layer to fully set, ensuring clean, beautiful slices and the perfect firm-yet-creamy texture. Trying to cut them too early will result in a messy, unset bar. Patience is truly a virtue here for the best Brownie Bottom Bars.
The Importance of Chilling:
Do not skip or shorten the chilling time. This isn’t just about making them cold; it’s about allowing the fats in the cheesecake to firm up, resulting in that delightful, dense texture and making them easy to slice without crumbling. It also lets the flavors meld beautifully.
Optional: Adding a Decadent Chocolate Ganache Drizzle
While optional, a luscious chocolate ganache drizzle adds an extra layer of indulgence and a beautiful finish to your already amazing Brownie Bottom Bars. It’s a simple step that really elevates the presentation and taste.
- Prepare the Ganache: In a small, microwave-safe bowl, combine the semi-sweet chocolate chips (or finely chopped chocolate) and heavy cream. Microwave on high for 30-45 seconds, or until the cream is hot and simmering. Let it sit for 1 minute, then whisk until completely smooth and glossy. If you’re using the optional butter, whisk it in now until melted and fully incorporated for extra shine.
-
Drizzle and Set: Once your ganache is smooth, let it cool for about 5-10 minutes, stirring occasionally, until it’s slightly thickened but still pourable. If it’s too warm, it will melt into the cheesecake; if it’s too cool, it will be too thick to drizzle. You can drizzle it decoratively over the chilled Brownie Bottom Bars right in the pan, or lift the bars out and drizzle just before cutting. Allow the ganache to set for about 15-30 minutes at room temperature, or in the fridge for 5-10 minutes, before slicing.
Achieving the Perfect Drizzle Consistency:
The key to a good ganache drizzle is temperature. It should be warm enough to flow, but cool enough to hold its shape and not melt the cheesecake surface. If it gets too thick, you can gently rewarm it for a few seconds in the microwave. If it’s too runny, let it sit longer or pop it in the fridge for a minute or two.
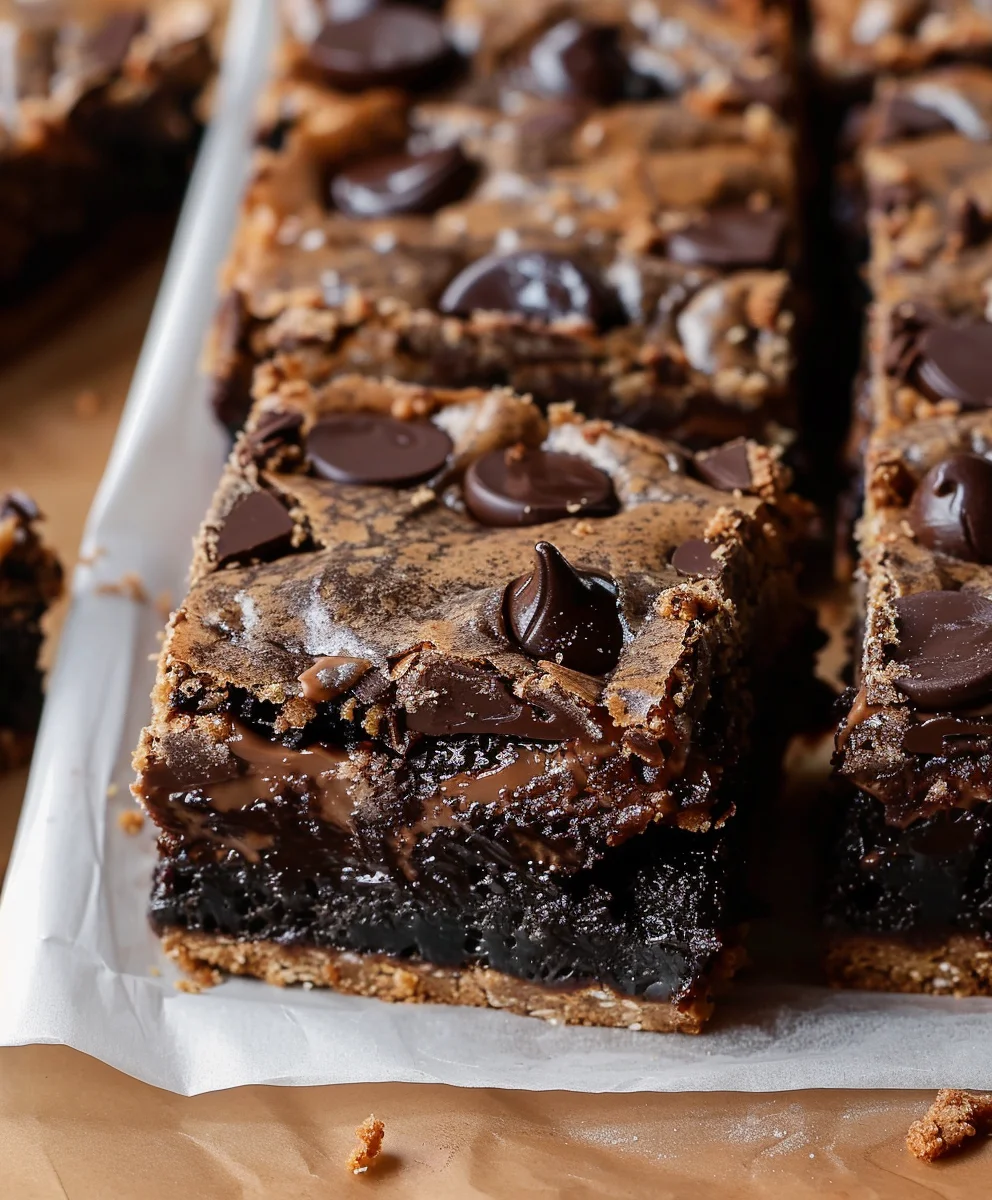
Cutting and Serving Your Perfect Brownie Bottom Bars
The moment of truth! After all that waiting, it’s time to slice into these glorious Brownie Bottom Bars. A little trick here will ensure you get those coveted clean, sharp edges.
- Lift and Slice: Once thoroughly chilled and any optional ganache is set, use the parchment paper overhang to carefully lift the entire slab of Brownie Bottom Bars out of the pan and onto a cutting board.
- Achieve Clean Cuts: For the neatest slices, use a large, sharp knife. For even cleaner cuts, run your knife under hot water for a few seconds, wipe it dry, and then make a slice. Repeat this process for each cut: warm, wipe, slice. This helps the knife glide through the cold cheesecake and fudgy brownie without sticking or tearing. Slice into desired bar sizes – I usually go for 24 squares (6×4) but you can make them larger or smaller depending on your preference.
- Serve and Store: Serve your delicious Brownie Bottom Bars chilled. They are absolutely perfect for parties, potlucks, or just as a special treat at home. Store any leftover bars in an airtight container in the refrigerator for up to 5 days. For longer storage, you can freeze individual bars wrapped tightly in plastic wrap and then foil for up to 1-2 months. Just thaw in the refrigerator overnight before enjoying. Enjoy every single bite of these truly exceptional treats! They are sure to become a new favorite in your dessert repertoire.
Conclusion:
Well, my friends, we’ve reached the sweet end of our culinary journey for today, and I genuinely hope you’re feeling inspired, perhaps even a little bit hungry, to get into your kitchen and experience the pure magic of these incredible creations. When I tell you that this recipe for Brownie Bottom Bars isn’t just another dessert recipe, I truly mean it. It’s a symphony of textures and flavors that consistently earns rave reviews from everyone who tries a bite. Imagine sinking your teeth into a rich, fudgy brownie base, intensely chocolatey and perfectly chewy, followed by a luscious, often contrasting, creamy layer that melts in your mouth, all topped off with something delightfully crunchy or an extra burst of flavor. It’s not merely a bar; it’s an experience, a delightful surprise in every single square. This isn’t just a simple treat; it’s a showstopper, effortlessly elegant yet surprisingly straightforward to prepare, making it a definite must-try for any baking enthusiast, novice or seasoned.
What makes these bars truly stand out and why I believe they absolutely deserve a permanent spot in your baking repertoire is their masterful balance. The deep, dark chocolate intensity of the brownie provides the perfect counterpoint to whatever delightful topping you choose to pair with it – be it a bright, tangy cream cheese frosting, a nutty caramel layer, or a simple shower of sea salt flakes that enhance the chocolate’s complexity. They are endlessly satisfying, hitting all the right notes: sweet, salty (if you choose to add it), rich, and utterly comforting. I’ve seen these bars disappear from platters at potlucks, parties, and even quiet family gatherings with astonishing speed. They possess an almost magnetic appeal, drawing people back for “just one more.” If you’re looking for a dessert that offers depth, variety, and an undeniable ‘wow’ factor without demanding hours of intricate work, then you’ve found your new favorite here.
Elevate Your Brownie Bottom Bar Experience: Serving & Variation Ideas
Now, while these Brownie Bottom Bars are absolutely divine straight out of the pan (after cooling, of course!), I love experimenting with ways to elevate them even further. For an extra special treat, try serving them slightly warm with a scoop of premium vanilla bean ice cream or a dollop of freshly whipped cream. The contrast between the warm, gooey bar and the cold, creamy ice cream is simply out of this world. A light dusting of cocoa powder or a delicate drizzle of melted chocolate or a homemade caramel sauce can also add an elegant touch that makes them feel incredibly gourmet. Consider how a touch of freshly grated orange zest over the top could brighten the entire flavor profile, especially if you’ve added a hint of orange extract to your creamy layer. These small additions can transform a wonderful dessert into an unforgettable culinary moment, perfect for any occasion from a casual weeknight treat to a sophisticated dinner party finale.
Don’t be afraid to get creative with variations either! Think of the basic structure as a canvas for your culinary imagination. For a nutty twist, try sprinkling some chopped toasted pecans or walnuts over the top layer before baking, or even folding them into the brownie batter for added crunch. A pinch of flaky sea salt sprinkled over the top just after baking will beautifully enhance the chocolate notes and provide a sophisticated edge. For a festive touch during the holidays, you could add a hint of peppermint extract to the creamy layer, creating a delicious mint chocolate bar. Or, how about swirling a spoonful of melted peanut butter or a dollop of raspberry jam into the top for an unexpected burst of flavor? You could even experiment with different extracts in your creamy layer, perhaps almond, orange zest, or even a tiny splash of rum extract for an adult-friendly version. The possibilities are truly boundless, allowing you to tailor this recipe to suit any taste, season, or occasion, making these bars endlessly customizable and always exciting.
Your Turn! I Can’t Wait to Hear From You!
So, there you have it, my comprehensive guide to creating what I believe are some of the most irresistible bars you’ll ever bake. I’ve poured my heart into sharing all my tips and tricks, and now it’s your turn to bring these sensational Brownie Bottom Bars to life in your own kitchen. I truly encourage you to give this recipe a try; I promise you won’t regret it. The joy of baking, the incredible aroma filling your home, and the sheer delight on the faces of those you share them with—these are moments worth savoring. And once you’ve experienced the magic, please, please come back and share your experience with me! What variations did you try? Who did you share them with? Did they vanish as quickly as they do in my house? I absolutely adore hearing about your baking adventures, your successes, and any fun tweaks you came up with. Your feedback and stories inspire me and our entire baking community. So, grab your apron, preheat that oven, and get ready to create something truly spectacular. Happy baking, everyone!
Irresistible Brownie Bottom Bars
Indulge in these delightful Brownie Bottom Bars, featuring a fudgy brownie base with crushed Oreos, topped with a creamy cheesecake layer, and finished with an optional decadent chocolate ganache. A perfect blend of textures and flavors, ideal for any occasion.
Ingredients
-
1 box brownie mix (for 9×13 pan)
-
22 Oreos, divided
-
8 ounces cream cheese, softened
-
1 large egg
-
1 teaspoon vanilla extract
-
1/4 cup granulated sugar
-
2 Tablespoons sour cream
-
1/4 cup chocolate chips
-
1/4 cup heavy whipping cream
Instructions
-
Step 1
Preheat oven to 350°F (175°C). Line a 9×13-inch pan with parchment paper. Prepare brownie mix according to package directions. Crush 18 Oreos and press into the bottom of the prepared pan. Pour brownie batter evenly over the crushed Oreos. -
Step 2
Bake the brownie layer for 20-25 minutes, until edges are just set. Remove from oven and cool slightly. -
Step 3
In a mixing bowl, beat softened cream cheese until smooth. Add 1/4 cup granulated sugar, then beat in the large egg, 1 teaspoon vanilla extract, and 2 Tablespoons sour cream until just combined and creamy. Avoid overmixing. -
Step 4
Carefully pour the cheesecake filling over the partially baked brownie layer. Crumble the remaining 4 Oreos over the cheesecake. Return pan to oven and bake for another 30-40 minutes, until cheesecake edges are set with a slight jiggle in the center. -
Step 5
Turn off oven, prop door open, and cool bars in the oven for 30 minutes. Transfer to a wire rack to cool completely at room temperature (approx. 2 hours). Once fully cool, cover and refrigerate for at least 4 hours, or preferably overnight, until thoroughly chilled and set. -
Step 6
In a small bowl, combine 1/4 cup chocolate chips and 1/4 cup heavy whipping cream. Microwave for 30-45 seconds until cream is hot. Let sit for 1 minute, then whisk until smooth. Let cool slightly until thickened but still pourable. Drizzle over chilled bars. -
Step 7
Lift bars from pan using parchment overhang. For clean slices, use a sharp knife warmed under hot water and wiped dry before each cut. Slice into desired bar sizes. Serve chilled and store leftovers in an airtight container in the refrigerator for up to 5 days.
Important Information
Nutrition Facts (Per Serving)
It is important to consider this information as approximate and not to use it as definitive health advice.
Allergy Information
Please check ingredients for potential allergens and consult a health professional if in doubt.