Butterfinger Balls Recipe A Quick And Easy Delight is precisely what you need to satisfy that irresistible craving for a truly unique and effortlessly enjoyable dessert. I’m thrilled to share my love for these incredible treats, which capture the iconic crunch and distinct peanut butter-chocolate flavor of a classic Butterfinger candy bar, transforming it into a bite-sized, melt-in-your-mouth experience that requires absolutely no baking. This fantastic recipe promises simplicity without compromising on extraordinary flavor, making it an ideal choice for any gathering or a delightful personal indulgence.
A History of Flavor and Modern Convenience
The Butterfinger candy bar itself boasts a fascinating history, captivating taste buds since its inception in 1923 with its crisp, flaky peanut butter core enrobed in rich chocolate. This specific dessert pays a delicious homage to that beloved confection, brilliantly translating its magic into an incredibly accessible form. People absolutely adore these Butterfinger Balls not only for their comforting, nostalgic flavor profile but also for their delightful textural contrast—a wonderfully creamy, rich center perfectly complemented by that signature candy crunch on the outside. Furthermore, the sheer convenience of a no-bake dessert cannot be overstated. When time is precious but the desire for something sweet and satisfying is strong, a Butterfinger Balls Recipe A Quick And Easy Delight truly shines. It’s incredibly simple to assemble, requiring minimal ingredients and effort, yet delivers maximum impact on flavor and satisfaction. Prepare to impress with absolute minimal fuss!

Ingredients:
- 12 regular-sized Butterfinger candy bars (approx. 1.5 oz each), or about 18-20 mini bars
- 1 cup (2 sticks) unsalted butter, softened to room temperature
- 1 cup creamy peanut butter (I find Jif or Skippy work wonderfully for consistency, but use your favorite!)
- 4 cups powdered sugar (also known as confectioners’ sugar), sifted
- 1 teaspoon pure vanilla extract (optional, but I love the depth it adds!)
- For the Optional Chocolate Coating:
- 12 ounces semi-sweet chocolate chips or melting wafers (good quality makes a difference!)
- 1 tablespoon coconut oil or shortening (this helps with a smooth, dippable consistency)
- Extra crushed Butterfinger pieces or chopped peanuts for garnish (optional)
Gathering Your Tools and Ingredients for a Smooth Start
Before we even think about mixing, I always find it’s incredibly helpful to gather all your ingredients and tools. This practice, often called “mise en place,” truly makes the entire process smoother and more enjoyable. For this delightful Butterfinger Balls Recipe A Quick And Easy Delight, you’ll want to have a large mixing bowl, a sturdy wooden spoon or rubber spatula, a hand mixer (if you prefer, though not strictly necessary), measuring cups and spoons, a baking sheet lined with parchment paper or a silicone mat, and a food processor or a heavy-duty Ziploc bag with a rolling pin for crushing those Butterfinger bars.
Ensure your butter is truly at room temperature. This isn’t just a suggestion; it’s key! Softened butter creams beautifully with other ingredients, creating a much smoother and more homogenous dough. If your butter is too cold, it won’t incorporate properly, leading to a lumpy texture. If it’s melted, your dough will be too soft and sticky, making it difficult to work with. I usually take my butter out of the fridge an hour or two before I plan to start. Similarly, have your peanut butter ready; if it’s a very firm natural peanut butter, giving it a quick stir can help its consistency.
Sifting the powdered sugar is another small but mighty step. It removes any lumps, ensuring a silky-smooth dough without gritty surprises. Trust me, it’s worth the extra minute! Once everything is laid out, you’ll feel much more confident and ready to tackle each step in making these incredible treats.
Crafting the Irresistible Butterfinger Crumble
-
Unwrap the Butterfingers: First things first, unwrap all of your Butterfinger candy bars. This might seem obvious, but it’s a good idea to get it out of the way before your hands get sticky! Place the unwrapped bars onto a clean surface or into a bowl.
-
Crush Them into Deliciousness: This is where the magic of the Butterfinger texture truly comes into play for our recipe. You have a couple of options here, depending on your preferred method and what tools you have available:
- Food Processor Method (My Go-To): If you have a food processor, this is by far the easiest and most efficient way to achieve a consistent crumble. Break the candy bars into smaller pieces (about 1-2 inches) and place them into the food processor. Pulse a few times, then process continuously until you have a fine, yet still slightly chunky, crumble. We don’t want a powder; we want those signature crispy, crunchy bits to remain distinguishable. Be careful not to over-process, as the heat from the motor can start to melt the chocolate coating and peanut butter core, potentially turning it into a sticky paste rather than a crumbly texture. Aim for a texture resembling coarse sand with some pea-sized pieces.
- Ziploc Bag & Rolling Pin Method: If you don’t have a food processor, don’t worry! Place the unwrapped Butterfinger bars into a sturdy, freezer-safe gallon-sized Ziploc bag. Seal the bag, pressing out as much air as possible. Lay the bag flat on a sturdy counter or cutting board. Using a rolling pin, a meat mallet, or even the bottom of a heavy pot, gently but firmly pound and roll over the candy bars until they are broken down into small, distinct pieces. Again, aim for that lovely mix of fine crumbs and small, crunchy chunks. This method might take a little more effort, but it’s quite satisfying and guarantees those delightful textual variations that make these Butterfinger Balls so special.
Once crushed, set aside about 1/4 to 1/2 cup of the crushed Butterfinger pieces for an optional garnish later, especially if you plan to coat your balls in chocolate. The rest will be incorporated into our glorious dough. This step is crucial for the signature “Butterfinger Balls Recipe A Quick And Easy Delight” crunch!
Whipping Up the Luscious Peanut Butter Dough
-
Cream the Butter and Peanut Butter: In your large mixing bowl, place the softened unsalted butter and the creamy peanut butter. Using a sturdy wooden spoon, a rubber spatula, or a hand mixer on medium speed, beat these two ingredients together until they are wonderfully smooth, light, and well combined. This usually takes about 2-3 minutes. You’re looking for a uniform, pale yellow mixture with no streaks of individual ingredients. The air incorporated during this creaming process will contribute to the overall texture of your no-bake treats.
-
Introduce the Powdered Sugar: Now, gradually add the sifted powdered sugar to the butter and peanut butter mixture. I recommend adding it in two or three additions, mixing well after each one. If you’re using a hand mixer, start on a low speed to prevent a “powdered sugar cloud” from erupting in your kitchen, then increase to medium. If mixing by hand, incorporate it slowly and deliberately, ensuring all the sugar is absorbed. The mixture will start to thicken considerably and become quite stiff. Keep mixing until the powdered sugar is fully incorporated and the dough is thick and homogenous. It should resemble a very thick cookie dough.
-
Add the Vanilla Extract (Optional, but Recommended): If you’re using vanilla extract, stir it in now. The vanilla adds a lovely warmth and depth of flavor that complements the peanut butter and chocolate notes beautifully. While it’s an optional addition, I personally find it elevates the taste profile, making each bite even more memorable. Mix until just combined.
-
Fold in the Crushed Butterfinger: Finally, add the majority of your crushed Butterfinger pieces to the peanut butter dough. Gently fold them in using your wooden spoon or spatula. Be careful not to overmix here; we want those delicious Butterfinger bits to remain intact, providing that wonderful textural contrast in every bite. Ensure the crumbles are evenly distributed throughout the dough. The dough will be quite firm but still pliable, with visible flecks of orange, brown, and peanut butter goodness. This creates the very heart of our “Butterfinger Balls Recipe A Quick And Easy Delight.”
Shaping and Chilling Your Delightful Butterfinger Bites
-
Prepare Your Workstation: Line a large baking sheet with parchment paper or a silicone baking mat. This will prevent the balls from sticking and make cleanup a breeze.
-
Roll into Perfect Spheres: Now comes the fun part – shaping our Butterfinger Balls! Using a small cookie scoop (about 1-inch in diameter, which holds about 1.5-2 tablespoons of dough) or just your hands, scoop out portions of the dough. Roll each portion between your palms to form smooth, uniform balls. Aim for consistency in size so they all chill and set evenly, and look beautiful when presented. If the dough starts to stick to your hands, you can lightly dust your palms with a tiny bit of powdered sugar, or even better, rinse your hands with cool water and dry them thoroughly to cool them down. Place the rolled balls onto your prepared baking sheet.
-
Chilling is Key: Once all the dough has been rolled into balls and placed on the baking sheet, transfer the sheet to the refrigerator. Allow the Butterfinger Balls to chill for at least 1-2 hours, or until they are firm to the touch. This chilling time is absolutely essential! It helps the balls set up properly, making them much easier to handle and preventing them from getting too soft if you decide to add a chocolate coating. A well-chilled ball holds its shape beautifully and provides a much more satisfying bite. If you’re in a hurry, you can pop them in the freezer for about 30 minutes, but keep a close eye on them to prevent them from freezing solid at this stage.
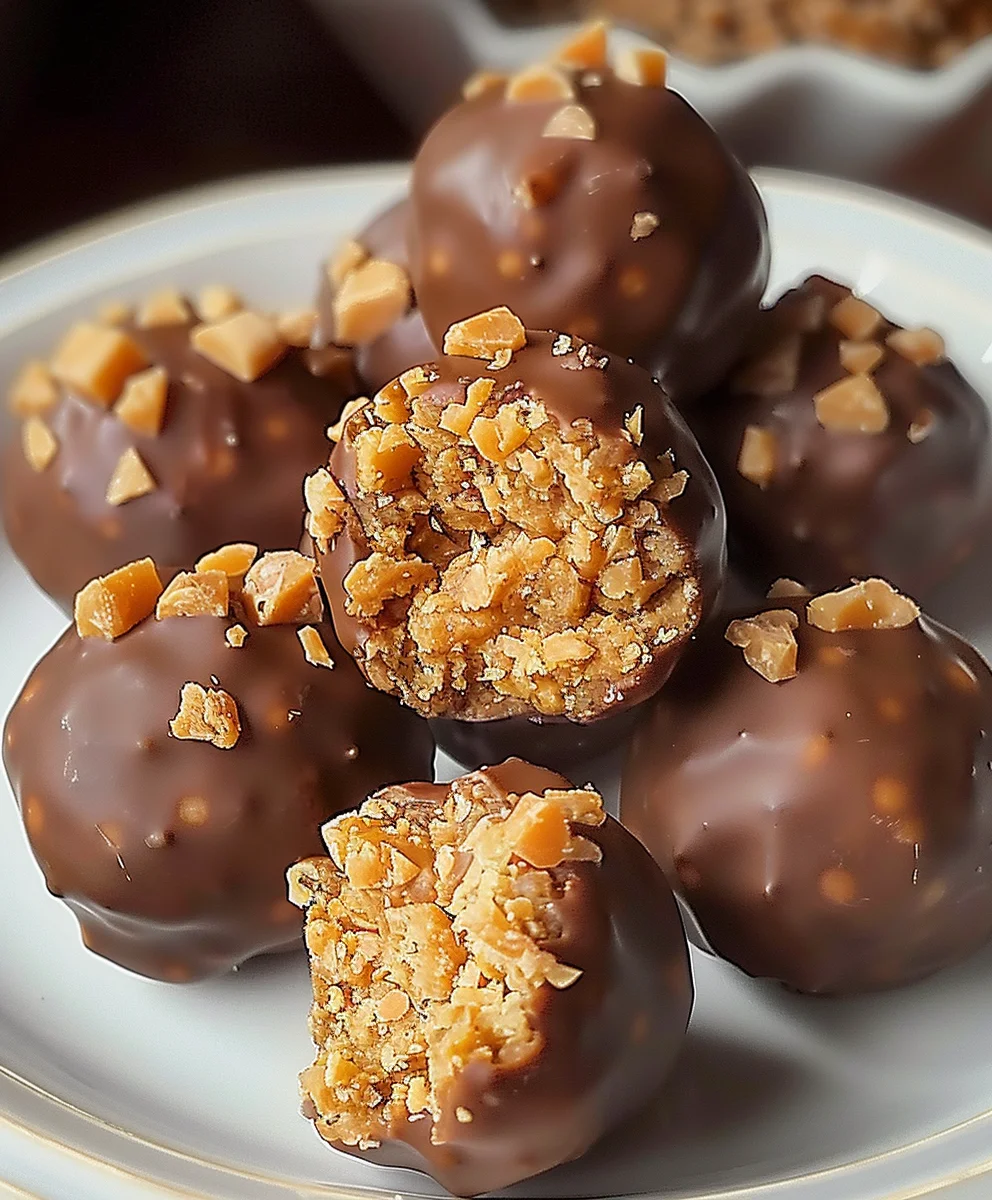
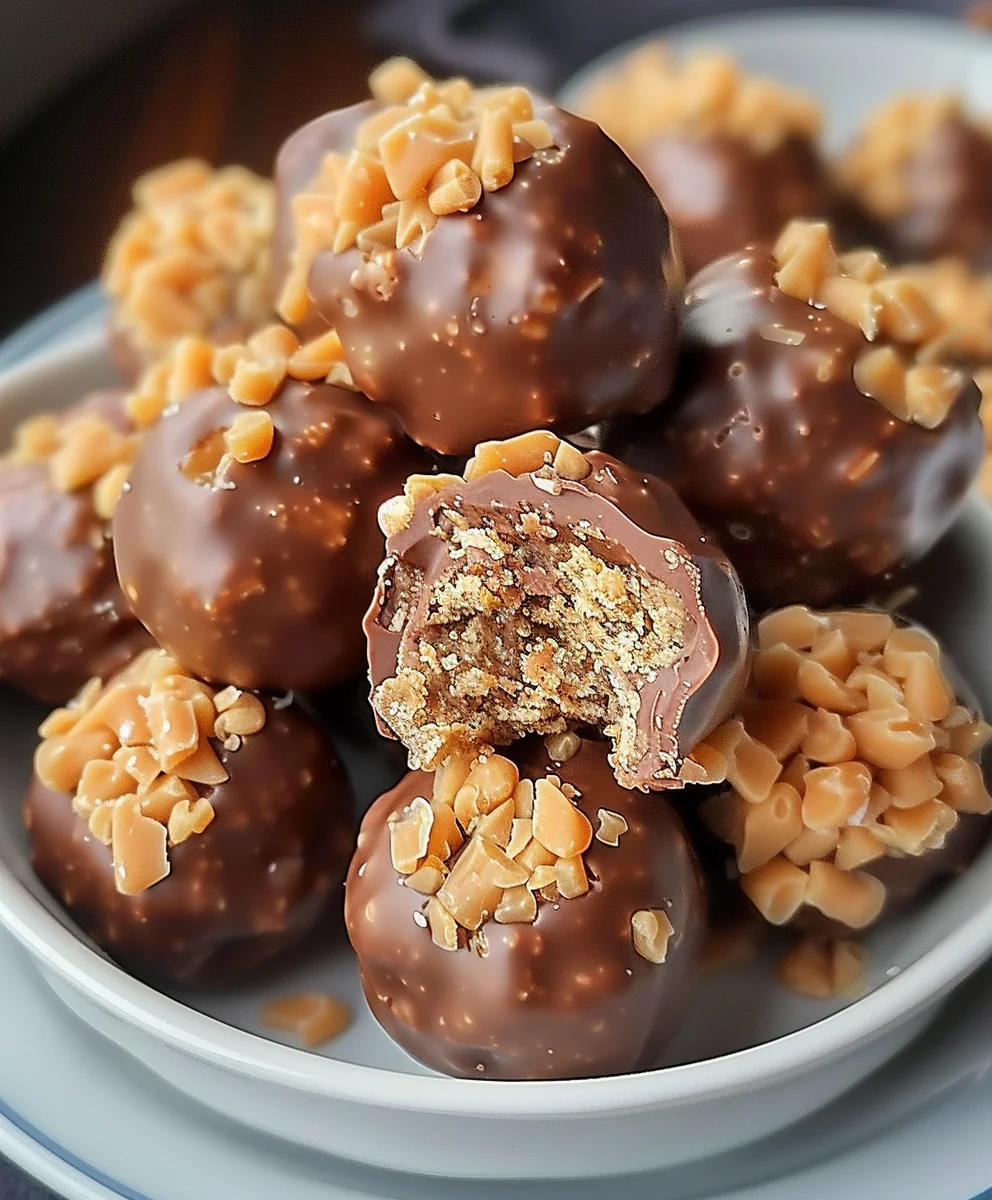
The Optional, Yet Highly Recommended, Chocolate Coating
While these Butterfinger Balls are utterly delicious on their own, a luscious chocolate coating takes them to an entirely new level, adding a sophisticated touch and an extra layer of chocolatey bliss. This step truly elevates the “Butterfinger Balls Recipe A Quick And Easy Delight” into a showstopper.
-
Prepare Your Chocolate: In a microwave-safe bowl, combine your semi-sweet chocolate chips (or melting wafers) and the coconut oil (or shortening). The coconut oil is a secret weapon here; it helps thin the chocolate slightly, making it smoother and easier to dip with, and gives it a beautiful sheen once set. For best results, use good quality chocolate chips or melting wafers; they melt more smoothly and taste better.
-
Melt the Chocolate: Microwave the chocolate mixture in 30-second intervals, stirring well after each interval, until the chocolate is completely melted and smooth. Be careful not to overheat the chocolate, as it can seize or burn. If you prefer, you can also melt the chocolate using a double boiler method on the stovetop, which provides more gentle, even heat. Once melted, stir until it’s perfectly smooth and glossy.
-
Dip Your Chilled Balls: Take your chilled Butterfinger Balls out of the refrigerator. Using a fork or a dipping tool, carefully dip each ball into the melted chocolate, ensuring it’s fully coated. Lift the ball out, gently tapping the fork against the edge of the bowl to allow any excess chocolate to drip off. You want a nice, even, thin coating, not a thick, gloopy layer. The coldness of the balls will help the chocolate set quickly.
-
Garnish (Optional): Immediately after dipping each ball, if you saved some of the crushed Butterfinger pieces or have some chopped peanuts, sprinkle them over the wet chocolate coating. This adds an extra layer of texture, visual appeal, and reinforces that delicious Butterfinger flavor. This is a fantastic way to signal the wonderful surprise inside! You could also do a simple drizzle of contrasting white chocolate for an elegant finish.
-
Set the Coating: Place the chocolate-coated balls back onto the parchment-lined baking sheet. Return them to the refrigerator for another 15-30 minutes, or until the chocolate coating is completely set and firm. This is important for handling and storage.
Perfect Presentation and Storage for Your Masterpiece
-
Allow to Come to Room Temperature (Slightly): While these are delightful straight from the fridge, I find that letting them sit at room temperature for about 10-15 minutes before serving allows their flavors to truly shine. The texture becomes slightly softer and more yielding, enhancing the experience of this Butterfinger Balls Recipe A Quick And Easy Delight.
-
Serving Suggestions: Arrange your beautiful Butterfinger Balls on a platter for parties, pack them in decorative boxes as homemade gifts, or simply enjoy them as a personal indulgence. They are perfect with a cup of coffee, a glass of milk, or as a sweet ending to any meal. Their vibrant flavor and satisfying crunch make them a hit with everyone.
-
Storage: Store the finished Butterfinger Balls in an airtight container in the refrigerator. They will keep well for up to 1-2 weeks. While they might last that long in your house, mine typically disappear much, much faster! If you want to store them for longer, they can also be frozen in an airtight container for up to 2-3 months. Just be sure to layer them with parchment paper to prevent sticking. When you’re ready to enjoy a frozen treat, simply transfer them to the refrigerator to thaw overnight, or let them sit at room temperature for about 30 minutes. Freezing can sometimes alter the texture slightly, but they remain wonderfully delicious. Proper storage ensures you can enjoy your “Butterfinger Balls Recipe A Quick And Easy Delight” for days to come!
Conclusion:
Well, my friends, we’ve reached the sweet end of our journey, and I genuinely hope you’re as excited as I am about this incredible confection. If you’ve been searching for that perfect treat that delivers on all fronts – taste, convenience, and sheer joy – then look no further. This isn’t just another recipe; it’s your new secret weapon for parties, potlucks, or simply a delightful indulgence after a long day. I’ve made these countless times, and every single time, without fail, they vanish almost as quickly as I can make them. There’s something truly magical about the combination of crunchy, peanut-buttery Butterfinger pieces, enveloped in a creamy, rich mixture, and then perfectly coated to create a bite-sized piece of heaven. It’s a texture party in your mouth, a symphony of sweet and salty, and an absolute triumph of simple dessert making.
What I adore most about this particular creation is its undeniable versatility and its ability to bring a smile to anyone’s face. It’s the kind of treat that feels incredibly special and decadent, yet, behind the scenes, it’s astoundingly easy to pull together. You don’t need an army of fancy gadgets or hours of prep time. In fact, that’s precisely why I believe this is a must-try for everyone, from novice bakers to seasoned dessert enthusiasts. It’s the ultimate expression of maximum flavor with minimum effort, allowing you to spend less time in the kitchen and more time enjoying the company of those you love, or simply savoring a quiet moment with a well-deserved treat. Think about the joy of presenting a platter of these beautiful, golden spheres, knowing the delicious surprise that awaits inside each one. They are truly a testament to the power of simple ingredients creating extraordinary results.
Now, let’s talk about taking your delicious creations to the next level. While these treats are absolutely divine on their own, there are so many wonderful ways to serve and personalize them. Imagine them chilled, perhaps alongside a steaming mug of coffee or a cold glass of milk for the ultimate afternoon pick-me-up. They make a fantastic, unexpected addition to any dessert platter, especially when arranged with other contrasting sweets like fresh berries or a light lemon bar. For a truly show-stopping presentation, consider placing them in mini paper cupcake liners on a tiered stand. They also make incredibly thoughtful homemade gifts; just package a few in a decorative box or clear bag with a ribbon, and you’ve got a present that speaks volumes of your effort and affection. Who wouldn’t want to receive a box of these delightful bites?
And if you’re feeling adventurous, don’t hesitate to explore some fun variations! While the classic recipe is perfect, you could experiment by rolling some in different toppings – finely crushed pretzels for an extra salty crunch, toasted coconut flakes for a tropical twist, or even a light dusting of cocoa powder for a sophisticated finish. For an extra layer of decadence, you could drizzle them with melted white chocolate or dark chocolate after they’ve set, creating beautiful patterns and an additional flavor profile. Consider incorporating other crushed candy bars into the mixture for a custom “candy bar explosion” effect – think Snickers, Reese’s, or even M&M’s. Or, for a seasonal touch, add a drop of food coloring to the mixture before rolling, turning them green for St. Patrick’s Day or red for Valentine’s Day. The possibilities are genuinely endless, and each variation simply adds another layer of fun to an already fantastic base.
So, there you have it, my friends. I’ve shared with you my love for what I genuinely believe is a game-changing sweet treat. This isn’t just a recipe; it’s an invitation to create something truly special, something that will bring smiles and satisfy even the most demanding sweet tooth. I wholeheartedly encourage you to dive into your kitchen, gather your ingredients, and give this an honest try. Trust me, you won’t regret it. The Butterfinger Balls Recipe A Quick And Easy Delight is waiting to become your next favorite go-to dessert. Once you’ve whipped up your batch, please, please, please share your experience with me and with our community! Did you try a fun variation? Did they disappear in record time? What did your friends and family think? I absolutely love hearing about your kitchen adventures, seeing your photos, and learning from your creative twists. Let’s spread the joy of these amazing treats far and wide. Happy baking!
Delightful Butterfinger Balls: Quick & Easy No-Bake Treat
Satisfy cravings with these quick and easy, no-bake Butterfinger Balls. This delightful dessert transforms the iconic crunch and flavor of a Butterfinger candy bar into a bite-sized, melt-in-your-mouth experience, perfect for any gathering or personal indulgence.
Ingredients
-
4 tablespoons butter, softened
-
1 teaspoon vanilla extract
-
1 cup creamy peanut butter (avoid all-natural varieties that separate)
-
1 cup powdered sugar, sifted
-
¾ cup graham cracker crumbs
-
½ cup crushed Butterfinger bars
-
8 ounces chocolate bark or chocolate chips for coating
-
Optional: extra crushed Butterfinger bars, festive sprinkles, coarse sea salt for topping
Instructions
-
Step 1
Unwrap Butterfinger bars and crush them into a fine yet slightly chunky crumble using a food processor or a Ziploc bag and rolling pin. Set aside 1-2 tablespoons for optional garnish. -
Step 2
In a large bowl, cream together softened butter and peanut butter until smooth. Gradually beat in sifted powdered sugar until well combined and thick. Stir in vanilla extract (if using) and graham cracker crumbs until just incorporated. -
Step 3
Fold in the majority of the crushed Butterfinger pieces into the peanut butter dough until evenly distributed. The dough will be firm but pliable. -
Step 4
Line a baking sheet with parchment paper. Scoop out portions of dough (approx. 1.5-2 tablespoons) and roll into smooth, uniform balls. Place on the prepared baking sheet and refrigerate for at least 1-2 hours, or until firm. -
Step 5
In a microwave-safe bowl, melt chocolate bark or chips in 30-second intervals, stirring until smooth and glossy. Alternatively, use a double boiler. -
Step 6
Dip each chilled Butterfinger ball into the melted chocolate, allowing excess to drip off. Immediately sprinkle with reserved crushed Butterfinger, sprinkles, or sea salt. Place coated balls back on the parchment-lined sheet. -
Step 7
Refrigerate coated balls for another 15-30 minutes until the chocolate is completely set. Allow to sit at room temperature for 10-15 minutes before serving for optimal flavor and texture. -
Step 8
Store finished Butterfinger Balls in an airtight container in the refrigerator for up to 1-2 weeks, or freeze for 2-3 months, layered with parchment paper to prevent sticking.
Important Information
Nutrition Facts (Per Serving)
It is important to consider this information as approximate and not to use it as definitive health advice.
Allergy Information
Please check ingredients for potential allergens and consult a health professional if in doubt.