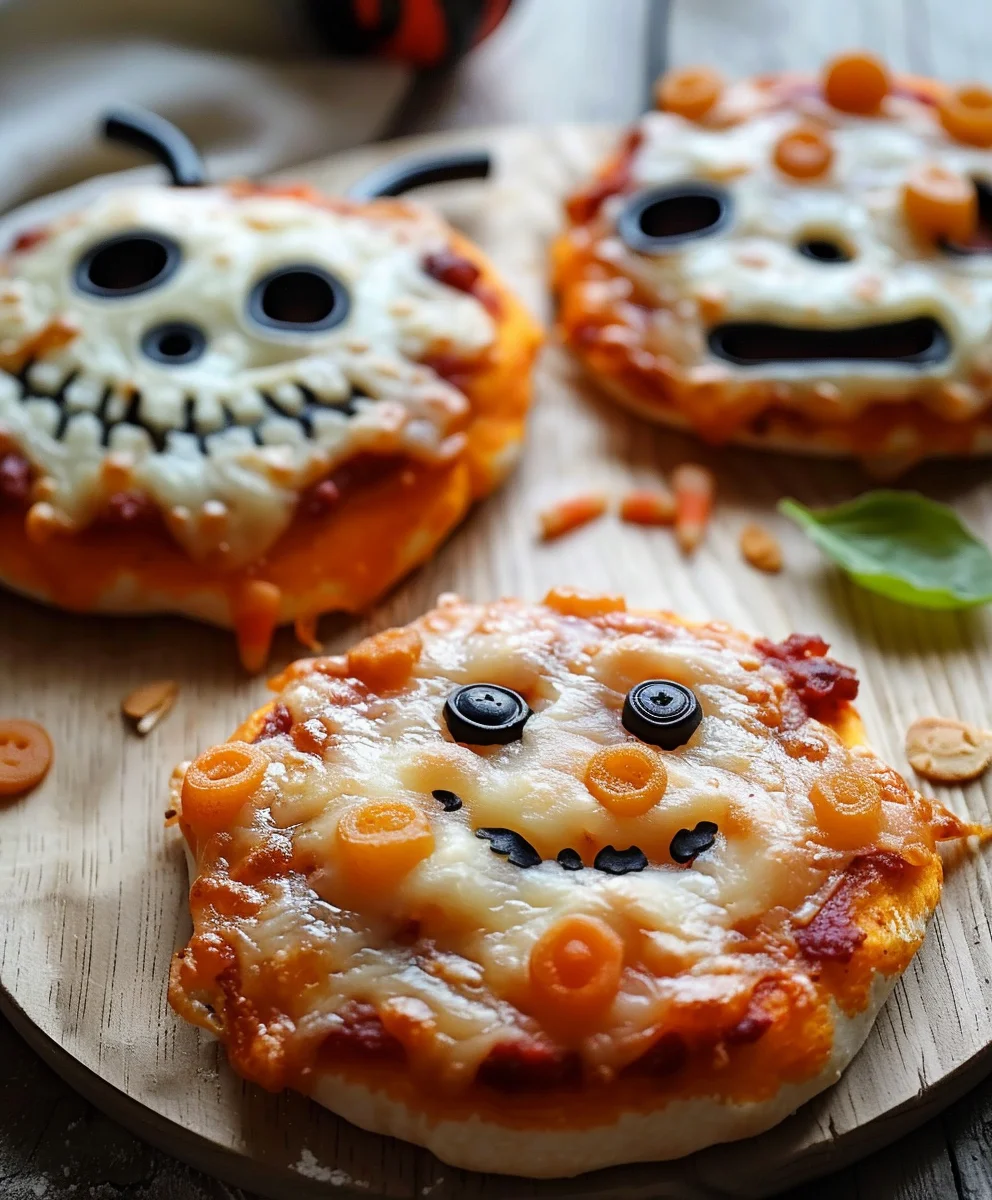
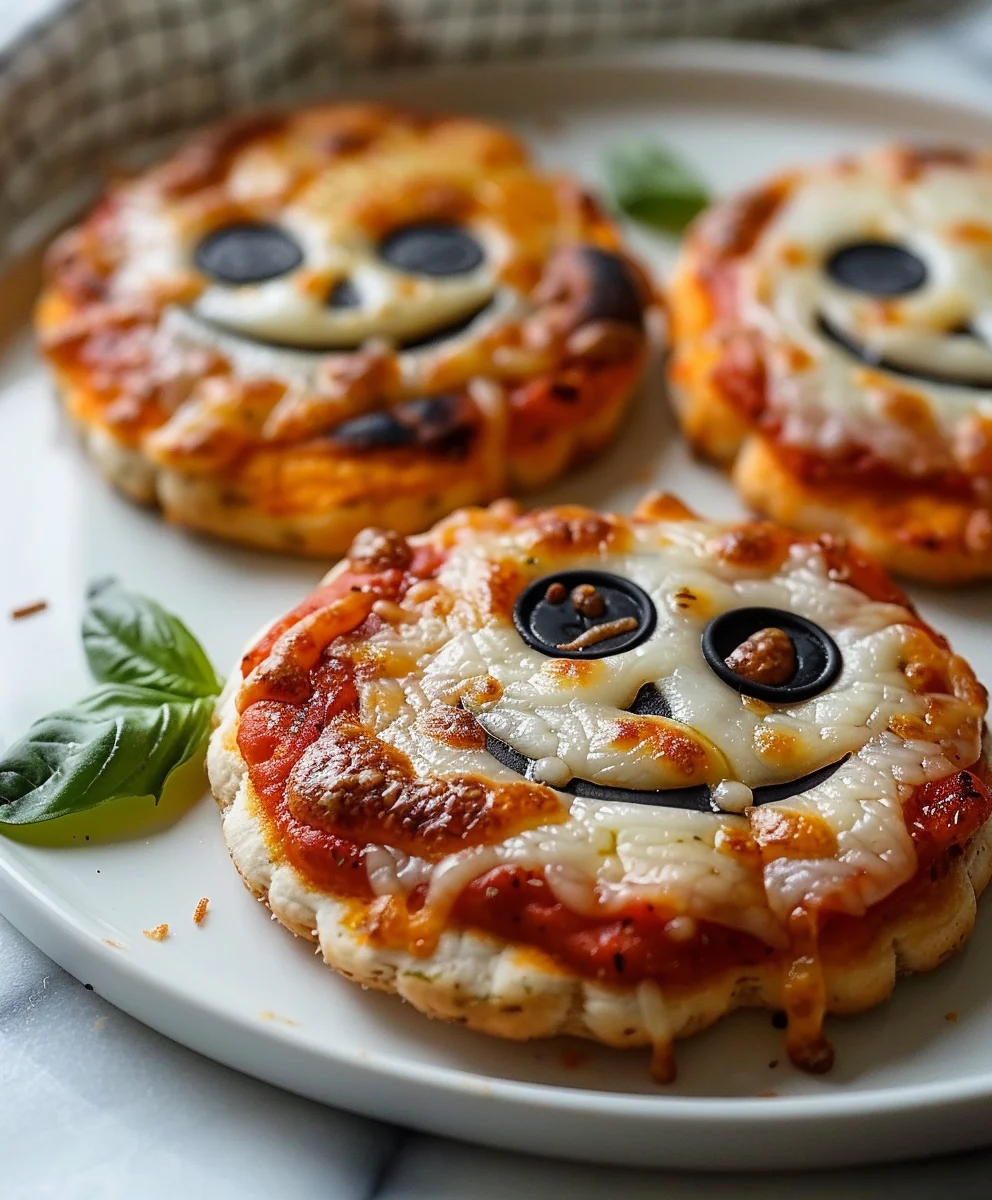
Mini Halloween Pizzas are more than just a seasonal snack; they are a delightful invitation to celebrate the spooky season with a smile. There’s an undeniable charm in tiny, themed treats, and these adorable bites perfectly capture the playful, whimsical spirit of Halloween. While the origins of pizza stretch back centuries, the tradition of crafting festive, individual portions like these has become a cherished part of modern holiday gatherings, transforming a simple meal into an interactive, themed experience. I find immense joy in seeing the creative ways people transform simple ingredients into edible masterpieces for their Halloween parties, and these mini pizzas are a prime example.
What truly makes these Mini Halloween Pizzas a perennial favorite isn’t just their charming, spooky aesthetic, but their irresistible combination of crispy crust, savory sauce, and gooey cheese, all packed into a convenient, handheld package. They offer the beloved taste of classic pizza, scaled down for effortless enjoyment at any festive gathering. Their individual size makes them perfect for parties, ensuring everyone gets a personalized, delicious treat. Whether you’re hosting a ghoulish gala, looking for a fun and easy dinner for the family, or simply seeking a creative activity, preparing these delightful appetizers adds a touch of magic and deliciousness to the fright night festivities.

Ingredients:
- For the Pizza Dough (makes about 12-15 mini pizzas):
- 1 ¾ cups warm water (105-115°F / 40-46°C) – This is crucial for activating the yeast!
- 2 ¼ teaspoons active dry yeast (one standard packet)
- 1 tablespoon granulated sugar – Feeds the yeast and helps with browning.
- 1 teaspoon sea salt – Essential for flavor and controlling yeast activity.
- 2 tablespoons olive oil, plus extra for greasing – Adds richness and elasticity.
- 4 ½ cups all-purpose flour, unbleached – For the best texture in your “Mini Halloween Pizzas”.
- For the Spooky Pizza Sauce:
- 1 (28-ounce) can crushed tomatoes – Opt for a good quality brand for superior flavor.
- 2 cloves garlic, minced – Adds a wonderful aromatic base.
- 1 teaspoon dried oregano – Classic pizza flavor!
- ½ teaspoon dried basil – Complements the oregano beautifully.
- ¼ teaspoon red pepper flakes (optional, for a hint of heat)
- 1 teaspoon sugar (optional, to balance acidity)
- Salt and freshly ground black pepper to taste
- 1 tablespoon olive oil
- For the Cheesy Layer:
- 1 (16-ounce) package low-moisture, part-skim mozzarella cheese, shredded – This melts perfectly without making your “Mini Halloween Pizzas” soggy.
- ½ cup fresh mozzarella cheese, thinly sliced or shredded (for ghost shapes) – Its soft texture is perfect for cutting into little specters.
- For the Halloween Toppings:
- 1 (3.8-ounce) can sliced black olives, drained – Perfect for spider bodies and eyes.
- 1 red bell pepper – For vibrant pumpkin or devil horn shapes.
- 1 green bell pepper – Excellent for witch hats or monster mouths.
- 6-8 slices pepperoni – Ideal for classic “Mini Halloween Pizzas” or cutting into bat shapes.
- Small cookie cutters with Halloween shapes (optional, but highly recommended for fun!) – Think ghosts, bats, pumpkins, or even tiny spiders.
- Fresh basil leaves (optional, for garnish)
Equipment You’ll Need:
- Large mixing bowl
- Stand mixer with dough hook attachment (optional, but makes dough preparation much easier!)
- Measuring cups and spoons
- Plastic wrap or a clean kitchen towel
- Rolling pin
- Round cookie cutters (2-3 inch diameter) or a drinking glass rim
- Baking sheets
- Parchment paper
- Small sharp knife or kitchen scissors
- Small Halloween-themed cookie cutters (for toppings)
- Small saucepan (for sauce)
- Wire rack (for cooling)
- Pizza cutter or sharp knife
Preparing Your “Mini Halloween Pizzas” Dough:
-
Activate the Yeast: In your large mixing bowl (or the bowl of your stand mixer), combine the warm water and granulated sugar. Sprinkle the active dry yeast over the top. Give it a gentle stir and then let it sit undisturbed for 5-10 minutes. You’re looking for a foamy, bubbly layer to form on the surface – this is your yeast waking up and telling you it’s ready to work! If your yeast doesn’t foam, it might be expired or the water wasn’t the right temperature, and you’ll need to start again. This step is paramount for a light and airy dough for your “Mini Halloween Pizzas.”
-
Combine Wet and Dry Ingredients: Once your yeast is beautifully bloomed, add the olive oil and sea salt to the yeast mixture. Then, gradually add the all-purpose flour, about a cup at a time, mixing well after each addition. If using a stand mixer, attach the dough hook and begin mixing on low speed.
-
Knead the Dough:
- By Hand: Once the flour is mostly incorporated and a shaggy dough forms, turn the dough out onto a lightly floured surface. Knead the dough for about 8-10 minutes. Use the heel of your hand to push the dough away from you, then fold it back, rotate it, and repeat. You’ll feel the dough become smoother, more elastic, and less sticky.
- With a Stand Mixer: Continue mixing on medium-low speed with the dough hook for 6-8 minutes. The dough should gather around the hook and pull away cleanly from the sides of the bowl.
The goal here is to develop the gluten, which gives your “Mini Halloween Pizzas” their wonderful chewiness.
-
First Rise: Lightly grease a clean large bowl with a little olive oil. Place the kneaded dough into the bowl, turning it once to coat all sides with oil. Cover the bowl tightly with plastic wrap or a clean, damp kitchen towel. Place it in a warm, draft-free spot in your kitchen. Let the dough rise for 1 to 1 ½ hours, or until it has doubled in size. Patience is key here for a truly fantastic “Mini Halloween Pizzas” crust! A warm oven (turned off, with just the light on) can be a great place for rising.
-
Punch Down and Divide: Once the dough has doubled, gently punch it down to release the air. Turn the dough out onto a lightly floured surface and divide it into two equal portions. This makes it easier to manage for rolling out your individual “Mini Halloween Pizzas” bases.
-
Pre-shape for Ease: For easier handling, I like to gently roll each portion into a loose log, then divide each log into 6-8 smaller, roughly equal pieces. You’ll end up with around 12-16 mini dough balls, depending on how large you want your individual “Mini Halloween Pizzas” to be. Lightly roll each small piece into a smooth ball. Cover these dough balls loosely with plastic wrap while you work on them, to prevent them from drying out.
Crafting the Spooky Toppings:
-
Prepare the Spooky Pizza Sauce: In a small saucepan, heat 1 tablespoon of olive oil over medium heat. Add the minced garlic and sauté for about 30 seconds until fragrant, being careful not to burn it. Pour in the crushed tomatoes. Stir in the dried oregano, dried basil, red pepper flakes (if using), and sugar (if using). Bring the sauce to a gentle simmer, then reduce the heat to low and let it cook for at least 15-20 minutes, stirring occasionally. This allows the flavors to meld beautifully. Season with salt and freshly ground black pepper to taste. A well-seasoned sauce is the backbone of truly delicious “Mini Halloween Pizzas.” Remove from heat and let cool slightly.
-
Shape Your Cheese Ghosts: Take your fresh mozzarella and, using a small ghost-shaped cookie cutter (or a small sharp knife), cut out several ghost shapes. These will be adorable, melty ghosts on your “Mini Halloween Pizzas.” If you don’t have a ghost cutter, you can simply tear small irregular shapes, which will also look quite spectral once melted.
-
Prep Your Bell Pepper Decorations:
- Red Bell Pepper Pumpkins/Horns: Wash the red bell pepper. Slice it open and remove the seeds and white membranes. Lay the flat pieces on your cutting board. Using a tiny pumpkin cookie cutter, cut out small pumpkin shapes. If you don’t have a cutter, you can carefully cut small triangles for “devil horns” or thin strips to resemble “mummy wraps.”
- Green Bell Pepper Witch Hats/Monster Mouths: Repeat the process with the green bell pepper. You can cut small triangles for “witch hats,” or thin, curved strips for “monster mouths” or even “frankenstein stitches.”
-
Transform Black Olives: Drain your can of sliced black olives very well. These are incredibly versatile for Halloween designs!
- Spiders: For spider bodies, use whole black olive halves. For spider legs, carefully slice the remaining olive halves into thin strips.
- Eyes: Use a whole olive slice for a single “eyeball” or cut a small circle out of a pepper for the iris.
These tiny details really bring the “Mini Halloween Pizzas” to life!
-
Cut Your Pepperoni Bats: If you’re using pepperoni, take a few slices and, using a small bat-shaped cookie cutter, cut out bat shapes. Alternatively, you can use kitchen scissors to carefully cut two small “wings” out of each pepperoni slice to create a simple bat silhouette.
Assembling Your “Mini Halloween Pizzas”:
-
Preheat Oven and Prep Baking Sheets: Preheat your oven to a hot 425°F (220°C). Line two large baking sheets with parchment paper. This prevents sticking and makes cleanup a breeze, ensuring your “Mini Halloween Pizzas” slide off easily.
-
Roll Out the Mini Bases: On a lightly floured surface, take one of your small dough balls. Using a rolling pin, roll it out into a roughly 2-3 inch circle, about ¼-inch thick. You can use a round cookie cutter or the rim of a drinking glass to ensure uniform circles if you desire, or simply freehand them for a more rustic look. Repeat this process with all the dough balls, placing the rolled-out circles onto your prepared baking sheets, leaving a little space between each one.
-
Sauce It Up: Spoon about 1-2 tablespoons of your spooky pizza sauce onto the center of each mini pizza base. Use the back of the spoon to spread the sauce evenly, leaving a small border around the edge for the crust. Don’t over-sauce, or your “Mini Halloween Pizzas” might get soggy!
-
Layer with Shredded Mozzarella: Sprinkle a generous amount of the shredded low-moisture mozzarella cheese over the sauce on each mini pizza. This is your base layer of deliciousness.
-
Get Creative with Halloween Toppings! Now for the really fun part – bringing your “Mini Halloween Pizzas” to life with spooky designs:
- Mummy Pizzas: Take thin strips of your shredded mozzarella and crisscross them over a few mini pizzas, leaving a small space at the top. Place two olive slices at the top for eyes peering out from under the “bandages.”
- Spider Pizzas: Place a whole black olive half in the center of a mini pizza for the spider’s body. Arrange 3-4 thin olive strips on each side to create the spider’s legs.
- Ghost Pizzas: Gently lay one of your fresh mozzarella ghost shapes on top of the shredded mozzarella. As it bakes, it will melt into a beautifully spooky specter. You can add tiny olive dots for eyes after baking if you wish.
- Pumpkin Pizzas: Arrange a few of your red bell pepper pumpkin shapes on a mini pizza. You can add a tiny green bell pepper stem if you’re feeling extra crafty.
- Bat Pizzas: Place your pepperoni bat shapes strategically on the mini pizzas.
- Frankenstein Pizzas: Use green bell pepper strips for “stitches” across the cheese, and a couple of olive slices for eyes.
- Eyeball Pizzas: Take a single slice of black olive and place it in the center of some shredded mozzarella. Around it, arrange small strips of red bell pepper to look like bloodshot veins.
Encourage everyone to join in this step – it’s a fantastic activity for kids and adults alike, making each of your “Mini Halloween Pizzas” uniquely special. Be careful not to overload your pizzas with too many toppings, or they won’t cook evenly.
Baking Your “Mini Halloween Pizzas” to Perfection:
-
Bake the First Batch: Carefully transfer one of your baking sheets with the assembled “Mini Halloween Pizzas” into the preheated oven. Bake for 10-14 minutes. The exact timing can vary depending on your oven and the thickness of your crust.
-
Look for Golden Perfection: You’ll know your “Mini Halloween Pizzas” are ready when the crust is golden brown and crispy, and the cheese is bubbly and melted, with perhaps a few beautifully browned spots. The toppings should look softened and slightly caramelized.
-
Rotate for Even Baking: If your oven tends to bake unevenly, rotate the baking sheet halfway through the baking time to ensure all your “Mini Halloween Pizzas” get an even bake.
-
Cool Slightly: Once baked, carefully remove the baking sheet from the oven. Let the “Mini Halloween Pizzas” cool on the baking sheet for a minute or two, then transfer them to a wire rack. This helps the crust stay crispy and prevents it from getting soggy on the bottom. While the first batch is cooling, bake the second batch.
Serving and Spooky Suggestions:
-
Slice and Serve: While these are “mini,” sometimes a quick slice with a pizza cutter or sharp knife can make them even easier to eat, especially for smaller hands. Serve your “Mini Halloween Pizzas” warm and fresh from the oven.
-
Garnish (Optional): For an extra touch of freshness and color, you can sprinkle a few torn fresh basil leaves over your “Mini Halloween Pizzas” just before serving. This adds a lovely aromatic finish.
-
Presentation Matters: Arrange your assorted “Mini Halloween Pizzas” on a large platter or a festive Halloween-themed serving board. They look fantastic when grouped together, showcasing all the different spooky designs you’ve created.
-
Pairing Ideas: These “Mini Halloween Pizzas” are perfect on their own as a party appetizer, or they can be served alongside a simple green salad or a bowl of “bloody” tomato soup for a full festive meal. They are truly the star of any Halloween gathering!
Conclusion:
Well, my fellow food adventurers, we’ve reached the end of our culinary journey, but this is truly just the beginning of your delicious adventure! If you’ve been on the fence about trying a new recipe, I genuinely believe this is the one to jump into with both feet. Why, you ask? Because these aren’t just any pizzas; they are the ultimate expression of playful festivity and irresistible flavor, all rolled into one bite-sized, incredibly fun package. I’ve designed this recipe to be an absolute breeze, ensuring that even if you’re a novice in the kitchen, you’ll feel like a seasoned chef crafting something truly special. The joy of cooking, especially when it results in something as charming and tasty as our featured delight, is unparalleled. Imagine the smiles, the laughter, and the pure delight on faces young and old as they pick up these adorable treats. It’s more than just food; it’s an experience, a memory in the making, and a testament to how simple ingredients can transform into something truly magical. These are perfect for sparking creativity and bringing people together, whether it’s for a casual family dinner or a lively themed gathering. The simplicity ensures you spend less time fussing and more time enjoying the company and the festive spirit that these delightful creations naturally bring to any table. Trust me when I say, you won’t regret diving into this recipe.
Serving Suggestions to Elevate Your Fun
Once your masterpieces are out of the oven, piping hot and smelling incredible, the fun doesn’t have to stop there! While they are undoubtedly fantastic enjoyed straight off the cooling rack, a few thoughtful additions can really elevate the experience. Think about setting up a “dipping station” alongside your freshly baked Mini Halloween Pizzas. A classic marinara sauce is always a winner, but don’t shy away from venturing into creamy ranch, a tangy garlic aioli, or even a spicy sriracha mayo for those who like a little kick. These little dippers add an extra layer of flavor and interactivity, making each bite even more exciting. For a more balanced meal, consider pairing them with a crisp, vibrant garden salad dressed with a light vinaigrette – the fresh greens offer a wonderful contrast to the savory, cheesy goodness. Or, if you’re hosting a party, arrange them artfully on a large platter with some fresh basil leaves sprinkled over for a pop of color, alongside some olives and cherry tomatoes. They make for the perfect finger food, easy to grab and mingle with, ensuring everyone gets to enjoy the festive spirit without a fuss.
Unleash Your Creativity: Spellbinding Variations!
Now, for the really exciting part – making this recipe uniquely yours! This is where the true magic happens, and the possibilities are as endless as your imagination. Don’t be afraid to experiment with different types of cheese beyond mozzarella. A blend of cheddar and Monterey Jack can add a sharper, more complex flavor, while smoked gouda could introduce an unexpected depth. For the base, if you’re not using pre-made dough circles, consider using cookie cutters in actual Halloween shapes – ghosts, pumpkins, bats – to cut your dough. Imagine tiny ghost pizzas or bat-shaped bites! When it comes to toppings, let your creativity run wild.
Want to make them even spookier? Thinly sliced black olives can become creepy spiders or be arranged as the pupils of ghoulish eyes. Strips of bell pepper or jalapeños can form pumpkin stems or monster mouths. For a vegetarian twist, consider finely diced bell peppers in various colors, thinly sliced mushrooms, or even some caramelized onions for a sweeter note. If you’re catering to different dietary needs, gluten-free pizza dough works beautifully, and vegan cheese alternatives melt surprisingly well. You could even create a sweet version using a cream cheese base, fruit slices, and a drizzle of chocolate sauce for a dessert pizza that still fits the “mini” and “fun” theme! The beauty of this recipe lies in its incredible adaptability, allowing you to tailor it to any preference or party theme. Each variation you try is an opportunity to discover a new favorite and showcase your culinary flair.
So, what are you waiting for? I urge you, don’t let this recipe just sit on your screen. Head into your kitchen, gather your ingredients, and let the fun begin! Whether you’re a seasoned chef or just dipping your toes into the world of cooking, I promise you a rewarding and delicious experience. These mini marvels are more than just a meal; they’re an invitation to create, to share, and to celebrate. Once you’ve whipped up your own batch of these delightful treats, I would absolutely love to hear about it!
Did you try a unique topping combination? Did your kids help decorate them with spooky designs? Did they become the star of your latest gathering? Please, share your stories, your photos, and your triumphs! Your experiences inspire me and other home cooks in our vibrant community. Simply leave a comment below describing your culinary adventure; I read every one! There’s nothing more gratifying than seeing how my recipes come to life in your homes.
Go forth and bake some amazing Mini Halloween Pizzas! Your taste buds (and your party guests) will thank you. Happy cooking, and may your kitchen be filled with delicious aromas and joyful memories!
Easy Mini Halloween Pizzas: Spooky & Fun Kids’ Treat!
Mini Halloween Pizzas are a delightful invitation to celebrate the spooky season with a smile. These adorable bites perfectly capture the playful, whimsical spirit of Halloween, offering a beloved taste scaled down for effortless enjoyment at any festive gathering.
Ingredients
-
8 mini pizza crusts (store-bought or homemade)
-
1 cup pizza sauce
-
2 cups shredded mozzarella cheese
-
8 slices mozzarella cheese (for ghost shapes)
-
12 slices beef pepperoni
-
1 small black olive, sliced (for eyes)
-
1 orange bell pepper, cut into pumpkin shapes
Instructions
-
Step 1
Preheat oven to 425°F (220°C). Line baking sheets with parchment paper. Prepare toppings: cut fresh mozzarella into ghost shapes. Slice orange bell pepper into pumpkin shapes. Slice black olives for spider bodies, legs, or eyes. Cut beef pepperoni into bat shapes using a small cookie cutter or kitchen scissors. -
Step 2
Place mini pizza crusts on prepared baking sheets. Spread about 1-2 tablespoons of pizza sauce on each crust, leaving a small border for the crust. Sprinkle shredded mozzarella cheese over the sauce. -
Step 3
Get creative with your Halloween toppings! Create Mummy Pizzas by crisscrossing thin strips of shredded mozzarella and adding olive eyes. Form Spider Pizzas with a whole olive half for the body and thin olive strips for legs. Place mozzarella ghost shapes on some pizzas for Ghost Pizzas. Use orange bell pepper pumpkins and beef pepperoni bats for other festive designs. -
Step 4
Bake for 10-14 minutes, or until the crust is golden brown and crispy, and the cheese is bubbly and melted. Rotate baking sheets halfway through for even baking, if needed. -
Step 5
Carefully remove the baking sheet from the oven. Let the mini pizzas cool for 1-2 minutes on the sheet, then transfer to a wire rack. Serve warm. Optionally, garnish with fresh basil leaves for an added touch of freshness.
Important Information
Nutrition Facts (Per Serving)
It is important to consider this information as approximate and not to use it as definitive health advice.
Allergy Information
Please check ingredients for potential allergens and consult a health professional if in doubt.